
In this article we will learn about FormArray Example in Angular. The FormArray allows us to add controls dynamically to the reactive forms. In this example, we will take a very simple task of dynamically adding/removing skills to an employee form. Please read my previous lesson of FormControl Example in Angular.
What is FormArray
The FormArray is a way to manage the collection of Form Controls in Angular. The controls can be a FormGroup, FormControl, or another FormArray.
We can group Form Controls in Angular forms in two ways. One is using the FormGroup and the other one is FormArray. The difference is how they implement it. In FormGroup controls becomes a property of the FormGroup. Each control is represented as key-value pair. While in FormArray, the controls become part of an array.
FormArray Example
Import FormArray
To use FormArray, First, you need to import the FormArray from the Angular Forms Module.
import { FormGroup, FormControl,FormArray, FormBuilder } from '@angular/forms'Build a Form Model
Build a form model skillsForm using the FormBuilder. Our Form has two fields. name of the person and his skills. Since the person can have more than one skill, we define skills as FormArray.
skillsForm: FormGroup;
  constructor(private fb:FormBuilder) {
    this.skillsForm = this.fb.group({
      name: '',
      skills: this.fb.array([]) ,
    });
  }
The skill FormGroup
We need to capture two fields under each skill. Name of the skill & years of exp. Hence we create a FormGroup with two fields. The method newSkill creates a new FormGroup and returns it. Note that we won’t be able to assign a name to Form Group.
newSkill(): FormGroup {
   return this.fb.group({
     skill: '',
     exp: '',
   })
}
Dynamically adding skill
We need to add a new skill to the skills FormArray. Since it is an array we can use the push method to add the new skill using the the newSkill method. Note that newSkill() method returns a FormGroup. The name of the FormGroup is its Index in the FormArray.
addSkills() {
   this.skills.push(this.newSkill());
}
Dynamically Removing Skill
Use the removeAt method to remove the element from the skills FromArray.
removeSkill(i:number) {
  this.skills.removeAt(i);
}
Submit
On submit the data we can see the object in console log.
onSubmit() {
   console.log(this.skillsForm.value);
 }
HTML Template
Now, it is time to build the Template, on below we define complete HTML file.
We Use the [formGroup]="skillsForm" to bind the form to the skillsForm model. The formControlName=”name” directive binds the name input element to name property of the skillsForm.
When anyone add the Skill button then we can add multiple skills with experience. And we define the stylesheet to make the design better. Новостная лента индустрии для взрослых
<link rel="stylesheet" href="https://fonts.googleapis.com/css?family=Roboto|Varela+Round|Open+Sans">
<link rel="stylesheet" href="https://stackpath.bootstrapcdn.com/bootstrap/4.5.0/css/bootstrap.min.css">
<link rel="stylesheet" href="https://fonts.googleapis.com/icon?family=Material+Icons">
<link rel="stylesheet" href="https://maxcdn.bootstrapcdn.com/font-awesome/4.7.0/css/font-awesome.min.css">
<mat-card class="example-card">
<mat-card-header>
<mat-card-title>
Reactive Forms
</mat-card-title>
</mat-card-header>
<mat-card-content>
<div class="card">
<div class="card-body">
<div class="row justify-content-sm-center col-sm-6">
<form [formGroup]="skillsForm" (ngSubmit)="onSubmit()">
<div class="row">
<div class="col-md-2"> <label for="name">Name :</label></div>
<div class="col-md-10">
<input type="text" id="name" name="name" formControlName="name" class="form-control">
</div>
</div>
<div class="row mt-3">
<div class="col-md-2"> <label for="name"> Skills:</label></div>
<div class="col-md-10">
<table class="table table-bordered" formArrayName="skills">
<thead>
<tr>
<th>Sl#</th>
<th>Skill</th>
<th>Expierence</th>
<th>Action</th>
</tr>
</thead>
<tbody>
<tr *ngFor='let skill of skills.controls; let i=index' [formGroupName]="i">
<td> {{i}}</td>
<td> <input type="text" formControlName="skill" class="form-control"></td>
<td> <input type="text" formControlName="exp" class="form-control"></td>
<td> <a class="delete" title="Delete" data-toggle="tooltip" (click)="removeSkill(i)"><i class="material-icons" style="color:brown; cursor: pointer; "></i></a>
</td>
</tr>
</tbody>
</table>
</div>
</div>
<div class="row">
<div class="col-md-2"> </div>
<div class="col-md-10">
<button type="submit" class="btn btn-primary">Submit</button>
<button type="button" class="btn btn-info add-new" (click)="addSkills()" style="float: right;"><i class="fa fa-plus"></i> Add New Skill</button>
</div>
</div>
</form>
<div class="row mt-5">
<div class="col-md-2"></div>
<div class="col-md-10">
{{this.skillsForm.value | json}}
</div>
</div>
</div>
</div>
</div>
</mat-card-content>
</mat-card>
Skills Component
import { Component, OnInit } from '@angular/core';
import { FormArray, FormBuilder, FormGroup } from '@angular/forms';

@Component({
  selector: 'app-sample-reactive-form',
  templateUrl: './sample-reactive-form.component.html',
  styleUrls: ['./sample-reactive-form.component.css']
})
export class SampleReactiveFormComponent implements OnInit {
  title = 'FormArray Example in Angular Reactive forms';

  skillsForm: FormGroup;

  constructor(private fb: FormBuilder) {

    this.skillsForm = this.fb.group({
      name: '',
      skills: this.fb.array([]),
    });

  }
  ngOnInit(): void {
  }
  get skills(): FormArray {
    return this.skillsForm.get("skills") as FormArray
  }

  newSkill(): FormGroup {
    return this.fb.group({
      skill: '',
      exp: '',
    })
  }

  addSkills() {
    this.skills.push(this.newSkill());
  }

  removeSkill(i: number) {
    this.skills.removeAt(i);
  }

  onSubmit() {
    console.log(this.skillsForm.value);
  }

}
export class country {
  id: string;
  name: string;

  constructor(id: string, name: string) {
    this.id = id;
    this.name = name;
  }
}
Output
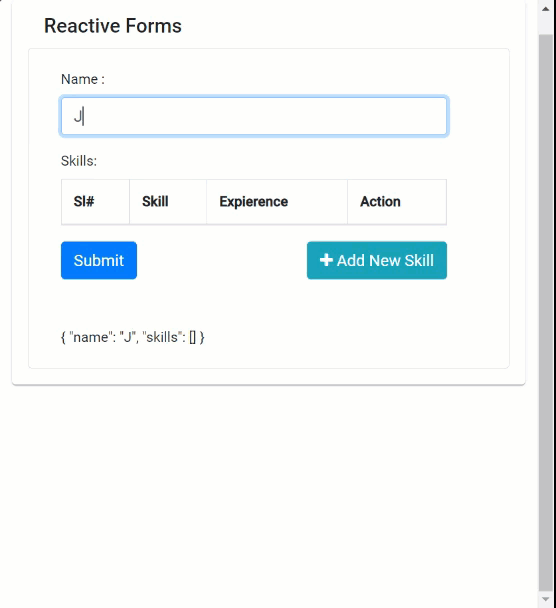
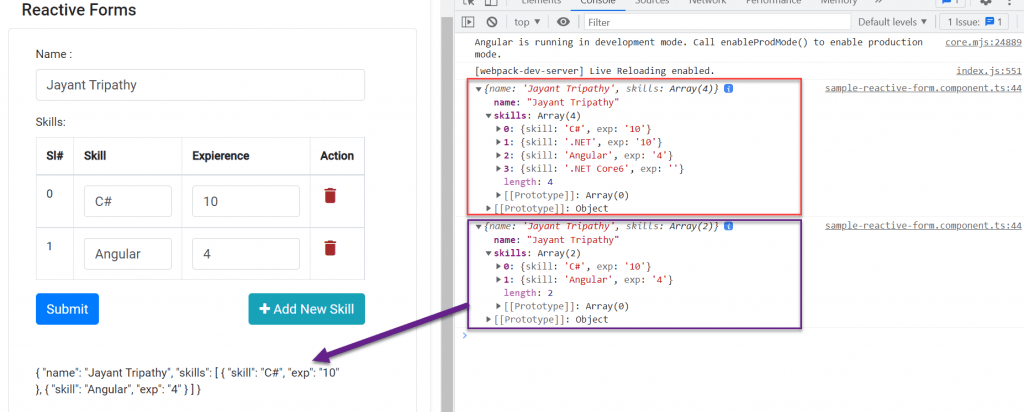
You can see the output on below Image
The below image shows how it log into console. First it capture 4 skills and after removal 2 skill it captured then new object.
Conclusion
In this article we will learn about FormArray Example in Angular. The FormArray allows us to add controls dynamically to the reactive forms. In this example, we will take a very simple task of dynamically adding/removing skills to an employee form.
Leave behind your valuable queries and suggestions in the comment section below. Also, if you think this article helps you, do not forget to share this with your developer community. Happy Coding 🙂
Jayant Tripathy
Coder, Blogger, YouTuberA passionate developer keep focus on learning and working on new technology.