
In this article we will learn about AddTransient Vs AddScoped Vs AddSingleton Example in ASP.Net Core. Please read my all .NET Core articles in this link. Dependency injection (DI) is a technique for achieving loose coupling between objects and their collaborators, or dependencies. Most often, classes will declare their dependencies via their constructor, allowing them to follow the Explicit Dependencies Principle. This approach is known as “constructor injection”.
Understanding the life cycle of Dependency Injection (DI) is very important in ASP.Net Core applications. To implement dependency injection, we need to configure a DI container with classes that is participating in DI. DI Container has to decide whether to return a new instance of the service or provide an existing instance. In startup class, we perform this activity on ConfigureServices method.
The lifetime of the service depends on when the dependency is instantiated and how long it lives. And lifetime depends on how we have registered those services. The below three methods define the lifetime of the services,
AddTransient
Transient lifetime services are created each time they are requested. This lifetime works best for lightweight, stateless services.
AddScoped
Scoped lifetime services are created once per request.
AddSingleton
Singleton lifetime services are created the first time they are requested (or when ConfigureServices is run if you specify an instance there) and then every subsequent request will use the same instance.
Creating ASP.Net Core application
Here we create the ASP.Net core application using .NET Core 6.
Creating Interfaces to check Service Lifetime
We created a folder named as Interfaces where we create 3 interfaces like ISingletonService, IScopedService and ITransientService.
ISingletonService
namespace DI_ServiceLife.Interfaces
{
    public interface ISingletonService
    {
        Guid GetCurrentGUID();
    }
}
IScopedService
namespace DI_ServiceLife.Interfaces
{
    public interface IScopedService
    {
        Guid GetCurrentGUID();
    }
}
ITransientService
namespace DI_ServiceLife.Interfaces
{
    public interface ITransientService
    {
        Guid GetCurrentGUID();
    }
}
Creating a class to implement all Interfaces
We create a class under Model folder named as “CallService.cs” and Implement all interfaces and returned the GUID
using DI_ServiceLife.Interfaces;
namespace DI_ServiceLife.Models
{
// We Implement 3 DI Interfaces here
public class CallerService : ITransientService, IScopedService, ISingletonService
{
Guid currentGUId;
public CallerService()
{
currentGUId = Guid.NewGuid();
}
public Guid GetCurrentGUID()
{
return currentGUId;
}
}
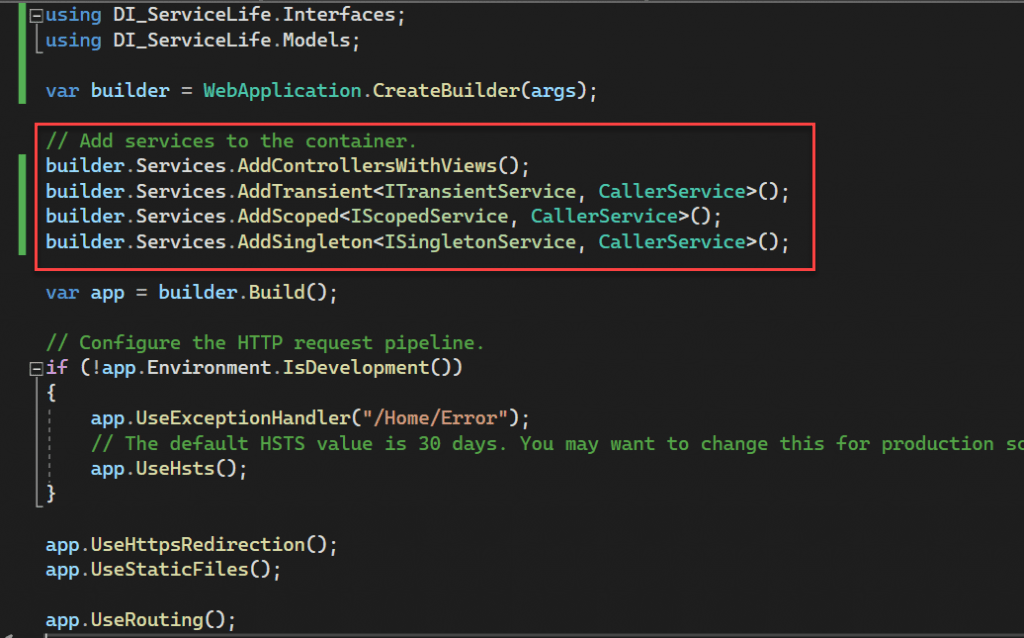
}Now, register the CallerService via those three interfaces as shown below in Program.cs.
// Add services to the container.
builder.Services.AddControllersWithViews();
builder.Services.AddTransient<ITransientService, CallerService>();
builder.Services.AddScoped<IScopedService, CallerService>();
builder.Services.AddSingleton<ISingletonService, CallerService>();
Now we are ready to inject those services into controller. For better understanding, we will inject two instances of each service in the constructor of HomeController. We will call GetCurrentGUID() method of each service instance and assign it to ViewBag so that we can see those values in UI.
 public class HomeController : Controller
    {
        private readonly ILogger<HomeController> _logger;
        private readonly ITransientService _tranService1;
        private readonly ITransientService _tranService2;
        private readonly IScopedService _scopedService1;
        private readonly IScopedService _scopedService2;
        private readonly ISingletonService _singletonService1;
        private readonly ISingletonService _singletonService2;

        public HomeController(ILogger<HomeController> logger,
            ITransientService tranService1,
            ITransientService tranService2,
            IScopedService scopedService1,
            IScopedService scopedService2,
            ISingletonService singletonService1,
            ISingletonService singletonService2)
        {
            _logger = logger;
            _tranService1 = tranService1;
            _tranService2 = tranService2;
            _scopedService1 = scopedService1;
            _scopedService2 = scopedService2;
            _singletonService1 = singletonService1;
            _singletonService2 = singletonService2;
        }

        public IActionResult Index()
        {
            ViewBag.transient1 = _tranService1.GetCurrentGUID().ToString();
            ViewBag.transient2 = _tranService2.GetCurrentGUID().ToString();
            ViewBag.scoped1 = _scopedService1.GetCurrentGUID().ToString();
            ViewBag.scoped2 = _scopedService2.GetCurrentGUID().ToString();
            ViewBag.singleton1 = _singletonService1.GetCurrentGUID().ToString();
            ViewBag.singleton2 = _singletonService2.GetCurrentGUID().ToString();
            return View();
        }
    }
Then change the View page according to display the 3 services to call the GUID and check the requests.
@{
    ViewData["Title"] = "Home Page";
}
 <h4>Dependency Injection Lifetime</h4>

<div class="text-center">
   <table class="table table-bordered">
    <thead>
        <tr>
            <th>Service Type</th>
            <th>First Instance Operation ID</th>
            <th>Second Instance Operation ID</th>
        </tr>
    </thead>
    <tbody>
        <tr>
            <td style="background-color:#e0ffdc;">Singleton</td>
            <td style="background-color: #e0ffdc">@ViewBag.singleton1</td>
            <td style="background-color: #e0ffdc">@ViewBag.singleton2</td>
        </tr>
         <tr>
            <td>Scoped</td>
            <td>@ViewBag.scoped1</td>
            <td>@ViewBag.scoped2</td>
        </tr>
        <tr>
            <td style="background-color: aliceblue">Transient</td>
            <td style="background-color: aliceblue">@ViewBag.transient1</td>
            <td style="background-color: aliceblue">@ViewBag.transient2</td>
        </tr>
    </tbody>
</table>
</div>
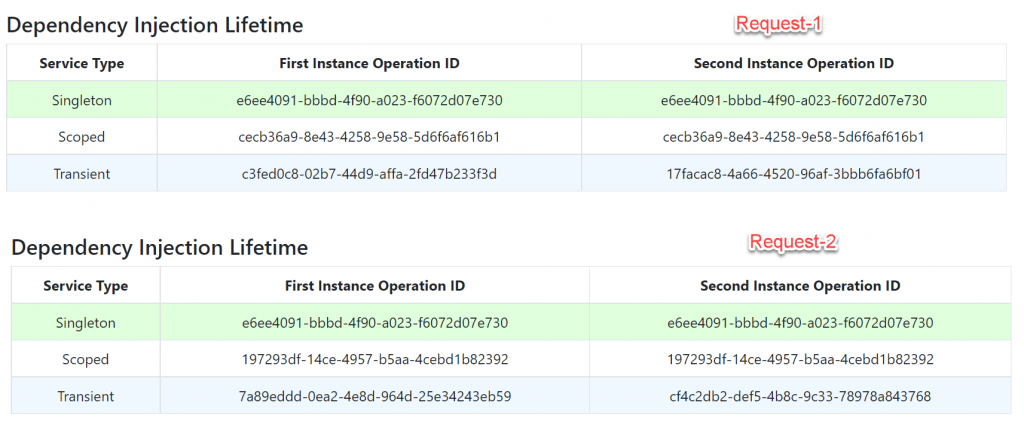
Once we execute the application, we will see two different GUIDs are displayed for their respective service types. Now run two instance of UI in two different tabs of the browser like request 1 and request 2.
DI Requests Lifetime
Explanation of above Image
Singleton service, only one instance is created and shared across applications. If we click on refresh button or load the UI on the different tab of a browser (which is nothing but Request 2), those ids will remain the same.
Scoped service, a single instance is created per request and the same instance is shared across the request. That is why operation Ids are the same for first instance as well as second instance of Request 1. But if we click on refresh button or load the UI on different tab of a browser (which is nothing but Request 2), new ids are generated.
Transient service always returns a new instance even though it’s the same request, that is why operation Ids are different for first instance and second instance for both the requests (Request 1 and Request 2).
| Service Type | In the scope of a given http request | Across different http requests |
| Transient | New Instance | New Instance |
| Scoped | Same Instance | New Instance |
| Singleton | Same Instance | Same Instance |
Conclusion
Leave behind your valuable queries and suggestions in the comment section below. Also, if you think this article helps you, do not forget to share this with your developer community. Happy Coding 🙂
Jayant Tripathy
Coder, Blogger, YouTuberA passionate developer keep focus on learning and working on new technology.