
This article explain the popular way of building API Applications- Microservices Architecture in ASP.Net Core-6 with API Gateway. This article will cover in detail how to create Microservices with ASP.NET Core, API Gateways with Ocelot, Serilog, Swagger UI, Health Checks, CQRS etc. Please read my previous article of Microservices Interview Questions, If you are preparing the interviews then Microservices is the hot topic regarding the API interview questions, it must help.
At the end of article we will learn the concept of Microservices, their architecture, and how to create Microservices Architecture in ASP.Net Core-6. You will also learn steps to build, deploy, and test microservices in .NET.
Microservice Architecture in ASP.NET Core
In this growing fast-paced world, the amount of data and internet usage are proportionally increasing, and so more reliable and fast responding software systems are required, Unlike the older way of application development in Monolithic architecture which causes high maintenance cost, more downtime during upgrades made to existing monolithic architected software is not reliable. So, the Microservices Architecture of developing applications came into the picture.
Earlier software architecture build contains all business functionalities, Database calls, and UI designed in a single bundle. Like Asp.Net Webforms, MVC as a collection of single projects.mIt has its disadvantages, the larger the application grows, the harder it is to quickly resolve the technical bugs/problems and to update the app with the new features. The Microservice architecture-based approach for building applications helps solve these real-time issues and provides more space for agile development methods and faster response from applications.
What are Microservices?
Microservices are the architectural approach to build applications from small to large scale applications. With this architectural approach, an application is broken down into the smallest components, independent of each other. Unlike Monolithic architecture, where all the functionalities are targeted to build into a single project/application, Microservices helps to separate functionalities to develop in a more modular way and all modules work together to accomplish the specific targeted tasks.
Best Practices for Microservices
- Microservice should implement only one single functionality that should be able to deliver value.
- Each Microservice should have their own datastore and this should not be shared across services.
- Always maintain updated documentation for Microservices.
- Use containers for the deployment of services.
- DevOps & CI/CD practices
Monolithic vs Microservices Architecture
Monolithic Architecture – The traditional way of building applications called Monolith Architecture, which is the widely used architectural pattern while developing applications. Still, we can see these architecture applications exist in the real world, it is designed in a way that the entire application built is ultimately a single piece, no matter how much you try to de-couple them by using Patterns and tiers – 1/2/3. All the services or business functionalities would be tightly coupled within the single Solution. The major thing to note is that while publishing the application, you would have to deploy them to a single server only.
While it is still an effective way to build applications, there are some drawbacks associated with Monolith Architecture. Any small to midscale Applications would do just fine with this Architecture, but when you scale up further to extend the capabilities of existing software, you would have to make a few compromises as well as face whole application downtimes while deploying new versions/bug fixes.
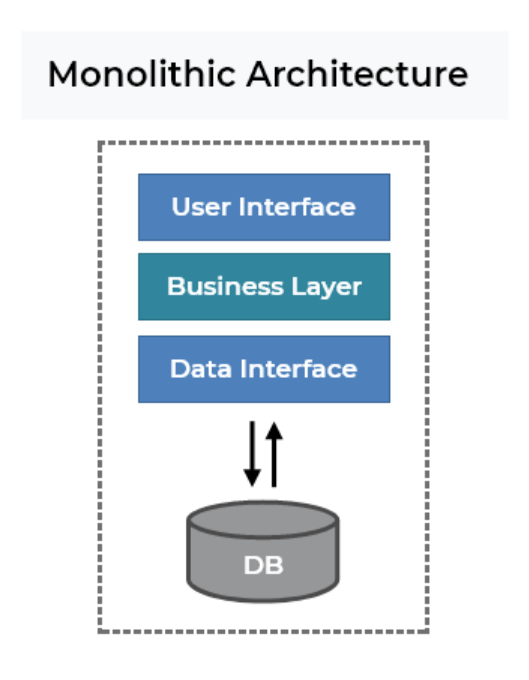
Monolithic applications are more of a single complete package having all the related needed components and services encapsulated in one package.
Microservices Architecture– Microservice is an approach to create small services each running in their own space and can communicate via messaging. These are independent services directly calling their own database.

Let us understand the above image, Here you can see the Components identified are Products, Customers and Orders. Now each of this Microservice will be a Standalone WebAPI Project with each have its own databases and it host with different servers. So the benefit is that we can better control over with the API as it is independent with each other and if one API is down it doesn’t halt entire application.
API Gateway: The entry point for clients where all the calls from the client will be taken, analyze, and forward to appropriate services. In case some calls are needed from multiple services API Gateway will aggregate and will return the aggregated result.
Let’s say Product Microservice is deployed to localhost:44322
Order Microservice is deployed to localhost:23664
Customer Microservice is deployed to localhost:54732
Instead of call every Microservices individually we can configure the APIGateway as a host and the client connects to the gateway, which in turn re-routes the data / endpoints to / from the Microservices.
Finally, the microservices can call using API Gateway like below,
localhost:50001/api/product/
localhost:50001/api/order/
localhost:50001/api/customer/
Monolithic v/s Microservices Comparison
| Monolithic | Microservices |
|---|---|
| Single service/application should contain all the business functionality | Single service should contains only one business functionality |
| All service are tightly coupled | All services are loosely coupled |
| Application is developed in one single programming language | Each service can be in different programming language |
| Single database for all services. | Each service has separate database |
| All services needs to be deployed together on VM | Each service can be deployed on separate VM |
| All services run in same process so if one service goes down then whole application breaks | Each service runs in different process so failure of one service does not affects other services |
| Difficult to scale a particular service as new instance will have to have all services | Can be Scaled easily as any single service can be deployed independently |
| Single large team works on whole application | Separate small team work on each Service which are more focused. |
| Simple to develop & test small applications | Add complexity to the application by the fact that its a distributed system |
What we’ll Build Here?
We will have to build a simple Microservice Architecture in ASP.NET Core-6 with API Gateways. We are going to create 3 Microservice WebAPIs that perform CRUD Operations for Product, Orders and Customer. We will also need an API Gateway that is responsible to re-direct the incoming request from client (Here, a browser or Postman would be the client) to and from the Microservices.
Here I’m starting the project from scratch so that it can be clear for all.
Creating Microservices Architecture in ASP.Net Core-6
Step-1: Create a blank solution like below where we can start the project from scratch
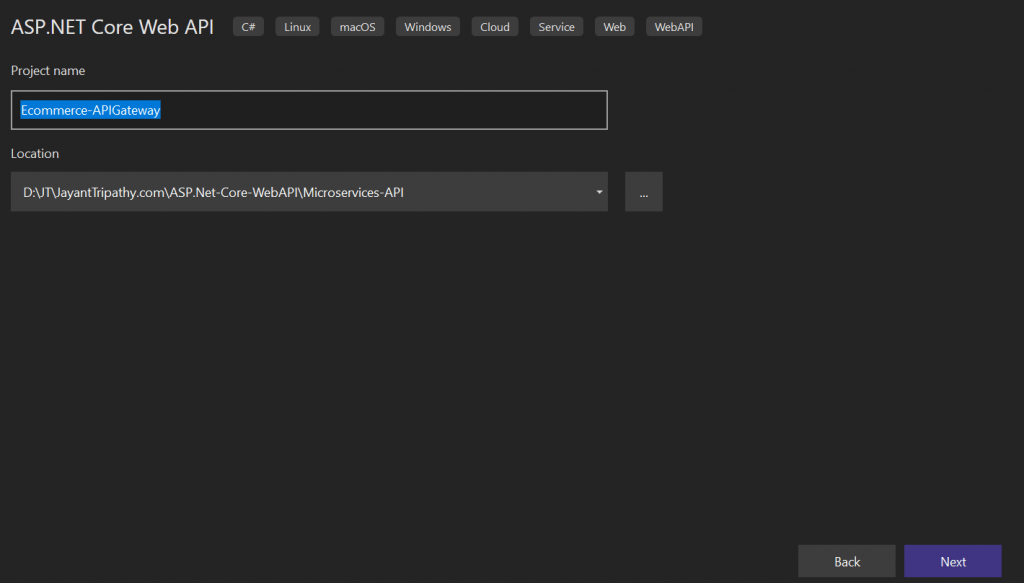
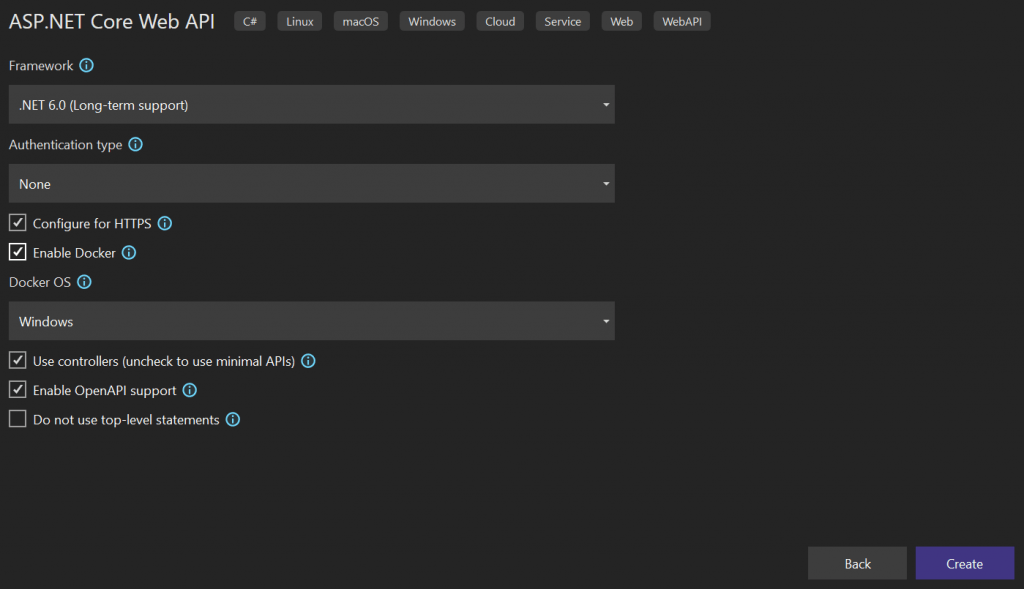
Step-2: Create an ASP.NET Core Web API project named as “Ecommerce-APIGateway” like below where we can manage and configure all microservices. On below we discuss it more.
Step-3: Create a folder named as “Microservices” and under it I have created 3 ASP.Net Core Web API services like Product Service, Customer Service and Order Service where we implement CRUD operation of 3 components.
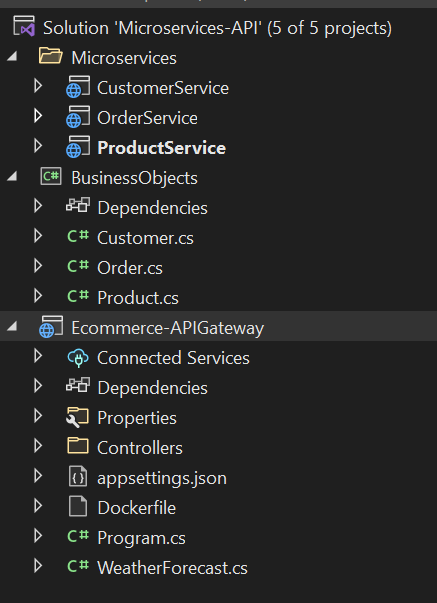
Here I created the BusinessObjects , it is a class library that hold the different microservices class and will send across.
Implementing Entity Framework Core in ASP.NET Core 6 WebApi – Code-First Approach
If you can want step by step process how to create the CRUD in ASP.Net Core using EF Core, you can visit this link.
Product Microservice
Installing the Required EFCore Packages
Install-Package Microsoft.EntityFrameworkCore
Install-Package Microsoft.EntityFrameworkCore.Tools
Install-Package Microsoft.EntityFrameworkCore.SqlServer
Install-Package Microsoft.EntityFrameworkCore.Design
Install-Package Swashbuckle.AspNetCore
Install-Package Swashbuckle.AspNetCore.Swagger
Install-Package Microsoft.VisualStudio.Web.CodeGeneration.Design
For this demonstration, we will be using SQLServer as our database provider. That is why I am installing the SQLServer extension of EntityFrameworkCore.
For faster approach to create the CRUD operation I’m using scaffold technique.
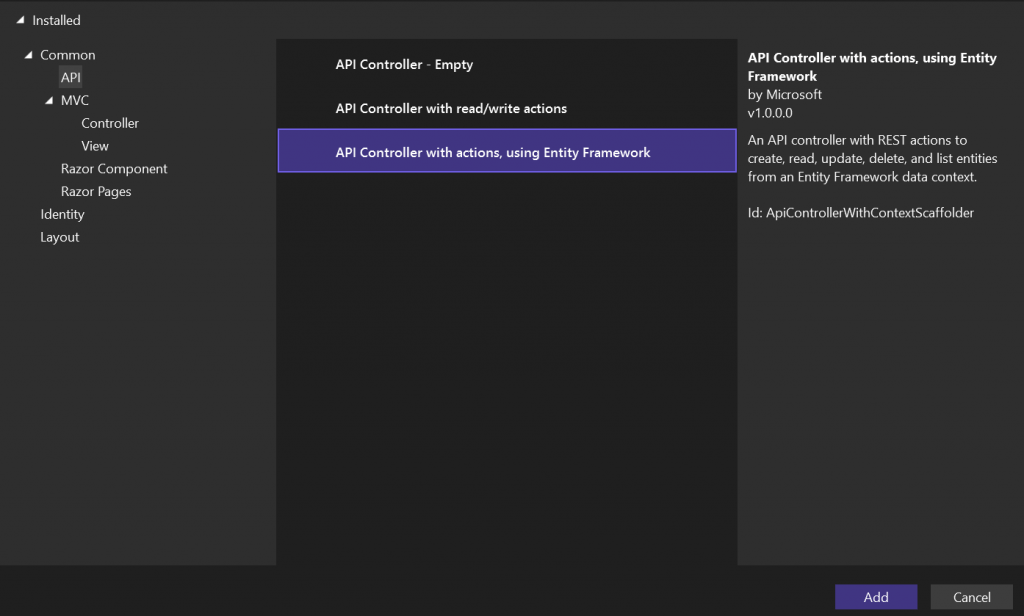
Created a Web API controller with actions using Entity Framework.
Then we create the scaffold technique to create the Database context.
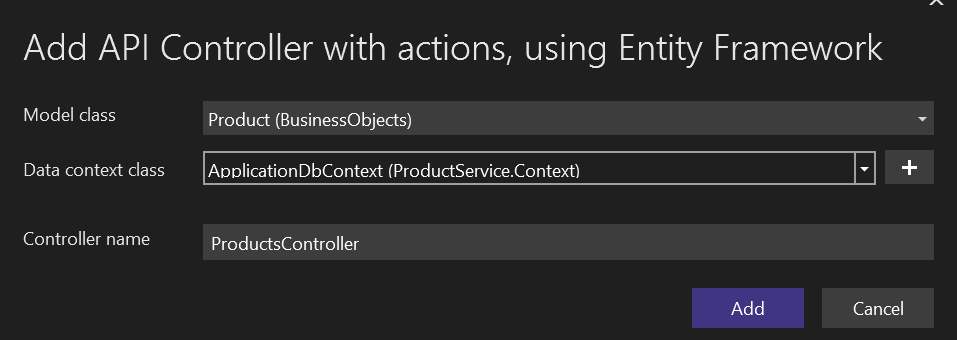
After clicking the add button it will create the CRUD for ProductsController. We need to change the connection string according to our DB server.
 "ConnectionStrings": {
    "ProductServiceContext": "Server=MSCNUR1888004;Database=ProductDB;Trusted_Connection=True;MultipleActiveResultSets=true"
  }
The CRUD Operation look like below for ProductController
namespace ProductService.Controllers
{
    [Route("api/[controller]")]
    [ApiController]
    public class ProductsController : ControllerBase
    {
        private readonly ProductServiceContext _context;
        public ProductsController(ProductServiceContext context)
        {
            _context = context;
        }
        // GET: api/Products
        [HttpGet]
        public async Task<ActionResult<IEnumerable<Product>>> GetProduct()
        {
          if (_context.Product == null)
          {
              return NotFound();
          }
            return await _context.Product.ToListAsync();
        }
        // GET: api/Products/5
        [HttpGet("{id}")]
        public async Task<ActionResult<Product>> GetProduct(int id)
        {
          if (_context.Product == null)
          {
              return NotFound();
          }
            var product = await _context.Product.FindAsync(id);
            if (product == null)
            {
                return NotFound();
            }
            return product;
        }
        // PUT: api/Products/5
        // To protect from overposting attacks, see https://go.microsoft.com/fwlink/?linkid=2123754
        [HttpPut("{id}")]
        public async Task<IActionResult> PutProduct(int id, Product product)
        {
            if (id != product.ProductID)
            {
                return BadRequest();
            }
            _context.Entry(product).State = EntityState.Modified;
            try
            {
                await _context.SaveChangesAsync();
            }
            catch (DbUpdateConcurrencyException)
            {
                if (!ProductExists(id))
                {
                    return NotFound();
                }
                else
                {
                    throw;
                }
            }
            return NoContent();
        }
        // POST: api/Products
        // To protect from overposting attacks, see https://go.microsoft.com/fwlink/?linkid=2123754
        [HttpPost]
        public async Task<ActionResult<Product>> PostProduct(Product product)
        {
          if (_context.Product == null)
          {
              return Problem("Entity set 'ProductServiceContext.Product'  is null.");
          }
            _context.Product.Add(product);
            await _context.SaveChangesAsync();
            return CreatedAtAction("GetProduct", new { id = product.ProductID }, product);
        }
        // DELETE: api/Products/5
        [HttpDelete("{id}")]
        public async Task<IActionResult> DeleteProduct(int id)
        {
            if (_context.Product == null)
            {
                return NotFound();
            }
            var product = await _context.Product.FindAsync(id);
            if (product == null)
            {
                return NotFound();
            }
            _context.Product.Remove(product);
            await _context.SaveChangesAsync();
            return NoContent();
        }
        private bool ProductExists(int id)
        {
            return (_context.Product?.Any(e => e.ProductID == id)).GetValueOrDefault();
        }
    }
}
Finally run the below command to execute EF and create the Database.
Add-Migration Initial
Update-Database
I follow the above steps like in Order Microservice & Customer Microservice and finally you can see the DB created like below.
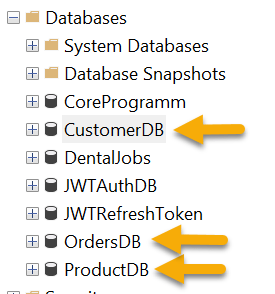
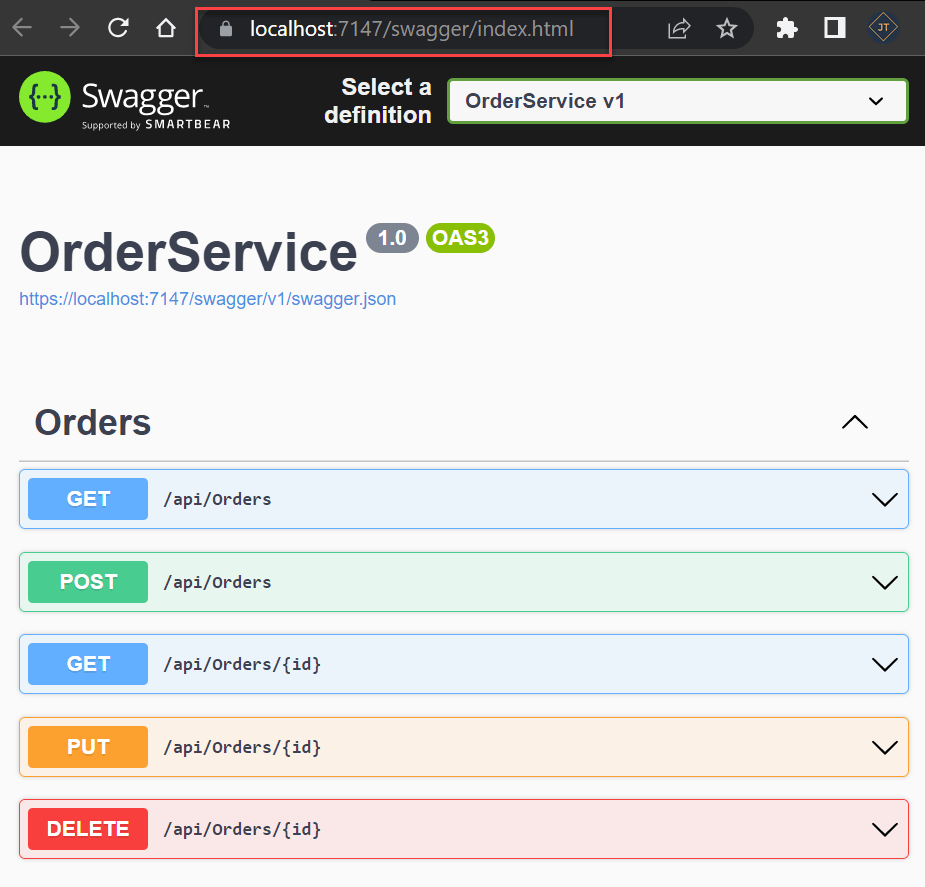
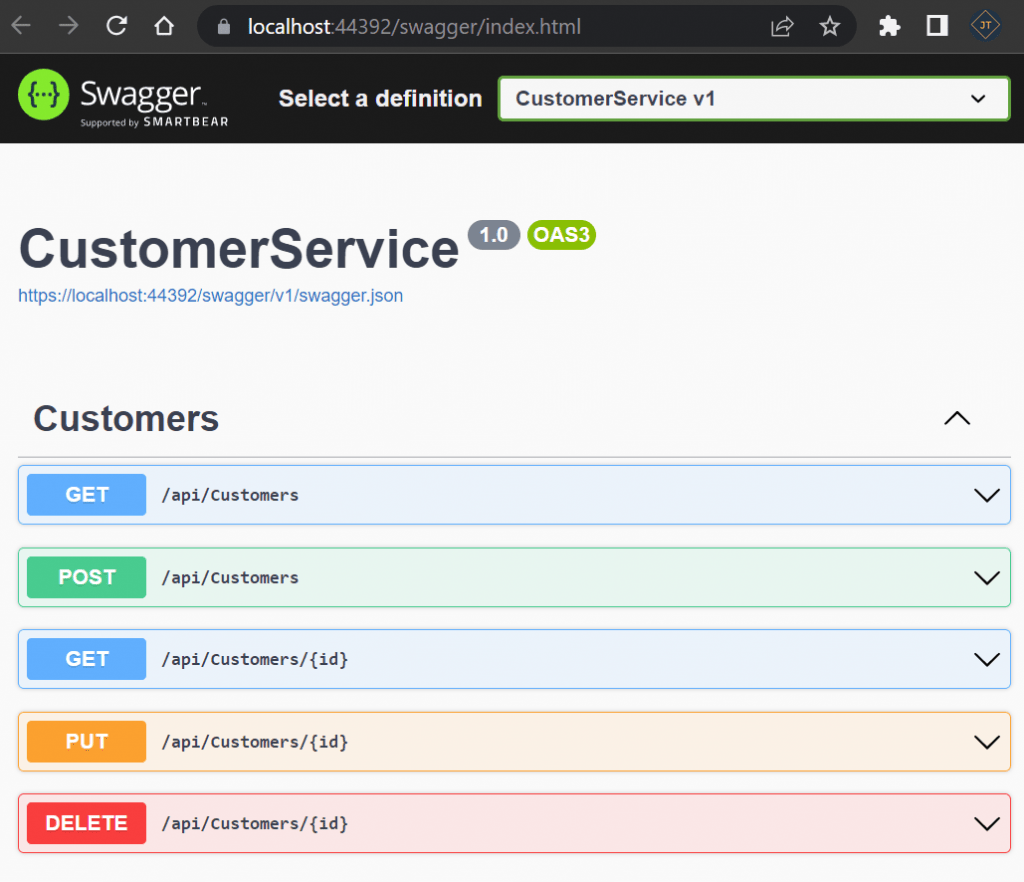
One thing that we need is different database connections for 3 Microservices. It’s not mandatory, but it allows you to understand the implementation of Microservices. Here is how the Swagger UI for the microservices. The same like customer microservices are also we can access.

Introduction to Ocelot API Gateway
Ocelot is an Open Source API Gateway for the .NET/Core Platform. It combines multiple microservices so that the client does not have to worry about the location of each and every Microservice. Ocelot API Gateway transforms the Incoming HTTP Request from the client and forward it to an appropriate Microservice.
Upstream and Downstream are 2 terms that you have to be clear with. Upstream Request is the Request sent by the Client to the API Gateway. Downstream request is the request sent to the Microservice by the API Gateway. All these are from the perspective of the API Gateway. Let’s see a small Diagram to understand this concept better.
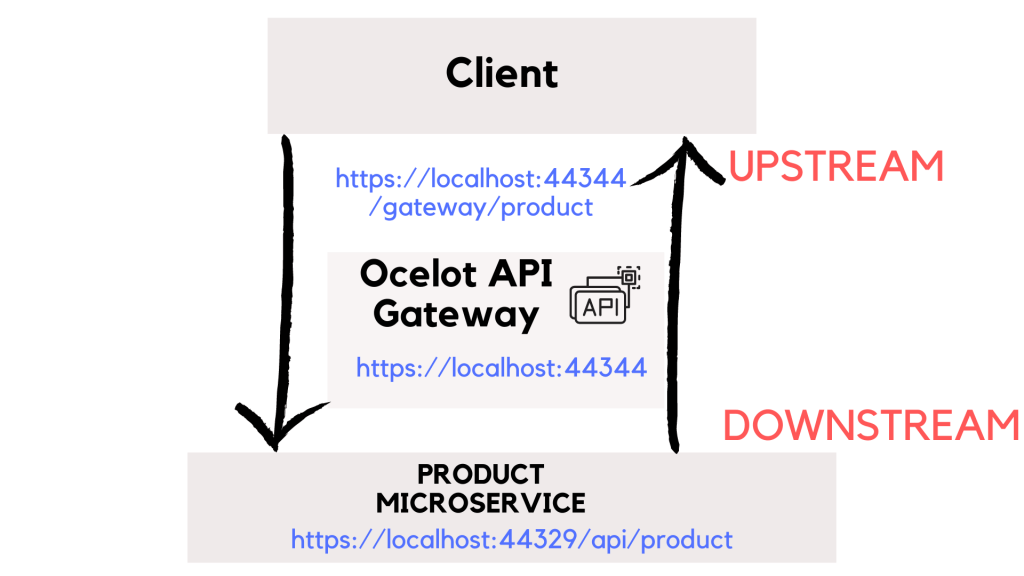
The API gateway is located at port 5000 , whereas the Microservice Port is at 12345. Now, the client will not have access to port 12345, but only to 5000. Thus, client sends a request to localhost:5000/api/weather to receive the latest weather. Now what the Ocelot API Gateway does is quite interesting. It takes in the incoming request from the client and sends another HTTP Request to the Microsevrice, which in turn returns the required response. Once that is done, the Gateway send the response to the client. Here is localhost:5000 is the upstream path that the client knows of. localhost:123456 is the downstream path that the API Gateways knows about.
Building an Ocelot API Gateway
Navigate to the Ecommerce.ApiGateway Project that we had created earlier and let’s install the Ocelot package.
Install-Package Ocelot
We need to configure Ocelot to work with our ASP.NET Core 6 Application. Go to the Program.cs of the Ecommerce.ApiGateway Project and change the CreateHostBuilder method as follows.
using Ocelot.DependencyInjection;
using Ocelot.Middleware;
var builder = WebApplication.CreateBuilder(args);
builder.WebHost.ConfigureAppConfiguration((hostingContext, config) =>
    {
        config
        .SetBasePath(hostingContext.HostingEnvironment.ContentRootPath)
        .AddJsonFile("apiGateway.json", optional: false, reloadOnChange: true);
    });
You can see we have created a Json file named as “apiGateway.json” that holds the route navigation of microservices.
Finally, add the Ocelot services and add the Ocelot middleware on below and the final service like below.
using Ocelot.DependencyInjection;
using Ocelot.Middleware;
var builder = WebApplication.CreateBuilder(args);
builder.WebHost.ConfigureAppConfiguration((hostingContext, config) =>
    {
        config
        .SetBasePath(hostingContext.HostingEnvironment.ContentRootPath)
        .AddJsonFile("apiGateway.json", optional: false, reloadOnChange: true);
    });
// Add services to the container.
builder.Services.AddOcelot();
builder.Services.AddControllers();
// Learn more about configuring Swagger/OpenAPI at https://aka.ms/aspnetcore/swashbuckle
builder.Services.AddEndpointsApiExplorer();
builder.Services.AddSwaggerGen();
var app = builder.Build();
// Configure the HTTP request pipeline.
if (app.Environment.IsDevelopment())
{
    app.UseSwagger();
    app.UseSwaggerUI();
}
app.UseHttpsRedirection();
app.UseAuthorization();
app.MapControllers();
await app.UseOcelot();
app.Run();
Configuring Ocelot Routes
This is the most important part of this article. Here is where you would configure the Upstream / Downstream routes for the API Gateways, which helps Ocelot to know the routes.
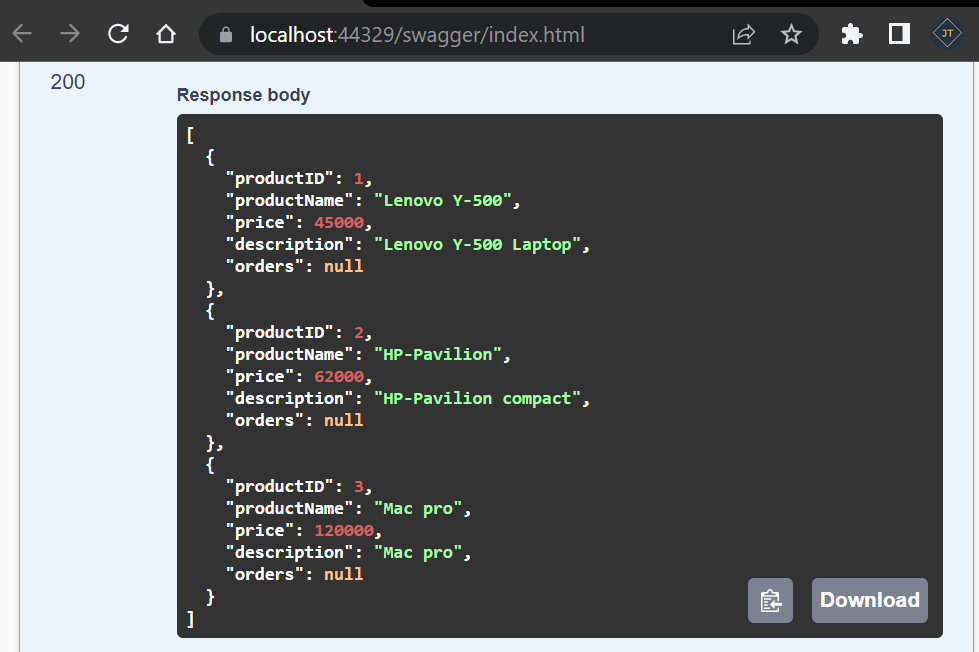
If you can now run the Product Microservice you can find sample Json data like below, And you can see the Product Microservice response the data like below.
Create a new JSON file in the root of the Ecommerce.ApiGateway Project. This file would contain the configurations needed for Ocelot. We will name this file as apiGateway.json.
{
  "Routes": [
    {
      // Prducts Microservice Route
      "DownstreamPathTemplate": "/api/products",
      "DownstreamScheme": "https",
      "DownstreamHostAndPorts": [
        {
          "Host": "localhost",
          "Port": 44329
        }
      ],
      "UpstreamPathTemplate": "/gateway/product",
      "UpstreamHttpMethod": [ "POST", "PUT", "GET" ]
    },
    {
      "DownstreamPathTemplate": "/api/products/{id}",
      "DownstreamScheme": "https",
      "DownstreamHostAndPorts": [
        {
          "Host": "localhost",
          "Port": 44329
        }
      ],
      "UpstreamPathTemplate": "/gateway/product/{id}",
      "UpstreamHttpMethod": [ "GET", "DELETE" ]
    },
    // Order Microservice Route
    {
      "DownstreamPathTemplate": "/api/orders",
      "DownstreamScheme": "https",
      "DownstreamHostAndPorts": [
        {
          "Host": "localhost",
          "Port": 44348
        }
      ],
      "UpstreamPathTemplate": "/gateway/order",
      "UpstreamHttpMethod": [ "POST", "PUT", "GET" ]
    },
    {
      "DownstreamPathTemplate": "/api/orders/{id}",
      "DownstreamScheme": "https",
      "DownstreamHostAndPorts": [
        {
          "Host": "localhost",
          "Port": 44348
        }
      ],
      "UpstreamPathTemplate": "/gateway/order/{id}",
      "UpstreamHttpMethod": [ "GET", "DELETE" ]
    },
    // Customer Microservice Route
    {
      "DownstreamPathTemplate": "/api/customers",
      "DownstreamScheme": "https",
      "DownstreamHostAndPorts": [
        {
          "Host": "localhost",
          "Port": 44392
        }
      ],
      "UpstreamPathTemplate": "/gateway/customer",
      "UpstreamHttpMethod": [ "POST", "PUT", "GET" ]
    },
    {
      "DownstreamPathTemplate": "/api/customers/{id}",
      "DownstreamScheme": "https",
      "DownstreamHostAndPorts": [
        {
          "Host": "localhost",
          "Port": 44392
        }
      ],
      "UpstreamPathTemplate": "/gateway/customer/{id}",
      "UpstreamHttpMethod": [ "GET", "DELETE" ]
    }
  ]
}
On the above code you can see the port 44329 is the Product Microservice port and here we can see when the port is called “/api/products” it is navigated to “/gateway/product”. Like this I have configured the routes in 3
DownstreamPathTemplate denotes the route of the actual endpoint in the Microservice.
DownstreamScheme is the scheme of the Microservice, here it is HTTPS
DownstreamHostAndPorts defines the location of the Microservice. We will add the host and port number here.
UpstreamPathTemplate is the path at which the client will request the Ocelot API Gateway.
UpstreamHttpMethod are the supported HTTP Methods to the API Gateway. Based on the Incoming Method, Ocelot sends a similar HTTP method request to the microservice as well.
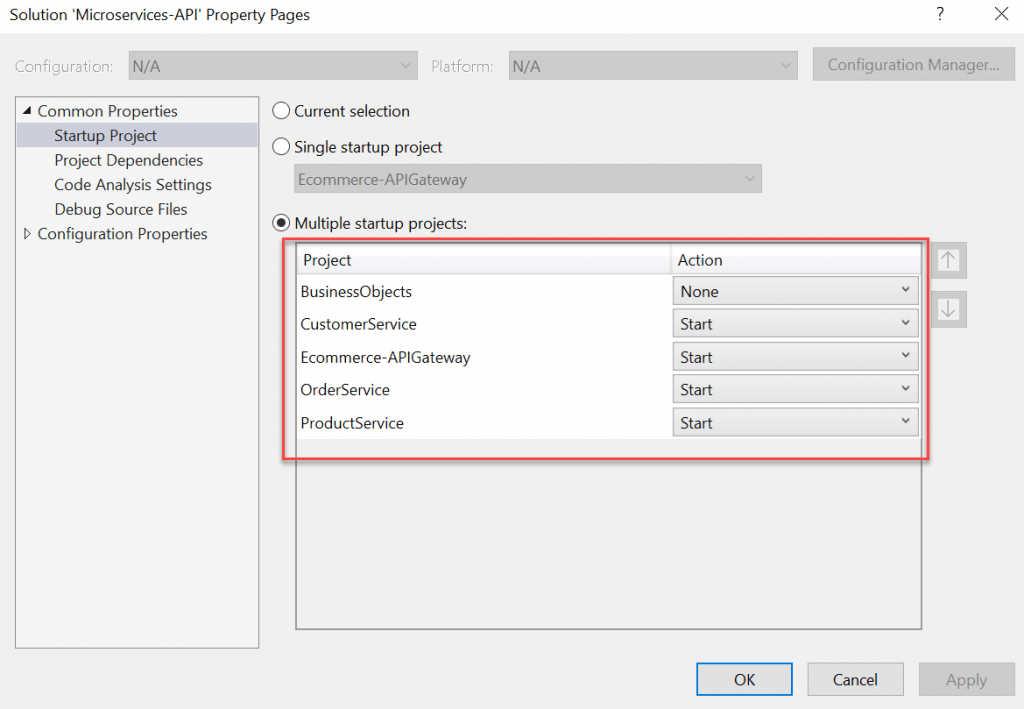
To enable Multiple Startup Projects, Right click on the solution and click on Properties. Here, select the Multiple Startup Projects options and enable all the projects, only business objects project selected as None.
Now we can able to access the all microservices using our configured API Gateways URL like below, You can see instead of call the Product Microservices URL directly, we can access the Product Microservices using Ocelot API Gateways.

Also you can filter the product according to by Id like below,

Also we can access other Microservices using same Ocelot API Gateways like below,

That’s it for this article about Microservices Architecture in ASP.Net Core-6.
Benefits of Microservices
- Gentle Learning Curve – As business functionality is broken into small services it allows developers to learn just the functionality of that service only.
- Better Scaling – Each service is deployed independently and so can be scaled separately.
- Lesser time to market – The application development cycle can be shorter as each service component is independent of the other.
- Fault Isolation – Failure of one service does not affect the operation of other services.
- No dependency on a single programming language & deployment model.
- Parallel & Fast development of different Services is possible as separate teams are working on different services.
Drawbacks with Microservices
- Small independent services require coordination among each other which may be not simple as compared to Monolith Application
- Managing distributed transactions across multiple services can be complex.
- There are Multiple Services/Components to Monitor.
- Testing can be little time consuming as each independent service needs to be tested before integrated testing.
- Whole deployment architecture for large applications becomes very Complex to Manage.
Microservices Architecture is about better handling a large & complex system but to achieve that it exposes its own set of complexities & implementation Challenges. Despite the disadvantages or problems, the benefits of adopting Microservices are driving factors for many companies to implement Microservices.
Conclusion
Leave behind your valuable queries and suggestions in the comment section below. Also, if you think this article helps you, do not forget to share this with your developer community. Happy Coding 🙂
Related Articles
- Step-by-Step Guide to Using Azure Redis Cache in ASP.NET Core 9 Web API
- .NET 8 Authentication with Identity in a Web API using Bearer Tokens and Cookies
- How to convert Text To Speech With Azure Cognitive Services using Angular and .Net Core
- CRUD operation using the repository pattern with .Net 8, Ef-Core, and MySQL
- How to use Response Compression in .NET Core
Jayant Tripathy
Coder, Blogger, YouTuberA passionate developer keep focus on learning and working on new technology.