
In this article we discuss here about Angular Decorator. There are several important concepts in Angular, and Decorators are an important concept to learn when we are working with Angular-2 and above. Through this post we will learn about decorators, its types and how it is being used in real time applications. Please read my previous article Modules in Angular Application.
Decorators are an important concept in TypeScript and since Angular uses Typescript widely, decorators become an important part of Angular as well.
What are Angular Decorators?
Decorators are the features of Typescript and are implemented as functions. The name of the decorator starts with @ symbol following by brackets and arguments. That means in angular whenever you find something which is prefixed by @ symbol, then you need to consider it as a decorator.
The decorator provides metadata to angular classes, property, value, method, etc. and decorators are going to be invoked at runtime.
In AngularJS, decorators are functions that allow a service, directive, or filter to be modified before it is used.
Types of Angular Decorators
- Class decorators, such as @Component and @NgModule
- Property decorators for properties inside classes, such as @Input and @Output
- Method decorators for methods inside classes, such as @HostListener
- Parameter decorators for parameters inside class constructors, such as @Inject
How Decorators work?
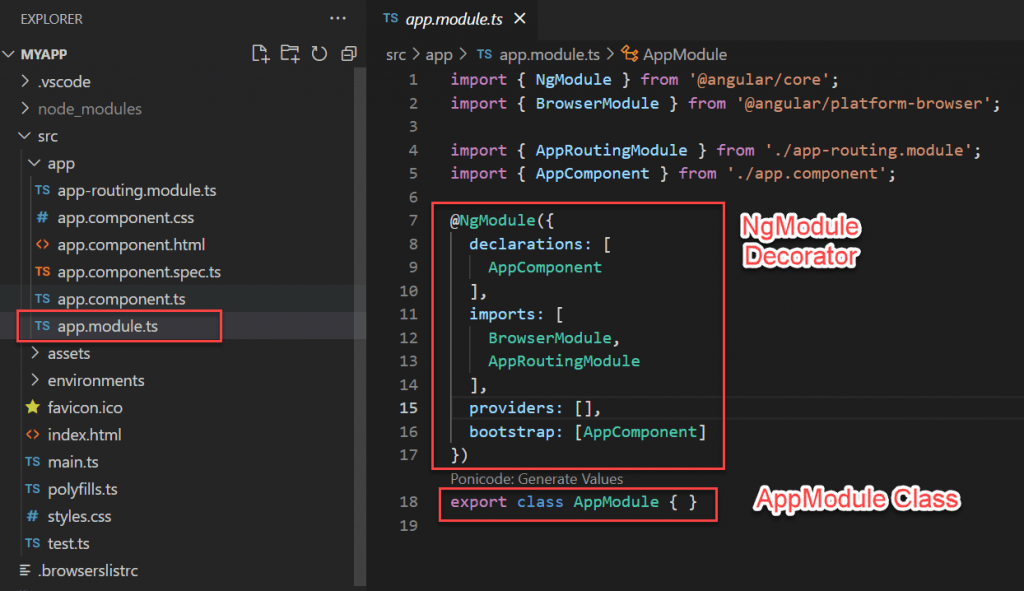
In the app.module.ts file, we will find AppModule which is the root module of the angular application. Further, if you notice, this AppModule is nothing but it’s a class. We call this class as module because this class is decorated with @NgModule decorator as shown in the below image. Here, the @NgModule decorator provides the necessary metadata to make the AppModule class as a module.
Above built-in decorators are imported from @angular/core library and so before using the above decorator, you first need to import the decorators from @angular/core library. For example, if you want to use the component decorator, then first you need to import the component decorator as shown below.
import { Component } from ‘@angular/core’;
To enable Angular Decorators, we need to add the experimentalDecorators to the tsconfig.json file. The ng new command automatically adds this for us.
{
  "compilerOptions": {
    "target": "ES5",
    "experimentalDecorators": true
  }
}
Example of Decorators
Let’s discuss here how we can use decorators in different ways.
Class Decorators
Angular offers us a few class decorators. These are the top-level decorators that we use to express intent for classes. They allow us to tell Angular that a particular class is a component, or module, for example. And the decorator allows us to define this intent without having to actually put any code inside the class.
A @Component and @NgModule decorator example with classes:
import { NgModule, Component } from '@angular/core';

@Component({
  selector: 'Sample-component',
  template: '<div>Example of Class Decorator</div>',
})
export class SampleComponent {
  constructor() {
    console.log('Hey I am a component!');
  }
}

@NgModule({
  imports: [],
  declarations: [],
})
export class SampleModule {
  constructor() {
    console.log('Hey I am a module!');
  }
}
Both of the classes by themselves are effectively the same. No code is needed within the class to tell Angular that it is a component or a module. All we need to do is decorate it, and Angular will do the rest.
Property Decorators
These are probably the second most common decorators that you’ll come across. They allow us to decorate specific properties within our classes – an extremely powerful mechanism.
Let’s take a look at @Input(). Imagine that we have a property within our class that we want to be an input binding.
Without decorators, we’d have to define this property in our class anyway for TypeScript to know about it, and then somewhere else tell Angular that we’ve got a property that we want to be an input.
With decorators, we can simply put the @Input() decorator above the property – which Angular’s compiler will automatically create an input binding from the property name and link them.
import { Component, Input } from '@angular/core';

@Component({
  selector: 'example-component',
  template: '<div>Example of Class Decorator</div>'
})
export class SampleComponent {
  @Input()
  sampleProperty: string;
}
We’d then pass the input binding via a component property binding:
<Sample-component
  [sampleProperty]="sampleData">
</Sample-component>
We will discuss more about property decorator in my up-coming lessons.
Method Decorators
Method decorators are very similar to property decorators but are used for methods instead. This let’s us decorate specific methods within our class with functionality. A good example of this is @HostListener. This allows us to tell Angular that when an event on our host happens, we want the decorated method to be called with the event.
import { Component, HostListener } from '@angular/core';

@Component({
  selector: 'sample-component',
  template: 'Woo a component!'
})
export class SampleComponent {
  @HostListener('click', ['$event'])
  onHostClick(event: Event) {
    // clicked, `event` available
  }
}
Parameter Decorators
Parameter decorators allow us to decorate parameters in our class constructors. An example of this is @Inject that lets us tell Angular what we want that parameter to be initiated with:
import { Component, Inject } from '@angular/core';
import { MyService } from './my-service';

@Component({
  selector: 'sample-component',
  template: 'Woo a component!'
})
export class SampleComponent {
  constructor(@Inject(MyService) myService) {
    console.log(myService); // MyService
  }
}
Due to the metadata that TypeScript exposes for us we don’t actually have to do this for our providers. We can just allow TypeScript and Angular to do the hard work for us by specifying the provider to be injected as the parameter type:
import { Component } from '@angular/core';
import { MyService } from './my-service';

@Component({
  selector: 'example-component',
  template: 'Woo a component!'
})
export class SampleComponent {
  constructor(myService: MyService) {
    console.log(myService); // MyService
  }
}
Conclusion
Leave behind your valuable queries and suggestions in the comment section below. Also, if you think this article helps you, do not forget to share this with your developer community. Happy Coding 🙂
Jayant Tripathy
Coder, Blogger, YouTuberA passionate developer keep focus on learning and working on new technology.