
Angular is a TypeScript-based free and open-source web application framework led by the Angular Team at Google and by a community of individuals and corporations. Angular is a platform for building mobile and desktop web applications.
Here we discuss most of the common angular question and answers.
What is Angular? Why was it introduced?
Angular was introduced to create Single Page applications. This framework brings structure and consistency to web applications and provides excellent scalability and maintainability.
Angular is a TypeScript-based open-source front-end platform that makes it easy to build applications with in web/mobile/desktop. The major features of this framework such as declarative templates, dependency injection, end to end tooling, and many more other features are used to ease the development.
Angular Basics
In below we find all the angular basics questions and answers with sample example.
What is TypeScript?
TypeScript is a superset of JavaScript that offers excellent consistency. It is highly recommended, as it provides some syntactic sugar and makes the code base more comfortable to understand and maintain. Ultimately, TypeScript code compiles down to JavaScript that can run efficiently in any environment.
Angular built entirely in TypeScript and used as a primary language. You can install it globally as
npm install -g typescript
function greeter(person: string) {
    return "Hello, " + person;
}

let user = "John";

document.body.innerHTML = greeter(user);
The greeter method allows only string type as argument.
What is the difference between AngularJS and Angular?
Angular is a completely revived component-based framework in which an application is a tree of individual components.
| AngularJS | Angular |
|---|---|
| It is based on MVC architecture | This is based on Service/Controller |
| It uses JavaScript to build the application | Introduced the TypeScript to write the application |
| Based on controllers concept | This is a component based UI approach |
| Not a mobile friendly framework | Developed considering mobile platform |
| Difficulty in SEO friendly application development | Ease to create SEO friendly applications |
What are Single Page Applications (SPA)?
Single-page applications are web applications that load once with new features just being mere additions to the user interface. It does not load new HTML pages to display the new page’s content, instead generated dynamically. This is made possible through JavaScript’s ability to manipulate the DOM elements on the existing page itself. A SPA approach is faster, thus providing a seamless user experience.
Angular architecture
The main building blocks of an Angular application is shown in the below diagram.

What are the key components of Angular?
Angular has the below key components,
- Component: These are the basic building blocks of angular application to control HTML views.
- Modules: An angular module is set of angular basic building blocks like component, directives, services etc. An application is divided into logical pieces and each piece of code is called as “module” which perform a single task.
- Templates: This represent the views of an Angular application.
- Services: It is used to create components which can be shared across the entire application.
- Metadata: This can be used to add more data to an Angular class.
What are directives?
Directives add behavior to an existing DOM element or an existing component instance. Directives are attributes that allow the user to write new HTML syntax specific to their applications. They execute whenever the Angular compiler finds them in the DOM. Angular supports three types of directives.
- Component Directives
- Structural Directives
- Attribute Directives
import { Directive, ElementRef, Input } from '@angular/core';

@Directive({ selector: '[myHighlight]' })
export class myCustomHighlight {
    constructor(el: ElementRef) {
       el.nativeElement.style.backgroundColor = 'red';
    }
}
Now this directive extends HTML element behavior with a yellow background as below. As you see in below
<p myHighlight>Highlight me!</p>
For more details about Directive follow this lesson Angular Decorator.
What are components?
Components are the most basic UI building block of an Angular app which formed a tree of Angular components. These components are subset of directives. Unlike directives, components always have a template and only one component can be instantiated per an element in a template. Let’s see a simple example of Angular component
import { Component } from '@angular/core';

@Component ({
   selector: 'my-app',
   template: ` <div>
      <h1>{{title}}</h1>
      <div>Learn Angular </div>
   </div> `,
})

export class AppComponent {
   title: string = 'Welcome to Angular world';
}
Here AppComponent is the class that expose the class with property as title and the same is accessed in template. When we run the Angular application we can find the output it print like
Welcome to Angular world
Learn Angular
What are the differences between Component and Directive?
A component(@component) is a directive-with-a-template. Directives are attributes that allow the user to write new HTML syntax specific to their applications.
| Component | Directive |
|---|---|
| To register a component we use @Component meta-data annotation | To register directives we use @Directive meta-data annotation |
| Components are typically used to create UI widgets | Directive is used to add behavior to an existing DOM element |
| Component is used to break up the application into smaller components | Directive is use to design re-usable components |
| Only one component can be present per DOM element | Many directives can be used per DOM element |
| @View decorator or templateurl/template are mandatory | Directive doesn’t use View |
What is a template?
A template is a HTML view where you can display data by binding controls to properties of an Angular component. You can store your component’s template in one of two places.
- We can define it inline using the
templateproperty. - We can define the template in a separate HTML file and link to it in the component metadata using the @Component decorator’s
templateUrlproperty.
Using inline template with template syntax
import { Component } from '@angular/core';

@Component ({
   selector: 'my-app',
   template: '
      <div>
         <h1>{{title}}</h1>
         <div>Learn Angular</div>
      </div>
   '
})

export class AppComponent {
   title: string = 'Hello World';
}
Using separate template file such as app.component.html
import { Component } from '@angular/core';

@Component ({
   selector: 'my-app',
   templateUrl: 'app/app.component.html'
})

export class AppComponent {
   title: string = 'Hello World';
}
What is the option to choose between inline and external template file?
You can store your component’s template in one of two places. You can define it inline using the template property, or you can define the template in a separate HTML file and link to it in the component metadata using the @Component decorator’s templateUrl property.
The choice between inline and separate HTML is a matter of taste, circumstances, and organization policy. But normally we use inline template for small portion of code and external template file for bigger views. By default, the Angular CLI generates components with a template file. But you can override that with the below command,
ng generate component hero -it
What is a module?
Modules are logical boundaries in your application and the application is divided into separate modules to separate the functionality of your application. Lets take an example of app.module.ts root module declared with @NgModule decorator as below,
import { NgModule }      from '@angular/core';
import { BrowserModule } from '@angular/platform-browser';
import { AppComponent }  from './app.component';

@NgModule ({
   imports:      [ BrowserModule ],
   declarations: [ AppComponent ],
   bootstrap:    [ AppComponent ],
   providers: []
})
export class AppModule { }
The NgModule decorator has five important options
- The
importsoption is used to import other dependent modules. TheBrowserModuleis required by default for any web based angular application - The
declarationsoption is used to define components in the respective module. - The
bootstrapoption tells Angular which Component to bootstrap in the application. - The
providersoption is used to configure set of injectable objects that are available in the injector of this module. - The entry Components option is a set of components dynamically loaded into the view.
What is an AOT compilation? What are its advantages?
The Ahead-of-time (AOT) compiler converts the Angular HTML and TypeScript code into JavaScript code during the build phase, i.e before the browser downloads and runs the code.
Angular provides two types of compilation:
- JIT(Just-in-Time) compilation
- AOT(Ahead-of-Time) compilation
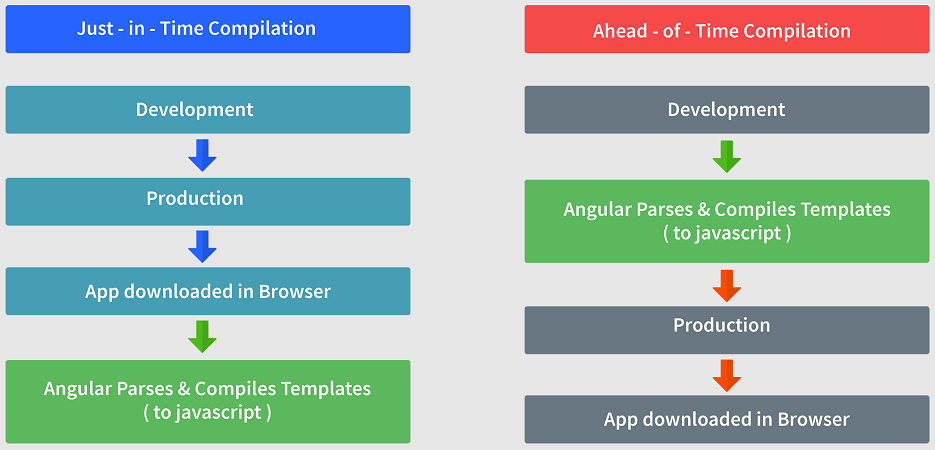
Some of its advantages are as follows.
- Faster rendering
- Fewer asynchronous requests
- Smaller Angular framework download size
- Quick detection of template errors
- Better security
By default, angular builds and serves the application using JIT compiler
ng build
ng serve
For using AOT compiler following changes should be made
ng build --aot
ng serve --aot
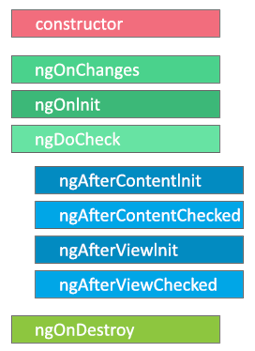
What are lifecycle hooks in Angular?
Every component in Angular has a lifecycle, different phases it goes through from the time of creation to the time it’s destroyed. Angular provides hooks to tap into these phases and trigger changes at specific phases in a lifecycle.
- ngOnChanges: When the value of a data bound property changes, then this method is called.
- ngOnInit: This is called whenever the initialization of the directive/component after Angular first displays the data-bound properties happens.
- ngDoCheck: This is for the detection and to act on changes that Angular can’t or won’t detect on its own.
- ngAfterContentInit: This is called in response after Angular projects external content into the component’s view.
- ngAfterContentChecked: This is called in response after Angular checks the content projected into the component.
- ngAfterViewInit: This is called in response after Angular initializes the component’s views and child views.
- ngAfterViewChecked: This is called in response after Angular checks the component’s views and child views.
- ngOnDestroy: This is the cleanup phase just before Angular destroys the directive/component.
What is the difference between constructor and ngOnInit?
TypeScript classes has a default method called constructor which is normally used for the initialization purpose. Whereas ngOnInit method is specific to Angular, especially used to define Angular bindings. Even though constructor getting called first, it is preferred to move all of your Angular bindings to ngOnInit method. In order to use ngOnInit, you need to implement OnInit interface as below,
import { Component, OnInit } from '@angular/core';

@Component({
  selector: 'app-root',
  templateUrl: './app.component.html',
  styleUrls: ['./app.component.css']
})
export class AppComponent implements OnInit {
  title = 'myApp';
  constructor() {
    //called first time before the ngOnInit()
  }
  ngOnInit() {
    //called after the constructor and called  after the first ngOnChanges()
  }
}
What is a data binding?
Data binding is a core concept in Angular and allows to define communication between a component and the DOM, making it very easy to define interactive applications without worrying about pushing and pulling data. There are four forms of data binding(divided as 3 categories) which differ in the way the data is flowing.
From the Component to the DOM:
Interpolation: {{ value }}: Adds the value of a property from the component
<li>Name: {{ user.name }}</li>
<li>Address: {{ user.address }}</li>
Property binding: [property]=”value”: The value is passed from the component to the specified property or simple HTML attribute
<input type="email" [value]="user.email">
From the DOM to the Component:
Event binding: (event)=”function”: When a specific DOM event happens (eg.: click, change, keyup), call the specified method in the component
<button (click)="logout()"></button>
Two-way binding:
Two-way data binding: [(ngModel)]=”value”: Two-way data binding allows to have the data flow both ways. For example, in the below code snippet, both the email DOM input and component email property are in sync
<input type="email" [(ngModel)]="user.email">
What is interpolation?
Interpolation is a special syntax that Angular converts into property binding. It’s a convenient alternative to property binding. It is represented by double curly braces({{}}). The text between the braces is often the name of a component property. Angular replaces that name with the string value of the corresponding component property.
<h3>
  {{title}}
  <img src="{{url}}" style="height:30px">
</h3>
In the example above, Angular evaluates the title and url properties and fills in the blanks, first displaying a bold application title and then a URL.
What is metadata?
Metadata is used to decorate a class so that it can configure the expected behavior of the class. The metadata is represented by decorators
- Class decorators, e.g. @Component and @NgModule
import { NgModule, Component } from '@angular/core';

@Component({
  selector: 'my-component',
  template: '<div>Class decorator</div>',
})
export class MyComponent {
  constructor() {
    console.log('Hey I am a component!');
  }
}

@NgModule({
  imports: [],
  declarations: [],
})
export class MyModule {
  constructor() {
    console.log('Hey I am a module!');
  }
}
Property decorators Used for properties inside classes, e.g. @Input and @Output
import { Component, Input } from '@angular/core';

@Component({
    selector: 'my-component',
    template: '<div>Property decorator</div>'
})

export class MyComponent {
    @Input()
    title: string;
}
Method decorators Used for methods inside classes, e.g. @HostListener
import { Component, HostListener } from '@angular/core';

@Component({
    selector: 'my-component',
    template: '<div>Method decorator</div>'
})
export class MyComponent {
    @HostListener('click', ['$event'])
    onHostClick(event: Event) {
        // clicked, `event` available
    }
}Parameter decorators Used for parameters inside class constructors, e.g. @Inject, Optional
import { Component, Inject } from '@angular/core';
import { MyService } from './my-service';

@Component({
    selector: 'my-component',
    template: '<div>Parameter decorator</div>'
})
export class MyComponent {
    constructor(@Inject(MyService) myService) {
        console.log(myService); // MyService
    }
}
What is a service?
A service is used when a common functionality needs to be provided to various modules. Services allow for greater separation of concerns for your application and better modularity by allowing you to extract common functionality out of components.
Let’s create a CommonService which can be used across components,
import { Injectable } from '@angular/core';
import { Http } from '@angular/http';

@Injectable({ // The Injectable decorator is required for dependency injection to work
  // providedIn option registers the service with a specific NgModule
  providedIn: 'root',  // This declares the service with the root app (AppModule)
})
export class CommonService{
  constructor(private http: Http){
  }
  fetchAll(){
    return this.http.get('https://api.github.com/repositories');
  }
}
The above service uses Http service as a dependency. We can get this service in any component of the project by importing this service class and then we can easily get fetchAll().
What is dependency injection in Angular?
Dependency injection (DI), is an important application design pattern in which a class asks for dependencies from external sources rather than creating them itself. Angular comes with its own dependency injection framework for resolving dependencies( services or objects that a class needs to perform its function).So you can have your services depend on other services throughout your application.
For more details of dependency injection of Angular you can find here official site of Angular.
There are three types of Dependency Injections in Angular, they are as follows:
Constructor injection: Here, it provides the dependencies through a class constructor.Setter injection: The client uses a setter method into which the injector injects the dependency.Interface injection: The dependency provides an injector method that will inject the dependency into any client passed to it. On the other hand, the clients must implement an interface that exposes a setter method that accepts the dependency.
Dependency injection offers some incredible advantages. Here are some of them
- Dependency Injection helps in Unit testing.
- Boilerplate code is reduced, as initializing of dependencies is done by the injector component.
- Extending the application becomes more manageable.
- It helps to enable loose coupling, which is essential in application programming.
What is angular CLI?
Angular CLI(Command Line Interface) is a command line interface to scaffold and build angular apps using nodejs style (commonJs) modules. You need to install using below npm command,
npm install @angular/cli@latest
Below are the list of few commands, which will come handy while creating angular projects
- Creating New Project:
ng new - Generating Components, Directives & Services:
ng generate/g. The different types of commands would be,ng generate class my-new-class: add a class to your applicationng generate component my-new-component: add a component to your applicationng generate directive my-new-directive: add a directive to your applicationng generate enum my-new-enum: add an enum to your applicationng generate module my-new-module: add a module to your applicationng generate pipe my-new-pipe: add a pipe to your applicationng generate service my-new-service: add a service to your application
- Running the Project:
ng serve
What are Pipes in Angular?
A pipe takes in data as input and transforms it to a desired output. For example, let us take a pipe to transform a component’s birthday property into a human-friendly date using date pipe.
import { Component } from '@angular/core';

@Component({
  selector: 'app-birthday',
  template: `<p>Birthday is {{ birthday | date }}</p>`
})
export class BirthdayComponent {
  birthday = new Date(1985, 5, 11); // May 11, 1985
}
Some key features include:
- Pipes are defined using the pipe “|” symbol.
- Pipes can be chained with other pipes.
- Pipes can be provided with arguments by using the colon (:) sign.
What is a parameterized pipe?
A pipe can accept any number of optional parameters to fine-tune its output. The parameterized pipe can be created by declaring the pipe name with a colon ( : ) and then the parameter value. If the pipe accepts multiple parameters, separate the values with colons. Let’s take a birthday example with a particular format(dd/MM/yyyy):
import { Component } from '@angular/core';

    @Component({
      selector: 'app-birthday',
      template: `<p>Birthday is {{ birthday | date:'dd/MM/yyyy'}}</p>` // 18/06/1987
    })
    export class BirthdayComponent {
      birthday = new Date(1985, 5, 11);
}How chain pipes work in Angular?
You can chain pipes together in potentially useful combinations as per the needs. Let’s take a birthday property which uses date pipe(along with parameter) and uppercase pipes as below
import { Component } from '@angular/core';

        @Component({
          selector: 'app-birthday',
          template: `<p>Birthday is {{  birthday | date:'fullDate' | uppercase}} </p>` // THURSDAY, MAY 11, 1985
        })
        export class BirthdayComponent {
          birthday = new Date(1985, 5, 11);
        }
The output should like below,
// THURSDAY, MAY 11, 1985
What is a custom pipe?
Apart from built-inn pipes, you can write your own custom pipe with the below key characteristics,
- A pipe is a class decorated with pipe metadata @Pipe decorator, which you import from the core Angular library For example
@Pipe({name: 'myCustomPipe'})- The pipe class implements the PipeTransform interface’s transform method that accepts an input value followed by optional parameters and returns the transformed value. The structure of pipeTransform would be as below,
interface PipeTransform {
  transform(value: any, ...args: any[]): any
}- The @Pipe decorator allows you to define the pipe name that you’ll use within template expressions. It must be a valid JavaScript identifier.
template: `{{someInputValue | myCustomPipe: someOtherValue}}`Example of Custom pipe
You can create custom reusable pipes for the transformation of existing value. For example, let us create a custom pipe for finding file size based on an extension,
import { Pipe, PipeTransform } from '@angular/core';

  @Pipe({name: 'customFileSizePipe'})
  export class FileSizePipe implements PipeTransform {
    transform(size: number, extension: string = 'MB'): string {
      return (size / (1024 * 1024)).toFixed(2) + extension;
    }
  }
Now you can use the above pipe in template expression as below,
 template: `
      <h2>Find the size of a file</h2>
      <p>Size: {{288966 | customFileSizePipe: 'GB'}}</p>
    `
What is the PipeTransform interface?
As the name suggests, the interface receives an input value and transforms it into the desired format with a transform() method. It is typically used to implement custom pipes.
import { Pipe, PipeTransform } from '@angular/core';

 @Pipe({
  name: 'demopipe'
})

export class DemopipePipe implements PipeTransform {

  transform(value: unknown, ...args: unknown[]): unknown {
    return null;
  }
}
What are Pure Pipes?
A pure pipe is only called when Angular detects a change in the value or the parameters passed to a pipe. For example, any changes to a primitive input value (String, Number, Boolean, Symbol) or a changed object reference (Date, Array, Function, Object). Angular calls the pipe only when it detects a change in the parameters being passed. A single instance of the pure pipe is used throughout all components.
What are Impure Pipes?
For every change detection cycle in Angular, an impure pipe is called regardless of the change in the input fields. Multiple pipe instances are created for these pipes. Inputs passed to these pipes can be mutable.
By default, all pipes are pure. However, you can specify impure pipes using the pure property, as shown below.
@Pipe({
  name: 'demopipe',
  pure : true/false
})
export class DemopipePipe implements PipeTransform {
}
What are filters in Angular? Name a few of them.
Filters are used to format an expression and present it to the user. They can be used in view templates, controllers, or services. Some inbuilt filters are as follows.
- date – Format a date to a specified format.
- filter – Select a subset of items from an array.
- Json – Format an object to a JSON string.
- limitTo – Limits an array/string, into a specified number of elements/characters.
- lowercase – Format a string to lowercase.
What is the purpose of ngIf directive?
Sometimes an app needs to display a view or a portion of a view only under specific circumstances. The Angular ngIf directive inserts or removes an element based on a truthy/falsy condition. Let’s take an example to display a message if the user age is more than 18,
<p *ngIf="user.age > 18">You are not eligible for student pass!</p>
What is the purpose of ngFor directive?
We use Angular ngFor directive in the template to display each item in the list. For example, here we iterate over list of users,
<li *ngFor="let user of users">
  {{ user }}
</li>
The user variable in the ngFor double-quoted instruction is a template input variable.
What happens if you use script tag inside template?
Angular recognizes the value as unsafe and automatically sanitizes it, which removes the script tag but keeps safe content such as the text content of the script tag. This way it eliminates the risk of script injection attacks. If you still use it then it will be ignored and a warning appears in the browser console.
Let’s take an example of innerHtml property binding which causes XSS vulnerability,
export class InnerHtmlBindingComponent {
  // For example, a user/attacker-controlled value from a URL.
  htmlSnippet = 'Template <script>alert("0wned")</script> <b>Syntax</b>';
}
What are template expressions?
A template expression produces a value similar to any Javascript expression. Angular executes the expression and assigns it to a property of a binding target; the target might be an HTML element, a component, or a directive.
In the property binding, a template expression appears in quotes to the right of the = symbol as in [property]="expression". In interpolation syntax, the template expression is surrounded by double curly braces. For example, in the below interpolation, the template expression is {{username}},
<h3>{{username}}, welcome to Angular</h3>
The below javascript expressions are prohibited in template expression
- assignments (=, +=, -=, …)
- new
- chaining expressions with ; or ,
- increment and decrement operators (++ and –)
What are template statements?
A template statement responds to an event raised by a binding target such as an element, component, or directive. The template statements appear in quotes to the right of the = symbol like (event)="statement".
Let’s take an example of button click event’s statement
<button (click)="editProfile()">Edit Profile</button>
In the above expression, editProfile is a template statement. The below JavaScript syntax expressions are not allowed.
- new
- increment and decrement operators, ++ and —
- operator assignment, such as += and -=
- the bitwise operators | and &
- the template expression operators
How do you categorize data binding types?
Binding types can be grouped into three categories distinguished by the direction of data flow. They are listed as below,
- From the source-to-view
- From view-to-source
- View-to-source-to-view
The possible binding syntax can be tabularized as below,
| Data direction | Syntax | Type |
|---|---|---|
| From the source-to-view(One-way) | 1. {{expression}} 2. [target]=”expression” 3. bind-target=”expression” | Interpolation, Property, Attribute, Class, Style |
| From view-to-source(One-way) | 1. (target)=”statement” 2. on-target=”statement” | Event |
| View-to-source-to-view(Two-way) | 1. [(target)]=”expression” 2. bindon-target=”expression” | Two-way |
What is a bootstrapping module?
Every application has at least one Angular module, the root module that you bootstrap to launch the application is called as bootstrapping module. It is commonly known as AppModule. The default structure of AppModule generated by AngularCLI would be as follows,
/* JavaScript imports */
import { BrowserModule } from '@angular/platform-browser';
import { NgModule } from '@angular/core';
import { FormsModule } from '@angular/forms';
import { HttpClientModule } from '@angular/common/http';

import { AppComponent } from './app.component';

/* the AppModule class with the @NgModule decorator */
@NgModule({
  declarations: [
    AppComponent
  ],
  imports: [
    BrowserModule,
    FormsModule,
    HttpClientModule
  ],
  providers: [],
  bootstrap: [AppComponent]
})
export class AppModule { }
What is view encapsulation in Angular?
View encapsulation defines whether the template and styles defined within the component can affect the whole application or vice versa. Angular provides three encapsulation strategies:
- Emulated – styles from the main HTML propagate to the component.
- Native – styles from the main HTML do not propagate to the component.
- None – styles from the component propagate back to the main HTML and therefore are visible to all components on the page.
What are Template and Reactive forms?
Template-driven approach
- In this method, the conventional form tag is used to create forms. Angular automatically interprets and creates a form object representation for the tag.
- Controls can be added to the form using the
NGModeltag. Multiple controls can be grouped using theNGControlGroupmodule. - A form value can be generated using the “
form.value” object. Form data is exported as JSON values when the submit method is called. - Basic HTML validations can be used to validate the form fields. In the case of custom validations, directives can be used.
- This method is the simplest way to create an Angular App.
Reactive Form Approach
- With Reactive forms, the component directly manages the data flows between the form controls and the data models.
- Reactive forms are code-driven, unlike the template-driven approach.
- Reactive forms break from the traditional declarative approach.
- Reactive forms eliminate the anti-pattern of updating the data model via two-way data binding.
- Typically, Reactive form control creation is synchronous and can be unit tested with synchronous programming techniques.
For complex form recommended to use as Reactive Form.
How does one share data between components in Angular?
Data Sharing Between Angular Components
- Parent to Child: via Input
- Child to Parent: via Output() and EventEmitter
- Child to Parent: via ViewChild
- Unrelated Components: via a Service
Parent to Child: via Input
Every time you define @Input() in the child component the information will be obtained from the master or parent component. Data model has to be always defined using interfaces before sharing data between components. Here we are defining the Product interface with productID and productName as mandatory fields and rest are optional.
Now the parent component can import the product interface. At this point a template is created. Here the template has a product id and product name. Now our aim is to share the product name with the child component. Once the product name is updated in the child component it should be reflected in the parent component also.
Child to Parent: via Output() and EventEmitter
For sharing data from child to parent we need an output decorator. In child component we have to define output decorator like this:
@Output() childToParent = new EventEmitter<String>();
Now since we can sharing the data with the parent component, the child component requires to bubble the event with value to the parent components. We can bubble the event based on a trigger point, here we are doing it by using a button click. sendToParent is called on button click.
sendToParent(name){this.childToParent.emit(name);}Here there is an association with childtoParent property and child tag in the parent component.
<app-child [childToMaster]=product.productName (childToParent)="childToParent($event)">
</app-child>
Here, The value is received and set in the parent component.
childToParent(name)
{
this.product.productName=name;
}
Sharing data between sibling components:
Use the above points and similarly share the data between siblings as well, First share data between the child and parent using the output decorator and EventEmitter. Once received data in the parent component shares it to another child component using Input decorator. Now, siblings can communicate with each other via parent components.
Sharing data using ViewChild decorator:
ViewChild allows child components to be injected into parent components. So this makes ViewChild more powerful. It allows parents to control the child’s methods and properties. But a parent can get access to the properties after viewing init events. That means we have to implement ngAfterViewInit life cycle hook in order to get the properties from parent components.
Sharing data between not related components:
Say there is no relation between the components in that case we cannot pass the data using the above mentioned methods. Generally you can encounter this when components are in different modules. There are other scenarios when you have a list of products and click on a particular product and then redirect to product details components. In these kinds of scenarios, Data Service is used to share data between components.
Angular Router
Angular Router is a mechanism in which navigation happens from one view to the next as users perform application tasks. It borrows the concepts or model of browser’s application navigation.
What is the purpose of base href tag?
The routing application should add element to the index.html as the first child in the tag in order to indicate how to compose navigation URLs. If app folder is the application root then you can set the href value as below
<base href="/">
What are the router imports?
The Angular Router which represents a particular component view for a given URL is not part of Angular Core. It is available in library named @angular/router to import required router components. For example, we import them in app module as below,
import { RouterModule, Routes } from '@angular/router';
What is router outlet?
The RouterOutlet is a directive from the router library and it acts as a placeholder that marks the spot in the template where the router should display the components for that outlet. Router outlet is used like a component,
<router-outlet></router-outlet>
<!-- Routed components go here -->
What are router links?
The RouterLink is a directive on the anchor tags give the router control over those elements. Since the navigation paths are fixed, you can assign string values to router-link directive as below,
<h1>Angular Router</h1>
<nav>
  <a routerLink="/todosList" >List of todos</a>
  <a routerLink="/completed" >Completed todos</a>
</nav>
<router-outlet></router-outlet>
What are active router links?
RouterLinkActive is a directive that toggles css classes for active RouterLink bindings based on the current RouterState. i.e, The Router will add CSS classes when this link is active and remove when the link is inactive. For example, you can add them to RouterLinks as below.
<h1>Angular Router</h1>
<nav>
  <a routerLink="/todosList" routerLinkActive="active">List of todos</a>
  <a routerLink="/completed" routerLinkActive="active">Completed todos</a>
</nav>
<router-outlet></router-outlet>
What is router state?
RouterState is a tree of activated routes. Every node in this tree knows about the “consumed” URL segments, the extracted parameters, and the resolved data. You can access the current RouterState from anywhere in the application using the Router service and the routerState property.
@Component({templateUrl:'template.html'})
class MyComponent {
  constructor(router: Router) {
    const state: RouterState = router.routerState;
    const root: ActivatedRoute = state.root;
    const child = root.firstChild;
    const id: Observable<string> = child.params.map(p => p.id);
    //...
  }
}
What are router events?
During each navigation, the Router emits navigation events through the Router events property allowing you to track the lifecycle of the route. The sequence of router events is as below,
- NavigationStart
- RouteConfigLoadStart
- RouteConfigLoadEnd
- RoutesRecognized
- GuardsCheckStart
- ChildActivationStart
- ActivationStart
- GuardsCheckEnd
- ResolveStart
- ResolveEnd
- ActivationEnd
- ChildActivationEnd
- NavigationEnd
- NavigationCancel
- NavigationError
- Scroll
What is activated route?
ActivatedRoute contains the information about a route associated with a component loaded in an outlet. It can also be used to traverse the router state tree. The ActivatedRoute will be injected as a router service to access the information. In the below example, you can access route path and parameters,
@Component({...})
class MyComponent {
  constructor(route: ActivatedRoute) {
    const id: Observable<string> = route.params.pipe(map(p => p.id));
    const url: Observable<string> = route.url.pipe(map(segments => segments.join('')));
    // route.data includes both `data` and `resolve`
    const user = route.data.pipe(map(d => d.user));
  }
}
How do you define routes?
A router must be configured with a list of route definitions. You configures the router with routes via the RouterModule.forRoot() method, and adds the result to the AppModule’s imports array.
 const appRoutes: Routes = [
  { path: 'todo/:id',      component: TodoDetailComponent },
  {
    path: 'todos',
    component: TodosListComponent,
    data: { title: 'Todos List' }
  },
  { path: '',
    redirectTo: '/todos',
    pathMatch: 'full'
  },
  { path: '**', component: PageNotFoundComponent }
];

@NgModule({
  imports: [
    RouterModule.forRoot(
      appRoutes,
      { enableTracing: true } // <-- debugging purposes only
    )
    // other imports here
  ],
  ...
})
export class AppModule { }
What is the purpose of Wildcard route?
If the URL doesn’t match any predefined routes then it causes the router to throw an error and crash the app. In this case, you can use wildcard route. A wildcard route has a path consisting of two asterisks to match every URL.
For example, you can define PageNotFoundComponent for wildcard route as below
{ path: '**', component: PageNotFoundComponent }
Do I need a Routing Module always?
No, the Routing Module is a design choice. You can skip routing Module (for example, AppRoutingModule) when the configuration is simple and merge the routing configuration directly into the companion module (for example, AppModule). But it is recommended when the configuration is complex and includes specialized guard and resolver services.
Brief about RxJS
What is RxJS?
RxJS(Reactive Extensions for JavaScript) is a library for reactive programming using Observables, to make it easier to compose asynchronous or callback-based code. Many APIs such as HttpClient produce and consume RxJS Observables and also uses operators for processing observables.
For example, you can import observables and operators for using HttpClient as below,
import { Observable, throwError } from 'rxjs';
import { catchError, retry } from 'rxjs/operators';
What are observables?
Observables are declarative which provide support for passing messages between publishers and subscribers in your application. They are mainly used for event handling, asynchronous programming, and handling multiple values. In this case, you define a function for publishing values, but it is not executed until a consumer subscribes to it. The subscribed consumer then receives notifications until the function completes, or until they unsubscribe.
An Observable is a unique Object similar to a Promise that can help manage async code. Observables are not part of the JavaScript language so we need to rely on a popular Observable library called RxJS. The observables are created using new keyword.
import { Observable } from 'rxjs';

const observable = new Observable(observer => {
  setTimeout(() => {
    observer.next('Hello from a Observable!');
  }, 2000);
});
What are Promises?
Promises are emit a single value at a time and it is Asynchronous events like observables. They execute immediately after creation and are not cancellable. They are Push errors to the child promises.
What is the difference between promise and observable?
| Observable | Promise |
|---|---|
| Declarative: Computation does not start until subscription so that they can be run whenever you need the result | Execute immediately on creation |
| Provide multiple values over time | Provide only one |
| Subscribe method is used for error handling which makes centralized and predictable error handling | Push errors to the child promises |
| Provides chaining and subscription to handle complex applications | Uses only .then() clause |
What is an observer?
Observer is an interface for a consumer of push-based notifications delivered by an Observable. It has below structure,
interface Observer<T> {
  closed?: boolean;
  next: (value: T) => void;
  error: (err: any) => void;
  complete: () => void;
}
A handler that implements the Observer interface for receiving observable notifications will be passed as a parameter for observable as below,
myObservable.subscribe(myObserver);
How do you perform error handling in observables?
You can handle errors by specifying an error callback on the observer instead of relying on try/catch which are ineffective in asynchronous environment.
myObservable.subscribe({
  next(num) { console.log('Next num: ' + num)},
  error(err) { console.log('Received an errror: ' + err)}
});
What is subscribing?
An Observable instance begins publishing values only when someone subscribes to it. So you need to subscribe by calling the subscribe() method of the instance, passing an observer object to receive the notifications.
Let’s take an example of creating and subscribing to a simple observable, with an observer that logs the received message to the console.
//Creates an observable sequence of 5 integers, starting from 1
const source = range(1, 5);

// Create observer object
const myObserver = {
  next: x => console.log('Observer got a next value: ' + x),
  error: err => console.error('Observer got an error: ' + err),
  complete: () => console.log('Observer got a complete notification'),
};

// Execute with the observer object and Prints out each item
source.subscribe(myObserver);
// => Observer got a next value: 1
// => Observer got a next value: 2
// => Observer got a next value: 3
// => Observer got a next value: 4
// => Observer got a next value: 5
// => Observer got a complete notification
What is the short hand notation for subscribe method?
The subscribe() method can accept callback function definitions in line, for next, error, and complete handlers is known as short hand notation or Subscribe method with positional arguments.
myObservable.subscribe(
  x => console.log('Observer got a next value: ' + x),
  err => console.error('Observer got an error: ' + err),
  () => console.log('Observer got a complete notification')
);
What are observable creation functions?
RxJS provides creation functions for the process of creating observables from things such as promises, events, timers and Ajax requests. Let us explain each of them with an example,
Create an observable from a promise
import { from } from 'rxjs'; // from function
const data = from(fetch('/api/endpoint')); //Created from Promise
data.subscribe({
 next(response) { console.log(response); },
 error(err) { console.error('Error: ' + err); },
 complete() { console.log('Completed'); }
});
Create an observable that creates an AJAX request
import { ajax } from 'rxjs/ajax'; // ajax function
const apiData = ajax('/api/data'); // Created from AJAX request
// Subscribe to create the request
apiData.subscribe(res => console.log(res.status, res.response));
Create an observable from a counter
import { interval } from 'rxjs'; // interval function
const secondsCounter = interval(1000); // Created from Counter value
secondsCounter.subscribe(n =>
  console.log(`Counter value: ${n}`));
Create an observable from an event
import { fromEvent } from 'rxjs';
const el = document.getElementById('custom-element');
const mouseMoves = fromEvent(el, 'mousemove');
const subscription = mouseMoves.subscribe((e: MouseEvent) => {
  console.log(`Coordnitaes of mouse pointer: ${e.clientX} * ${e.clientY}`);
  });
What is the purpose of async pipe?
The AsyncPipe subscribes to an observable or promise and returns the latest value it has emitted. When a new value is emitted, the pipe marks the component to be checked for changes.
Let’s take a time observable which continuously updates the view for every 2 seconds with the current time.
@Component({
  selector: 'async-observable-pipe',
  template: `<div><code>observable|async</code>:
       Time: {{ time | async }}</div>`
})
export class AsyncObservablePipeComponent {
  time = new Observable(observer =>
    setInterval(() => observer.next(new Date().toString()), 2000)
  );
}
What is HttpClient and its benefits?
Most of the Front-end applications communicate with backend services over HTTP protocol using either XMLHttpRequest interface or the fetch() API. Angular provides a simplified client HTTP API known as HttpClient which is based on top of XMLHttpRequest interface. This client is avaialble from @angular/common/http package. You can import in your root module as below,
import { HttpClientModule } from '@angular/common/http';
The major advantages of HttpClient can be listed as below,
- Contains testability features
- Provides typed request and response objects
- Intercept request and response
- Supports Observalbe APIs
- Supports streamlined error handling
Explain on how to use HttpClient with an example?
Below are the steps need to be followed for the usage of HttpClient.
- Import HttpClient into root module:
import { HttpClientModule } from '@angular/common/http';
@NgModule({
  imports: [
    BrowserModule,
    // import HttpClientModule after BrowserModule.
    HttpClientModule,
  ],
  ......
  })
export class AppModule {}- Inject the HttpClient into the application: Let’s create a UserProfileService(userprofile.service.ts) as an example. It also defines get method of HttpClient
import { Injectable } from '@angular/core';
import { HttpClient } from '@angular/common/http';

const userProfileUrl: string = 'assets/data/profile.json';

@Injectable()
export class UserProfileService {
  constructor(private http: HttpClient) { }

  getUserProfile() {
    return this.http.get(this.userProfileUrl);
  }
}- Create a component for subscribing service: Let’s create a component called UserProfileComponent(userprofile.component.ts) which inject UserProfileService and invokes the service method,
fetchUserProfile() {
  this.userProfileService.getUserProfile()
    .subscribe((data: User) => this.user = {
        id: data['userId'],
        name: data['firstName'],
        city:  data['city']
    });
}
Additional Questions on Angular
What is content projection?
Content projection is a pattern in which you insert, or project, the content you want to use inside another component. For example, you could have a Card component that accepts content provided by another component.
Content Projection are divided into 3 parts.
| CONTENT PROJECTION | DETAILS |
|---|---|
| Single-slot content projection | With this type of content projection, a component accepts content from a single source. |
| Multi-slot content projection | In this scenario, a component accepts content from multiple sources. |
| Conditional content projection | Components that use conditional content projection render content only when specific conditions are met. |
For more details please visit this official Angular link.
If we add the tag <ng-content></ng-content> anywhere in our template HTML for our component. The inner content of the tags that define our component are then projected into this space.
So if we changed the template for our JokeComponent to be something like:
<div class="card card-block">
  <h4 class="card-title">{{ data.setup }}</h4>
  <p class="card-text"
     [hidden]="data.hide">
    <ng-content></ng-content> (1)
  </p>
  <a class="btn btn-primary"
     (click)="data.toggle()">Tell Me
  </a>
</div>
We’ve replaced {{data.punchline}} with <ng-content></ng-content>
Then if we changed our JokeListComponent template from this:
<joke *ngFor="let j of jokes" [joke]="j"></joke>
To this
<joke *ngFor="let j of jokes" [joke]="j">
  <h1>{{ j.punchline }}</h1> (1)
</joke>
In-between the opening and closing joke tags we’ve added some HTML to describe how we want the punchline to be presented on the screen, with a <h1> tag.
The <h1>{{ j.punchline }}</h1> defined in the parent JokeListComponent, replaces the <ng-content></ng-content> tag in the JokeComponent.
This is called Content Projection we project content from the parent Component to our Component.
If we create our components to support content projection then it enables the consumer of our component to configure exactly how they want the component to be rendered.
The downside of content projection is that the JokeListComponent doesn’t have access to the properties or methods on the JokeComponent.
So the content we are projecting we can’t bind to properties or methods of our JokeComponent, only the JokeListComponent.
What is ng-content?
The ng-content tag acts as a placeholder for inserting external or dynamic content. The Parent component passes the external content to the child component. When Angular parses the template, it inserts the external content where ng-content appears in the child component’s template.
Take an example of a card component. It has a header section, footer section & body section. The contents of these sections will vary. The ng-content will allow us to pass these sections to the card component from the parent component. This enables us to use the card component at many places in the app.
Create a new component FancyBtnComponent. Copy all the codes from BtnComponent except for one change. Remove Click Me and add <ng-content> </ng-content> instead. This tag acts as a placeholder. You can also think of it as an argument to the component. The parent component must supply the argument
import { Component, Output, EventEmitter } from '@angular/core';

@Component({
 selector: 'app-fancybtn',
 template: `
     <button>
       <ng-content></ng-content>
     </button> `
})
export class FancyBtnComponent {
}
Now open the app.component.html
<h2>Button Demo With ng-content</h2>
<app-fancybtn>Click Me</app-fancybtn>
<app-fancybtn><b>Submit</b></app-fancybtn>
The content between <app-fancybtn> </app-fancybtn> is passed to our FancyBtnComponent. The component displays it in place of ng-content.
What are the differences between reactive forms and template driven forms?
Below are the main differences between reactive forms and template driven forms
| Feature | Reactive | Template-Driven |
|---|---|---|
| Form model setup | Created(FormControl instance) in component explicitly | Created by directives |
| Data updates | Synchronous | Asynchronous |
| Form custom validation | Defined as Functions | Defined as Directives |
| Testing | No interaction with change detection cycle | Need knowledge of the change detection process |
| Mutability | Immutable(by always returning new value for FormControl instance) | Mutable(Property always modified to new value) |
| Scalability | More scalable using low-level APIs | Less scalable using due to abstraction on APIs |
Explain Angular Authentication and Authorization.
The user login credentials are passed to an authenticate API, which is present on the server. Post server-side validation of the credentials, a JWT (JSON Web Token) is returned. The JWT has information or attributes regarding the current user. The user is then identified with the given JWT. This is called authentication.
Post logging-in successfully, different users have a different level of access. While some may access everything, access for others might be restricted to only some resources. The level of access is authorization.
Explain Dependency Injection in Angular?
Dependency injection is an application design pattern that is implemented by Angular and forms the core concepts of Angular. Let us understand in a detailed manner. Dependencies in Angular are services which have a functionality. Various components and directives in an application can need these functionalities of the service. Angular provides a smooth mechanism by which these dependencies are injected into components and directives.
What is a singleton pattern and where we can find it in Angular?
Singleton pattern in Angular is a great pattern which restricts a class from being used more than once. Singleton pattern in Angular is majorly implemented on dependency injection and in the services. Thus, if you use ‘new Object()’ without making it a singleton, then two different memory locations will be allocated for the same object. Whereas, if the object is declared as a singleton, in case it already exists in the memory then simply it will be reused.
What is the difference between a provider, a service and a factory in Angular?
| Provider | Service | Factory |
| A provider is a method using which you can pass a portion of your application into app.config | A service is a method that is used to create a service instantiated with the ‘new’ keyword. | It is a method that is used for creating and configuring services. Here you create an object, add properties to it and then return the same object and pass the factory method into your controller. |
Advanced Level – Angular Interview Questions
In Angular, describe how will you set, get and clear cookies?
For using cookies in Angular, you need to include a module called ngCookies angular-cookies.js.
To set Cookies – For setting the cookies in a key-value format ‘put’ method is used.
cookie.set('nameOfCookie',"cookieValue");To get Cookies – For retrieving the cookies ‘get’ method is used.
cookie.get('nameOfCookie');To clear Cookies – For removing cookies ‘remove’ method is used.
cookie.delete('nameOfCookie');What is the process of inserting an embedded view from a prepared TemplateRef?
@Component({
    selector: 'app-root',
    template: `
        <ng-template #template let-name='fromContext'><div>{{name}}</ng-template>
    `
})
export class AppComponent implements AfterViewChecked {
    @ViewChild('template', { read: TemplateRef }) _template: TemplateRef<any>;
    constructor() { }

    ngAfterViewChecked() {
        this.vc.createEmbeddedView(this._template, {fromContext: 'John'});
    }
}
What is the purpose of FormBuilder?
The FormBuilder is a syntactic sugar that speeds up the creation of FormControl, FormGroup, and FormArray objects. It cuts down on the amount of boilerplate code required to create complex forms.
When dealing with several forms, manually creating multiple form control instances can get tedious. The FormBuilder service provides easy-to-use control generation methods.
Follow the steps below to use the FormBuilder service:
- Import the FormBuilder class to your project.
- FormBuilder service should be injected.
- Create the contents of the form.
To import the FormBuilder into your project use the following command in the typescript file:
import { FormBuilder } from '@angular/forms';