
In this article we will learn how to create Toast Notifications in ASP.Net Core. Please read our previous article Toast Notifications in ASP.NET Core Razor Pages where we discussed how to create toast using Toast Jquery.
Here in this article we will learn how to create Toast Notifications in ASP.Net Core using toast plugin and can access the Toast notification in controller or class level in C# using below some steps.
Prerequisite
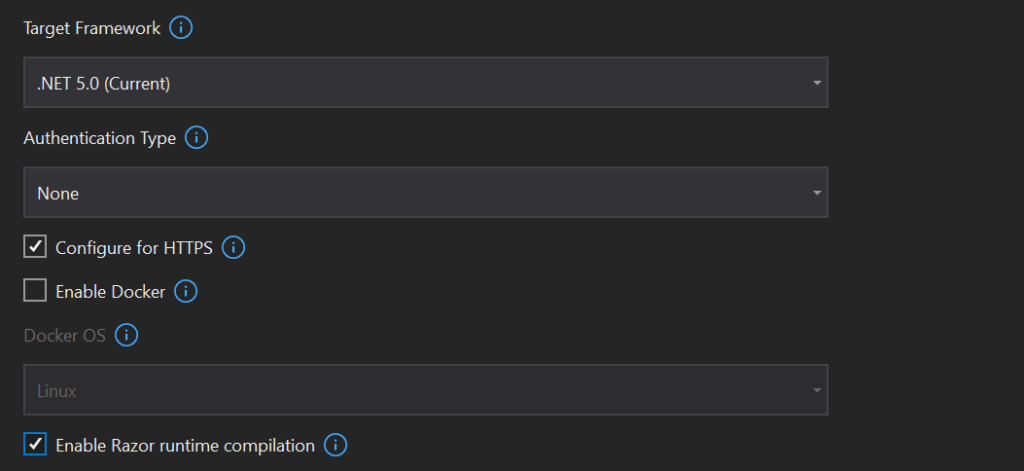
We have create this application using the below configurations.
– Visual Studio 2019
– .NET Core 5.0 SDK
– ASP.Net core Toast Plugin
What is Toastr ?
Toastr is a simple JavaScript toast notification library that is small, easy to use, and extendable. It allows you to create simple toasts with HTML5 and JavaScript like this: Simply include the files in your HTML page and write a simple line of code like this: toastr.
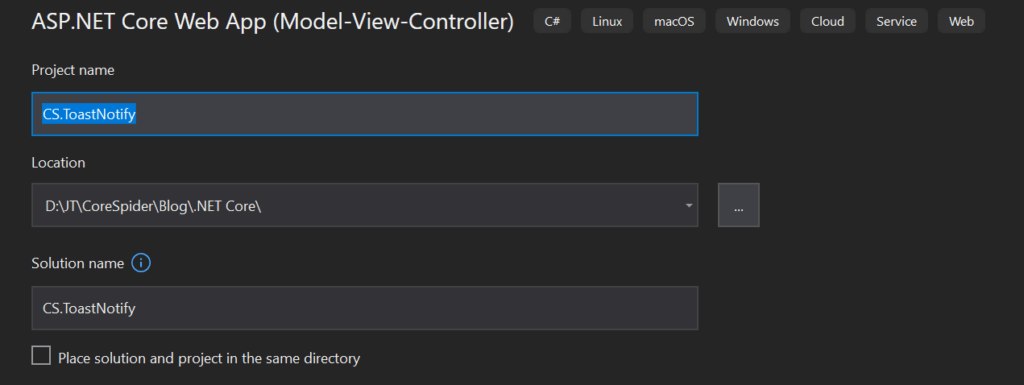
Createing ASP.Net Core MVC application
Let’s create an ASP.Net Core MVC Application.
Install Toast notify package
The Toast Notifications is a free library for ASP.NET Core Applications. It is elegant and compatible with ASP.NET Core 3.1 and .NET 5.

You can also download it directly from https://www.nuget.org/packages/AspNetCoreHero.ToastNotification
How to use Toast package in ASP.Net Core
Let’s learn how to use Toast package in ASP.Net Core.
You need to open the _Layout file or Index.cshtml file then modify your code as shown below.
<script src="~/lib/jquery/dist/jquery.min.js"></script>
<script src="~/lib/bootstrap/dist/js/bootstrap.bundle.min.js"></script>
<script src="~/js/site.js" asp-append-version="true"></script>
@await Component.InvokeAsync("Notyf")
<form method="post" asp-controller="Home" asp-action="Index">
    <div class="text-center">
        <button class="btn btn-success" name="submit" value="Success">Toast Success</button>
        <button class="btn btn-primary" name="submit" value="Info">Toast Info</button>
        <button class="btn btn-danger" name="submit" value="Error">Toast Error</button>
        <button class="btn btn-warning" name="submit" value="Warning">Toast Warning</button>
    </div>
</form>
Code Explanation
- Line #1-3 : We added the required jquery and css file.
- Line #4 : @await Component.InvokeAsync(“Notyf”) is the view component that register the Toast named as “Notyf”.
- Line #6-13 : We have create multiple buttons that can send the POST request to Home Controller.
Next, Open the Startup class, then modify your Configure method to enable toast notification while working with AJAX Requests, you will have to add the middleware into the Service Container
 public void ConfigureServices(IServiceCollection services)
        {
            services.AddControllersWithViews();
            services.AddNotyf(config => { config.DurationInSeconds = 10; config.IsDismissable = true; config.Position = NotyfPosition.BottomRight; });
        }
Code Explanation
- Line #4 : We have added the Toast notify services in configureservices method. Here this AddNotfy belongs several properties where you can manage the duration, position of Notification etc.
- DurationInSeconds allows you to configure the toaster close time.
- DurationInSeconds allows you to configure the toaster close time.
- Position allows you to set the toast notification to appear.
In the start up class Configure method to enable toast notification while working with AJAX Requests, you will have to add the middleware into the Service Container
public void Configure(IApplicationBuilder app, IWebHostEnvironment env)
{
    //..
    app.UseNotyf();

    app.UseEndpoints(endpoints =>
    {
        endpoints.MapControllerRoute(
            name: "default",
            pattern: "{controller=Home}/{action=Index}/{id?}");
        endpoints.MapRazorPages();
    });
}
So you have installed ToastNotification. Next, You can open your HomeController, then modify your code as shown below.
public class HomeController : Controller
    {
        private readonly ILogger<HomeController> _logger;
        private readonly INotyfService _notyfService;
        public HomeController(ILogger<HomeController> logger, INotyfService notyfService)
        {
            _logger = logger;
            _notyfService = notyfService;
        }
        public IActionResult Index()
        {
            _notyfService.Success("You have successfully saved the data.");
            _notyfService.Error("Exception...");
            _notyfService.Warning("Warning...");
            _notyfService.Information("Welcome to CoreSpider.", 5);
            return View();
        }
        [HttpPost]
        public IActionResult Index(string submit)
        {
            switch (submit)
            {
                case "Success":
                    _notyfService.Success("You have successfully saved the data.");
                    break;
                case "Info":
                    _notyfService.Information("Welcome to CoreSpider.", 5);
                    break;
                case "Error":
                    _notyfService.Error("Exception...");
                    break;
                case "Warning":
                    _notyfService.Warning("Warning...");
                    break;
            }
            return View();
        }
      }
Code Explanation
- Line #1-9 : The constructor dependency injection added to implement the notification.
- Line #11-18: The Index action method holds the Toast notifications where we defined several types of notifications that are available in Toast notify package.
- Line #21-38: Here we create the post method where we send the notify details of 4 buttons. According to the submit button we can segregate.
Finally, Run the application and see output like below,
You can also customize the toast notification like below.
_notyfService.Custom("Custom Notification...", 10, "#B500FF", "fa fa-home");Conclusion
Leave behind your valuable queries and suggestions in the comment section below. Also, if you think this article helps you, do not forget to share this with your developer community. Happy Coding 🙂
Follow Other Articles
- Building an AI Knowledge Base Search with Azure AI Foundry: Step-by-Step Guide
- Build Your First MCP Server in .NET 10 (C#) – Complete Beginner-Friendly Guide
- Run Local LLMs in .NET: Rapid Prototyping with Ollama & Semantic Kernel
- Building your own AI Assistant Using Python, LangChain, Streamlit & GPT‑4o (Step‑by‑Step Guide)
- How to Secure React.js application with Azure AD Authentication Using MSAL Library
- 🔐 Securing .NET Core Web Apps with Azure AD/Intra and MSAL
- Step-by-Step Guide to Using Azure Redis Cache in ASP.NET Core 9 Web API
- 🤖 Build a Full-Stack AI App with React, Node.js & Azure OpenAI
Jayant Tripathy
Coder, Blogger, YouTuberA passionate developer keep focus on learning and working on new technology.