
In this article we will learn about Angular Interceptors- The Complete Guide. Interceptors in Angular, as the name suggests, is a simple way provided by the framework to intercept and modify the application’s http requests globally before they are sent to the server. That really comes in handy, allowing us to configure authentication tokens, add logs of the requests, add custom headers that out application may need and much more. Please read my previous article about Understanding of HttpClient in Angular.
What Is An Angular HTTP Interceptor?
An HTTP interceptor is an Angular service that intercepts HTTP requests and responses generated by the built-in HTTP client of the Angular framework.
By using an interceptor to change HTTP requests and answers in a single area, we may avoid redundant code and make our code more intelligible.
Angular Interceptor is built similarly to other services, but it must have an intercept function. You will always intercept the request and, if desired, follow it through to intercept the response.
Interceptors can perform a variety of implicit tasks, from authentication to logging, in a routine, standard way, for every HTTP request/response. Without interception, developers would have to implement these tasks explicitly for each HttpClient method call.
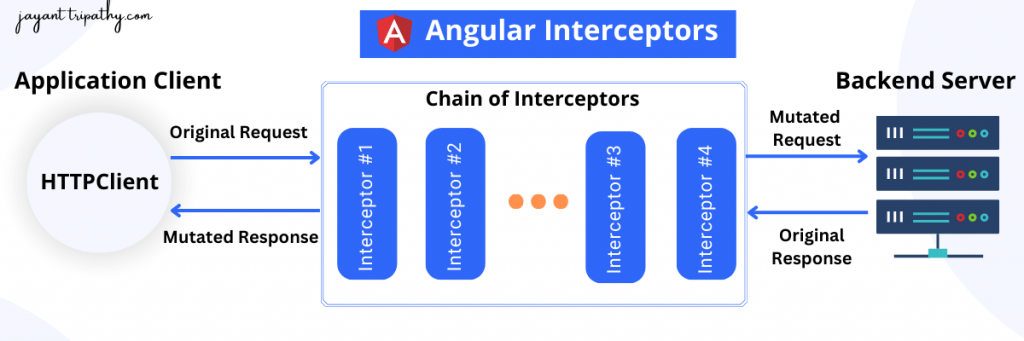
Let’s understand the above diagram,
- The application (client) that uses the
HttpClientto create requests. On the other end, there is the backend (server) that’s going to respond to these requests. Before requests are dispatched from our application, they pass through a chain of interceptors. - This chain contains all the interceptors we provide to the application (more on that soon). At the end of this chain, there will always be a final handler added by Angular, the
HttpBackend. So, the chain will always have at least one handler. - The
HttpBackenddispatches the requests to the server. We’ll see how we can useHttpBackendto bypass the previous handlers in the following section. - In all other cases, requests and responses pass through the entire chain of interceptors. This makes interceptors the perfect place to globally mutate requests and responses.
Benefits of HTTP Interceptors
- Testability and reusability: Interceptors are simple to test individually, allowing you to confirm that each interceptor behaves correctly.
- Centralized Logic: HTTP Interceptors let you implement logic for common tasks like authentication, logging, error handling, and header addition in a centralized area.
- Global application-level changes: Interceptors operate globally, intercepting all HTTP requests and answers generated by the Angular application. This implies that you can make consistent changes or perform actions across several API calls without having to manually edit each request or response.
- Error handling and logging: Interceptors can be used to handle errors across the application, ensuring a consistent approach to error reporting and management.
- Caching and request/response manipulation: HTTP Interceptors can be used to build caching methods, which reduce unnecessary requests and improve application speed.
- Separation of concerns: By using HTTP Interceptors, you may keep concerns about data retrieval and communication (HTTP) separate from the business logic of your components and services.
- Security and authentication: Interceptors are typically used to include authorization headers or authentication tokens in outgoing requests. This ensures that the user’s authentication status is automatically included in API calls, eliminating the need to explicitly specify headers in each request.
- Simple integration with third-party libraries: Interceptors enable smooth integration with third-party libraries or APIs. For example, you can use a specific format for API replies that are requested by a charting library or data visualization tool.
Creating an Angular Interceptor
In order to implement an Interceptor, you need to create a class that implements the intercept method of the HttpInterceptor interface. Execute this below CLI command to add an interceptor service:
ng generate interceptor headersimport { Injectable } from '@angular/core';
import {
HttpRequest,
HttpHandler,
HttpEvent,
HttpInterceptor
} from '@angular/common/http';
import { Observable } from 'rxjs';
@Injectable()
export class HeadersInterceptor implements HttpInterceptor {
constructor() {}
intercept(request: HttpRequest<unknown>, next: HttpHandler): Observable<HttpEvent<unknown>> {
return next.handle(request);
}
}
Code Explanation
- To Implement the Interceptor, need to create an injectable service, that implements the
HttpInterceptorinterface.
@Injectable() export class AppHttpInterceptor implements HttpInterceptor- This class must implement the method Intercept.
 intercept(request: HttpRequest<unknown>, next: HttpHandler): Observable<HttpEvent<unknown>> {
    //do whatever you want with the HttpRequest
    return next.handle(request); //invoke the next handler
  }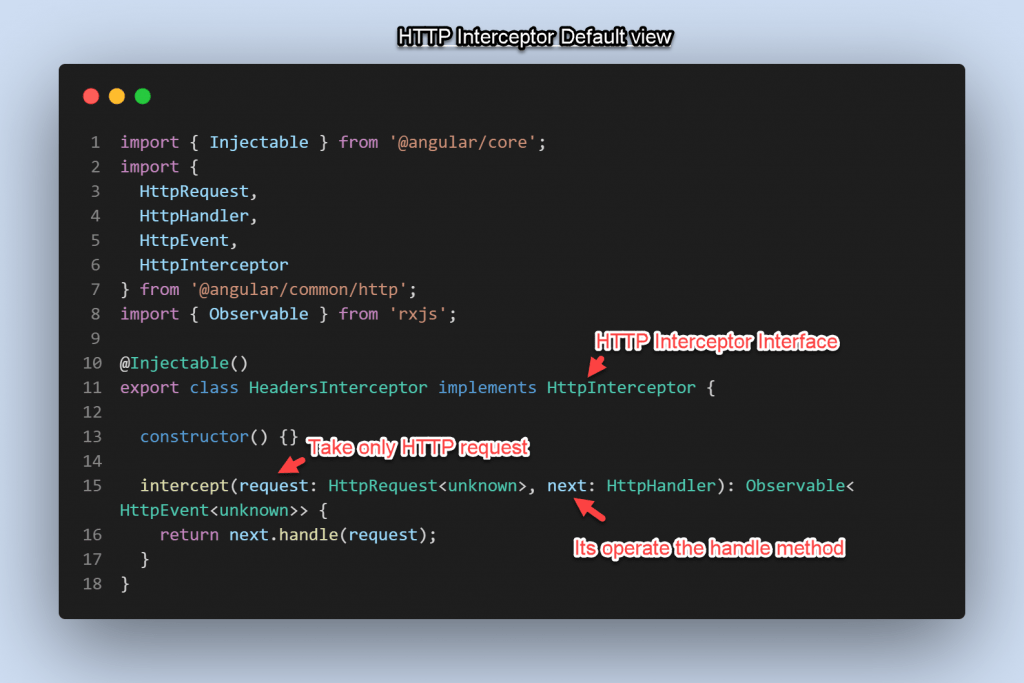
- The first parameter
request, with theHttpRequesttype represents the actual request on its way to the server. - The second parameter
next, with theHttpHandlertype represents the next interceptor in the chain. - Finally, the returned type is an
Observableof theHttpEventtype. In most cases, this represents the response to ordinaryHTTPrequests. HttpRequestis an outgoing HTTP request which is being intercepted. It contains URL, method, headers, body, and other request configurations. The HttpRequest is an immutable class, which means that we can’t modify the original request. To make changes we need to clone the Original request using theHttpRequest.clonemethod.HttpHandlerdispatches theHttpRequestto thenext Handlerusing the methodHttpHandler.handle. The next handler could be another Interceptor in the chain or the HTTP Backend.
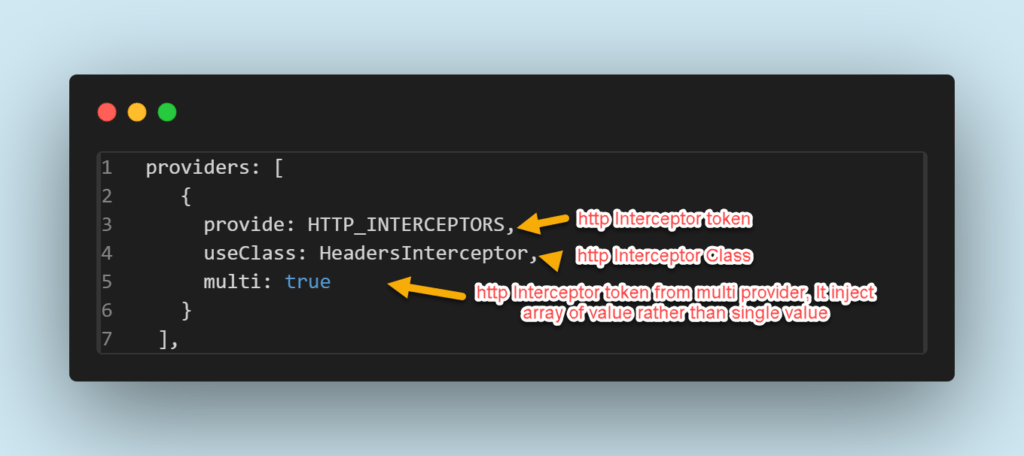
Interceptor registration
We need to register the HTTP interceptor to use in the application. So, open the app.module.ts file and go to the provider section and the Interceptor information.
providers: [
    { provide: HTTP_INTERCEPTORS, useClass: HeadersInterceptor, multi: true }
  ],
Interceptor Examples
Here we have discussed the two examples regarding Interceptor.
- Adding the API Key using Interceptor
- Sending Tokens with Every Request
Example-1: Adding the API Key using Interceptor
Step-1
- Here we have added the apikey that will register on the HTTP headers.
import { Injectable } from '@angular/core';
import {
  HttpRequest,
  HttpHandler,
  HttpEvent,
  HttpInterceptor
} from '@angular/common/http';
import { Observable } from 'rxjs';

@Injectable()
export class HeadersInterceptor implements HttpInterceptor {

  constructor() {}

  intercept(request: HttpRequest<any>, next: HttpHandler): Observable<HttpEvent<any>> {
    const apiKey = 'Jayant Tripathy'
    request = request.clone({
      setHeaders: {
        'x-api-key': apiKey,
      }
    });

    console.log(request);
    return next.handle(request);
  }
}Step-2
- On the components, we have taken a button and called the HTTP Service call to a dummy API.
// Components here called the service
getData() {
    this.apiService.getData().subscribe(
      response => {
        this.data = response;
        console.log(this.data);
      },
      error => {
        console.log(error);
      })
  }
// API Service
getData() {
return this.http.get('https://jsonplaceholder.typicode.com/todos/');
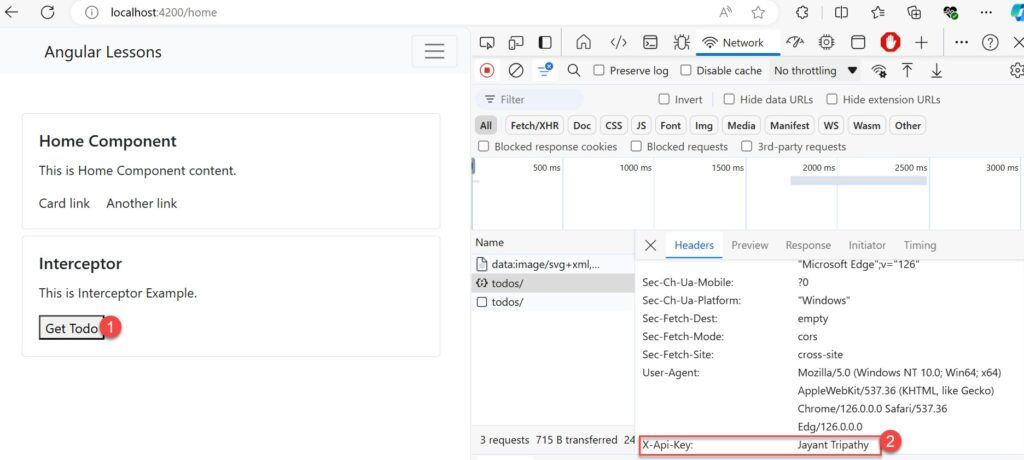
}<div class="card mt-2">
<div class="card-body">
<h5 class="card-title">Interceptor</h5>
<p class="card-text">This is Interceptor Example.</p>
<button (click)="getData()" class="primary">Get Todo</button>
</div>
</div>- When we start the application, we can see the following output: when we click the button, it calls the HTTP Service and Interceptor, which registers the x-API-key in the Request Header, as shown in the image below.
Example-2: Sending Auth Tokens with Every Request
Step-1
Let’s create a new interceptor named as auth-interceptor and there we can set the auth token and we can pass this token in every request.
- Here we have set the token using localstorage and set the token as setHeaders.
import { Injectable } from '@angular/core';
import {
  HttpRequest,
  HttpHandler,
  HttpEvent,
  HttpInterceptor
} from '@angular/common/http';
import { Observable } from 'rxjs';

@Injectable()
export class AuthInterceptor implements HttpInterceptor {

  constructor() {}

  intercept(request: HttpRequest<unknown>, next: HttpHandler): Observable<HttpEvent<unknown>> {
    // Get the token from localStorage
    localStorage.setItem('token','xhja787rrT$321')
    const token = localStorage.getItem('token');
    // Clone the request and add the token to the headers if it exists
    if (token) {
      const authReq = request.clone({
        setHeaders: { Authorization: `Bearer ${token}` },
      });
      return next.handle(authReq);
    }
    return next.handle(request);
  }
}
<button (click)="getData()" class="primary ml-5">Send Token</button>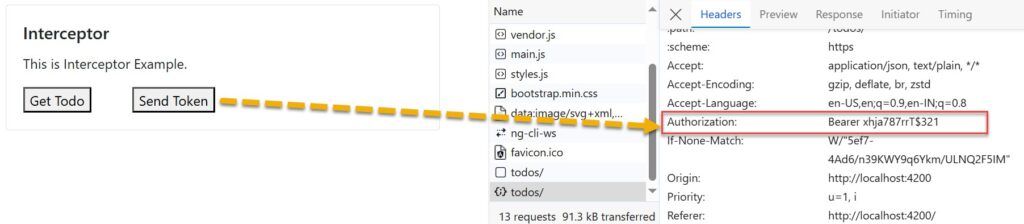
When we click on the send token it calls the Auth Interceptor and we can see it registered on the request headers as Authorization header.
Limitations of HTTP Interceptors
- Complexity: Using too many interceptors or implementing them poorly can complicate code maintenance and understanding.
- Ordering: When you have several interceptors set up, the order in which they run can be important. If the order is incorrect, you may encounter unexpected behaviors or conflicts.
- Performance Overhead: Interceptors perform additional processing for each HTTP request and response. If not completed efficiently, this additional effort can slow down your application, especially if it receives a lot of traffic.
- Limited to HttpClient: Interceptors in Angular are limited to HTTP requests made using the built-in HttpClient module. They will not intercept or change requests sent via other libraries or techniques such as Axios, fetch, or XMLHttpRequest.
Conclusion
In this article we discussed about Angular Interceptors, we discussed here about steps to create the Interceptors with examples.
- Interceptors streamline frequent tasks throughout your app. This implies fewer repeated codes and improved organization.
- They make your apps more dependable and efficient.
- Use them for security, error handling, and a variety of other improvements.
Leave behind your valuable queries and suggestions in the comment section below. Also, if you think this article helps you, do not forget to share this with your developer community. Happy Coding 🙂
Related Post
- Deploying Angular apps in Azure Blob Storage with CI/CD Integration 🚀
- Building a Chatbot in Angular using Gemini API
- Create a responsive sidebar with Angular Material- Angular 18 Example Series
- How to Deploy Angular 17/18 App in GitHub Pages
- How to convert Text To Speech With Azure Cognitive Services using Angular and .Net Core
- Angular Interceptors- The Complete Guide
- Upload Download and Delete files in Azure Blob Storage using ASP.NET Core and Angular
- How to use Policy-based Authorization using JWT in .Net Core 7 and Angular
- How to deploy Angular App in Azure Static Web App
- Global Error Handling in Angular
SUPPORT ME