
In this article we are going to discuss in depth about Angular Template Driven vs. Reactive Forms. Forms are a very common kind of feature used in any app. In this guide, we’ll learn about the two techniques used by Angular to create forms – Template-driven and reactive forms. Please read all angular articles in this link.
This post is an in-depth comparison between the two different alternatives for building forms in Angular – Template Driven Forms and Reactive Forms. Angular provides two modules for creating and managing forms for complex apps. This article will explore the two modules readily available, provide in-depth comparisons to determine when to use each module, and finally look at a demonstration on managing forms using the two modules.
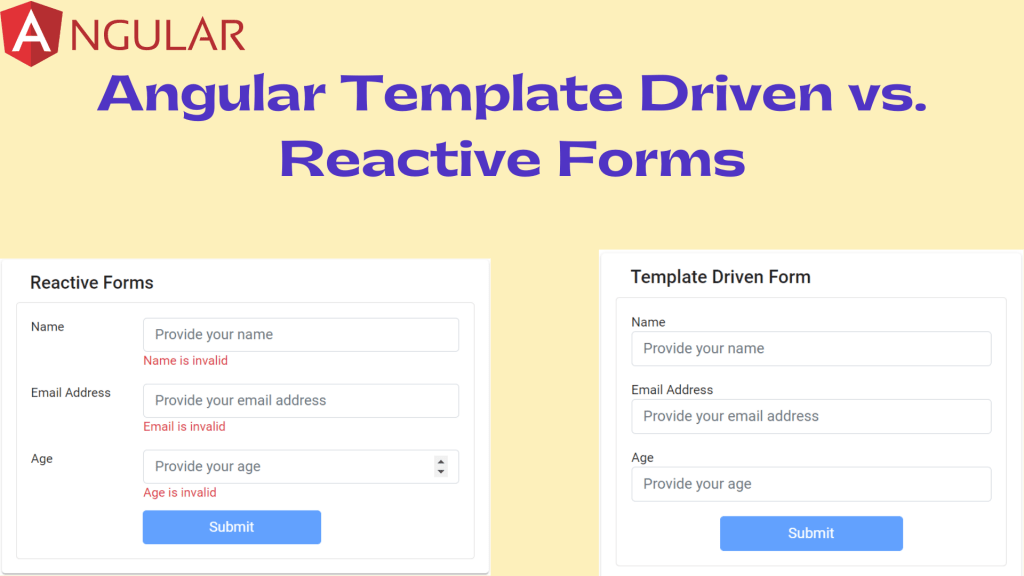
High-level Differences between Template-driven and Reactive Forms
Template-driven forms make use of the “FormsModule”, while reactive forms are based on “ReactiveFormsModule”.
Template-driven forms are asynchronous in nature, whereas Reactive forms are mostly synchronous.
In a template-driven approach, most of the logic is driven from the template, whereas in reactive-driven approach, the logic resides mainly in the component or typescript code. Let us get started by generating a component and then we’ll update our form code.
Both the above approaches of template-driven and Reactive Forms have few common building blocks holding the following attributes,
FormControl:
FormControl is used mainly for monitoring user input and authentication of the individual form control.
FormGroup:
FormGroup used to track the same values and authentication status for a collection of a form of control.
FormArray:
FormArray tracks the same values and status for the array of the form control.
ControlValueAccessor:
ControlValueAccessor is used to develop a distance between Angular native DOM and form control elements.
Template-Driven Forms
A template-driven form is the simplest way to build a form in Angular. It uses Angular’s two-way data-binding directive (ngModel) to create and manage the underlying form instance.
Additionally, as the name suggests, a template form is mainly driven by the view component. So, it uses directives placed in HTML rather than TypeScript or JavaScript to manage the form. A template-driven form is asynchronous due to the use of “directives” because the creation of form controls is delegated to the declared directives (IoC).
Pros
Using template-driven forms has several advantages:
- The entire form gets managed in the view template, it increases the initial simplicity of the form, as you do not need to manage multiple files for one form.
- It is HTML-based. Therefore, you can add validators to your input fields that you are already using with vanilla HTML.
Cons
However, using template-driven forms has minor drawbacks, too. A few common disadvantages are:
- As the form keeps growing, the view templates get cluttered, making the code difficult to read. Thus, it gets harder to maintain, resulting in a less scalable approach.
- The complex validation code becomes coupled with the template. So, it is difficult to write unit tests for the validation logic. The code becomes less testable and more susceptible to bugs.
- It isn’t easy to write complex validation code directly in the template. This makes it challenging to use custom validators for input fields as it requires you to create custom directives for a custom validator.
- Template-driven forms are asynchronous; it takes a second or two to recreate the form. Therefore, accessing the form values in the component class will sometimes result in inaccurate values.
Understanding Template-Driven Forms with Example
Let’s create an Angular application using below command, here we named as application as “angular-template-driven-and-reactive-forms”.
ng new angular-template-driven-and-reactive-forms
// We set Routing as Yes and style as css
To use template-driven forms, Angular requires the FormsModule to be imported into AppModule (app.module.ts). On below you can see the FormsModule imported on line no# 19. Also we added material component in angular using below command and then we register it in app.module.ts to access globally.
ng add @angular/materialThis import will create the directives required for template-driven forms to be available throughout the app.
import { NgModule } from '@angular/core';
import { FormsModule, ReactiveFormsModule } from '@angular/forms';
import { BrowserModule } from '@angular/platform-browser';

import { AppComponent } from './app.component';
import { ReactiveFormComponent } from './components/reactive-form/reactive-form.component';
import { TemplateDrivenComponent } from './components/template-driven/template-driven.component';
import { BrowserAnimationsModule } from '@angular/platform-browser/animations';
import { MatCardModule } from "@angular/material/card";
import { MatButtonModule } from "@angular/material/button";
@NgModule({
  declarations: [
    AppComponent,
    ReactiveFormComponent,
    TemplateDrivenComponent
  ],
  imports: [
    BrowserModule,
    FormsModule,
    ReactiveFormsModule,
    BrowserAnimationsModule,
    MatCardModule,
    MatButtonModule
  ],
  providers: [],
  bootstrap: [AppComponent]
})
export class AppModule { }
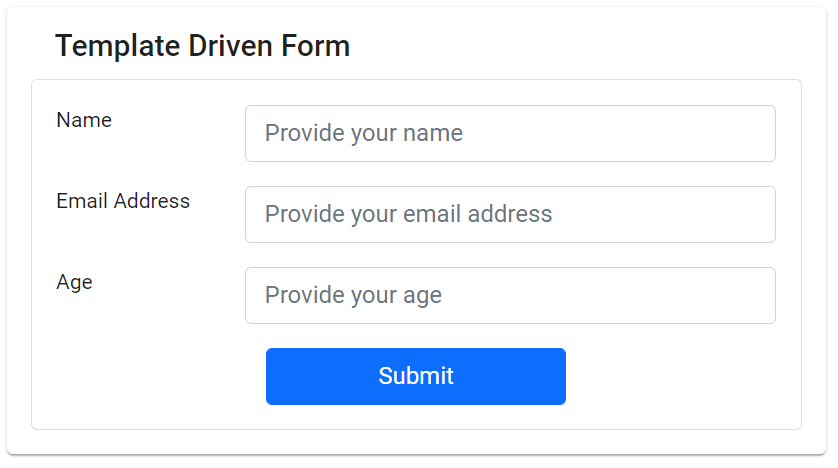
Design Template Driven design Form
Here we create a new component named “template-driven” under components folder and the design look like below,
<mat-card class="example-card">
  <mat-card-header>
    <mat-card-title>
      Template Driven Form
    </mat-card-title>
  </mat-card-header>
  <mat-card-content>
    <div class="card">
      <div class="card-body">
        <div class="row justify-content-sm-center">
            <form>
              <div class="form-group">
                <div class="row">
                  <div class="col-md-3"><label>Name</label></div>
                  <div class="col-md-9">
                    <input class="form-control" placeholder="Provide your name" type="text" autocomplete="off" />
                  </div>
                </div>
              </div>
              <div class="form-group mt-3">
                <div class="row">
                  <div class="col-md-3"> <label>Email Address</label></div>
                  <div class="col-md-9">
                    <input class="form-control" placeholder="Provide your email address"  autocomplete="off" />
                  </div>
                </div>
              </div>
              <div class="form-group mt-3">
                <div class="row">
                  <div class="col-md-3"><label>Age</label></div>
                  <div class="col-md-9">
                    <input class="form-control" placeholder="Provide your age" autocomplete="off"  />
                  </div>
                </div>
              </div>
              <div class="form-group mt-3 col-md-12" style="text-align: center;">
                  <button type="submit" class="btn btn-primary" style="width: 200px">
                    Submit
                  </button>
              </div>
            </form>
        </div>
      </div>
    </div>
  </mat-card-content>
</mat-card>
When you run the application you can see the below output like below.
Adding the Template-Driven Directives to the Form
As shown in the previous code snippet, the fields get wrapped in the <form> </form> tags. With the help of the FormsModule, bind Angular-specific directives to the form to create the template-driven form.
Then, we define the structure of the form by declaring its controls. Ensure that the form outputs an object containing the keys as the field name and the value entered.
We do place the directive ngModel (provided by FormsModule ) on the input field that you want to mark as a control. Add the HTML name attribute to define the the key that the form uses for the data model.
<!-- placing the ngModel directive and the NAME attribute (for data structure definition) on the form controls initially declared -->
<input class="form-control" placeholder="Provide your name" autocomplete="off" ngModel name="name" />
<input class="form-control" placeholder="Provide your email address" autocomplete="off" ngModel name="emailAddress"/>
<input class="form-control" placeholder="Provide your age" autocomplete="off" ngModel name="age"/>
Adding Validations to the Fields
Template-driven forms allow you to add validations easily by binding the native HTML validators to the input fields. For our form, let’s make all the fields as required and add property input types as shown in the following code.
<!-- Adding the HTML Validators to the Form Controls -->
<input class="form-control" placeholder="Provide your name" type="text" autocomplete="off" ngModel name="name" required type="text" />
<input class="form-control" placeholder="Provide your email address"  autocomplete="off" ngModel name="emailAddress"  required type="email"/>
<input class="form-control" placeholder="Provide your age" autocomplete="off" ngModel name="age" required type="number"  />
Submitting the Form and Computing Validation Errors
To submit the form, we require two things:
- A submit event.
- Access to the data on the form.
In Angular, the ngSubmit directive declares the submit event for the form. Therefore, when the Submit button is clicked, the event handler for ngSubmit() is executed. The callback for the event is declared in the component class. For the event, we have to pass the form values. To do this, create a local reference to the form of type ngForm.
Template Form
<form #templateDrivenForm="ngForm" (ngSubmit)="handleFormSubmit(templateDrivenForm)">
</form>
Component Class
import { Component, OnInit } from '@angular/core';
import { NgForm } from '@angular/forms';
@Component({
selector: 'app-template-driven',
templateUrl: './template-driven.component.html',
styleUrls: ['./template-driven.component.css']
})
export class TemplateDrivenComponent implements OnInit {
constructor() { }
ngOnInit(): void {
}
handleFormSubmit(form: NgForm): void {
// Form value will print the JavaScript Object.
console.log(form.value);
}
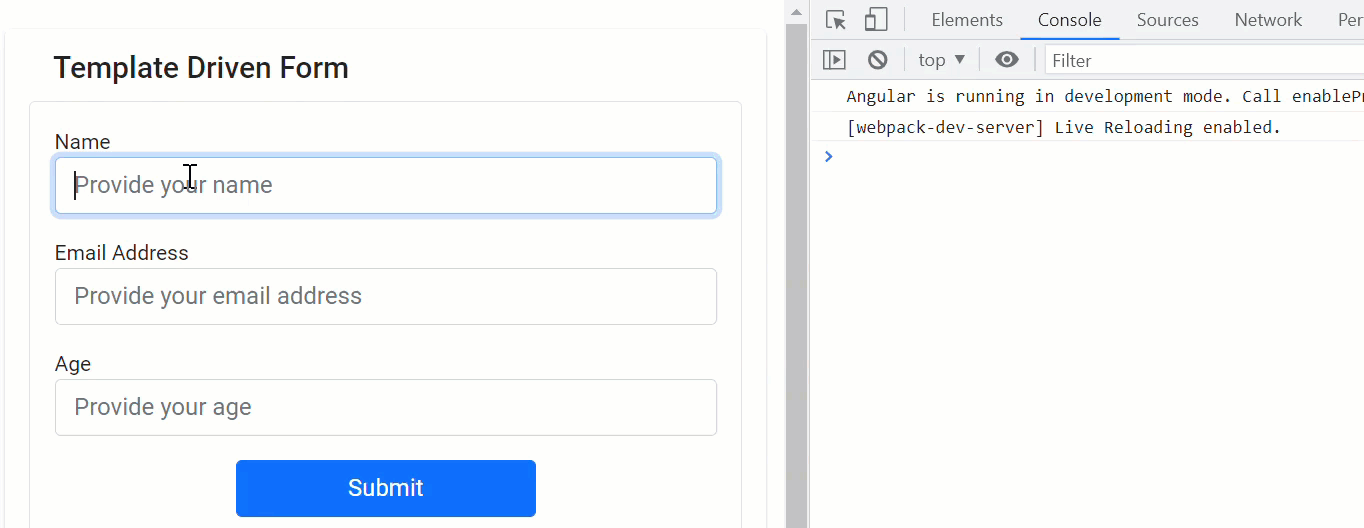
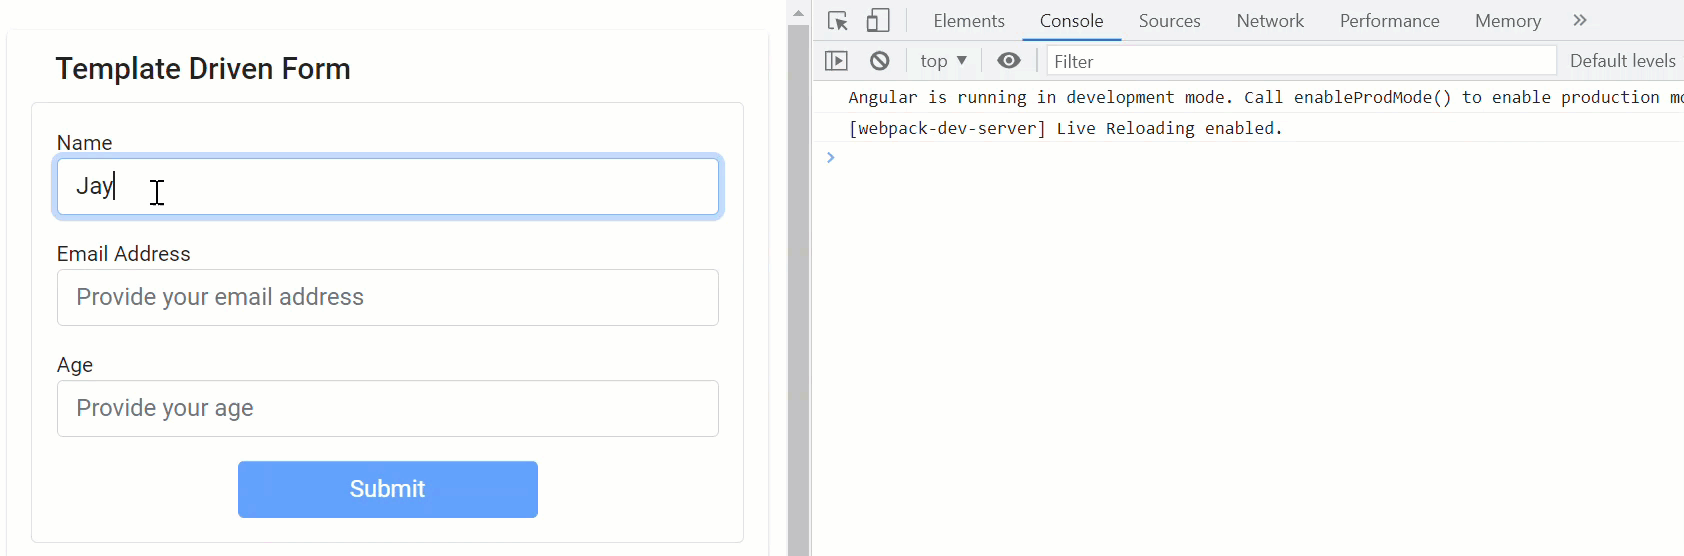
}All is set, let’s run the application and provide input the data and you can see it print the logs in console.
Displaying Validation Errors
To add validation messages, use the local reference, check for individual control errors, and disable the submit action if the form has an error present. The output shows the final form template and validation messages.
<!-- Adding the below span element in each field to check if it is blank or dirty -->
<input class="form-control" placeholder="Provide your email address"  autocomplete="off" ngModel name="emailAddress"  required type="email"/>
<span class="text-danger" *ngIf="templateDrivenForm.controls['emailAddress']?.invalid && templateDrivenForm.controls['emailAddress'].dirty">
Email is required
</span>

<input class="form-control" placeholder="Provide your age" autocomplete="off" ngModel name="age" required type="number"  />
<span class="text-danger" *ngIf="templateDrivenForm.controls['age']?.invalid && templateDrivenForm.controls['age'].dirty">
Age is required
</span>

 <button type="submit" class="btn btn-primary" style="width: 200px" [disabled]="templateDrivenForm.invalid">
 Submit
 </button>
We make the button as “disable” since all the input are typed correctly, let’s see how validation works.
The final Angular Template driven template file look like below. I hope you can now able to clear how the template driven work and how we can check the validation and submit data into component.
<mat-card class="example-card">
  <mat-card-header>
    <mat-card-title>
      Template Driven Form
    </mat-card-title>
  </mat-card-header>
  <mat-card-content>
    <div class="card">
      <div class="card-body">
        <div class="row justify-content-sm-center">
            <form #templateDrivenForm="ngForm" (ngSubmit)="handleFormSubmit(templateDrivenForm)">
              <div class="form-group">
                <div class="row">
                  <div class="col-md-3"><label>Name</label></div>
                  <div class="col-md-9">
                    <input class="form-control" placeholder="Provide your name" type="text" autocomplete="off" ngModel name="name" required type="text" />
                    <span class="text-danger" *ngIf="templateDrivenForm.controls['name']?.invalid && templateDrivenForm.controls['name'].dirty">
                      Name is required
                   </span>
                  </div>
                </div>
              </div>
              <div class="form-group mt-3">
                <div class="row">
                  <div class="col-md-3"> <label>Email Address</label></div>
                  <div class="col-md-9">
                    <input class="form-control" placeholder="Provide your email address"  autocomplete="off" ngModel name="emailAddress"  required type="email"/>
                    <span class="text-danger" *ngIf="templateDrivenForm.controls['emailAddress']?.invalid && templateDrivenForm.controls['emailAddress'].dirty">
                      Email is required
                    </span>
                  </div>
                </div>
              </div>
              <div class="form-group mt-3">
                <div class="row">
                  <div class="col-md-3"><label>Age</label></div>
                  <div class="col-md-9">
                    <input class="form-control" placeholder="Provide your age" autocomplete="off" ngModel name="age" required type="number"  />
                    <span class="text-danger" *ngIf="templateDrivenForm.controls['age']?.invalid && templateDrivenForm.controls['age'].dirty">
                      Age is required
                    </span>
                  </div>
                </div>
              </div>
              <div class="form-group mt-3 col-md-12" style="text-align: center;">
                  <button type="submit" class="btn btn-primary" style="width: 200px" [disabled]="templateDrivenForm.invalid">
                    Submit
                  </button>
              </div>
            </form>
        </div>
      </div>
    </div>
  </mat-card-content>
</mat-card>
Reactive Forms
Another way to develop forms in Angular is to use reactive forms. Reactive forms utilize the component class to programmatically declare the form controls and the required validators synchronously.
We then bind the controls to the input fields in the HTML template. Reactive forms use classes such as FormGroup and FormControl to define groups and controls wired to the template.
Pros
- The business logic (validations) and control declaration are isolated from the view template. The view template is solely responsible for the look and feel of the form. This increases scalability, readability, and maintainability.
- As the validation logic gets declared in the component class, unit tests are easily written for the logic to ensure the code is bug-free.
- Reactive forms take away the complexity of writing custom validators. They allow you to define custom validator functions and bind them to the form during declaration.
- Due to its synchronous nature, developers can access and update any form control (child or parent) readily available in the code.
Cons
- They are complex to use for first-time developers. The Reactive Forms Module requires an in-depth understanding of the API, creating a high learning curve.
- There is no way to disable inputs using the disabled attribute on an HTML control unless we manually disable it using the FormControl programmatically.
Understanding Reactive Forms with Example
Angular requires the ReactiveFormsModule to enable reactive forms for an Angular app. We can add it to the AppModule (app.module.ts) by importing the ReactiveFormsModule.
This import ensures that the classes required to construct reactive forms are available throughout the app.
import { NgModule } from '@angular/core';
import { ReactiveFormsModule } from '@angular/forms';
import { BrowserModule } from '@angular/platform-browser';
import { AppComponent } from './app.component';
@NgModule({
   declarations: [
      AppComponent,
   ],
   imports: [
      BrowserModule,
      // Import the ReactFormsModule to use Reactive Forms in the application.
      ReactiveFormsModule
   ],
   providers: [],
   bootstrap: [AppComponent]
})
export class AppModule { }
Defining the Form Controls
The controls are defined in the Component class in a reactive form, while the layout is defined in the template. Let’s convert the template-driven form we created earlier to a reactive form. To do so, we use a new component (ng g c ReactiveForms). The Reactive Forms Module offers the FormGroup and FormControl classes to build the form. Additionally, it provides built-in validator functions to test for required fields, regex patterns, and more.
You can see the sample form structure with validators and the submit callback in the following code.
import { Component, OnInit } from '@angular/core';
import { FormControl, FormGroup, Validators } from '@angular/forms';

@Component({
  selector: 'app-reactive-form',
  templateUrl: './reactive-form.component.html',
  styleUrls: ['./reactive-form.component.css']
})
export class ReactiveFormComponent implements OnInit {

  myreactiveForm!: FormGroup;

  ngOnInit(): void {
    // create an instance of form group
    // for the object passed, the key identifies the control name, the value identifies the actual control
    // the Validators provides validator functions that need to be applied to the control value
    this.myreactiveForm = new FormGroup({
      'name': new FormControl('', [Validators.required]),
      'emailAddress': new FormControl('', [Validators.required, Validators.email]),
      'age': new FormControl('', [Validators.required, Validators.pattern('^[0-9]+$')])
    });
  }

  handleSubmit() {
    console.log(this.myreactiveForm.value);
  }
}
Configuring the Template
After configuring the structure, validators, and submit events, define the template for the form and use the directives ngForm and formControlName to bind the declared form for the view.
This code binds the initialized form as the form group on the <form> tag and binds the controls by the formControlName directive. The value placed here is the value declared during initialization.
<mat-card class="example-card">
<mat-card-header>
<mat-card-title>
Reactive Forms
</mat-card-title>
</mat-card-header>
<mat-card-content>
<div class="card">
<div class="card-body">
<div class="row justify-content-sm-center">
<div class="col-sm">
<form [formGroup]="myreactiveForm" (ngSubmit)="handleSubmit()">
<div class="form-group">
<div class="row">
<div class="col-md-3"><label>Name</label></div>
<div class="col-md-9">
<input class="form-control" placeholder="Provide your name" type="text" formControlName="name" autocomplete="off" />
<span class="text-danger" *ngIf="myreactiveForm.get('name')?.invalid && myreactiveForm.get('name')?.touched">
Name is invalid
</span>
</div>
</div>
<div class="row mt-3">
<div class="col-md-3"><label>Email Address</label></div>
<div class="col-md-9">
<input class="form-control" placeholder="Provide your email address" required type="email"
formControlName="emailAddress" autocomplete="off"/>
<span class="text-danger"
*ngIf="myreactiveForm.get('emailAddress')?.invalid && myreactiveForm.get('emailAddress')?.touched">
Email is invalid
</span>
</div>
</div>
<div class="row mt-3">
<div class="col-md-3"><label>Age</label></div>
<div class="col-md-9">
<input class="form-control" placeholder="Provide your age" type="number" formControlName="age" autocomplete="off"/>
<span class="text-danger" *ngIf="myreactiveForm.get('age')?.invalid && myreactiveForm.get('age')?.touched">
Age is invalid
</span>
</div>
</div>
<div class="form-group">
<div style="margin-top: 10px;">
<button type="submit" class="btn btn-primary" style="margin-left: auto; width: 30%; text-align: center;margin-left: 125px;width: 200px;"
[disabled]="myreactiveForm.invalid">
Submit
</button>
</div>
</div>
</div>
</form>
</div>
</div>
</div>
</div>
</mat-card-content>
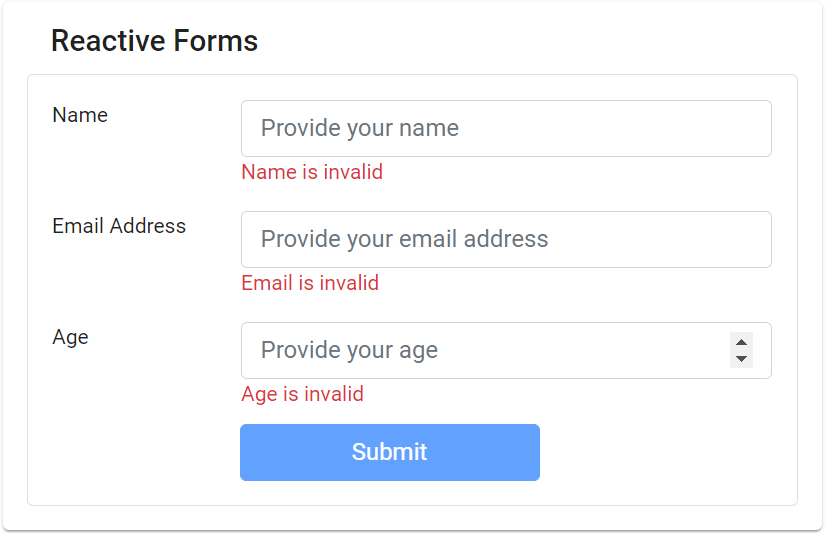
</mat-card>Output of Reactive Form
When to Use a Template Driven Form
It is essential to know when to use a template-driven form in Angular app. You may use a template-driven form if:
- If your form is small to medium scale (around 10 controls with no steps).
- If your form utilizes the validation attributes integrated with HTML without complex validation.
- If your form has basic requirements that can be managed within the template with minimal lines of code.
When to Use a Reactive Form
If the learning time and added use of the API are not a bother to you, you should consider using a reactive form in these cases:
- If your form has a lot of controls with many groups (children) that require complex validation logic.
- If you have validation code reused in multiple forms across your app. Reactive forms will help reuse the validation logic to avoid code duplication, thus making your code scalable.
- If you want your form data model to be immutable. Reactive forms return a new state when a change occurs in the form.
- To include unit tests for your validation code. As the validators are decoupled from the template, it increases its testability.
Source Code
Conclusion
Angular Template Driven vs. Reactive Forms – Angular takes away the added complexity of building forms by providing two modules: template-driven and reactive forms. There is no best way to create a form. You can use either of the two modules based on your use case.
It is recommend using a template-driven form to build simple forms with minimal validation. But if you require granular control of input fields with asynchronous and complex validators, reactive forms are the ones for you.
Leave behind your valuable queries and suggestions in the comment section below. Also, if you think this article helps you, do not forget to share this with your developer community. Happy Coding 🙂
Related Articles
- Deploying Angular apps in Azure Blob Storage with CI/CD Integration 🚀
- Building a Chatbot in Angular using Gemini API
- Create a responsive sidebar with Angular Material- Angular 18 Example Series
- How to Deploy Angular 17/18 App in GitHub Pages
- How to convert Text To Speech With Azure Cognitive Services using Angular and .Net Core
Jayant Tripathy
Coder, Blogger, YouTuberA passionate developer keep focus on learning and working on new technology.