
In this article we will discuss about ngIf directive in Angular. The ngIf directive is an Angular Structural Directive that allows us to add/remove DOM elements based on a condition. Using example code, we will demonstrate how to use ngIf. We will also learn how to use the ng-optional template’s else clause and optional then clause. Please read my previous article about ngSwitch Directive in Angular.
Syntax
<p *ngIf="condition">
    content to render, when the condition is true
</p>
The ngIf is attached to a DOM element ( p element in the above example). ngIf is a structural directive, which means that you can add it to any element like div, p, h1, component selector, etc. Like all structural directive, it is prefixed with * asterisk.
The condition can be anything. It can be a property of the component class. It can be a method in the component class. But it must evaluate as true/false. The ngIf directive tries to coerce the value to Boolean.
Angular ngIf Directive
The ngIf is a structural directive and it is used to add or removes the HTML element and its descendant elements from the DOM layout at runtime conditionally. That means it conditionally shows the inline template.
The ngIf directive works on the basis of a boolean true and false results of a given expression. If the condition is true, the elements will be added into the DOM layout otherwise they simply removed from the DOM layout.
The basic syntax of the ngIf directive is very simple, all we need to do is prefix the directive name with an asterisk (*) as shown below and add it anywhere inside your template. Here if the given “expression” result is false or null, then the elements HTML element and its descendant elements will not be added to the DOM.
*ngIf = "expression"Example to understand Angular ngIf Directive
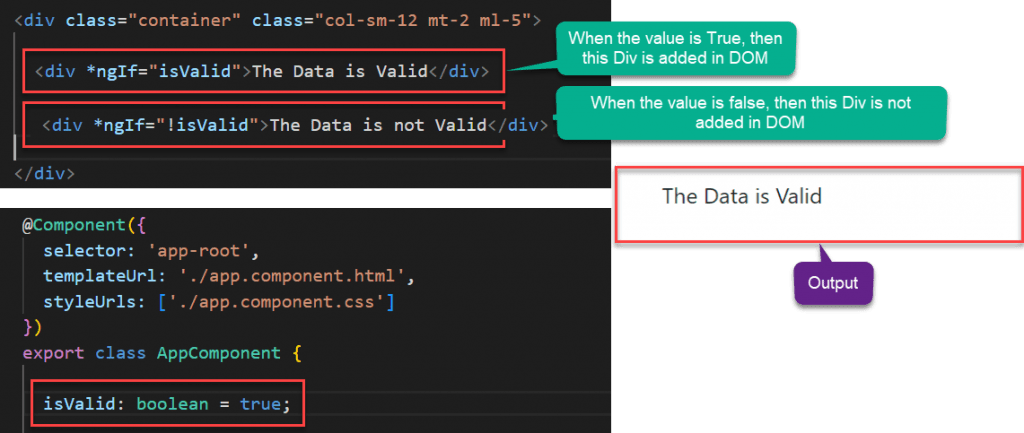
We have two div Element and we are using the ngIf directive to add or remove the div from the DOM. If the isValid (this is a variable defined in the component class) value is true, then the first div is going to be added into the DOM and if the value is false, then the second div is not going to be added into the DOM.
ngIf does not hide the DOM element. It removes the entire element along with its subtree from the DOM. It also removes the corresponding state freeing up the resources attached to the element.
ngIf condition on RadioButton
We will create two radio buttons and based on the selected radio button value we will set the IsValid property value.
import { Component, EventEmitter, Input, Output } from '@angular/core';

@Component({
  selector: 'app-root',
  templateUrl: './app.component.html',
  styleUrls: ['./app.component.css']
})
export class AppComponent {

  isValid: boolean = true;
  ChangeRadioButton(valid: boolean) {
    this.isValid = valid;
  }
}
We have created two radio buttons with the name radio button. Then we attach our method ChangeRadioButton to the click event of the radio button. For the Valid radio button, we are passing true to the ChangeRadioButton method and for the Invalid radio button, we are passing false to the ChangeRadioButton method.
<div class="container" class="col-sm-12 mt-2 ml-5">

  <input type="radio" name="rb" (click)="ChangeRadioButton(true)" checked> Valid
  <input type="radio" name="rb" (click)="ChangeRadioButton(false)"> Invalid

  <div *ngIf="isValid">The Data is Valid</div>

  <div *ngIf="!isValid">The Data is not Valid</div>

</div>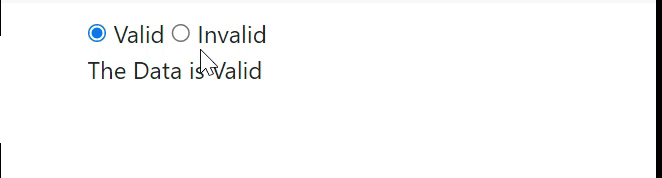
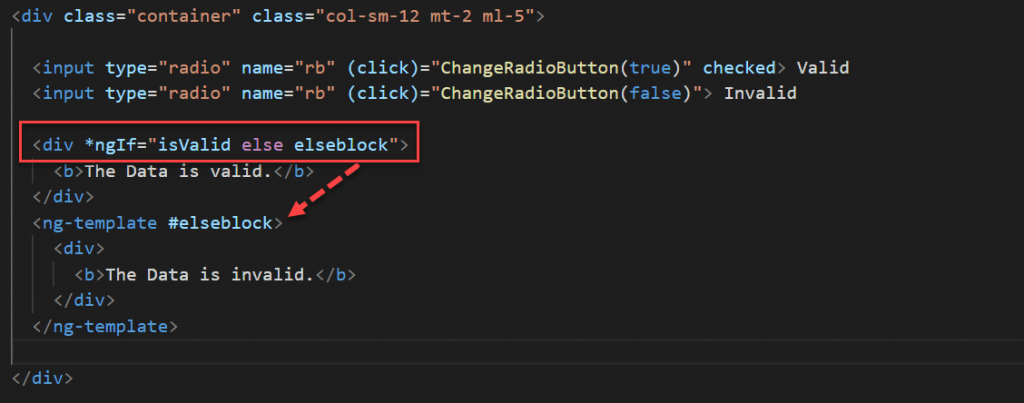
Angular NgIf directive with else block
Like other programming languages such as C, Java, and C#, the else is also used when you want to display something for the false condition of NgIf block.
<div *ngIf="condition; else elseBlock">
    content to render, when the condition is true
</div>

<ng-template #elseBlock>
    content to render, when the condition is false
</ng-template>
As on the below image, if the condition is false, then it will look for the else block. As we created the else block with the name elseblock, so it searches for ng-template tag followed by template variable name (<ng-template #elseblock>) and add that block to the DOM.
<div class="container" class="col-sm-12 mt-2 ml-5">

  <input type="radio" name="rb" (click)="ChangeRadioButton(true)" checked> Valid
  <input type="radio" name="rb" (click)="ChangeRadioButton(false)"> Invalid

  <div *ngIf="isValid else elseblock">
    <b>The Data is valid.</b>
  </div>
  <ng-template #elseblock>
    <div>
      <b>The Data is invalid.</b>
    </div>
  </ng-template>

</div>
NgIf with Then and else
The NgIf with then and else is used as follows. When the condition is true then the with the reference variable then block is executed and when the condition is false then the with the reference variable else block is executed.
<div *ngIf="condition; then thenBlock else elseBlock">
    This content is not shown
</div>

<ng-template #thenBlock>
    content to render when the condition is true.
</ng-template>

<ng-template #elseBlock>
    content to render when condition is false.
</ng-template>
We can have more than one <ng-template> for then and else block and at runtime, we can switch to that ng-template by changing the value of then block and else block. At any given point of time, one ng-template is going to be executed. So the HTML file can be change like this,
<div class="container" class="col-sm-12 mt-2 ml-5">

  <input type="radio" name="rb" (click)="ChangeRadioButton(true)" checked> Valid
  <input type="radio" name="rb" (click)="ChangeRadioButton(false)"> Invalid

  <div *ngIf="isValid then thenblock else elseblock"> </div>
  <ng-template #thenblock>
    <div>
      <b>This is Then Block</b>
    </div>
  </ng-template>

  <ng-template #elseblock>
    <div>
      <b>This is Else Block</b>
    </div>
  </ng-template>

</div>
Conclusion
In this article we discussed about ngIf directive in Angular. The ngIf directive is an Angular Structural Directive that allows us to add/remove DOM elements based on a condition.
Leave behind your valuable queries and suggestions in the comment section below. Also, if you think this article helps you, do not forget to share this with your developer community. Happy Coding 🙂
Related Articles
- Deploying Angular apps in Azure Blob Storage with CI/CD Integration 🚀
- How to resolve Function App Cannot Create within Azure Portal
- Building a Chatbot in Angular using Gemini API
- Create a responsive sidebar with Angular Material- Angular 18 Example Series
- How to Deploy Angular 17/18 App in GitHub Pages
- How to convert Text To Speech With Azure Cognitive Services using Angular and .Net Core
- Angular Interceptors- The Complete Guide
- Upload Download and Delete files in Azure Blob Storage using ASP.NET Core and Angular
- Introduction to Azure Cosmos DB
- How to create Cosmos DB in Azure
Jayant Tripathy
Coder, Blogger, YouTuberA passionate developer keep focus on learning and working on new technology.