
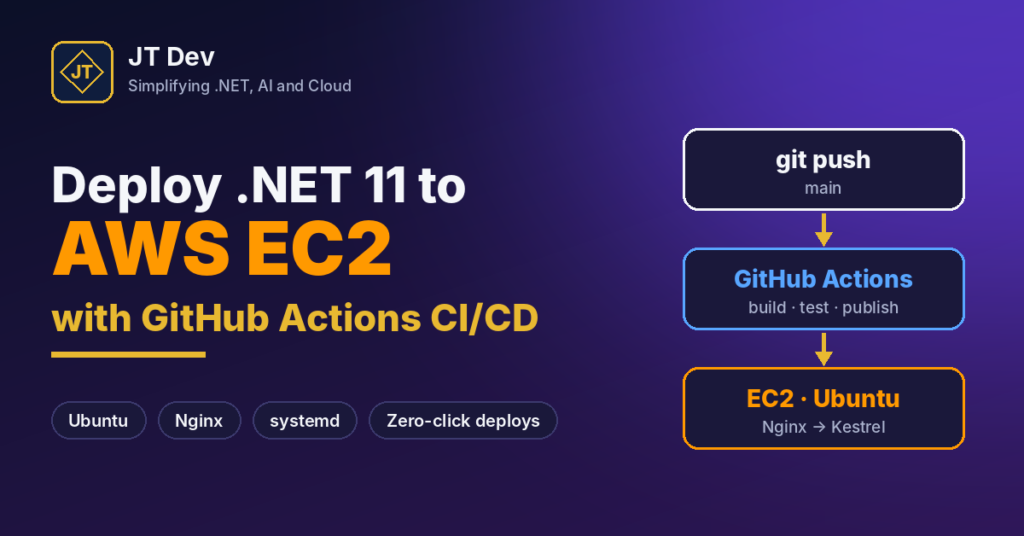
In this article we will learn about How to Deploy a .NET 11 Web API to AWS EC2 with GitHub Actions CI/CD. I still remember my first “deployment” to a cloud VM. I published the app on my laptop, zipped the folder, copied it with WinSCP, logged in, stopped the old process, unzipped, started it again, and then realised I had copied the Debug build. It took 25 minutes and I was nervous every single time.
In this guide we’ll remove every one of those manual steps. You push code to GitHub, and a pipeline builds it, runs the tests, copies it to an Ubuntu EC2 server, switches it live behind Nginx and checks that it’s healthy. If something goes wrong, you roll back with one command.
Quick answer: publish your .NET 11 API as a self-contained
linux-x64app in GitHub Actions, copy it to the EC2 instance withrsyncover SSH into a new release folder, point acurrentsymlink at it, and restart asystemdservice that runs Kestrel behind Nginx. The server needs no .NET runtime at all.
Please read my previous article on Build Your First MCP Server in .NET 10 (C#) – Complete Beginner-Friendly Guide.
What we will build here?
- A small .NET 11 Minimal API with a
/healthendpoint and integration tests. - An Ubuntu EC2 instance running the API as a systemd service, with Nginx as the reverse proxy.
- A GitHub Actions workflow with two jobs: build (restore, build, test, publish) and deploy (copy, switch, restart, health check).
- A release-folder layout that keeps the last five versions, so rolling back takes seconds.
git push (main)
   -> GitHub Actions: restore, build, test, publish linux-x64
   -> rsync over SSH to /var/www/jtdev-api/releases/<commit>
   -> current symlink switched, systemd restarts the app
   -> Users -> Nginx :80 -> Kestrel :5000
Prerequisites
- An AWS account. New accounts get a credit-based free plan, and the EC2 console marks eligible instance types as Free tier eligible.
- A GitHub account and a repository for the code.
- The .NET 11 SDK on your machine (
dotnet --list-sdksshould show 11.0.x). - An SSH client. Windows 10 and 11 already include OpenSSH, so
sshworks in PowerShell.
Step 1 – Create the .NET 11 Web API
Create a solution with an API project and a test project:
dotnet new sln -n JtDev.Ec2Demo
dotnet new webapi -n JtDev.Ec2Demo.Api -o src/JtDev.Ec2Demo.Api -f net11.0
dotnet new xunit -n JtDev.Ec2Demo.Api.Tests -o tests/JtDev.Ec2Demo.Api.Tests -f net11.0
dotnet sln add src/JtDev.Ec2Demo.Api tests/JtDev.Ec2Demo.Api.Tests
dotnet add tests/JtDev.Ec2Demo.Api.Tests reference src/JtDev.Ec2Demo.Api
dotnet add tests/JtDev.Ec2Demo.Api.Tests package Microsoft.AspNetCore.Mvc.Testing
Replace Program.cs in the API with this. Two things matter for EC2: forwarded headers (because Nginx sits in front of Kestrel) and a version field, so you can see which commit is live:
using System.Reflection;
using System.Runtime.InteropServices;
using Microsoft.AspNetCore.HttpOverrides;

var builder = WebApplication.CreateBuilder(args);

builder.Services.AddHealthChecks();

// Nginx sits in front of Kestrel, so trust the X-Forwarded-* headers it sends.
// Nginx connects from 127.0.0.1, which is trusted by default.
builder.Services.Configure<ForwardedHeadersOptions>(options =>
{
    options.ForwardedHeaders = ForwardedHeaders.XForwardedFor | ForwardedHeaders.XForwardedProto;
});

var app = builder.Build();

app.UseForwardedHeaders();

// Stamped by the pipeline with the git commit SHA
string version = Assembly.GetEntryAssembly()?
    .GetCustomAttribute<AssemblyInformationalVersionAttribute>()?
    .InformationalVersion ?? "local";

app.MapGet("/", (HttpContext http) => new
{
    App = "JT Dev - .NET 11 on EC2",
    Version = version,
    Environment = app.Environment.EnvironmentName,
    Framework = RuntimeInformation.FrameworkDescription,
    Server = Environment.MachineName,
    ClientIp = http.Connection.RemoteIpAddress?.ToString()
});

app.MapGet("/api/products", () => new[]
{
    new Product(1, "Mechanical keyboard", 4_499m),
    new Product(2, "Wireless mouse", 1_299m),
    new Product(3, "27-inch monitor", 18_999m),
});

app.MapHealthChecks("/health");

app.Run();

public sealed record Product(int Id, string Name, decimal Price);

// Lets the integration tests use WebApplicationFactory<Program>
public partial class Program;
Add one line to the API’s .csproj:
<PropertyGroup>
  <TargetFramework>net11.0</TargetFramework>
  <Nullable>enable</Nullable>
  <ImplicitUsings>enable</ImplicitUsings>
  <InvariantGlobalization>true</InvariantGlobalization>
</PropertyGroup>
InvariantGlobalization means the app doesn’t need the ICU library on the server. A fresh Ubuntu server image doesn’t always have it, and a missing ICU is one of the most common reasons a .NET app crashes on its first start on Linux. If your app formats dates or currency per culture, leave this off and install the libicu package instead.
Finally, add two quick integration tests. The pipeline runs them before every deployment, and if they fail, nothing goes to EC2:
public class ApiTests(WebApplicationFactory<Program> factory)
    : IClassFixture<WebApplicationFactory<Program>>
{
    private readonly HttpClient _client = factory.CreateClient();

    [Fact]
    public async Task Health_endpoint_returns_200()
    {
        var response = await _client.GetAsync("/health");
        Assert.Equal(HttpStatusCode.OK, response.StatusCode);
    }

    [Fact]
    public async Task Products_endpoint_returns_three_products()
    {
        var products = await _client.GetFromJsonAsync<List<Product>>("/api/products");
        Assert.NotNull(products);
        Assert.Equal(3, products.Count);
    }
}
Run dotnet test locally, then push the code to a new GitHub repository.
Step 2 – Launch an Ubuntu EC2 instance
- Sign in to the AWS Console, open EC2 and click Launch instance.
- Name it, for example jtdev-api-server.
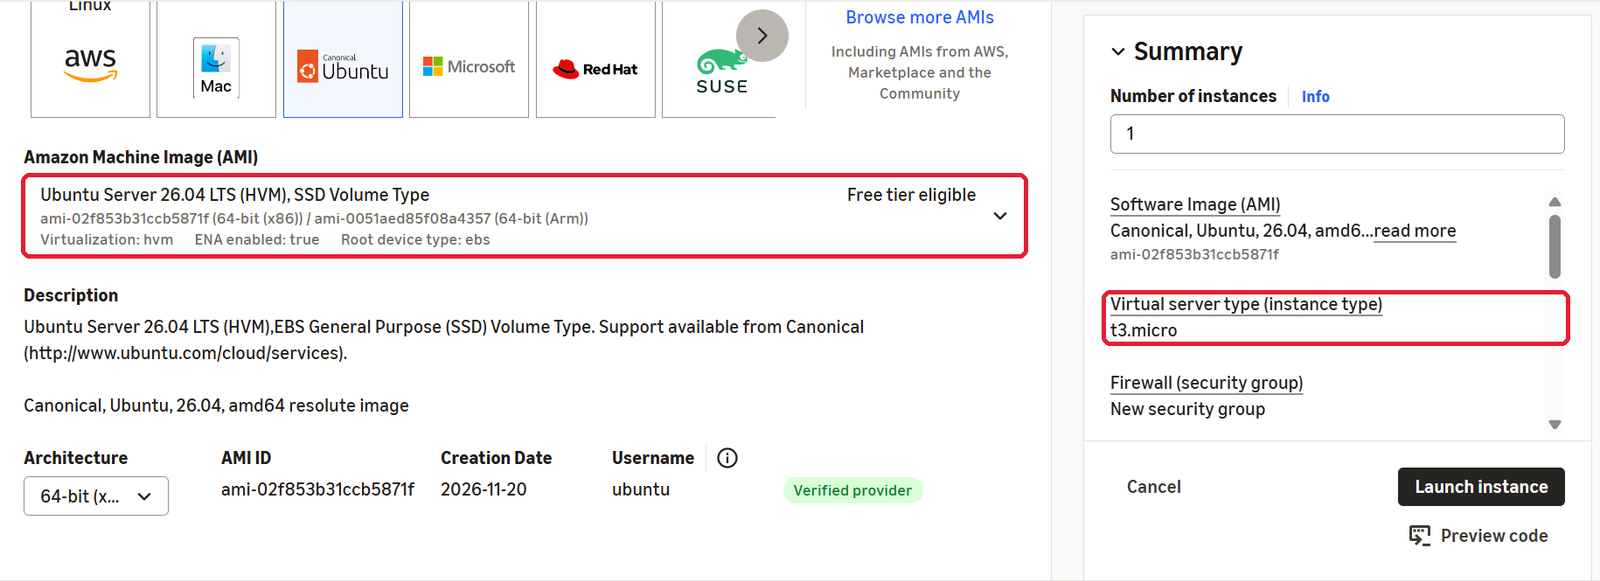
- Under Application and OS Images, choose Ubuntu and select Ubuntu Server 26.04 LTS (24.04 LTS works the same way). Keep the architecture as 64-bit (x86). Don’t pick an “Ubuntu Pro” image; it has an extra hourly charge.
- For Instance type, pick a small type marked Free tier eligible, such as t3.micro. A self-contained API like this one runs comfortably on 1 GB of memory.
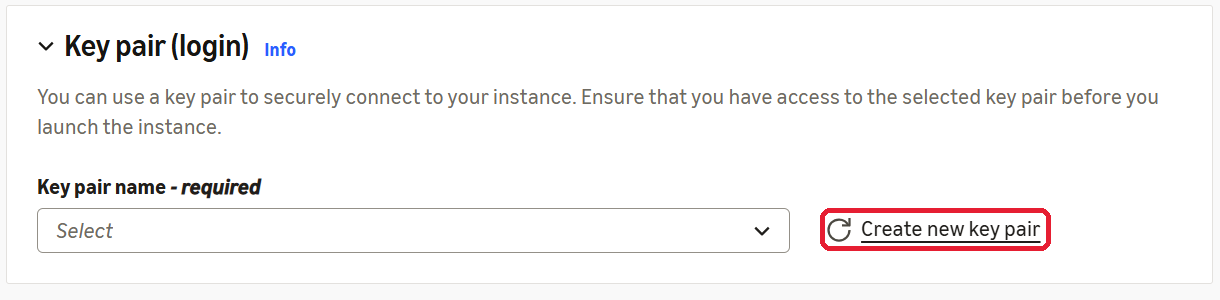
- Under Key pair, click Create new key pair, choose ED25519 and .pem, and download it. This is your admin key; we’ll create a separate key for GitHub later.
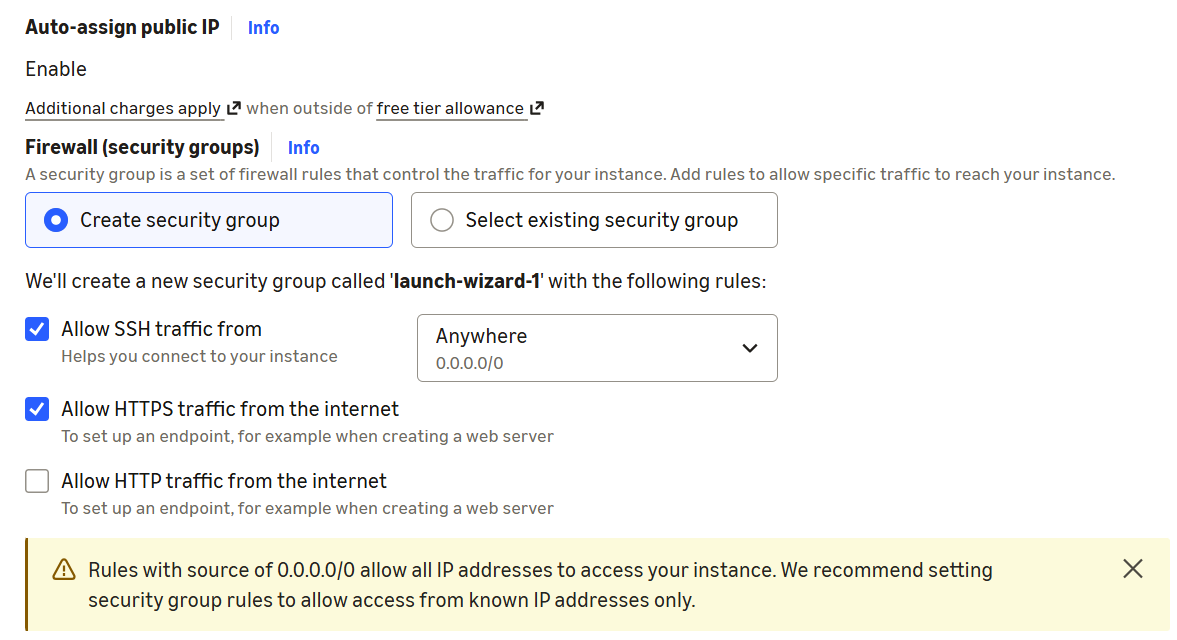
- Under Network settings, keep Create security group selected and tick Allow SSH traffic from: Anywhere (GitHub Actions needs it, see the note below), Allow HTTP traffic from the internet (Nginx serves the API on port 80) and, optionally, Allow HTTPS traffic from the internet for when you add a certificate later. The console shows a yellow warning for the 0.0.0.0/0 rule; that’s expected with this setup.
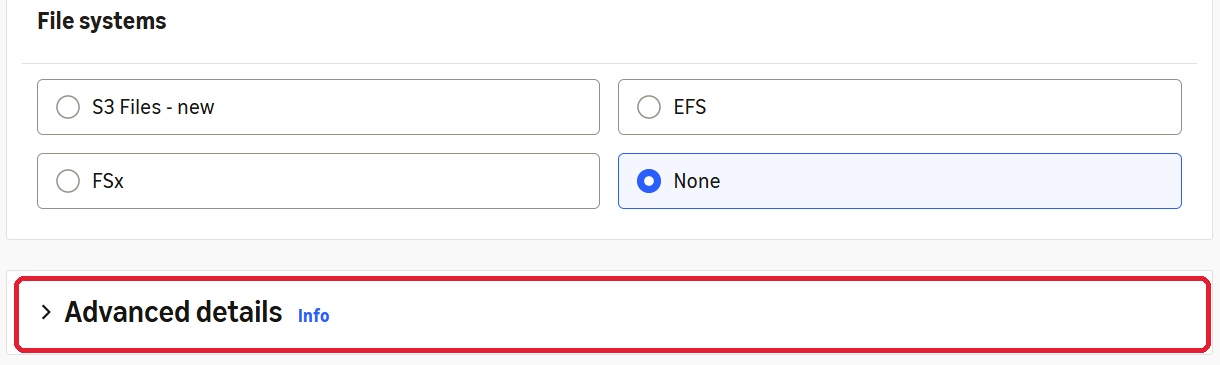
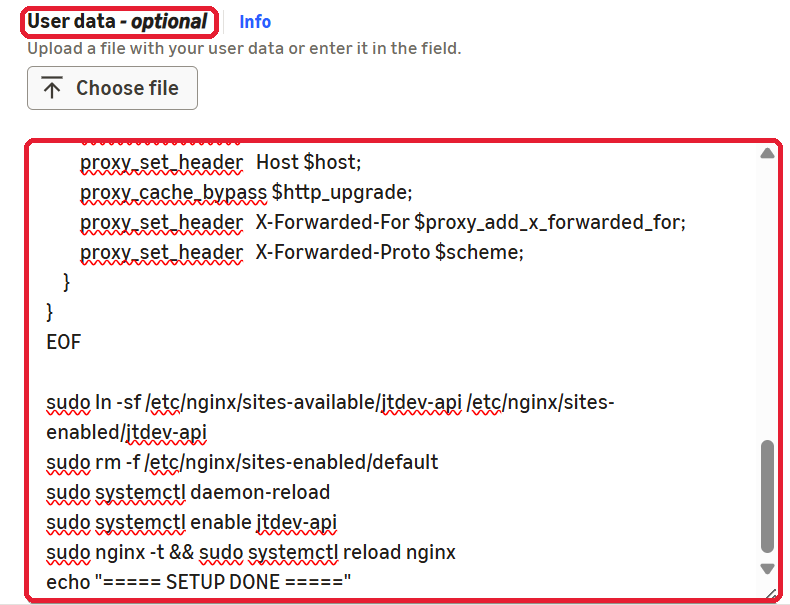
- Expand Advanced details, scroll to the bottom and paste the setup script from Step 3 into the User data box. EC2 runs it automatically on the first boot, so you never have to log in to the server to set it up.
- Click Launch instance.

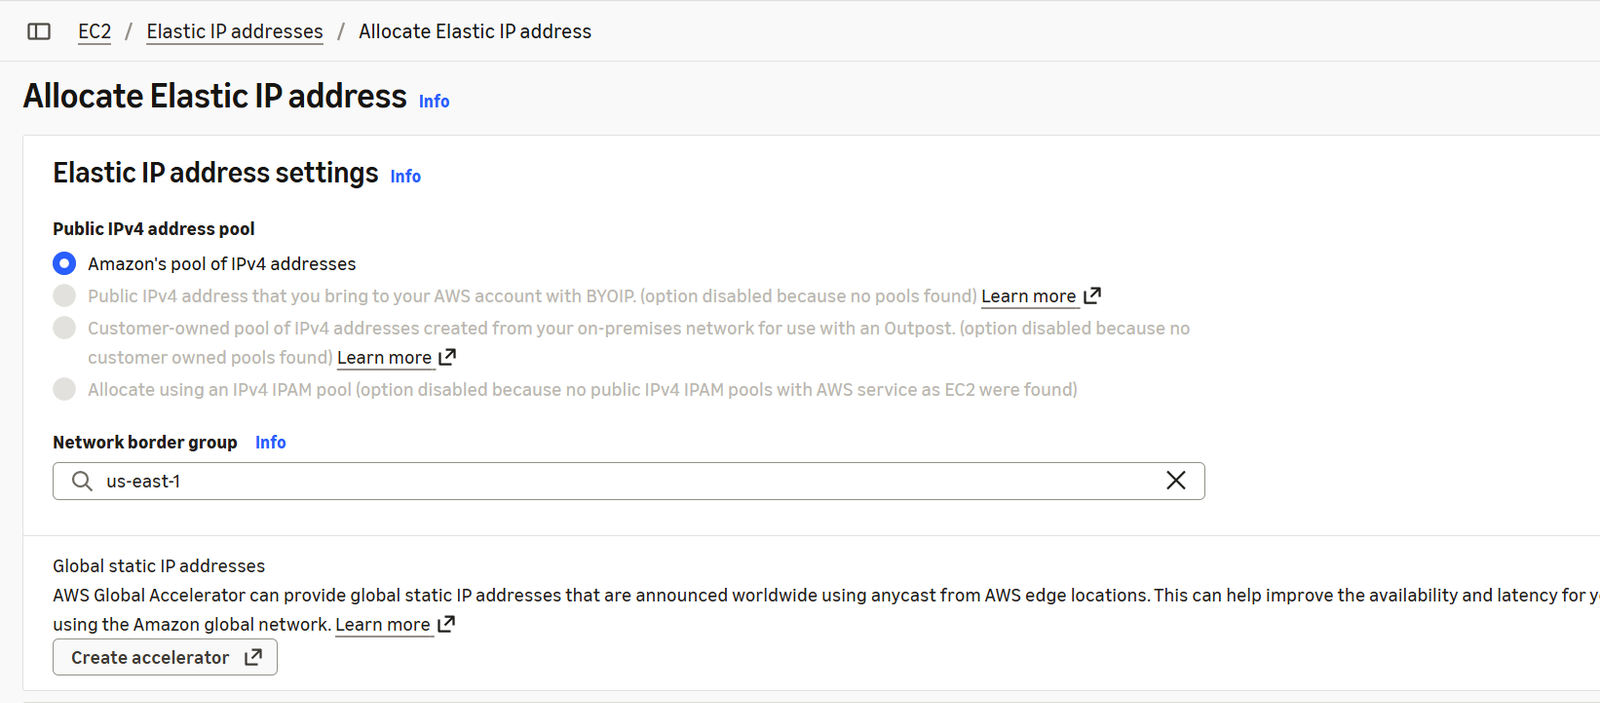
Next, give the server an address that never changes. By default, AWS gives the instance a new public IP every time it stops and starts. Our pipeline stores the server’s address in a GitHub secret, so a changed IP means the next deployment fails. An Elastic IP is a fixed public IP that you reserve and attach to the instance:
- In the EC2 left menu, under Network & Security, click Elastic IPs.
- Click Allocate Elastic IP address, keep the defaults and click Allocate.
- Select the new IP, then click Actions → Associate Elastic IP address.
- Choose Instance as the resource type, pick your instance (jtdev-api-server) and click Associate.
- Open your instance’s details: Public IPv4 address now shows the Elastic IP. Use this address everywhere from now on: for SSH, the
EC2_HOSTsecret andssh-keyscan.
When you no longer need the server, release the Elastic IP too (Actions → Release Elastic IP address), because AWS charges for public IPv4 addresses, including one that isn’t attached to anything.
Security note about port 22: GitHub-hosted runners don’t come from a small, fixed set of IP addresses, so with this SSH approach port 22 usually has to accept connections from anywhere. That’s acceptable for learning and small projects because Ubuntu on EC2 allows key-based login only, but for production consider a self-hosted runner inside your VPC or AWS Systems Manager, which needs no open SSH port at all.
Step 3 – The server setup script (runs automatically)
We need three things on the server: Nginx, a folder for the app and a systemd service. Notice what we don’t install: .NET. We publish the app as self-contained, so it carries its own runtime.
Instead of logging in and typing commands, we let EC2 do it on the first boot. This is the script you paste into the User data box in Step 2:
#!/bin/bash
sudo apt-get update -y && sudo apt-get install -y nginx rsync
sudo mkdir -p /var/www/jtdev-api/releases
sudo chown -R ubuntu:ubuntu /var/www/jtdev-api

sudo tee /etc/systemd/system/jtdev-api.service > /dev/null <<'EOF'
[Unit]
Description=JT Dev .NET 11 Web API
After=network.target

[Service]
WorkingDirectory=/var/www/jtdev-api/current
ExecStart=/var/www/jtdev-api/current/JtDev.Ec2Demo.Api
Restart=always
RestartSec=5
KillSignal=SIGINT
SyslogIdentifier=jtdev-api
User=www-data
Environment=ASPNETCORE_ENVIRONMENT=Production
Environment=ASPNETCORE_URLS=http://127.0.0.1:5000
Environment=DOTNET_NOLOGO=1

[Install]
WantedBy=multi-user.target
EOF

sudo tee /etc/nginx/sites-available/jtdev-api > /dev/null <<'EOF'
server {
    listen 80 default_server;
    listen [::]:80 default_server;
    server_name _;

    location / {
        proxy_pass         http://127.0.0.1:5000;
        proxy_http_version 1.1;
        proxy_set_header   Upgrade $http_upgrade;
        proxy_set_header   Connection keep-alive;
        proxy_set_header   Host $host;
        proxy_cache_bypass $http_upgrade;
        proxy_set_header   X-Forwarded-For $proxy_add_x_forwarded_for;
        proxy_set_header   X-Forwarded-Proto $scheme;
    }
}
EOF

sudo ln -sf /etc/nginx/sites-available/jtdev-api /etc/nginx/sites-enabled/jtdev-api
sudo rm -f /etc/nginx/sites-enabled/default
sudo systemctl daemon-reload
sudo systemctl enable jtdev-api
sudo nginx -t && sudo systemctl reload nginx
echo "===== SETUP DONE ====="
What the script sets up
- A systemd service called
jtdev-api. It starts the app on boot, restarts it if it crashes and collects its logs. Kestrel listens only on127.0.0.1:5000, so nobody can reach it directly from the internet, and the app runs as the low-privilegewww-datauser. - An Nginx site that forwards everything on port 80 to Kestrel and passes the real client details in the
X-Forwarded-*headers. - The app folder
/var/www/jtdev-api/releases, owned byubuntu, the user GitHub Actions logs in as. - The service is enabled but not started. There’s no app yet; the first deployment starts it.
Check that it worked
Give the instance two or three minutes after launch, then open http://<your-elastic-ip> in your browser. If you see a 502 Bad Gateway page from nginx, everything is ready: Nginx is running and simply has no app to forward to until the first deployment.
Already launched the instance without User data? No problem. User data only runs on the first boot, so adding it later won’t help, but you can run the same script from the browser: select the instance, click Connect → EC2 Instance Connect → Connect, paste the whole script into the terminal that opens and press Enter. Wait for
===== SETUP DONE =====.
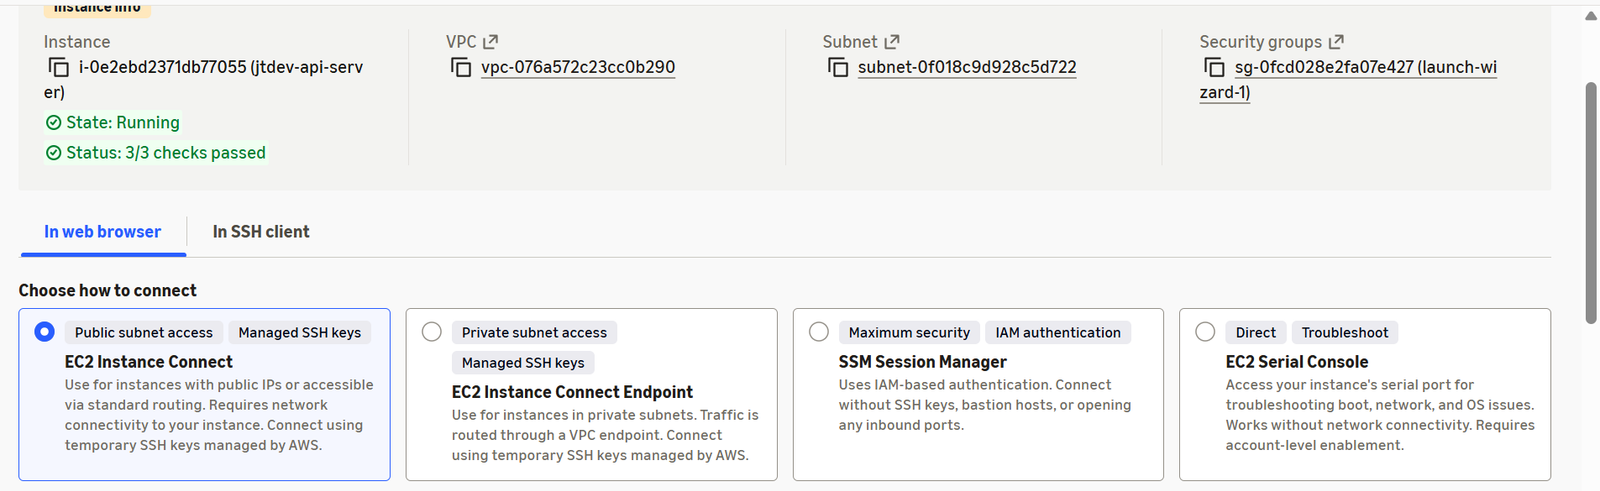
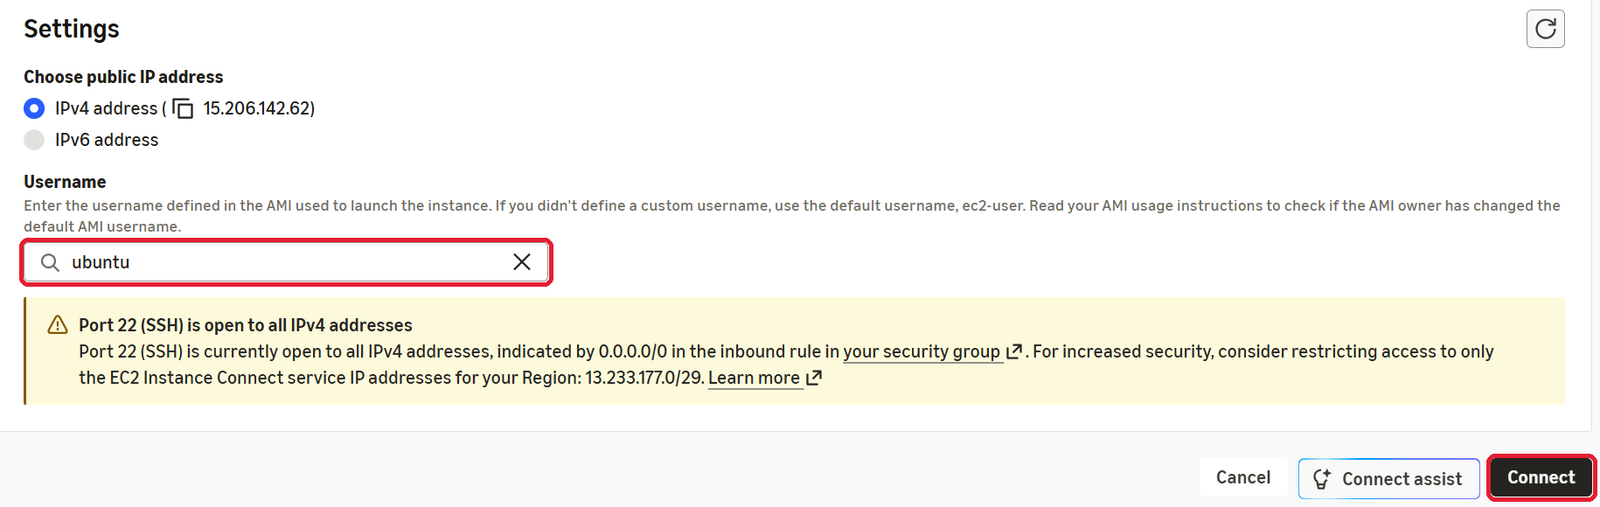
ubuntu, not the default ec2-user. Then click Connect.Why release folders instead of overwriting the app?
Most tutorials copy the new build straight over the old one. It works until the day a deployment goes wrong halfway through, and you’re left with a mix of old and new files and no easy way back. I prefer this layout instead:
/var/www/jtdev-api/
  current -> releases/9f3c2ab      (symlink, what systemd runs)
  releases/
    9f3c2ab/                       (newest)
    41de7c0/
c07aa18/ (last 5 kept)- Each deployment goes into its own folder named after the commit, so the running app is never touched while files are copying.
- Going live is a single
ln -sfnto move the symlink, followed by a restart. - Rolling back is the same move in reverse, pointing
currentat the previous folder.
Step 4 – Create a deploy key and add GitHub secrets
Don’t give GitHub your admin .pem. Create a separate key pair just for deployments, so you can revoke it any time without losing your own access. We’ll do it in the browser, without any commands on your own machine:
- In the EC2 console, select your instance and click Connect → EC2 Instance Connect → Connect.
- In the terminal that opens, paste the block below. Change the IP on the first line to your Elastic IP and press Enter.
EIP=13.233.10.20
ssh-keygen -t ed25519 -C "github-actions-deploy" -f ~/jtdev_deploy -N ""
cat ~/jtdev_deploy.pub >> ~/.ssh/authorized_keys
echo; echo "===== 1) EC2_SSH_KEY: copy this one long line ====="
base64 -w0 ~/jtdev_deploy; echo
echo; echo "===== 2) EC2_KNOWN_HOSTS: copy this one line ====="
echo "$EIP $(cut -d' ' -f1,2 /etc/ssh/ssh_host_ed25519_key.pub)"
This creates the deploy key pair, authorises its public half on the server, and prints the two values GitHub needs: the private key and the server’s host key. The private key is printed as one long base64 line on purpose: copying a multi-line key out of a browser terminal often breaks its line endings, and a single line can’t get broken. The workflow turns it back into a normal key file. To copy from the browser terminal, select the text, then right-click → Copy or press Ctrl+Shift+C.
Now, in your GitHub repository:
- Go to Settings → Environments → New environment and name it production.
- Optional but useful: under Deployment protection rules, add yourself as a Required reviewer. Each deployment will then wait for your approval.
- Under Environment secrets, add the four secrets below.
| Secret | Value |
|---|---|
EC2_HOST | Your Elastic IP, for example 13.233.10.20 |
EC2_USER | ubuntu |
EC2_SSH_KEY | Printed line 1: the long base64 line (a normal multi-line private key also works) |
EC2_KNOWN_HOSTS | Printed line 2, for example 13.233.10.20 ssh-ed25519 AAAA... |
Once both secrets are saved in GitHub, delete the key files from the server. Think of the key pair as a lock and its key: the lock (public part) is already installed in authorized_keys, and the key (private part) now lives safely in GitHub. A spare copy of the key on the server serves no purpose, so remove it:
rm ~/jtdev_deploy ~/jtdev_deploy.pubWhy the EC2_KNOWN_HOSTS secret? It’s your server’s ID card. GitHub checks it on every deployment and refuses to connect if a different machine answers on that IP. Many tutorials skip this and let the pipeline accept whatever server replies, which is like opening the door to anyone who knocks. Copying the ID card once, straight from the server, avoids that.
Step 5 – Write the GitHub Actions workflow
Create .github/workflows/deploy.yml. The build job is the CI part, and the deploy job is the CD part. Deploy only runs if build succeeds, so a failing test never reaches your server.
name: Build and deploy to EC2

on:
  push:
    branches: [ main ]   # change to master if that's your default branch
  workflow_dispatch:

permissions:
  contents: read

env:
  DOTNET_VERSION: '11.0.x'
  PROJECT: src/JtDev.Ec2Demo.Api/JtDev.Ec2Demo.Api.csproj
  APP_DIR: /var/www/jtdev-api
  SERVICE: jtdev-api

jobs:
  # ---------------- CI: build, test, publish ----------------
  build:
    runs-on: ubuntu-latest
    steps:
      - uses: actions/checkout@v7

      - uses: actions/setup-dotnet@v6
        with:
          dotnet-version: ${{ env.DOTNET_VERSION }}

      - name: Restore
        run: dotnet restore

      - name: Build
        run: dotnet build --no-restore -c Release

      - name: Test
        run: dotnet test --no-build -c Release

      - name: Publish (self-contained, linux-x64)
        run: >
          dotnet publish ${{ env.PROJECT }}
          -c Release
          -r linux-x64
          --self-contained true
          -o publish
          -p:InformationalVersion=${{ github.sha }}
          -p:IncludeSourceRevisionInInformationalVersion=false

      - uses: actions/upload-artifact@v7
        with:
          name: api
          path: publish
          retention-days: 7

  # ---------------- CD: copy to EC2 and switch ----------------
  deploy:
    needs: build
    runs-on: ubuntu-latest
    environment: production
    concurrency:
      group: production
      cancel-in-progress: false
    env:
      EC2_HOST: ${{ secrets.EC2_HOST }}
      EC2_USER: ${{ secrets.EC2_USER }}
    steps:
      - uses: actions/download-artifact@v8
        with:
          name: api
          path: publish

      - name: Set up SSH key
        env:
          EC2_SSH_KEY: ${{ secrets.EC2_SSH_KEY }}
          EC2_KNOWN_HOSTS: ${{ secrets.EC2_KNOWN_HOSTS }}
        run: |
          install -m 700 -d ~/.ssh
          if printf '%s' "$EC2_SSH_KEY" | grep -q "BEGIN OPENSSH PRIVATE KEY"; then
            printf '%s\n' "$EC2_SSH_KEY" | tr -d '\r' > ~/.ssh/ec2_deploy
          else
            printf '%s' "$EC2_SSH_KEY" | tr -d ' \r\n' | base64 -d > ~/.ssh/ec2_deploy
          fi
          chmod 600 ~/.ssh/ec2_deploy
          ssh-keygen -y -f ~/.ssh/ec2_deploy > /dev/null || { echo "EC2_SSH_KEY is not a valid private key."; exit 1; }
          printf '%s\n' "$EC2_KNOWN_HOSTS" | tr -d '\r' > ~/.ssh/known_hosts

      - name: Upload new release
        run: |
          RELEASE="$APP_DIR/releases/${GITHUB_SHA::7}"
          echo "RELEASE=$RELEASE" >> "$GITHUB_ENV"
          ssh -i ~/.ssh/ec2_deploy "$EC2_USER@$EC2_HOST" "mkdir -p '$RELEASE'"
          rsync -az --delete -e "ssh -i $HOME/.ssh/ec2_deploy" publish/ "$EC2_USER@$EC2_HOST:$RELEASE/"

      - name: Switch to new release and restart
        run: |
          ssh -i ~/.ssh/ec2_deploy "$EC2_USER@$EC2_HOST" "
            set -e
            chmod +x '$RELEASE/JtDev.Ec2Demo.Api'
            ln -sfn '$RELEASE' '$APP_DIR/current'
            sudo systemctl restart $SERVICE
            ls -1dt $APP_DIR/releases/* | tail -n +6 | xargs -r rm -rf
          "

      - name: Health check
        run: |
          for i in $(seq 1 10); do
            if curl -fsS "http://$EC2_HOST/health"; then
              echo " - deployed ${GITHUB_SHA::7}"
              exit 0
            fi
            echo "Waiting for the app to start ($i/10)..."
            sleep 3
          done
          echo "Health check failed - run deploy/rollback.sh on the server"
          exit 1
What each part does
- Self-contained publish: the output includes the .NET 11 runtime. Upgrading to a new .NET version later is just a change in the pipeline; you never touch the server.
InformationalVersionstamps the commit SHA into the app, soGET /tells you exactly which commit is running.- Artifact between jobs: the deploy job ships exactly the files that passed the tests, not a fresh build.
concurrencymakes sure two pushes in quick succession deploy one after the other instead of overwriting each other.- Health check: the workflow only turns green if
/healthanswers through Nginx, so a broken deployment shows up as a red run immediately. - Secrets as environment variables: the host and user are read from
envinstead of being pasted into the commands, which keeps the shell scripts cleaner and safer.
Step 6 – Push and watch the first deployment
- Commit the workflow and push to
main. - Open the Actions tab in GitHub. You’ll see the build job run first, then deploy (after your approval, if you added a reviewer).
- When both are green, open
http://<your-elastic-ip>/in the browser.
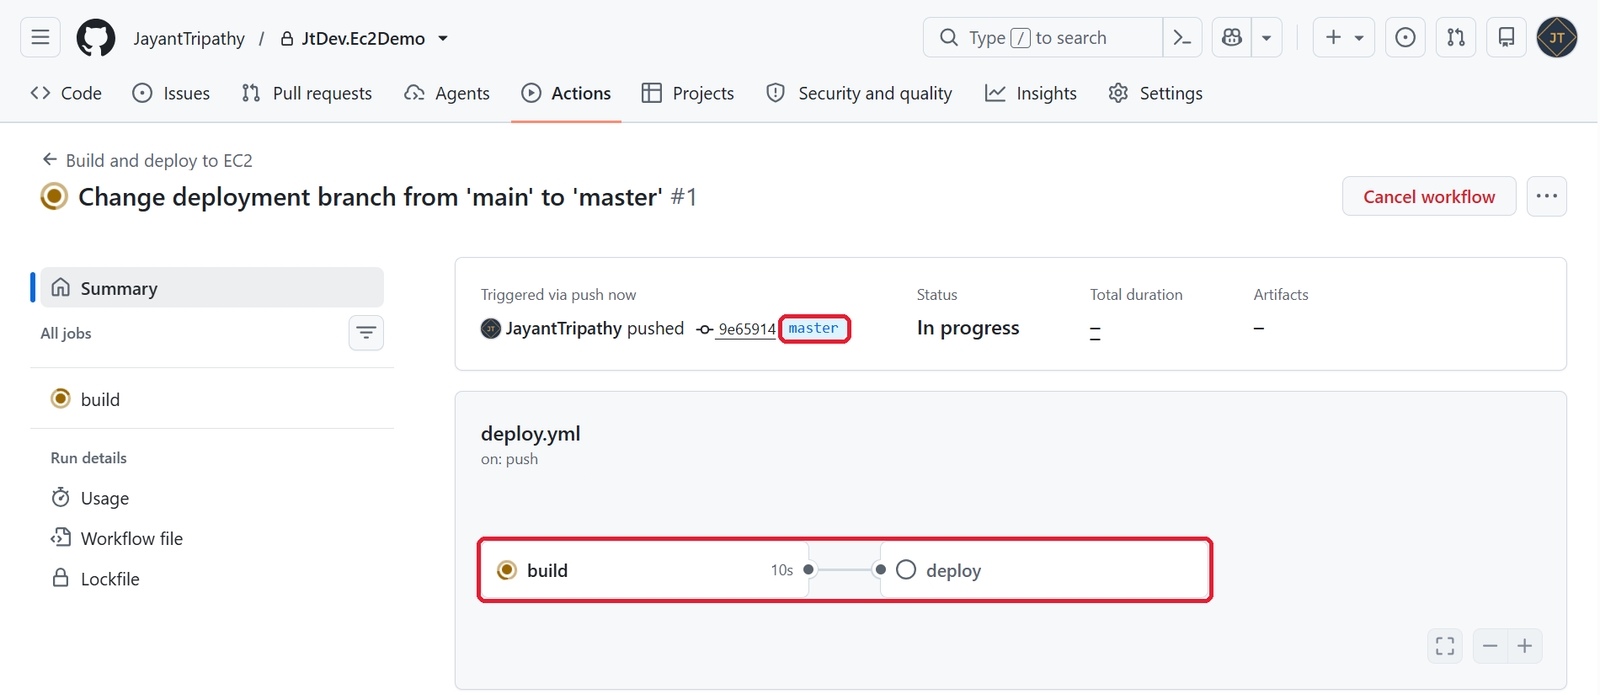
You should see something like this:
{
  "app": "JT Dev - .NET 11 on EC2",
  "version": "9f3c2ab1e4...",
  "environment": "Production",
  "framework": ".NET 11.0.0",
  "server": "ip-172-31-18-42",
  "clientIp": "203.0.113.25"
}

/api/products endpoint returns the three sample products.Look at clientIp: it shows your real IP, not 127.0.0.1. That’s the forwarded-headers setup from Step 1 doing its job. Now change something small, push again, and watch version change about a minute later without you touching the server.
Step 7 – Roll back in one command
If a release misbehaves, open a terminal on the server from the AWS Console: select the instance, click Connect → EC2 Instance Connect → Connect, then paste these lines. They point current at the previous release and restart the service:
APP_DIR=/var/www/jtdev-api
CURRENT=$(readlink -f "$APP_DIR/current")
PREVIOUS=$(ls -1dt "$APP_DIR"/releases/* | grep -vx "$CURRENT" | head -n 1)

if [ -n "$PREVIOUS" ]; then
  ln -sfn "$PREVIOUS" "$APP_DIR/current"
  sudo systemctl restart jtdev-api
  echo "Rolled back: $(basename "$CURRENT") -> $(basename "$PREVIOUS")"
else
  echo "No previous release to roll back to."
fi
A better long-term habit is to roll back by reverting the bad commit in Git and letting the pipeline deploy it, so Git stays the source of truth. The script is for the moments when you need the site back now.
Problems I ran into (and how I fixed them)
I didn’t get a green pipeline on the first try. These are the real problems I hit while setting this up for this article, in the order they happened. If you’re stuck, there’s a good chance it’s one of these.
1. Setting up the server over SSH from Windows was painful
My first attempt used PowerShell: fix the .pem file permissions with icacls, copy files with scp, log in with ssh, convert Windows line endings in the scripts… Too many places to slip. That’s why this guide now uses User data at launch and EC2 Instance Connect in the browser instead. You never need an SSH client on your own machine.
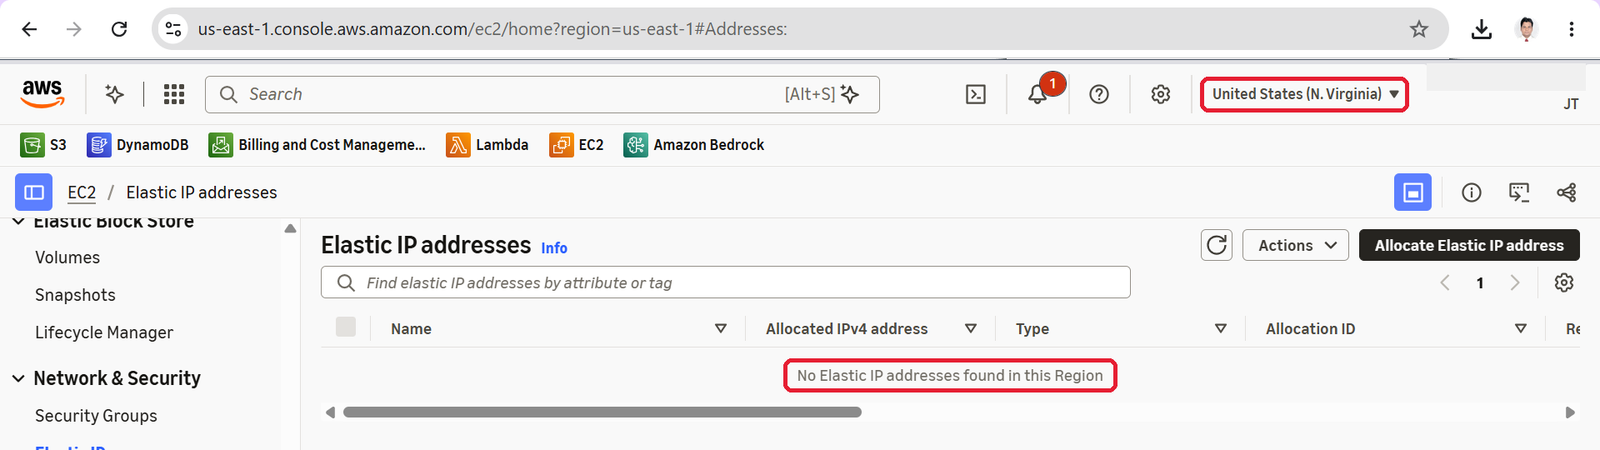
2. The Elastic IP and the instance were in different Regions
When I went to associate the Elastic IP, my instance wasn’t in the list. Elastic IPs only work inside their own Region, so check the Region in the top-right corner of the console (for me, Asia Pacific (Mumbai)) before you allocate one, and make sure it’s the same Region as your instance.
3. The workflow never started
deploy.yml was in the repo, but the Actions tab said “There are no workflow runs yet”. The reason: my repository’s default branch is master, and the workflow only listens to pushes on main. Check the branch name at the top left of your repository and make the trigger match:
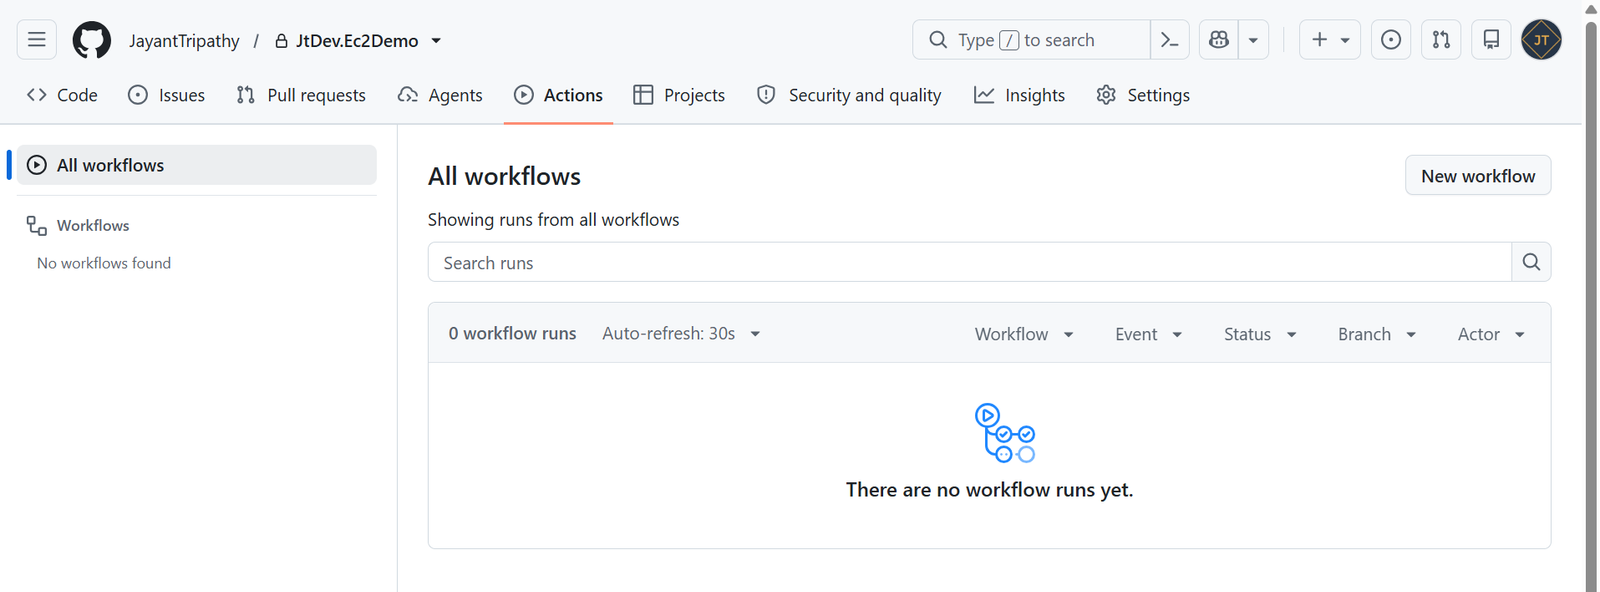
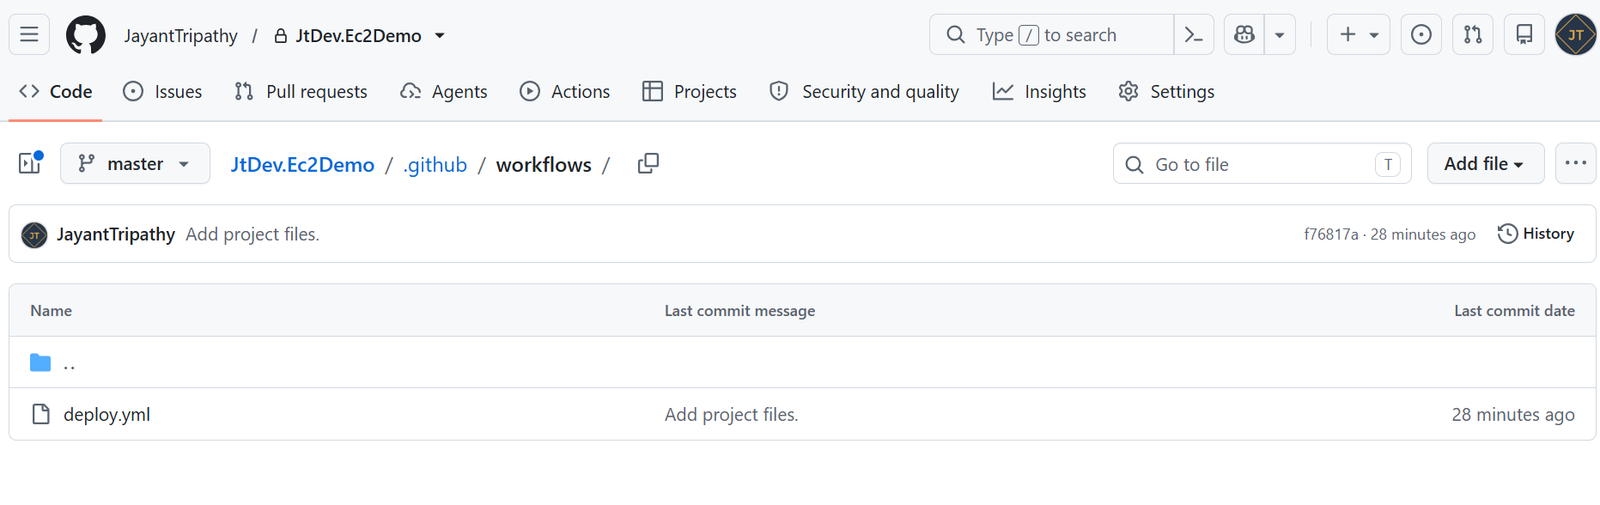
on:
  push:
    branches: [ master ]   # use the name of YOUR default branch
4. “Host key verification failed”
The build job went green, but deploy failed at Upload new release. I had left the example IP on the first line of the Step 4 script, so the EC2_KNOWN_HOSTS line started with the wrong IP and didn’t match EC2_HOST. The IP at the start of EC2_KNOWN_HOSTS must be exactly your Elastic IP. You can print the correct line any time on the server:
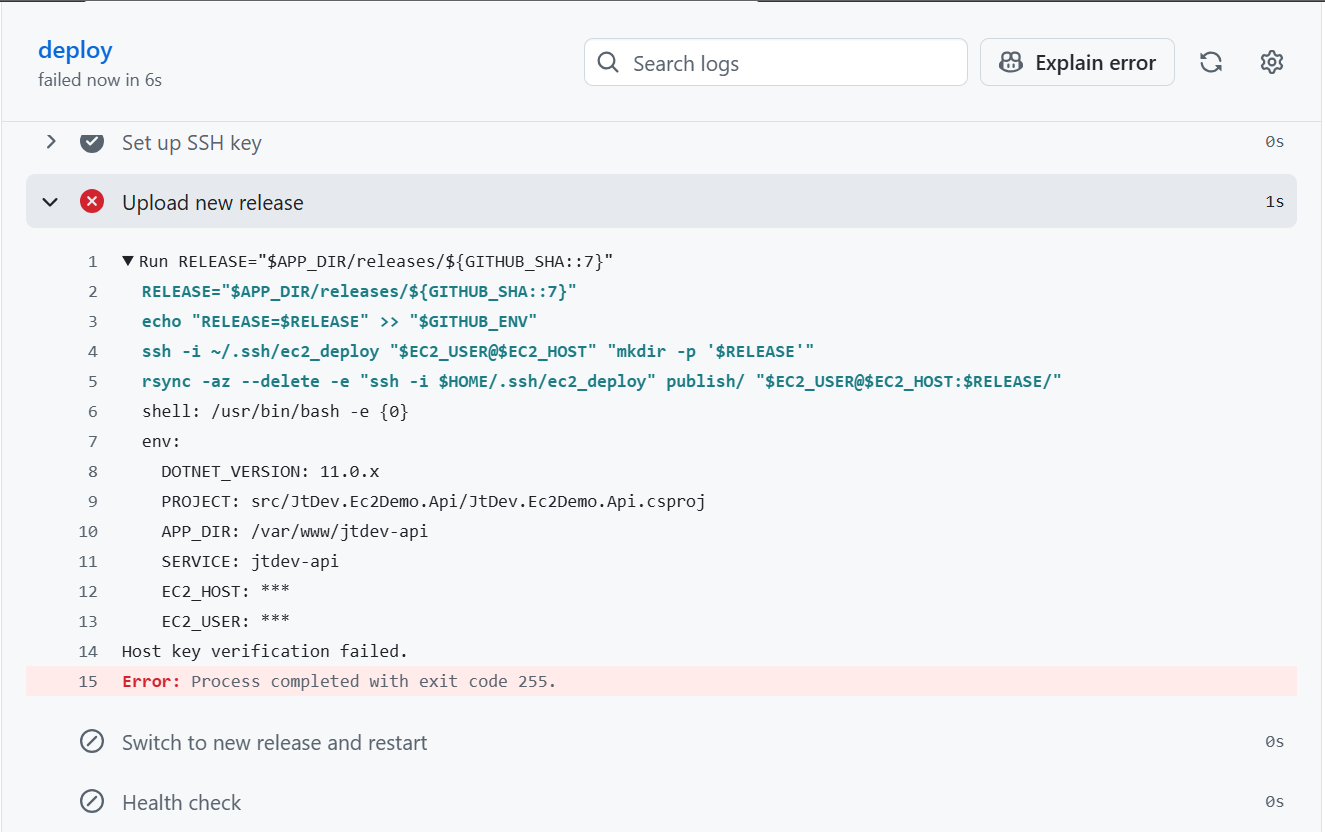
echo "YOUR-ELASTIC-IP $(cut -d' ' -f1,2 /etc/ssh/ssh_host_ed25519_key.pub)"5. “error in libcrypto” and “Permission denied (publickey)”
This one took the longest. The host key check now passed, but SSH couldn’t read the private key. I had copied the multi-line key out of the browser terminal, and somewhere on the way from the terminal to my Windows clipboard to GitHub, its line endings got broken. Copying it again carefully didn’t help.
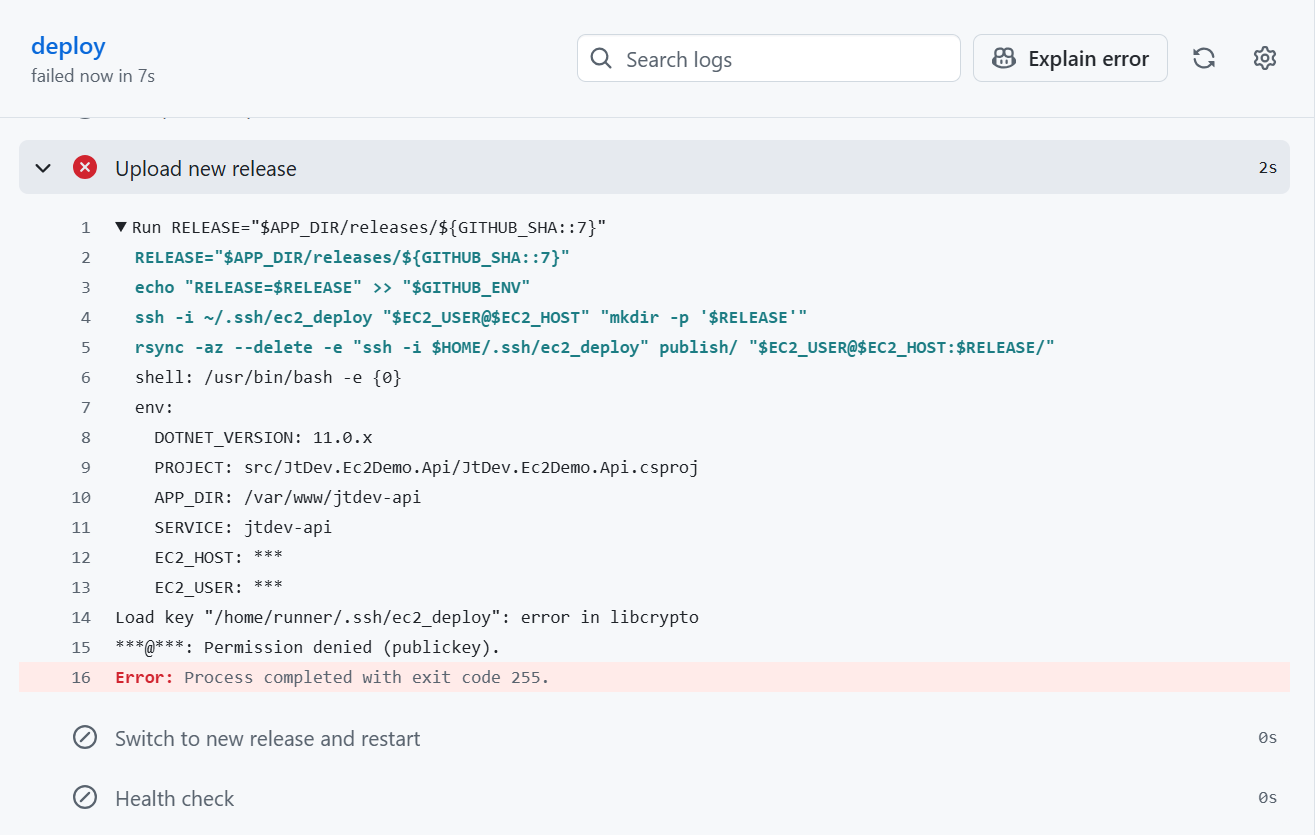
What fixed it for good was copying the key as one base64 line (base64 -w0 ~/jtdev_deploy) and letting the workflow turn it back into a key file, removing any stray spaces or Windows line breaks on the way. That’s the version you see in Steps 4 and 5. The workflow also checks the key with ssh-keygen -y before connecting, so a broken key now fails with a clear message instead of a cryptic libcrypto error.
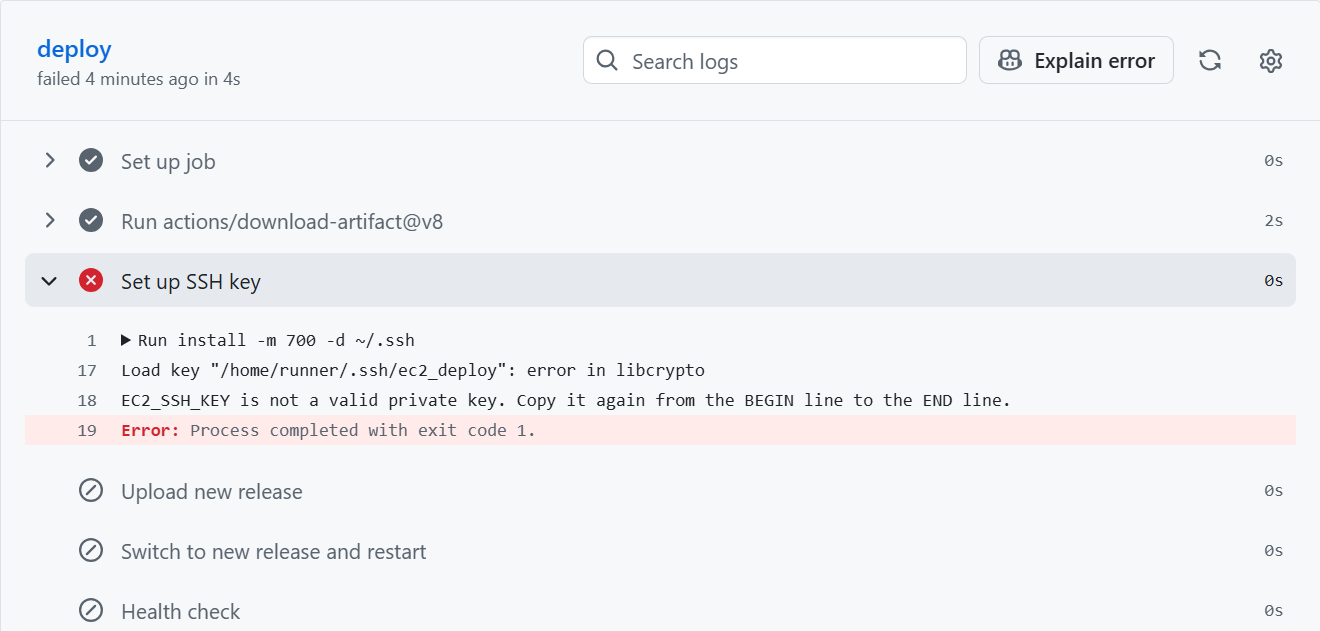
Tip: when a deployment fails, don’t push again to retry. Fix the secret or file, then open the failed run and click Re-run jobs → Re-run failed jobs. GitHub reuses the build that already passed and only runs the deploy job again.
Troubleshooting common errors
| Error | Likely cause | Fix |
|---|---|---|
| 502 Bad Gateway from Nginx | The app isn’t running | Run sudo journalctl -u jtdev-api -n 50 on the server and read the last error |
status=203/EXEC in systemd | File not executable, or built for the wrong CPU | Check the chmod +x step; on a Graviton (arm64) instance publish with -r linux-arm64 |
Permission denied (publickey) | Deploy key not in authorized_keys, or the secret was pasted incompletely | Paste the whole private key, including the BEGIN and END lines |
Host key verification failed | EC2_KNOWN_HOSTS is missing or from an old IP | Run ssh-keyscan -H again and update the secret |
| Connection timed out | Security group doesn’t allow port 22 or 80 | Check the inbound rules of the instance’s security group |
| No workflow runs at all | The trigger branch doesn’t match your default branch | Change branches: [ main ] to your branch name, for example master |
error in libcrypto or is not a valid private key | The private key got broken while copying | Copy it again as one line with base64 -w0 ~/jtdev_deploy and update EC2_SSH_KEY |
| Health check fails but the service is running | Nginx still serves the default site | Make sure sites-enabled/default is removed and run sudo nginx -t |
Clean up to avoid charges
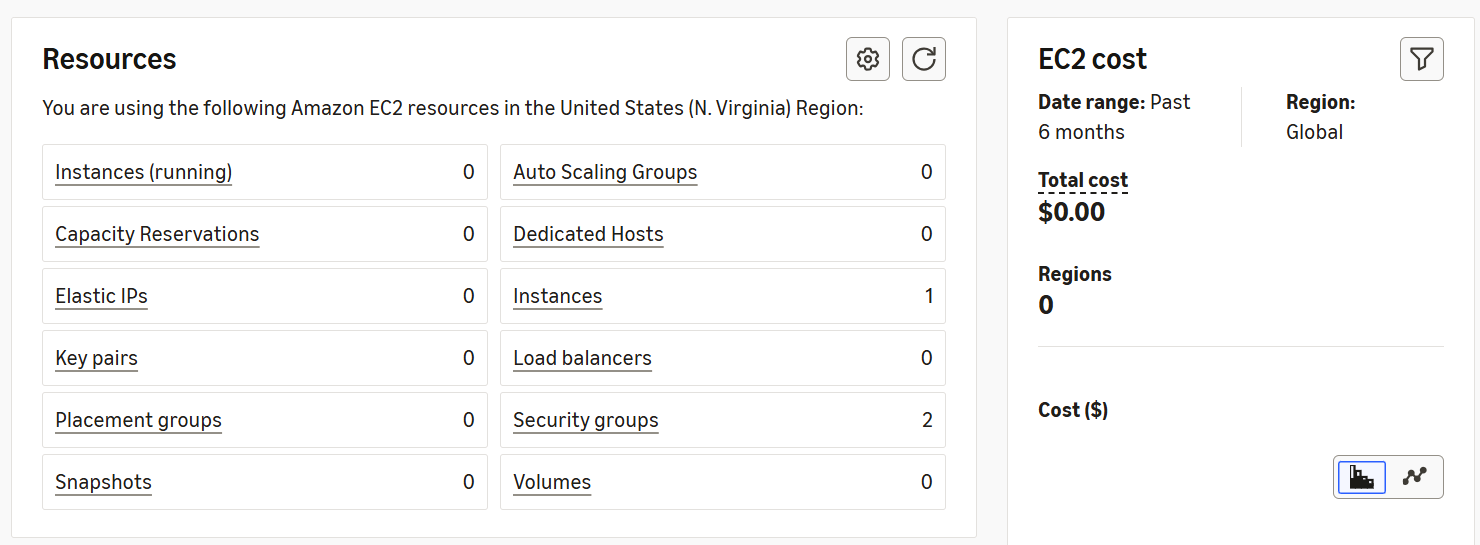
If you’re just learning or recording a demo, remove everything when you’re done. Stopping the instance isn’t enough: a stopped instance still pays for its disk, and AWS charges for a public IPv4 address that isn’t attached to a running instance.
- Terminate the instance: EC2 → Instances → select it → Instance state → Terminate (delete) instance. Its disk is deleted with it by default.
- Release the Elastic IP: EC2 → Elastic IPs → select it → Actions → Release Elastic IP address. Do this after terminating, or disassociate it first.
- Check the EC2 dashboard: Instances (running), Elastic IPs and Volumes should all show 0. The key pair and security group are free, so keeping them is fine.
- Set a budget alert once, for example $5: Billing and Cost Management → Budgets → Create budget.
What I would add for production
- HTTPS: point a domain at the Elastic IP and run Certbot with the Nginx plugin. It takes about five minutes and renews itself.
- A dedicated deploy user instead of
ubuntu, withsudoallowed only forsystemctl restart jtdev-api. - Secrets in AWS (Systems Manager Parameter Store or Secrets Manager) for connection strings, read by the app through an IAM role on the instance, instead of files on disk.
- Closing port 22 by moving to a self-hosted runner in the VPC or to Systems Manager Run Command once the project grows.
Key takeaways
- A self-contained
linux-x64publish means the EC2 server never needs a .NET runtime installed or upgraded. - Kestrel listens on localhost only; Nginx faces the internet and forwards the real client details.
- systemd keeps the app alive, restarts it on crashes and starts it on boot.
- Release folders plus a
currentsymlink give you safe switches and instant rollbacks. - Use a separate deploy key and store the server’s host key as a secret instead of trusting it blindly.
Frequently Asked Questions
Do I need to install .NET on the EC2 instance?
Not with this setup. The app is published self-contained, so the runtime ships inside the release folder. If you prefer a framework-dependent publish (smaller uploads), install the ASP.NET Core runtime on the server and remove --self-contained true.
Can I use a Graviton (ARM) instance?
Yes, and it’s usually cheaper. Choose the 64-bit (Arm) Ubuntu image and change the publish runtime to -r linux-arm64. Everything else stays the same.
Why use Nginx instead of exposing Kestrel directly?
Kestrel can face the internet, but Nginx makes the common jobs easy: HTTPS certificates with Certbot, compression, serving static files, rate limiting and hosting several apps on one server.
How do I add environment-specific settings like a connection string?
Add Environment=ConnectionStrings__Default=... lines to the systemd unit for simple cases, or better, store the value in AWS Systems Manager Parameter Store and read it at startup. Never commit secrets to the repository.
Will this work with .NET 10 too?
Yes. Change net11.0 to net10.0 in the project files and DOTNET_VERSION to 10.0.x in the workflow. Nothing on the server changes.
Conclusion
Thanks for reading this article. We discussed here how to deploy a .NET 11 Web API to AWS EC2 with GitHub Actions CI/CD. We built a pipeline that tests every change, ships a self-contained build over SSH, switches it live with a symlink behind Nginx and systemd, verifies it with a health check, and can roll back in seconds.
Once this is in place, deploying stops being an event. You push, you get a coffee, and the new version is live. As a next step, add HTTPS with Certbot, and when the project grows, move from SSH to a self-hosted runner or AWS Systems Manager.
Leave behind your valuable queries and suggestions in the comment section below. Also, if you think this article helps you, do not forget to share this with your developer community. Happy Coding 🙂
Related Articles
- Deploy a .NET 11 Web API to AWS EC2 with GitHub Actions CI/CD (Ubuntu + Nginx)
- How to Set up an Amazon CloudFront Distribution for Amazon S3 Bucket 🚀
- How to install and configure AWS Toolkit for VS Code
- How to send SMS using Amazon Simple Notification Services(SNS)
- Send Emails from ASP.NET Core using Amazon SES
- How to Deploy Blazor WebAssembly to AWS Amplify
- How to host Angular app on AWS S3 bucket using CloudFront
- Building Serverless ASP.NET Core Web API with AWS Lambda using Function URLs
- Setting Up the AWS Toolkit for Visual Studio
- Create An Amazon AWS Free Tier Account