

In this article, we will learn about How to Build Your First MCP Server in .NET 10 (C#) — Complete Beginner-Friendly Guide. The AI world is rapidly shifting toward agent-based applications, where AI systems can interact with tools, databases, APIs, and other external systems. One of the most talked-about technologies making this possible is the Model Context Protocol, or MCP. Please read my previous article on Run Local LLMs in .NET: Rapid Prototyping with Ollama & Semantic Kernel.
In this step-by-step tutorial, you’ll learn how to:
- Understand what MCP is
- Create an MCP Server using C#
- Expose tools/functions to AI clients
- Connect the MCP server with AI tools like Claude Desktop or VS Code
- Build a real working example using SQLite
By the end of this guide, you’ll have a fully working MCP server in .NET 10 and C#.
What is MCP?
Model Context Protocol (MCP) is an open standard developed by Anthropic, the company behind Claude. While it may sound technical, but the core idea is simple: give AI agents a consistent way to connect with tools, services, and data — no matter where they live or how they’re built.
The Model Context Protocol (MCP) is an open standard that allows AI models and applications to communicate with external tools and services in a standardized way.
Think of MCP as:
- REST API → for frontend/backend communication
- MCP → for AI/tool communication
Using MCP, AI assistants can:
- Read databases
- Call APIs
- Execute functions
- Access local files
- Trigger automation workflows
This makes AI systems significantly more powerful and dynamic.
What is the MCP Architecture and how it works?
- MCP Host (red highlight) is the AI-powered app – for example, Claude Desktop, an IDE, or another tool acting as an agent.
- The host connects to multiple MCP Servers, each one exposing a different tool or resource.
- Some servers access local resources (like a file system or database on your computer).
- Others can reach out to remote resources (like APIs or cloud services on the internet).
AI Client (Claude / VS Code / Cursor)
              │
              ▼
        MCP Client
              │
              ▼
        MCP Server (.NET)
              │
    ┌─────────┴─────────┐
    ▼                   ▼
SQLite DB           APIs/Files
All communication between host and servers happens over the standardized MCP Protocol, which ensures compatibility and structured responses.
What is MCP Server?
Think of an MCP server as a smart adapter for any tool or app. It takes a simple request from an AI—like “Get today’s sales report” – and translates it into the exact commands that tool needs.
For example:
- A GitHub MCP server could turn “list my open pull requests” into the right GitHub API call.
- A File MCP server might handle “save this summary as a text file” by writing it straight to your desktop.
- A YouTube MCP server could transcribe videos from links on demand.
Real-World Use Cases of MCP
| Use Case | Example |
| Database Access | AI fetches customer data |
| File Operations | AI reads local documents |
| Automation | AI triggers deployments |
| Reporting | AI generates reports |
| DevOps | AI checks Azure resources |
| Productivity | AI manages notes/tasks |
Prerequisites
Before starting, install:
- .NET 10 SDK
- Visual Studio 2026 or VS Code
- SQLite Browser (optional)
- Claude Desktop or VS Code with MCP support
Creating the .NET Project and Add the required & Dependencies
Step 1 – Create the Project
Open terminal and run:
dotnet new console -n JT.McpDemoStep 2 – Install Required NuGet Packages
Install MCP and database packages:
dotnet add package ModelContextProtocol            // MCP SDK
dotnet add package Microsoft.Extensions.Hosting    // Dependency Injection
dotnet add package Microsoft.Data.Sqlite           // SQLite DB
dotnet add package Dapper                          // Lightweight ORM
Step 3 – Create Database Model
namespace JT.McpDemo.Models
{
    public class Note
    {
        public int Id { get; set; }

        public string Title { get; set; } = string.Empty;

        public string Content { get; set; } = string.Empty;
    }
}
Step 4 – Create SQLite Repository
namespace JT.McpDemo.Repositories
{
    public class NoteRepository
    {
        private readonly string _connectionString =
            "Data Source=notes.db";

        public NoteRepository()
        {
            using var connection =
                new SqliteConnection(_connectionString);

            connection.Execute(@"
            CREATE TABLE IF NOT EXISTS Notes(
                Id INTEGER PRIMARY KEY AUTOINCREMENT,
                Title TEXT,
                Content TEXT
            )");
        }

        public void AddNote(string title, string content)
        {
            using var connection =
                new SqliteConnection(_connectionString);

            connection.Execute(
                "INSERT INTO Notes(Title, Content) VALUES(@Title,@Content)",
                new { Title = title, Content = content });
        }

        public IEnumerable<Note> GetNotes()
        {
            using var connection =
                new SqliteConnection(_connectionString);

            return connection.Query<Note>(
                "SELECT * FROM Notes");
        }
    }
}
Step 5 – Create MCP Tools
namespace JT.McpDemo.Tools
{
    [McpServerToolType]
    public class NoteTools
    {
        private readonly NoteRepository _repository;

        public NoteTools(NoteRepository repository)
        {
            _repository = repository;
        }

        [McpServerTool]
        public string SaveNote(string title, string content)
        {
            _repository.AddNote(title, content);

            return "Note saved successfully.";
        }

        [McpServerTool]
        public string GetAllNotes()
        {
            var notes = _repository.GetNotes();

            if (!notes.Any())
                return "No notes found.";

            return string.Join("\n\n",
                notes.Select(x =>
                    $"Title: {x.Title}\nContent: {x.Content}"));
        }
    }
}- [McpServerToolType] Registers tool class.
- [McpServerTool] Exposes method to AI
When AI clients connect, they automatically discover these tools.
Step 6 – Configure Program.cs
using JT.McpDemo.Repositories;
using JT.McpDemo.Tools;
using Microsoft.Extensions.DependencyInjection;
using Microsoft.Extensions.Hosting;

var builder = Host.CreateApplicationBuilder(args);

builder.Services.AddSingleton<NoteRepository>();

builder.Services
    .AddMcpServer()
    .WithStdioServerTransport()
    .WithTools<NoteTools>();

await builder.Build().RunAsync();- Creating the host builder and Register
NoteRepositoryin dependency injection as a singleton - Add the MCP server, Configure it to use stdio for communication and register the tools from
NoteTools
Step 7 – Run the MCP Server
Execute dotnet run Your MCP server, is now running and It uses STDIO Transport which is commonly used for local MCP integrations.
Step 8 – Configure Claude Desktop
Now connect the MCP server with Claude Desktop.
Locate Claude configuration file:
I is depends upon according to the system. Usually it is on the below path, but for me it is stored in different. To get the path easily follow this
You can usually find claude_desktop_config.json in your Claude Desktop app settings, under Settings → Developer → Edit Config. On Windows, it is typically here: %APPDATA%\Claude\claude_desktop_config.json, and on macOS: ~/Library/Application Support/Claude/claude_desktop_config.json
For me on below path I got the claude_desktop_config.json
C:\Users\USER\AppData\Local\Packages\Claude_pzs8sxrjxfjjc\LocalCache\Roaming\ClaudeI has published my .NET Code and the dll files are updated into claude_desktop_config.json like below.
{
  "mcpServers": {
    "notes-server": {
      "command": "dotnet",
      "args": [
        "D:\\JT\\JayantTripathy.com\\Blog\\AIML-DotNet\\JT.McpDemo\\bin\\Release\\net10.0\\win-x64\\publish\\JT.McpDemo.dll"
      ]
    }
  }
}
Once you update the JSON files, open the Claude Desktop app and you should be able to see that the MCP server is running.

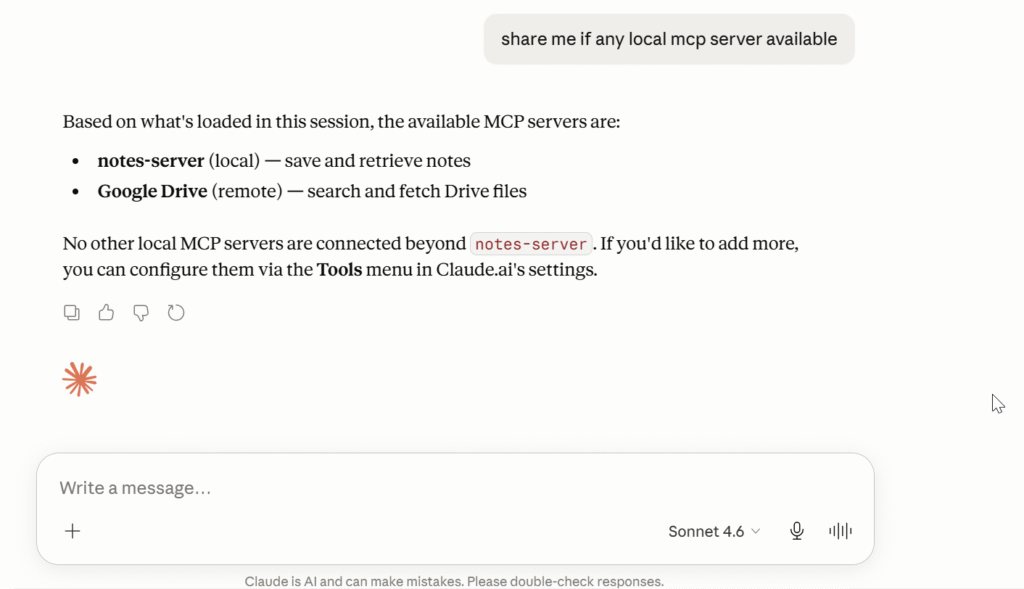
Step 9 – Test the Notes MCP Server
You can see now it automatically detect notes-server in the Claude.
How Claude detects the local MCP and work?
This is the core magic of MCP, Your Notes MCP is detected through:
Tool registration + tool metadata
What Happens Internally
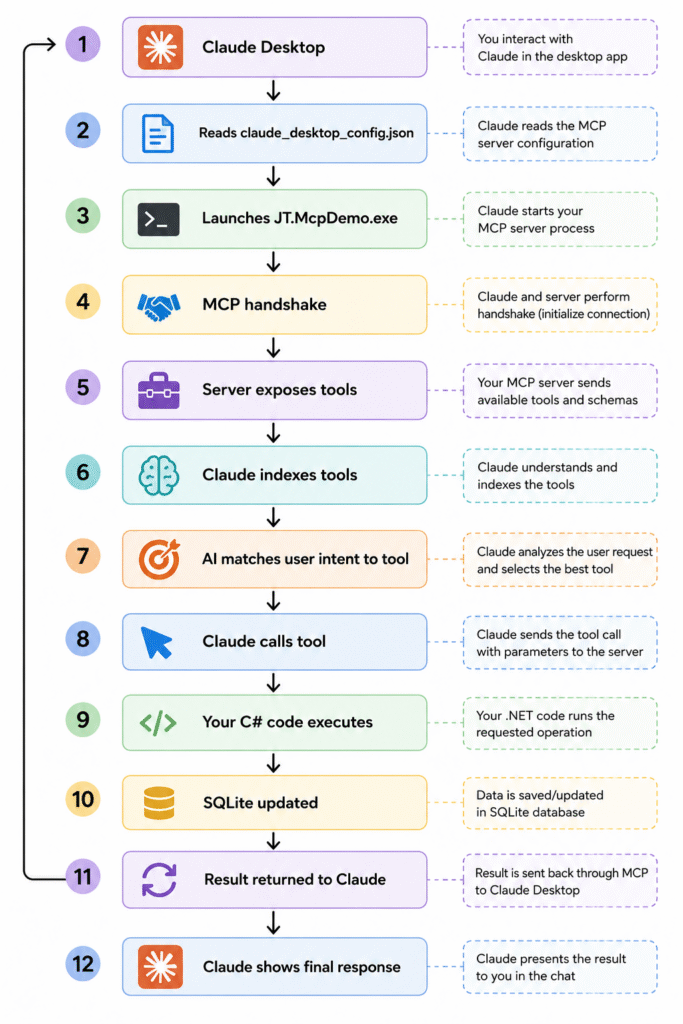
When Claude Desktop starts:
- Reads the
claude_desktop_config.json - Launches your MCP server
- Sends MCP handshake request
- Your .NET MCP server responds with
available toolsincluding tool names, descriptions, descriptions
This is the code responsible for
.WithTools<NoteTools>()tells MCP to Expose tools from NoteTools class- Then MCP scan this method and this metadata becomes visible to Claude.
[McpServerTool]
[Description("Save a note")]
public async Task<string> SaveNote(
    string title,
    string content)
{
}
Claude Internally Sees Something Like
{
  "tool": "SaveNote",
  "description": "Save a note",
  "parameters": {
    "title": "string",
    "content": "string"
  }
}
MCP Flow
What’s the benefit of using this Notes MCP?
The benefit of using a Notes MCP is not just storing notes in SQLite.
The real benefit is enabling AI to interact with your notes system using natural language.
Here are the key advantages:
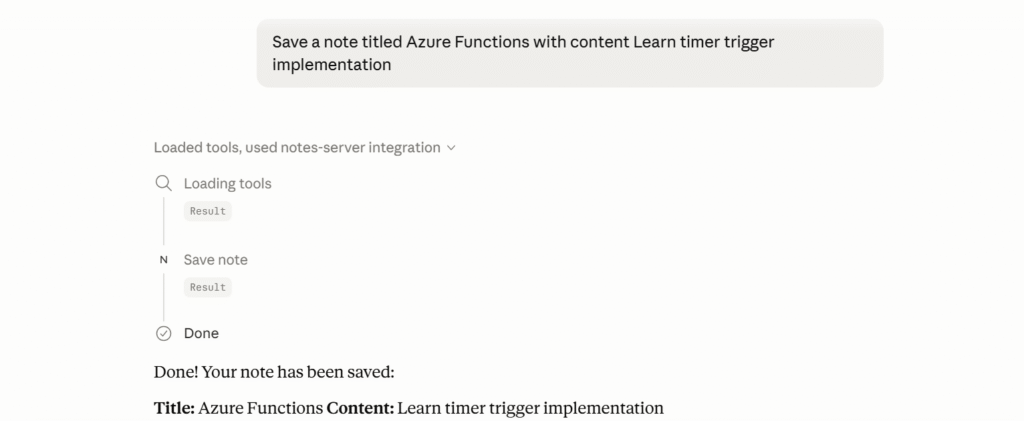
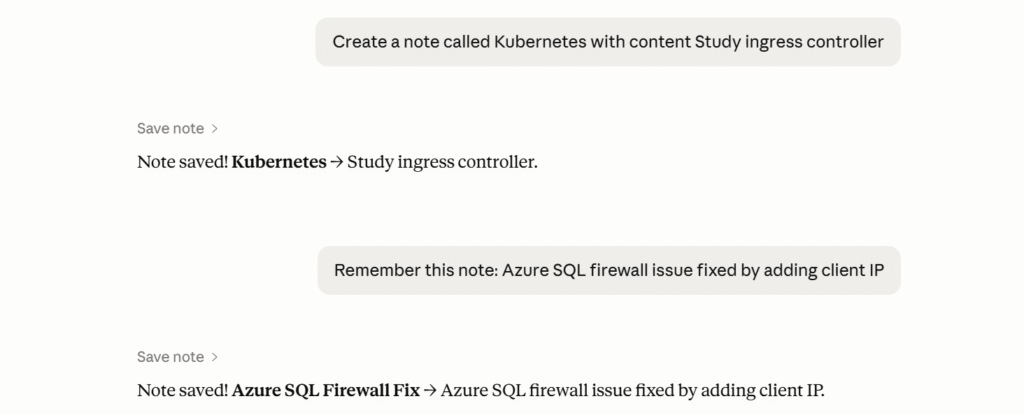
- Claude can save and retrieve notes automatically through conversation.
- No need to build separate UI screens or forms.
- AI understands user intent and chooses the correct tool.
- Notes become persistent across chats using SQLite storage.
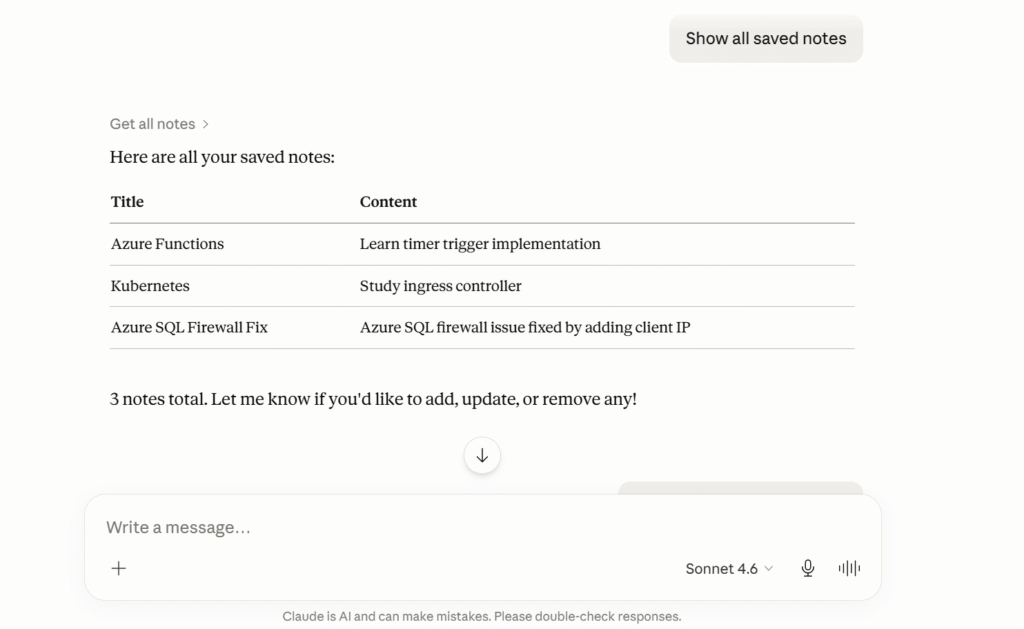
- You can search notes conversationally instead of writing SQL queries.
- MCP demonstrates how AI can interact with external systems safely.
- It becomes a foundation for larger AI-powered enterprise tools.
- You learn tool discovery, MCP protocol, and AI orchestration concepts.
- The same pattern can later connect Azure, DevOps, SQL, or APIs.
- It transforms AI from “chat only” into an actionable assistant.
- Claude can act like a memory assistant for deployments, troubleshooting, or documentation.
- It proves your .NET application can become AI-operable through MCP.
Conclusion
So far we discussed about Build Your First MCP Server in .NET 10 (C#) – Complete Beginner-Friendly Guide. I hope this tutorial helped you understand the fundamentals of building MCP servers with .NET. In future articles, we can explore advanced topics like Azure MCP Servers, SQL MCP integrations, file system tools, authentication, and enterprise-grade AI workflows.
Leave behind your valuable queries and suggestions in the comment section below. Also, if you think this article helps you, do not forget to share this with your developer community. Happy Coding 🙂
Latest Articles
- Building an AI Knowledge Base Search with Azure AI Foundry: Step-by-Step Guide
- Run Local LLMs in .NET: Rapid Prototyping with Ollama & Semantic Kernel
- Building your own AI Assistant Using Python, LangChain, Streamlit & GPT‑4o (Step‑by‑Step Guide)
- How to Secure React.js application with Azure AD Authentication Using MSAL Library
- 🔐 Securing .NET Core Web Apps with Azure AD/Intra and MSAL
- Step-by-Step Guide to Using Azure Redis Cache in ASP.NET Core 9 Web API
- 🤖 Build a Full-Stack AI App with React, Node.js & Azure OpenAI
- Effortless React Deployment 🚀: CI/CD with GitHub Actions & Azure Static Web Apps
- Deploying Angular apps in Azure Blob Storage with CI/CD Integration 🚀
- How to Build a serverless CRUD app with Azure function and Cosmos DB
- How to resolve Function App Cannot Create within Azure Portal
- Building a Chatbot in Angular using Gemini API
- How to convert Text To Speech With Azure Cognitive Services using Angular and .Net Core
- Building CI/CD Pipeline(YAML) using Azure DevOps – GitHub to Azure Web App (PaaS)
- Upload Download and Delete files in Azure Blob Storage using ASP.NET Core and Angular