
In this article we will learn How to Deploy Blazor WebAssembly to AWS Amplify. We will learn how to deploy Blazor WebAssembly to AWS Amplify as well as CI/CD using GitHub, giving you a streamlined development workflow. You’ll learn how to set up your Amplify environment, configure hosting and authentication, and take use of Amplifies powerful infrastructure to ensure lightning-fast performance and easy scalability. Please read my previous article Implement Unit Test in ASP.Net Core Middleware.

Blazor WebAssembly, a cutting-edge Microsoft framework, enables you to create interactive and feature-rich online apps in C# and.NET. You can easily deploy and manage your Blazor WebAssembly apps by integrating the power of Blazor with AWS Amplify, a cloud-based development platform. Blazor is available as both server-side rendered and static files. These files can be hosted on static hosting platforms such as AWS Amplify.
What is AWS Amplify?
AWS Amplify is a collection of existing AWS services that simplify the process of developing scalable and secure web and mobile applications. It provides a suite of tools and services to streamline the complete development workflow, from frontend user interface creation through backend infrastructure management. It enables you to deploy your apps quickly, securely, and reliably in just a few clicks, using the AWS Content Delivery Network, which has hundreds of presence points throughout the world, making your application highly available.
What we will build in this Post?
This is what we will construct and deploy in this article.
- A simple Blazor WebAssembly application running on .NET 7
- Push the code to the GitHub repository.
- Create an AWS Amplify application.
- Host the Static File from Blazor WebAssembly
- Continuous Deployment to AWS Amplify with the built-in CI/CD
Prerequisites
- AWS Account. Even a FREE Tier account is enough.
- .NET 7 SDK Installed.
- Git & CLI Installed.
- GitHub account.
Creating a Sample Blazor WebAssembly App
Using the below steps we can create the sample blazor web assembly app.
- Launch the Visual Studio IDE and click on “Create new project”.
- In the “Create new project” window, select “
Blazor Web Assembly App” from the list of templates displayed. - Click Next. In the “Configure your new project” window, specify the name and location for the new project and then click Create.
- In the “Blazor Web Assembly App” window shown next, select .NET Core as the runtime and
.NET 7.0from the drop-down list at the top. Select “API” as the project template to create a new ASP.NET Core API application. - Ensure that the check boxes “Enable Docker Support” is disabled s we won’t be using the default feature we will add it manually later and “Configure for HTTPS” are checked.
- Make Authentication type as “None” as we are not using any authentication mode here.
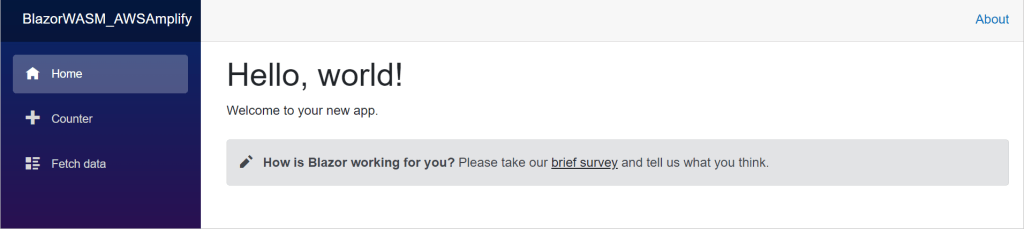
Once you run the application you can see the Blazor WASM running locally as like below.
Push the code into GitHub
Now that we’ve completed our Blazor application, let’s initialize GIT and push the code to a new GitHub repository. To push your blazor solution to your GitHub repository, open the terminal at the root of your blazor solution and enter the following command. Before you begin, make sure you’ve created a fresh blank repository on GitHub and that you’ve authorized your local machine to do operations on it.
git init
dotnet new gitignore
git add .
git commit -m "first commit"
git branch -M main
git remote add origin <your git repo url>
git push -u origin master
The preceding command is detailed in full.
- Initializes GIT.
- Adds a .NET-specific .gitignore file that restricts pushing the unwanted .NET build and binaries to the repository.
- Stages all the eligible files for committing.
- Adds a new commit with a message as “first commit”.
- Sets the default branch as main.
- Adds a remote origin (which is our new GitHub repository)
- Pushes the commits onto the remote GitHub repository.
Configuring Aws Amplify
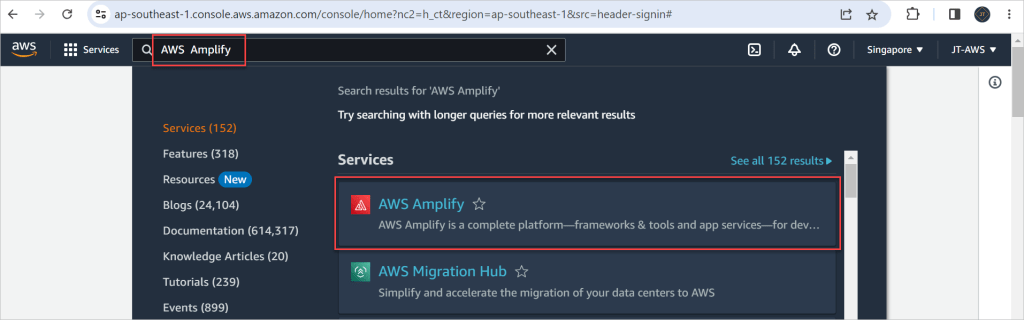
Now that our Blazor WASM Application has been published to a publicly accessible GitHub repository, let’s configure AWS Amplify to host it. You’ll be surprised at how simple it is to host our Blazor application. Log in to the AWS Management Console and launch AWS Amplify.
On clicking next, it opened the landing page like below.
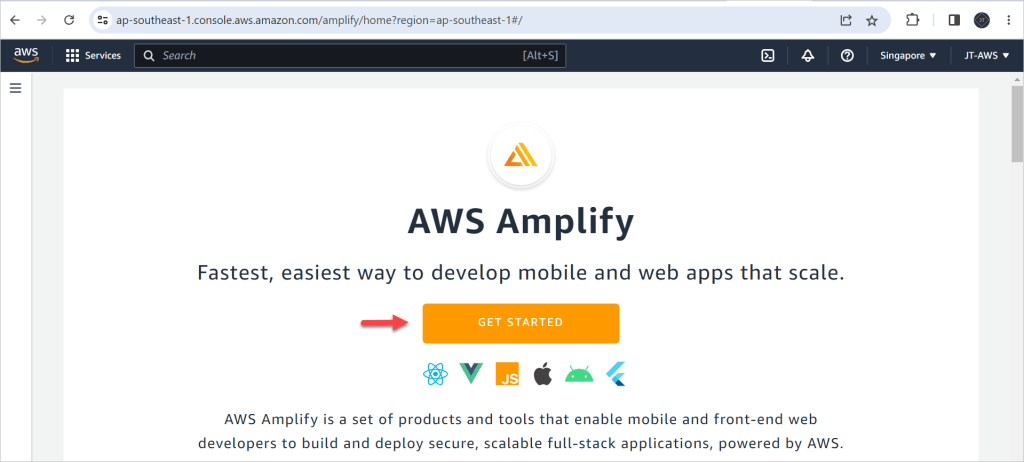
Select Get Started. We are currently looking for a host for our Blazor WASM software, Select Amplify Hosting get started button.

You must link your code repository to AWS Amplify. AWS, for example, allows users to connect to several platforms such as GitHub, GitLab, Bitbucket, and even the AWS Code Commit. Let’s choose GitHub for our use case and continue.

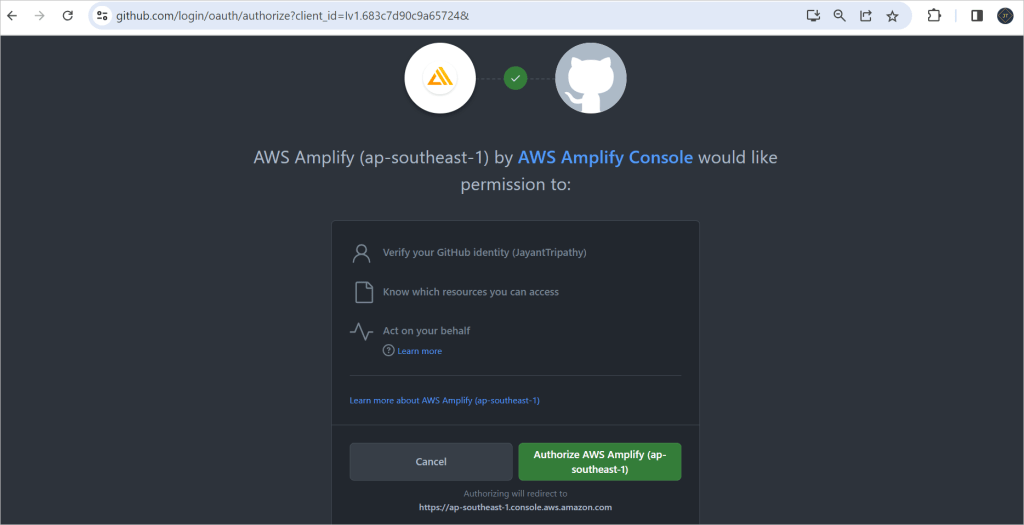
On the following screen, you must authorise AWS Amplify to read your GitHub account and repositories.
Choose your own account or the location where your Blazor code was pushed. Following that, you must pick the repositories that AWS Amplify may access. For the time being, I’m only picking my new Blazor repository. You can also grant access to all repositories based on your needs.
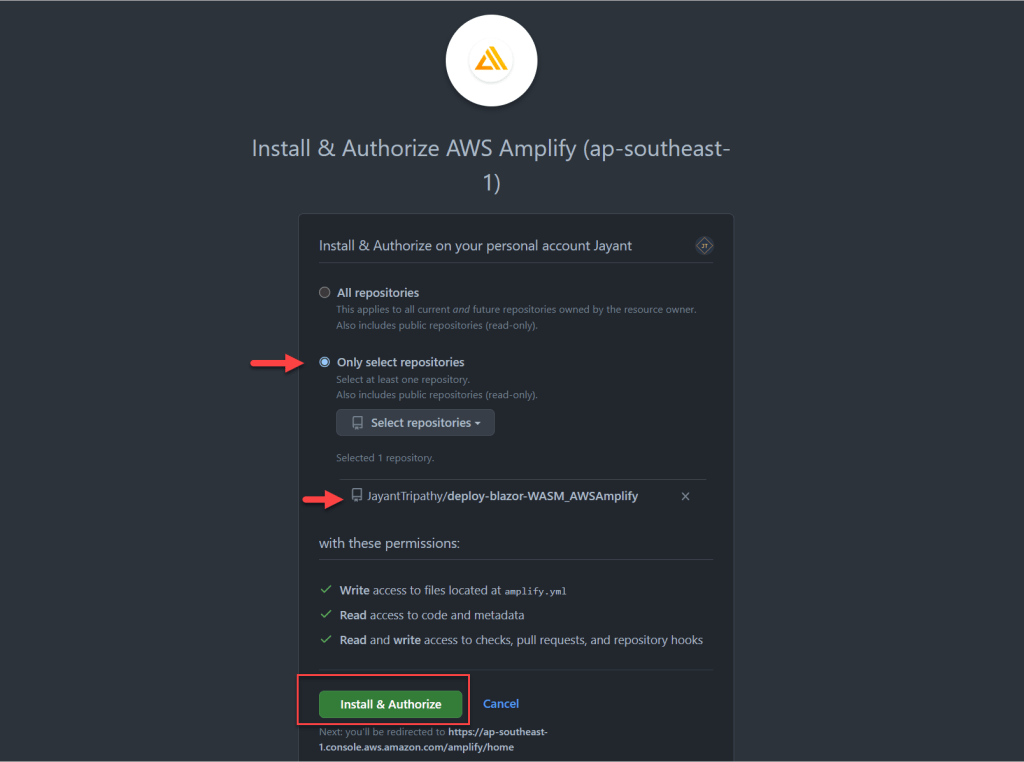
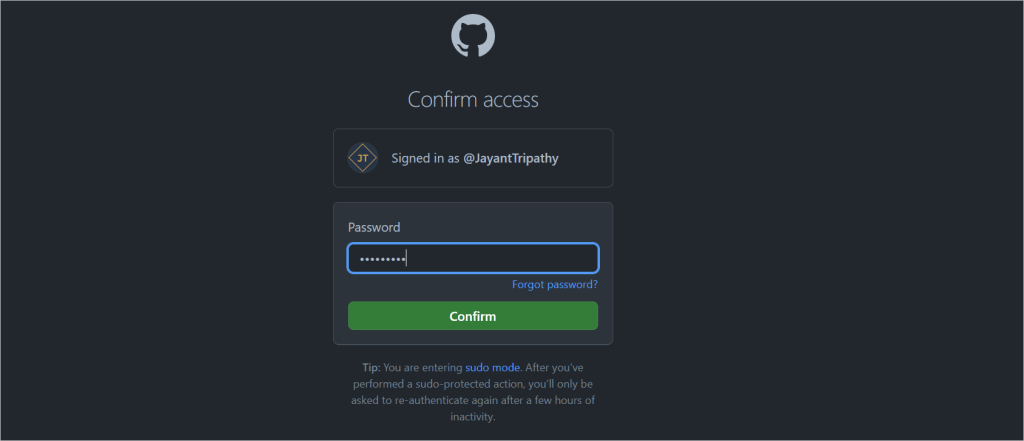
Install and Authorise should be selected, and the screen for passwords should be directed to. If you have activated Multi-Factor Authentication on GitHub, you must confirm with an OTP. You should definitely enable this as well to secure and protect your GitHub account.
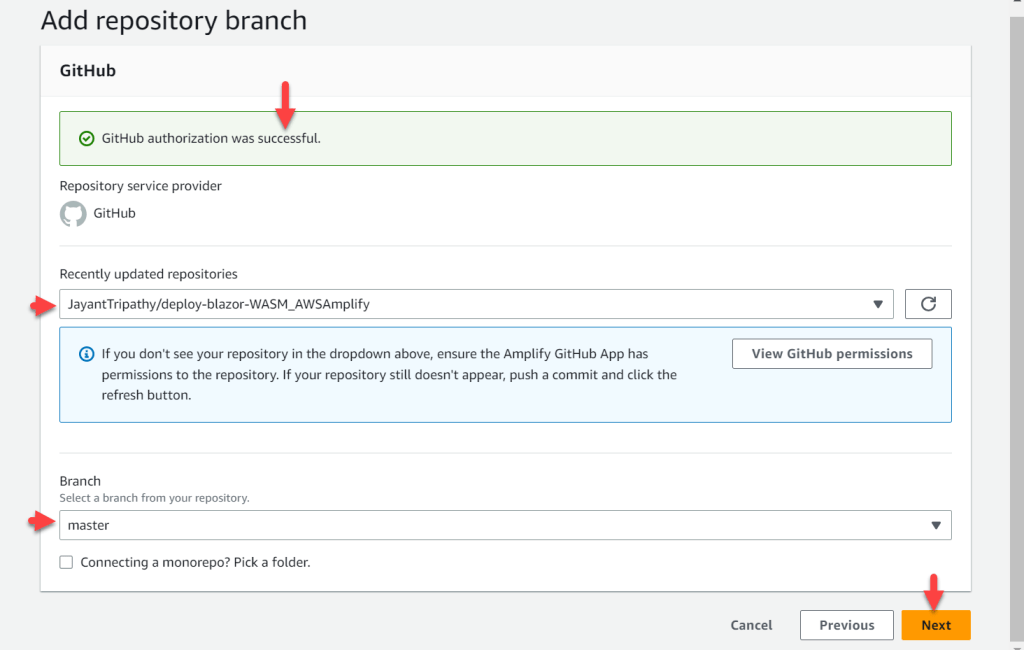
You will then be redirected to AWS Amplify, where you will see that the GitHub permission was successful and requested to select the repository and branch. Here I have master branch
Now we must construct specific build scripts in order to publish the Blazor WASM Static files that will be hosted.
To add your build commands, go to the next screen and click Edit. This is to guarantee that we are utilizing the correct version of the.NET SDK.
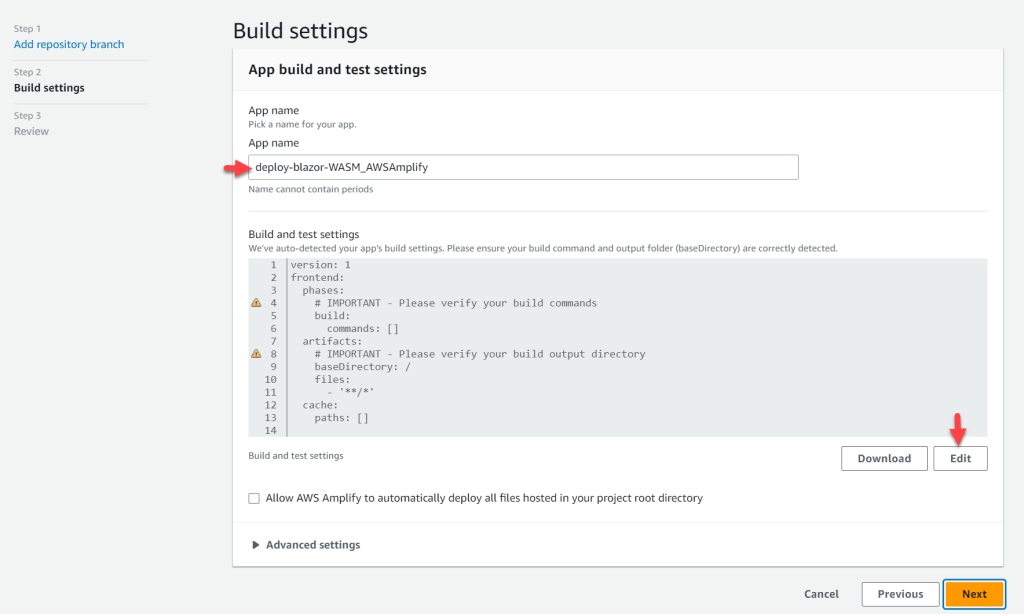
The below code you need to edit for configuration.
version: 1
frontend:
  phases:
    preBuild:
      commands:
        - curl -sSL https://dot.net/v1/dotnet-install.sh > dotnet-install.sh
        - chmod +x *.sh
        - ./dotnet-install.sh -c 7.0 -InstallDir ./dotnet7
        - ./dotnet7/dotnet --version
    build:
      commands:
        - ./dotnet7/dotnet publish -c Release -o release
  artifacts:
    baseDirectory: /release/wwwroot
    files:
      - '**/*'
  cache:
    paths: []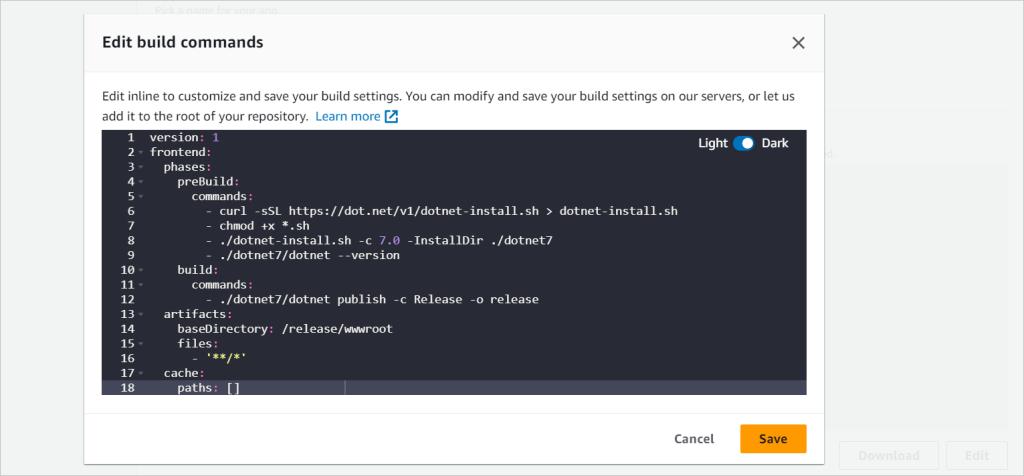
You may also add this code to your repository under the name amplify.yml. This allows you to keep the build commands on your source code management system. As soon as you join your repository, AWS Amplify will instantly take up this file.
The above code snippet’s description are below.
- Firstly, we are downloading the official dotnet script that allows us to install the required .NET SDK.
- The chmod command grants permission to execute the shell script file with extension sh.
- We are next using this script file to download and install the .NET 7 SDK to the /dotnet7 folder.
- Next, under the build command, we are going to publish the required blazor static files with the configuration set as Release and the output folder as Release.
- The required files to be hosted will be present under the release/wwwroot folder. Thus we are mentioning this directory as the base directory of artifacts. the **/** wildcard under files will ensure that all the files and folders under the release/wwwroot folder will be deployed by AWS Amplify.
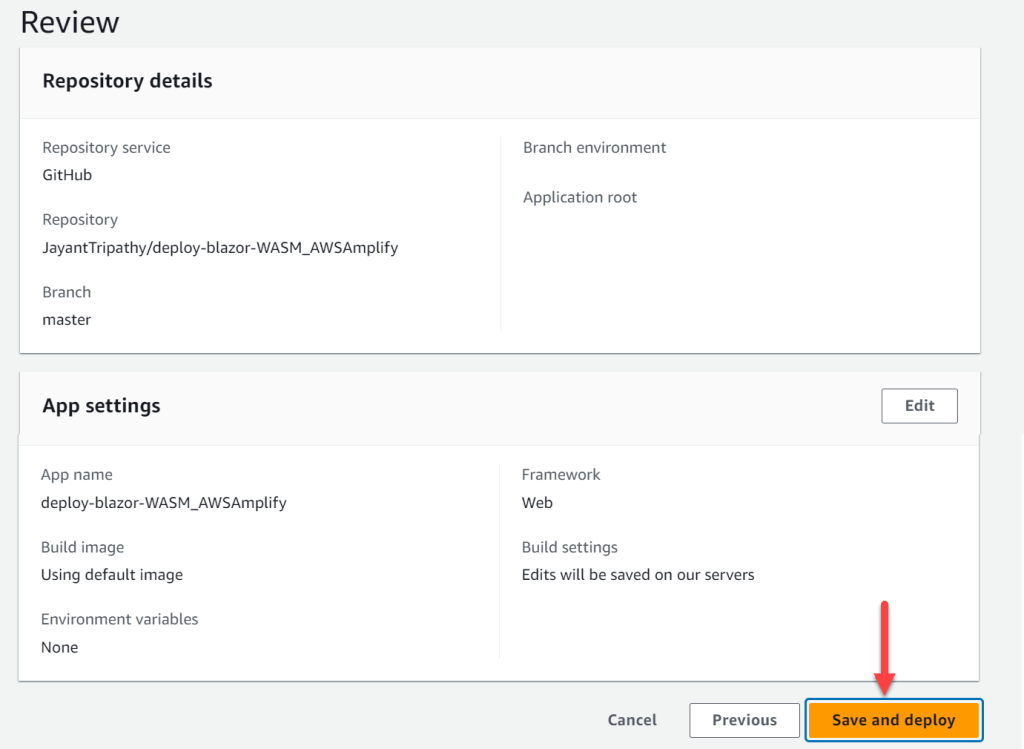
On the following screen, evaluate your changes before clicking Save and Deploy.
Here’s a sample with all three stages done and the application link highlighted.
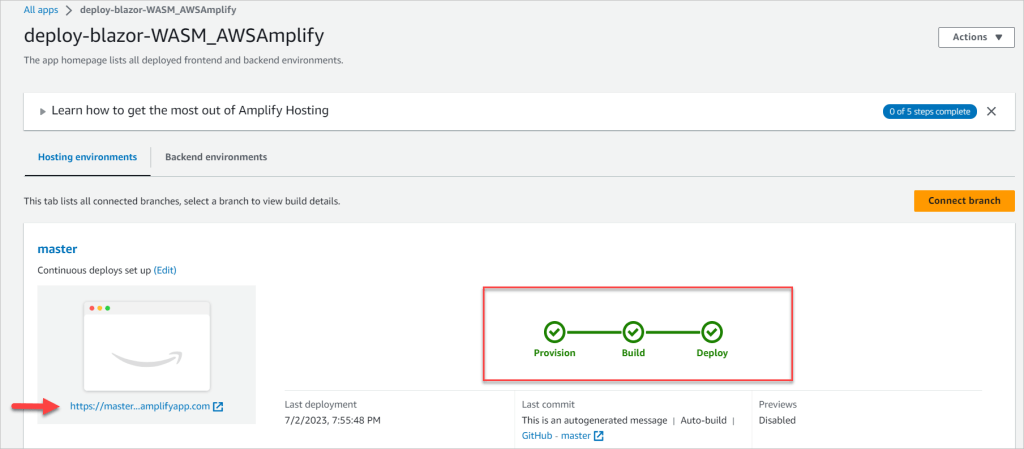
This will carry out three major steps like CI/CD.
- Provisioning – This phase configures the build environment on the host with a sample docker image and 4 vCPU and 7GB memory. To maintain isolation, each of the build environments will have its own host instance.
- Build – During this stage, we will clone our Blazor repository onto the host instance and begin performing the instructions we wrote earlier. As part of this, it downloads and installs the.NET 7 SDK, then publishes the Blazor WebAssembly Static files as an artefact.
- Finally, the Deploy stage, in which AWS Amplify pulls and deploys the artefacts from the previous step.
Clicking the highlighted link will launch the hosted Blazor app.

CI/CD(Continuous Integration/Continuous Deployment)
Continuous Deployment is the entire point of using AWS Amplify. So, every time there is a new push to the master branch (or the branch that we choose when configuring the amplified app), it will initiate a new provision-build-deploy task. This ensures that all of your most recent modifications on the main branch are deployed as soon as possible, without the need for human interaction.
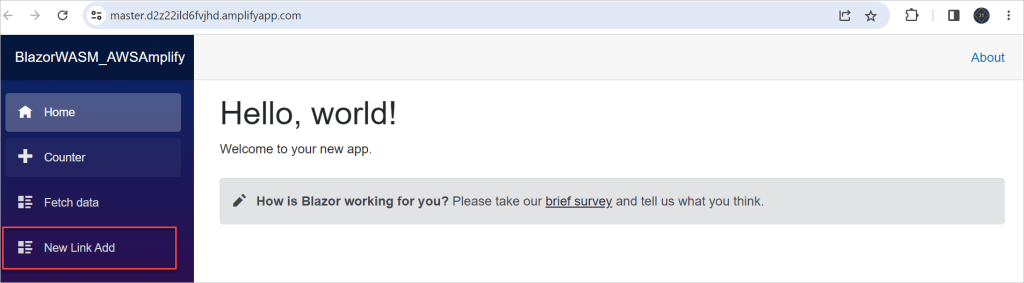
For example, I simply modified NavMenu.razor and added the new link before pushing the code back to the repository branch.
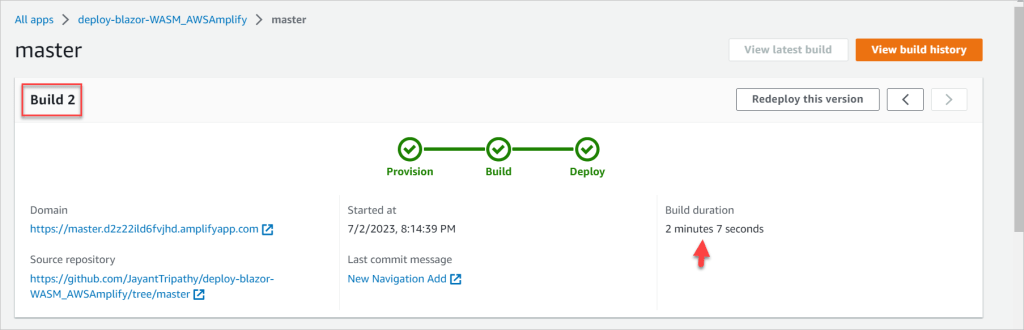
When we open the hosted Amplify URL again, we can see the update page on the below.
Preview of Pull Requests
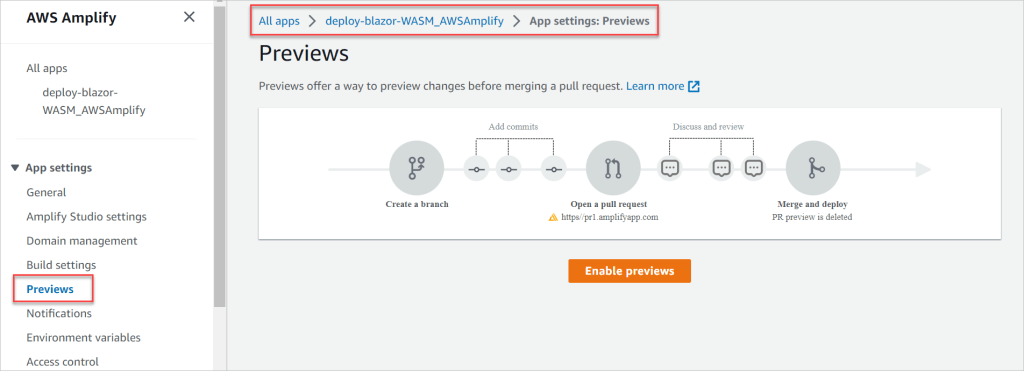
This is yet another intriguing AWS Amplify feature. It lets you preview changes from Pull Requests before they are merged and deployed. This allows the team to perform UI testing before the changes are merged. Let’s look into it.
Open AWS Amplify once more, choose your application, and then click Previews from the side menu. Enable previews by clicking here.
This will ask you to install a GitHub app in order for AWS Amplify to intercept PR builds. Install the app and grant your repository the necessary permissions.

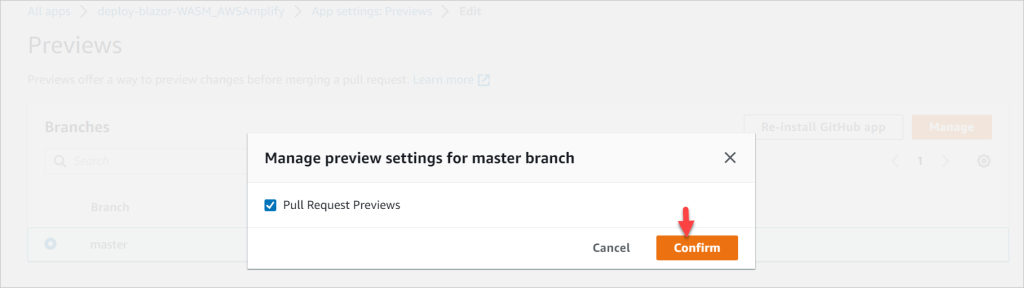
You can see the master branch select, and click to manage.

Return to your preview settings, choose the master branch, and click Manage. Previews are disabled by default, Click on the manage button and it prompt the window. Tick the checkbox and click on confirm.
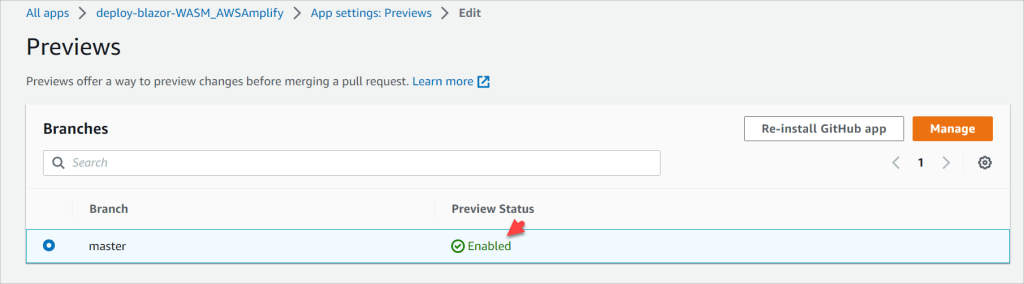
After confirm. we can see it enabled.
To put this to the test, return to your code editor and start a new pull request.
- Make a new branch. From the master branch, label it “master-dummy” and push your new branch as well.
- Add a fresh update (I updated the new nav link), and then push your changes.
- Navigate to GitHub. You will be prompted to make a new pull request because there have been new modifications on the new branch.
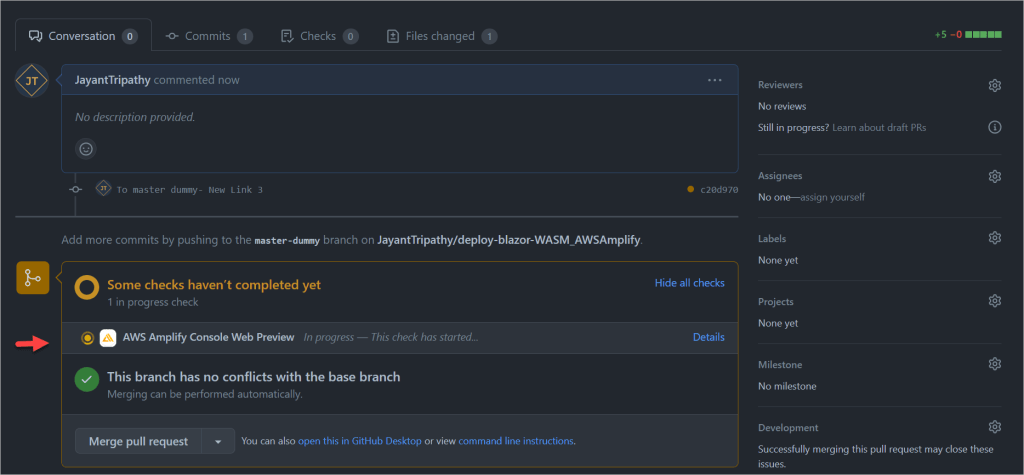
Simply click on the preview URL. And there you go, your changes are now deployed for testing.
For more details please visit https://docs.aws.amazon.com/amplify/latest/userguide/pr-previews.html.
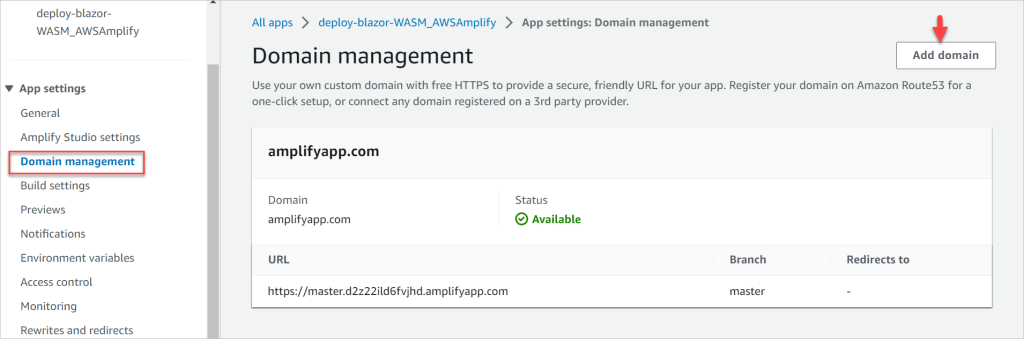
Custom Domain
You may have noticed that the app is hosted on xxxxxxxxxx.amplifyapp.com. In this case, the domain is amplifyapp, and the subdomain is random string. You may also use AWS Amplify to change this to a custom domain, such as www.mycustomdomain.com.
Open AWS Amplify and choose your app. Click on Domain Management in the sidebar and then Add Domain.
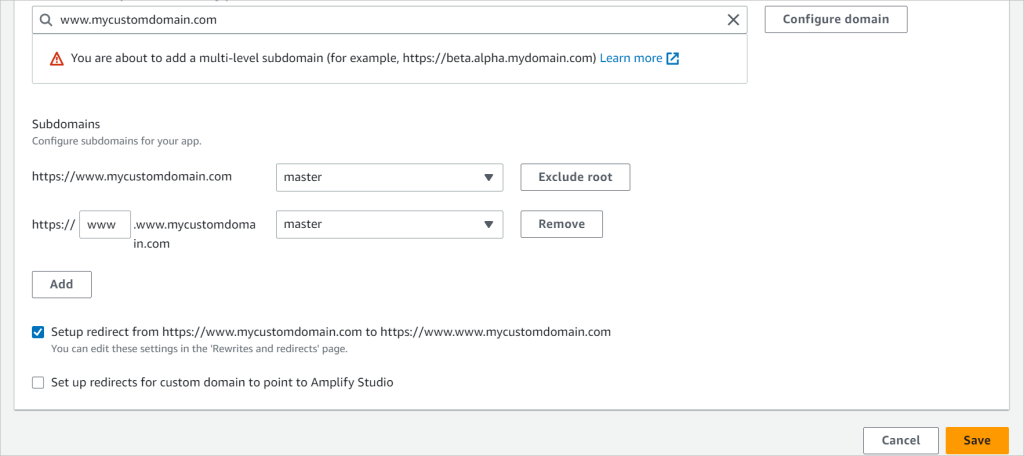
So, once you own a domain, you will have to enter it here and click configure. On this screen, you will be able to select the address for your blazor application. Here, you can either select the root domain or even a subdomain.
Other Features
AWS Amplify offers more than just Static Web Hosting. It is capable of much more, such as hosting a full backend and managing authentication with AWS Cognito, among other things.
Here are a few more capabilities available in the hosting mode.
- Emails can be sent to notify you of your Amplify application’s build status.
- redirects and rewrites
- Control of Custom Headers
- Variables for the Custom Environment
- Monitoring Metrics and Dashboards
You can find the source code here.
Cleanup
Make sure to wipe up your AWS Resources as soon as you finish testing something. This ensures that you are not charged more. Take your time with this. For AWS Amplify, just delete the app from the three-dot menu linked with the Amplify app.
That’s it for this article How to Deploy Blazor WebAssembly to AWS Amplify.
Conclusion
So, in this tutorial, we learned How to Deploy Blazor WebAssembly to AWS Amplify. We had created a sample Blazor WASM application, which we had uploaded to a new GitHub repository. Following that, we created an AWS Amplify app to which we attached our new GitHub repository and built some build instructions to assist us in publishing the necessary static blazor artefacts.
AWS Amplify then automatically hosts these files on globally available CDNs. We also discovered that anytime a new change is committed to the main branch, the build process is initiated, and the latest version of our blazor application is instantly deployed. Following that, we looked into a few other things, such as custom domain management, pull request previews, and so on.
Leave behind your valuable queries and suggestions in the comment section below. Also, if you think this article helps you, do not forget to share this with your developer community. Happy Coding 🙂
Related Articles
- Step-by-Step Guide to Using Azure Redis Cache in ASP.NET Core 9 Web API
- .NET 8 Authentication with Identity in a Web API using Bearer Tokens and Cookies
- How to convert Text To Speech With Azure Cognitive Services using Angular and .Net Core
- CRUD operation using the repository pattern with .Net 8, Ef-Core, and MySQL
- How to use Response Compression in .NET Core
- How to Integrate GraphQL in .Net Core
- Upload Download and Delete files in Azure Blob Storage using ASP.NET Core and Angular
- How to upload files to Azure Blob Storage using Asp.Net Core Web API
- How to store app secrets in ASP.NET Core using Secret Manager
- Logging into Azure App Service with ASP.Net Core
SUPPORT ME