
In this article we will learn about How to Send Emails from ASP.Net Core using Amazon SES. Do you need dependable and effective solution to send emails from your ASP.NET Core web applications? – If YES then this detailed post will teach you how to send emails from ASP.NET Core using Amazon SES, also known as Amazon Simple Email Service, allowing you to send emails with ease. Please read my previous article of Create a Blazor Web-Assembly App using Azure Function and deploy it as an Azure Static App.
Find the Source Code in this link
Email communication is vital in modern online applications, allowing organizations to connect with users, give essentialnk notifications, and effectively engage customers. Using Amazon SES, a highly scalable and cost-effective email delivery technology, can greatly improve the email capabilities of your ASP.NET Core apps.
This article will walk you through the process of setting up and configuring Amazon SES with your ASP.NET Core project step by step. From obtaining the appropriate credentials to integrating the SES API and implementing email-sending functionality in your application, we will cover all you need to know.
Basics of Amazon SES – Amazon Simple Email Service
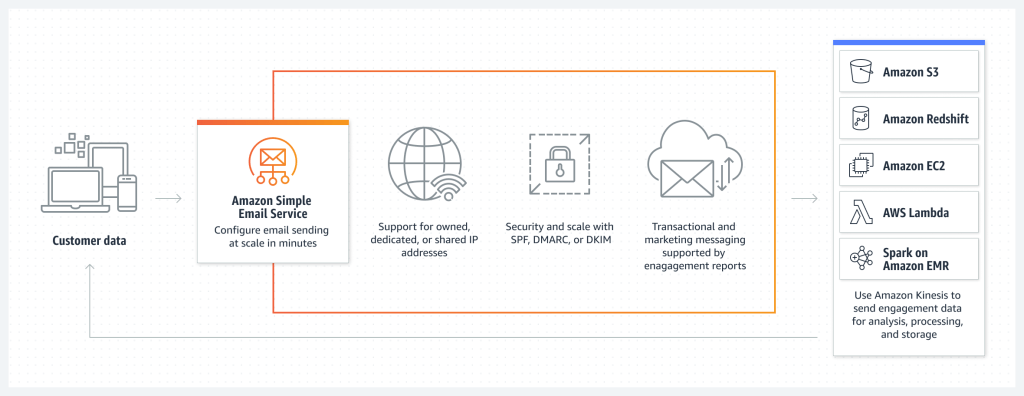
Amazon Simple Email Service (SES) is an email platform that provides an easy, cost-effective way for you to send and receive email using your own email addresses and domains. Amazon SES streamlines the email-sending process by providing a highly available infrastructure that handles email delivery. It manages email servers, handles bounces and complaints, and maintains sender reputation, ensuring that your emails reach their intended recipients’ inboxes.
Scalability is a big advantage of using Amazon SES. Whether you need to send a few hundred or millions of emails, SES can easily manage it. It makes use of AWS’s powerful infrastructure, allowing you to increase your email-sending capacity based on your demands without having to worry about infrastructure administration.
Another distinguishing element of Amazon’s SES is its low pricing. Pay-as-you-go pricing means you only pay for the emails you send, with no setup fees or minimum expenses. This makes it an appealing option for startups, small businesses, and corporations alike, since it allows you to effectively manage your email-sending costs based on consumption.
Understanding Amazon SES allows you to take advantage of its powerful infrastructure, scalability, cost-effectiveness, and advanced features to boost the email-sending capabilities of your ASP.NET Core apps.
Amazon Simple Email Service (Amazon SES) lets you reach customers confidently without an on-premises Simple Mail Transfer Protocol (SMTP) system.
Amazon SES pricing information
As previously stated, Amazon SES has a pay-as-you-go pricing approach. The Free Tier, on the other hand, is very liberal for you to try out. It is always free to send nearly 200 emails per 24 hours (if you are sending from an EC2 instance). In most circumstances, you will be charged nearly nothing. Aside from that, you’ll have to pay $0.10 per 1,000 emails sent or received, which is a really good price. There will be an additional charge of nearly $0.12 for each additional GB of data sent as an attachment.
For more details about pricing please visit this link https://aws.amazon.com/ses/pricing/.
Various methods for sending emails using Amazon SES
There are numerous methods for sending emails with Amazon Simple Email Service. They are listed below.
- Using the AWS Management Console.
- Using AWS CLI tool and JSON payload.
- Using the SMTP interface
- Using the AWS SDK for .NET (or any other framework/language)
Using Amazon SES on the AWS Management Console
Log in to the AWS Management Console and launch Amazon SES. This is how it would appear if you were to launch this service for the first time.

To begin sending emails, we must first create a new sender identity using an existing email id, and then have it validated. Following this, we will be able to send emails via Amazon SES.
Registering SES Identity
A domain, email address, or subdomain can be used as an identity to send emails through Amazon SES. Select Create Identity. I’ll use my spare email account to validate my identity in Amazon SES for this demonstration. Please keep in mind that once you register a mail id here, you will receive a verification email to validate your identity. As a result, make sure your mailbox is accessible.
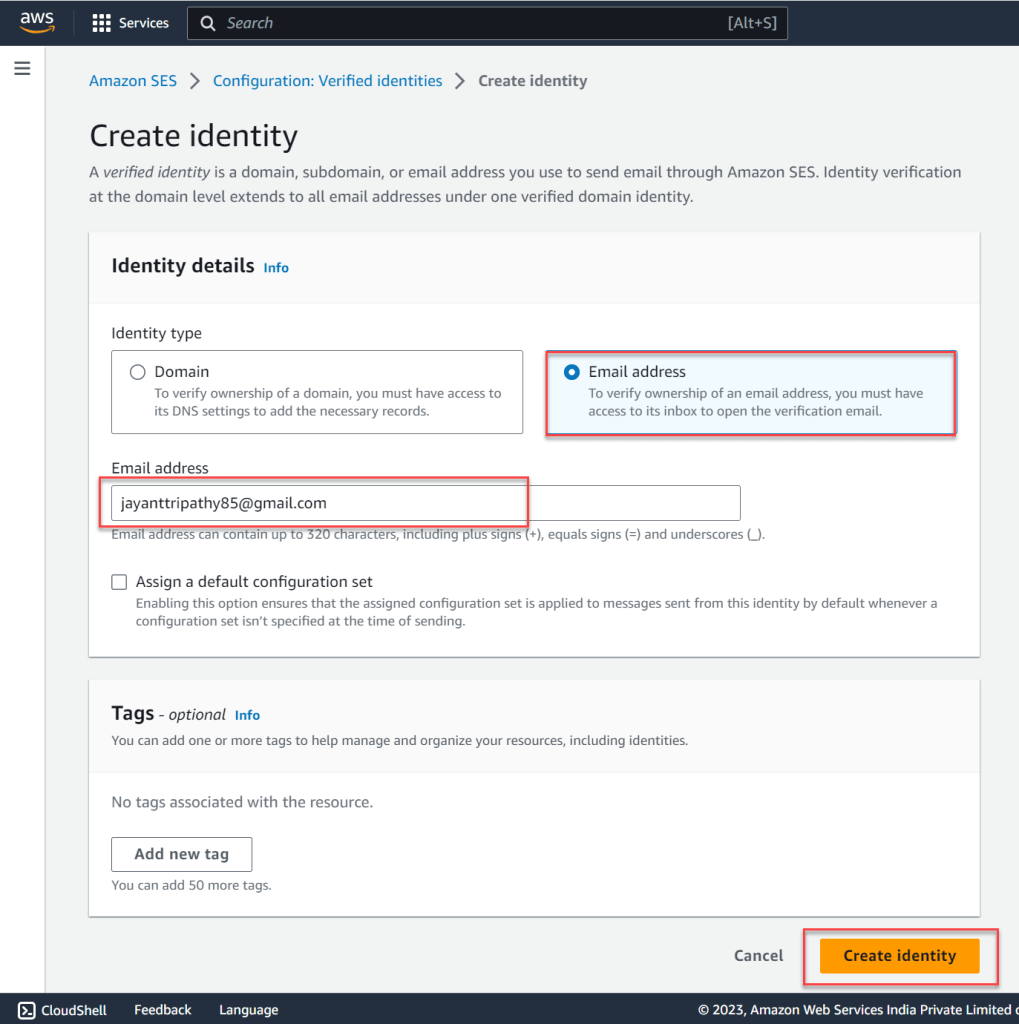
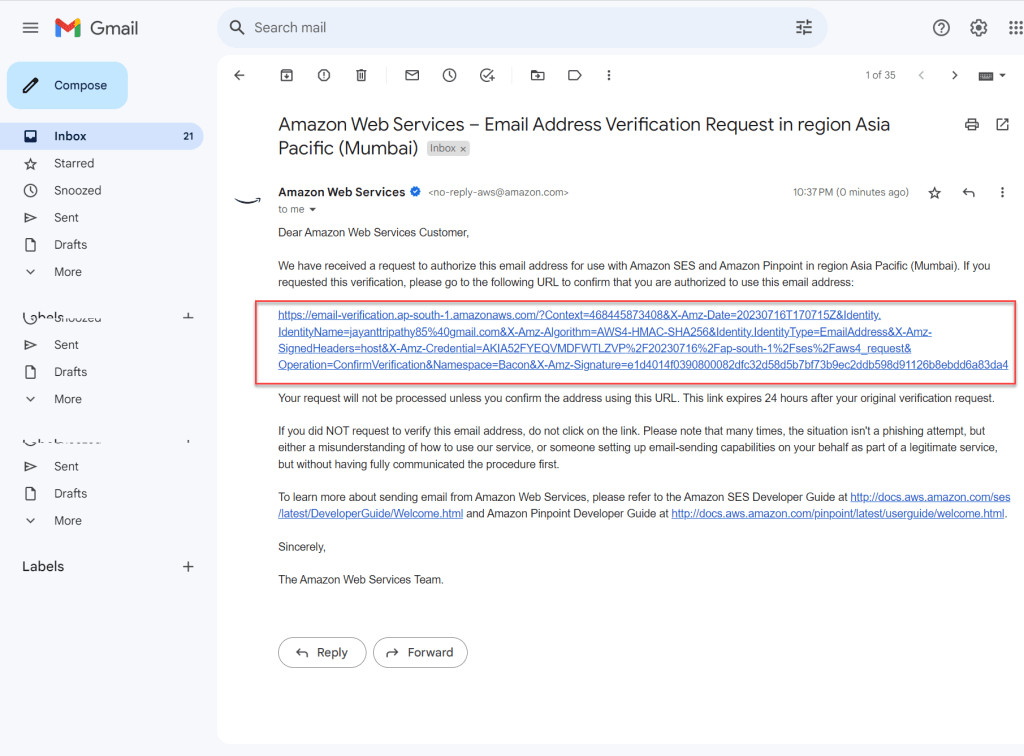
After clicking the Create Identity button, the following screen appears, indicating that validation is waiting. We must access our email and will validate the link.
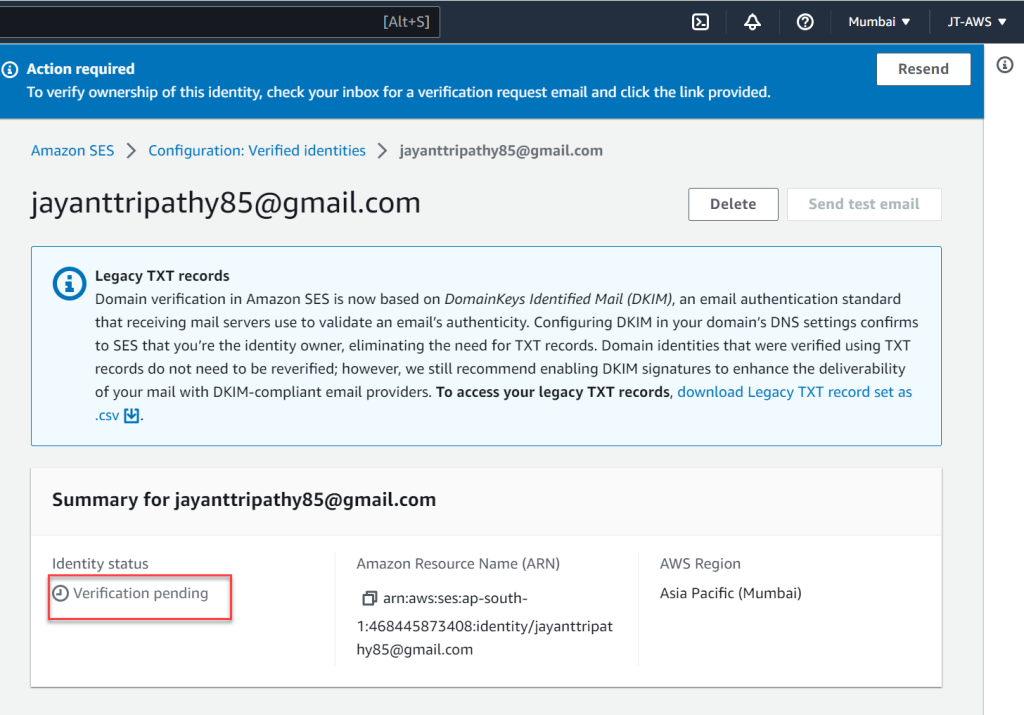
Verify the below link and after that we can able to send email using Amazon SES.
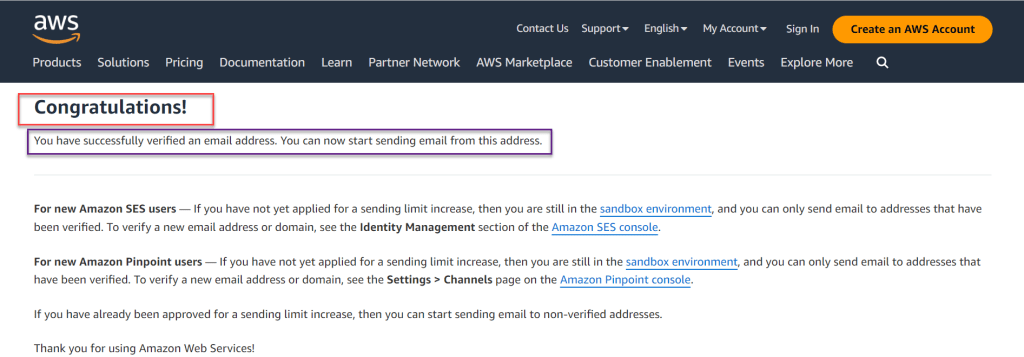
After verified we can see the below screen.
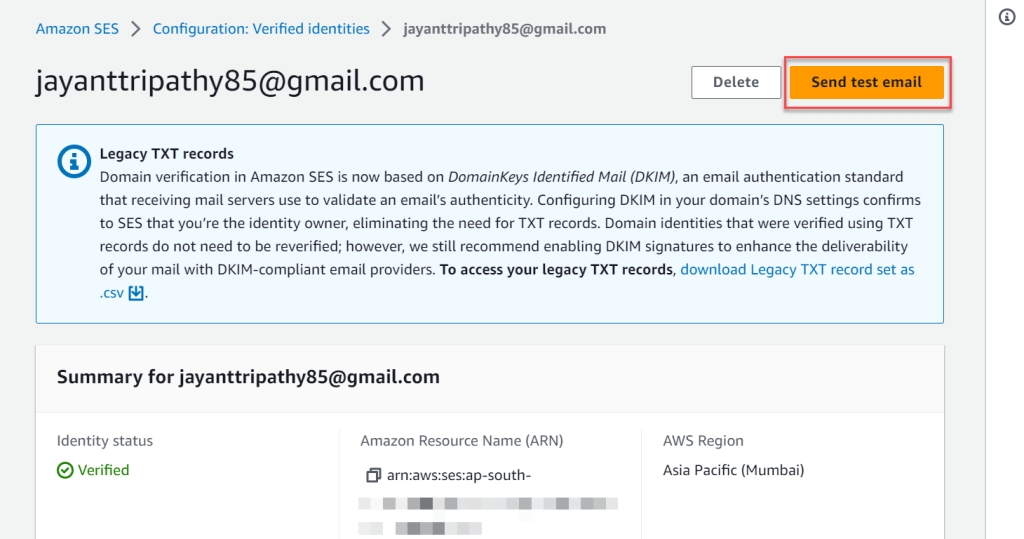
Return to your AWS Management Console and select Amazon SES -> Verified Identities. You will notice that your email address has been verified. Click on the highlighted button to Send the test email.
Using the AWS Management Console to Send Test Emails
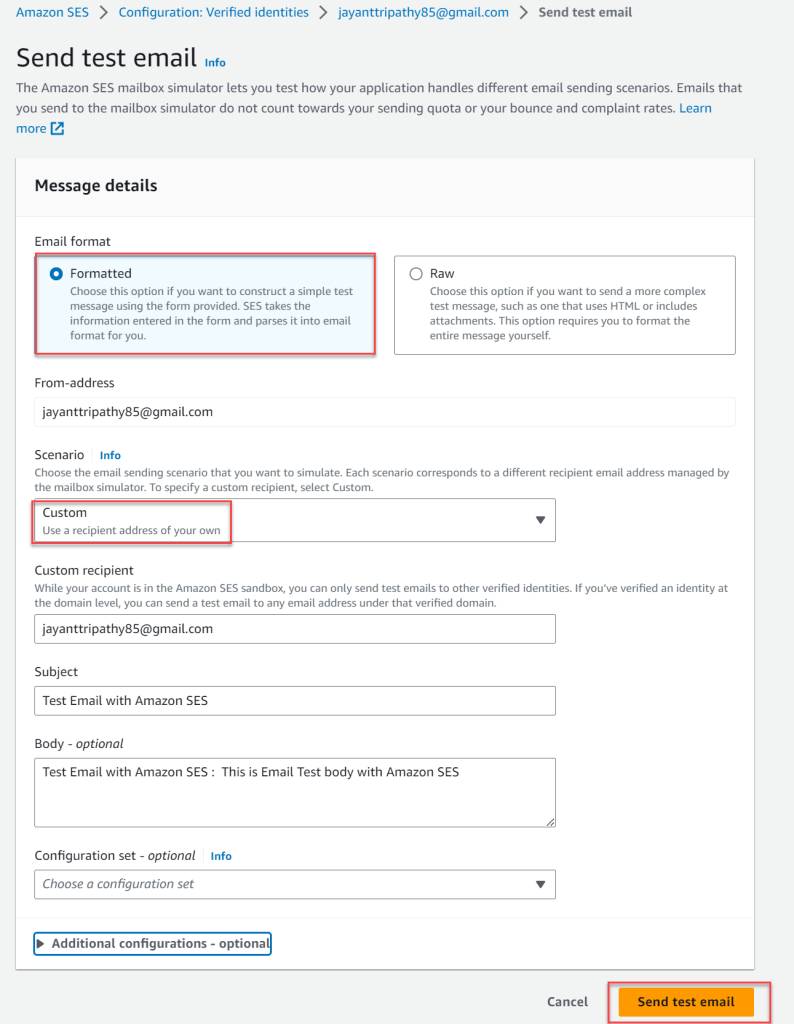
Now that we’ve established our identity, let’s send a quick test email via the AWS Management Console. You can use the Amazon SES mailbox simulator to test how your application handles various email-sending circumstances.
- Set the Email format as Formatted.
- The From Address should be the same email address that we validated earlier.
- Customize the scenarios, this lets you specify a specific recipient for testing purposes.
- Mention the email address to which you wish to send your test email in the custom recipient field. For demonstration purposes, I used the same email address.
- Provide the Test email’s Subject and Body lines.
- If you want to add the email’s CC and BCC addresses, expand the Additional Configuration-optional link and we can enter the information.
We have included all of the needed information, then please send test email.
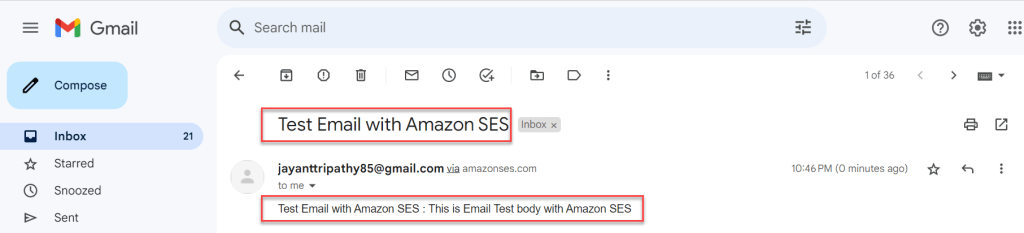
Navigate to your email box, and the test email will appear in my Inbox.
Sending Email using AWS CLI
We will be able to send emails via the AWS CLI. You will need AWS CLI installed on your machine for this, which I believe you already have. If not, you can get the CLI utility from this link
aws ses send-email --from jayanttripathy85@gmail.com --to jayanttripathy85@gmail.com --text "Test Body line from AWS CLI" --subject "Test Email from AWS CLI"Send Emails from ASP.NET Core using Amazon SES
Let’s create an ASP.Net Core Web API Project using below steps. As previously stated, there are two ways to send emails from ASP.NET Core using Amazon SES programmatically.
- Through the AWS SDK for .NET
- Through SMTP interface
- Launch the Visual Studio IDE and click on “Create new project”.
- In the “Create new project” window, select “
ASP.Net Core Web API Project” from the list of templates displayed. - Click Next. In the “Configure your new project” window, specify the name and location for the new project and then click Create.
- In the “ASP.Net Core Web API Project” window shown next, select .NET Core as the runtime and
.NET 7.0from the drop-down list at the top. Select “API” as the project template to create a new ASP.NET Core API application. - Ensure that the check boxes “Enable Docker Support” is disabled s we won’t be using the default feature we will add it manually later and “Configure for HTTPS” are checked.
- Make Authentication type as “None” as we are not using any authentication mode here.
- You can check the Open API support if you want to use Swagger
Sending Email using Amazon SES via SMTP in .NET
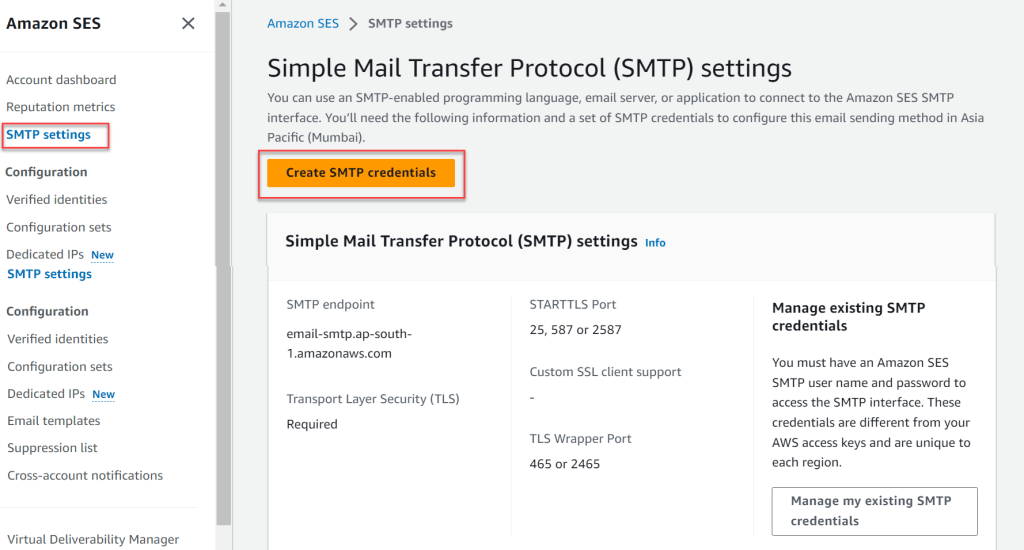
Let us first generate the necessary credentials to use the SMTP, Go to Amazon SES in the AWS Management Console. Go to SMTP Settings in the sidebar and click on Create SMTP Credentials on highlighted button.
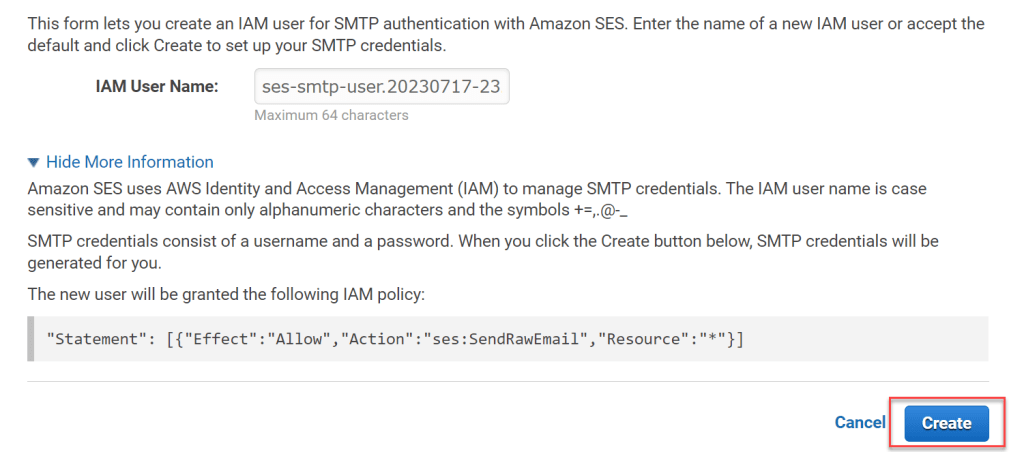
When you click Create smtp credentials, you will be taken to AWS IAM, where you will be assigned a new user. Continue by creating this user.
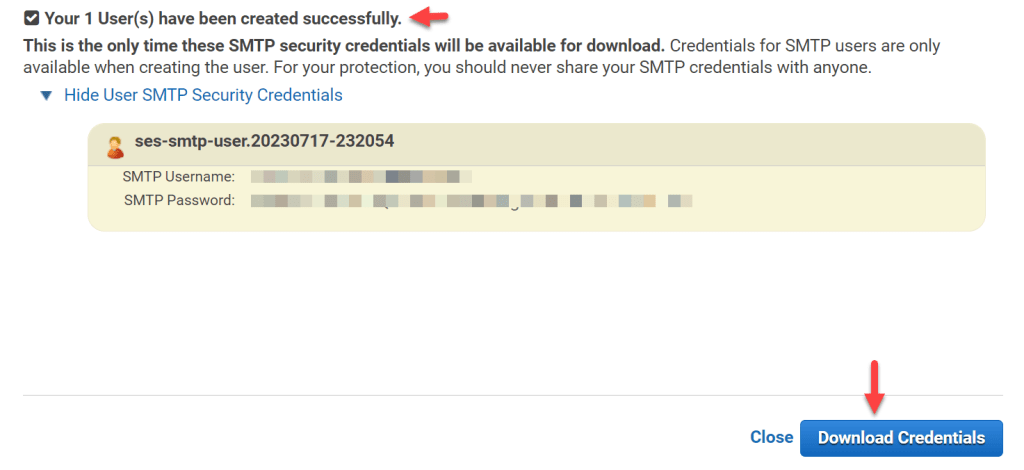
You will be provided the SMTP username and password once you have been created. Keep these details, as well as the SMTP destination, ready. Also you can downloads the credentials for further use
Install the Package to use SMTP
Install-Package MailKit
Install-Package MimeKit
Let’s a new Request class where the client can send data like as an email address to be mailed to, a subject, and body information. Create a new MailRequest class.
 public class MailRequest
    {
        public string? ToEmail { get; set; }
        public string? Subject { get; set; }
        public string? Body { get; set; }
    }
Next, let’s add another class to assist in loading the configuration from appsettings.json when configuring our email client. Create a new MailSettings class.
public class MailSettings
    {
        public string? Host { get; set; }
        public int Port { get; set; }
        public string? DisplayName { get; set; }
        public string? Mail { get; set; }
        public string? Username { get; set; }
        public string? Password { get; set; }
    }
Open the appsettings.json file and add the structure like below,
- Add the SMTP Server that we configured just before in IAM Credentials
- Add the registered email that we have used so far.
- Add the User name and Password according to i_am that we have created.
"MailSettings": {
  "Host": "<smtp server>",
  "Port": 587,
  "DisplayName": "<your name>",
  "Mail": "<ses identity registered mail id>",
  "Username": "<iam smtp username>",
  "Password": "<iam smtp password>"
}
Next, add the Email Service Interface and the class named as MailService for sending email using Mailkit package.
- Line #7 to #11 – We registered the constructor of Email Service.
- Line #21 – We’re generating a new Smtp client and attempting to connect to it using the appsettings host, port, and authentication information.json
 public interface IMailService
    {
        Task SendEmailAsync(MailRequest mailRequest);
    }
 public class MailService : IMailService
    {
        private readonly MailSettings _mailSettings;
        public MailService(IOptions<MailSettings> mailSettings)
        {
            _mailSettings = mailSettings.Value;
        }
        public async Task SendEmailAsync(MailRequest mailRequest)
        {
            var email = new MimeMessage();
            email.From.Add(new MailboxAddress(_mailSettings.DisplayName, _mailSettings.Mail));
            email.To.Add(MailboxAddress.Parse(mailRequest.ToEmail));
            email.Subject = mailRequest.Subject;
            var builder = new BodyBuilder();
            builder.HtmlBody = mailRequest.Body;
            email.Body = builder.ToMessageBody();
            using var smtp = new SmtpClient();
            smtp.Connect(_mailSettings.Host, _mailSettings.Port, SecureSocketOptions.StartTls);
            smtp.Authenticate(_mailSettings.Username, _mailSettings.Password);
            await smtp.SendAsync(email);
            smtp.Disconnect(true);
        }
    }
Next, open Program.cs and add the following code to register the dependencies in the ASP.NET Core application’s DI Container.
builder.Services.Configure<MailSettings>(builder.Configuration.GetSection("MailSettings"));
builder.Services.AddTransient<IMailService, MailService>();
Finally, let’s build a new EmailController and connect it to the service. Create a new Controller named EmailController in the Controllers folder and add the following code.
We’re going to make a new endpoint (/api/mails [POST]) that will call the IMailService’s SendEmailAsync method. It’s worth noting that the endpoint receives MailRequest as a request and passes it on to the service call, which sends the email via the SMTP client.
namespace AmazonSES_API.Controllers
{
    [Route("api/[controller]")]
    [ApiController]
    public class EmailController : ControllerBase
    {
        private readonly IMailService _mailService;
        public EmailController(IMailService mailService)
        {
            this._mailService = mailService;
        }
        [HttpPost]
        public async Task<IActionResult> SendMail(MailRequest request)
        {
            await _mailService.SendEmailAsync(request);
            return Ok("Email Sent Successfully !");
        }
    }
}
That’s it the changes let’s open the POSTMAN and test this API
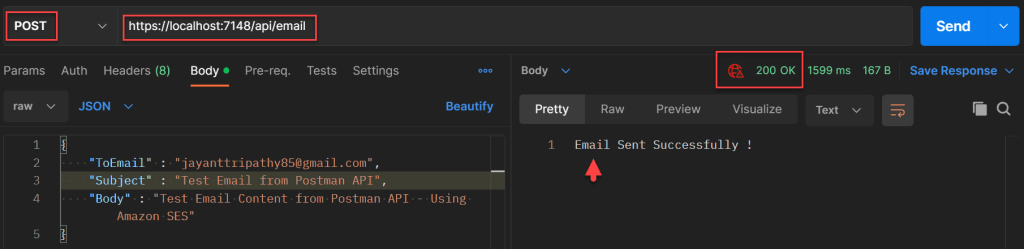
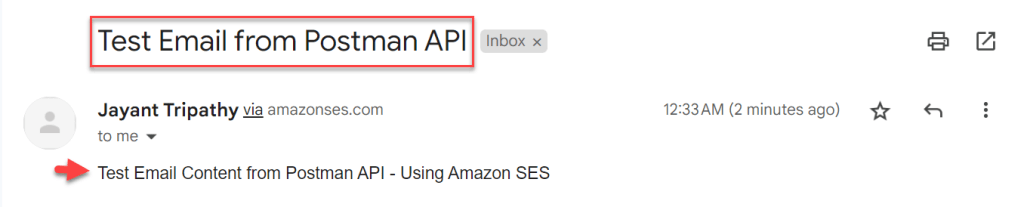
Navigate to your Inbox and we can see the Email.
Sending Mail using Amazon SES via AWS SDK for .NET
After learning how to send emails from ASP.NET Core using Amazon SES via SMTP, let’s look at how to do the same using AWS SDK Packages.
Install the below packages
install-package AWSSDK.Extensions.NETCore.Setup
install-package AWSSDK.SimpleEmail
Then, in appsettings.json, add the following, make sure you can change your details accordingly.
"AWS": {
  "Profile": "default",
  "Region": "ap-east-1"
}
Following that, we will introduce a new service that makes explicit use of the AWS SDK package. Make a new class called SESSDKService in the services folder. This service will also implement the IMailService interface.
 public class SESSDKService : IMailService
    {
        private readonly MailSettings _mailSettings;
        private readonly IAmazonSimpleEmailService _mailService;
        public SESSDKService(IOptions<MailSettings> mailSettings,
            IAmazonSimpleEmailService mailService)
        {
            _mailSettings = mailSettings.Value;
            _mailService = mailService;
        }
        public async Task SendEmailAsync(MailRequest mailRequest)
        {
            var mailBody = new Body(new Content(mailRequest.Body));
            var message = new Message(new Content(mailRequest.Subject), mailBody);
            var destination = new Destination(new List<string> { mailRequest.ToEmail! });
            var request = new SendEmailRequest(_mailSettings.Mail, destination, message);
            await _mailService.SendEmailAsync(request);
        }
    }
Modify the Program.cs file like below,
builder.Services.Configure<MailSettings>(builder.Configuration.GetSection("MailSettings"));
//builder.Services.AddTransient<IMailService, MailService>();
builder.Services.AddDefaultAWSOptions(builder.Configuration.GetAWSOptions());
builder.Services.AddAWSService<IAmazonSimpleEmailService>();
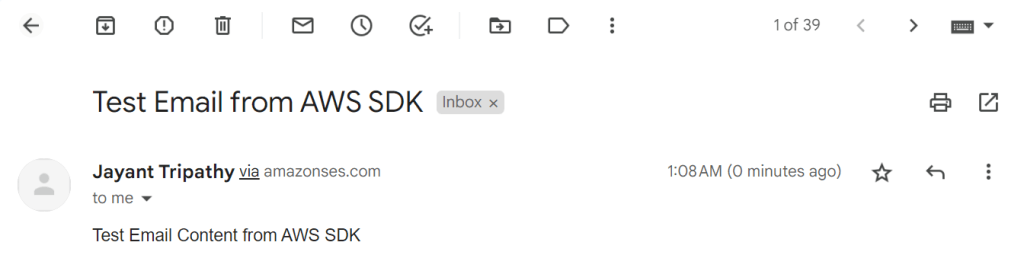
builder.Services.AddTransient<IMailService, SESService>();Reopen Postman and send the same request. The mail will be delivered this time via the SES Service (the AWS SDK package for Simple Email Service).
Amazon Simple Email Service (SES) is a strong and dependable solution for sending marketing, notification, and transactional emails in a timely manner. Setting up Amazon SES is simple and can be completed in a few simple steps.
After creating an AWS account and logging into the Amazon SES panel, you may verify and create a default email address and begin utilizing the service.
You can reap the benefits of cloud-based email sending with Amazon SES, including increased deliverability, scalability, and security.
Find the Source Code in this link
Conclusion
In this article we discussed about How to Send Emails from ASP.Net Core using Amazon SES. Email communication is vital in modern online applications, allowing organizations to connect with users, give essential notifications, and effectively engage customers. Using Amazon SES, a highly scalable and cost-effective email delivery technology, can greatly improve the email capabilities of your ASP.NET Core apps.
Leave behind your valuable queries and suggestions in the comment section below. Also, if you think this article helps you, do not forget to share this with your developer community. Happy Coding 🙂
Latest Articles
- How to Set up an Amazon CloudFront Distribution for Amazon S3 Bucket 🚀
- How to install and configure AWS Toolkit for VS Code
- How to send SMS using Amazon Simple Notification Services(SNS)
- Send Emails from ASP.NET Core using Amazon SES
- How to Deploy Blazor WebAssembly to AWS Amplify
- How to host Angular app on AWS S3 bucket using CloudFront
- Building Serverless ASP.NET Core Web API with AWS Lambda using Function URLs
- Setting Up the AWS Toolkit for Visual Studio
- Create An Amazon AWS Free Tier Account
SUPPORT ME