
In this article we will learn about JWT Authentication And Authorization With Identity Framework. Here I decided to write one article about JWT authentication using .NET 6.0 version. and also be using Microsoft Identity framework to store user and role information. Here we discuss how to protect an ASP.NET Core Web API application by implementing JWT authentication. We will also see how to use authorization in ASP.NET Core to supply access to various functionalities of the application. We will store user credentials in an SQL server database, and we will use Entity framework and Identity framework for database operations. Please read my previous article of Using API Key Authentication To Secure ASP.NET Core Web API.
Authentication is the process of validating user credentials and authorization is the process of checking privileges for a user to access specific modules in an application.
JSON Web Token (JWT) is an open standard (RFC 7519) that defines a compact and self-contained way for securely transmitting information between parties as a JSON object. This information can be verified and trusted because it is digitally signed. JWTs can be signed using a secret (with the HMAC algorithm) or a public/private key pair using RSA or ECDSA. For more details of JWT please visit this link https://jwt.io/introduction/.
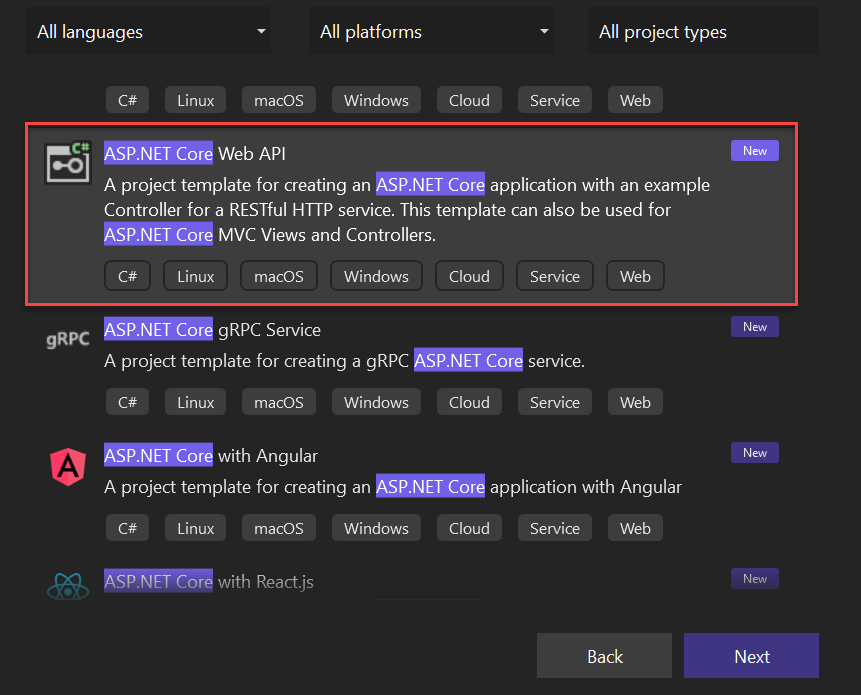
Creating ASP.NET Core Web API in .Net 6.0
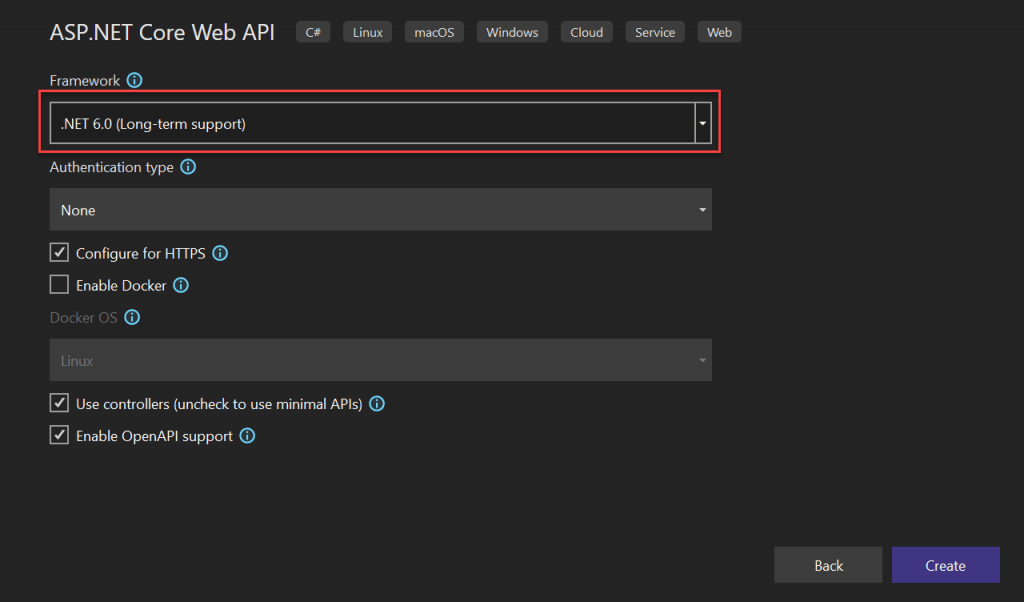
Here I am using Visual Studio 2022 to create .NET 6.0 applications. We can choose ASP.NET Core Web API template from Visual Studio 2022 like below.
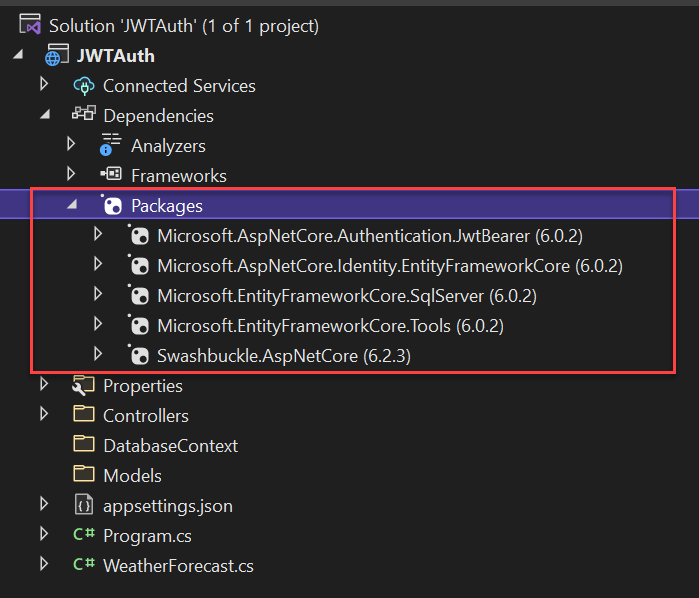
Adding below required packages using Nuget
Add the below required packages using Nuget,
Microsoft.EntityFrameworkCore.SqlServer
Microsoft.EntityFrameworkCore.Tools
Microsoft.AspNetCore.Identity.EntityFrameworkCore
Microsoft.AspNetCore.Authentication.JwtBearer
Once you got installed the above packages you can see it find under packages
Adding configuration details in appsettings.json
Open appsettings.json file and add the below configuration like this. Here I add two configuration
- Added connection string details
- Added
JWTAuthconfiguration details
{
  "Logging": {
    "LogLevel": {
      "Default": "Information",
      "Microsoft.AspNetCore": "Warning"
    }
  },
  "AllowedHosts": "*",
  "ConnectionStrings": {
    "ConnStr": "Data Source=MSCNUR1888004;Initial Catalog=JWTAuthDB;Integrated Security=True;ApplicationIntent=ReadWrite;MultiSubnetFailover=False"
  },
  "JWTAuth": {
    "ValidAudienceURL": "http://localhost:4200",
    "ValidIssuerURL": "http://localhost:5000",
    "SecretKey": "%TrwmbxYunsJWT8972jbgsjjfsnHHTwwmkOOmNVDRNBSTmmdshgsynsnb%$$@2mNggsshh&"
  }
}
Creating DBContext to communicate Database
We can create a new folder “DatabaseContext” and create a class AppDbContext class under DatabaseContext folder and add below code.
using Microsoft.AspNetCore.Identity;
using Microsoft.AspNetCore.Identity.EntityFrameworkCore;
using Microsoft.EntityFrameworkCore;
namespace JWTAuth.DatabaseContext
{
    public class AppDBContext : IdentityDbContext<IdentityUser>
    {
        public AppDBContext(DbContextOptions<AppDBContext> options) : base(options)
        {
        }
        protected override void OnModelCreating(ModelBuilder builder)
        {
            base.OnModelCreating(builder);
        }
    }
}
Creating Required Model class
On below I have created the required model classes.
Register.cs
 public class Register
    {
        [Required(ErrorMessage = "User Name is required")]
        public string? Username { get; set; }
        [EmailAddress]
        [Required(ErrorMessage = "Email is required")]
        public string? Email { get; set; }
        [Required(ErrorMessage = "Password is required")]
        public string? Password { get; set; }
    }
Login.cs
public class Login
    {
        [Required(ErrorMessage = "User Name is required")]
        public string? Username { get; set; }
        [Required(ErrorMessage = "Password is required")]
        public string? Password { get; set; }
    }
UserRoles.cs
We have added two constant values “Admin” and “User” as roles. You can add as many roles as you wish.
 public static class UserRoles
    {
        public const string Admin = "Admin";
        public const string User = "User";
    }
Response.cs
Response class is for returning the response value after user registration and user login. It will also return error messages if the request fails.
public class Response
    {
        public string? Status { get; set; }
        public string? Message { get; set; }
    }
Adding Auth Controller file
Let’s create an API controller “AuthController” inside the “Controllers” folder.
- We have added three methods
login,register, andregister-admininside the controller class. Register and register-admin are almost same, but the register-admin method will be used to create a user with admin role. In login method, we have returned a JWT token after successful login. - Here I have used Identity mechanism to get manage user roles and model.
GetTokenis used to create JWT token using our security keys that we defined inappsettings.jsonfile.
using JWTAuth.Models;
using Microsoft.AspNetCore.Http;
using Microsoft.AspNetCore.Identity;
using Microsoft.AspNetCore.Mvc;
using Microsoft.IdentityModel.Tokens;
using System.IdentityModel.Tokens.Jwt;
using System.Security.Claims;
using System.Text;
namespace JWTAuth.Controllers
{
    [Route("api/[controller]")]
    [ApiController]
    public class AuthController : ControllerBase
    {
        private readonly UserManager<IdentityUser> _userManager;
        private readonly RoleManager<IdentityRole> _roleManager;
        private readonly IConfiguration _configuration;
        public AuthController(
            UserManager<IdentityUser> userManager,
            RoleManager<IdentityRole> roleManager,
            IConfiguration configuration)
        {
            _userManager = userManager;
            _roleManager = roleManager;
            _configuration = configuration;
        }
        [HttpPost]
        [Route("login")]
        public async Task<IActionResult> Login([FromBody] Login model)
        {
            var user = await _userManager.FindByNameAsync(model.Username);
            if (user != null && await _userManager.CheckPasswordAsync(user, model.Password))
            {
                var userRoles = await _userManager.GetRolesAsync(user);
                var authClaims = new List<Claim>
                {
                    new Claim(ClaimTypes.Name, user.UserName),
                    new Claim(JwtRegisteredClaimNames.Jti, Guid.NewGuid().ToString()),
                };
                foreach (var userRole in userRoles)
                {
                    authClaims.Add(new Claim(ClaimTypes.Role, userRole));
                }
                var token = GetToken(authClaims);
                return Ok(new
                {
                    token = new JwtSecurityTokenHandler().WriteToken(token),
                    expiration = token.ValidTo
                });
            }
            return Unauthorized();
        }
        [HttpPost]
        [Route("register")]
        public async Task<IActionResult> Register([FromBody] Register model)
        {
            var userExists = await _userManager.FindByNameAsync(model.Username);
            if (userExists != null)
                return StatusCode(StatusCodes.Status500InternalServerError, new Response { Status = "Error", Message = "User already exists!" });
            IdentityUser user = new()
            {
                Email = model.Email,
                SecurityStamp = Guid.NewGuid().ToString(),
                UserName = model.Username
            };
            var result = await _userManager.CreateAsync(user, model.Password);
            if (!result.Succeeded)
                return StatusCode(StatusCodes.Status500InternalServerError, new Response { Status = "Error", Message = "User creation failed! Please check user details and try again." });
            return Ok(new Response { Status = "Success", Message = "User created successfully!" });
        }
        [HttpPost]
        [Route("register-admin")]
        public async Task<IActionResult> RegisterAdmin([FromBody] Register model)
        {
            var userExists = await _userManager.FindByNameAsync(model.Username);
            if (userExists != null)
                return StatusCode(StatusCodes.Status500InternalServerError, new Response { Status = "Error", Message = "User already exists!" });
            IdentityUser user = new()
            {
                Email = model.Email,
                SecurityStamp = Guid.NewGuid().ToString(),
                UserName = model.Username
            };
            var result = await _userManager.CreateAsync(user, model.Password);
            if (!result.Succeeded)
                return StatusCode(StatusCodes.Status500InternalServerError, new Response { Status = "Error", Message = "User creation failed! Please check user details and try again." });
            if (!await _roleManager.RoleExistsAsync(UserRoles.Admin))
                await _roleManager.CreateAsync(new IdentityRole(UserRoles.Admin));
            if (!await _roleManager.RoleExistsAsync(UserRoles.User))
                await _roleManager.CreateAsync(new IdentityRole(UserRoles.User));
            if (await _roleManager.RoleExistsAsync(UserRoles.Admin))
            {
                await _userManager.AddToRoleAsync(user, UserRoles.Admin);
            }
            if (await _roleManager.RoleExistsAsync(UserRoles.Admin))
            {
                await _userManager.AddToRoleAsync(user, UserRoles.User);
            }
            return Ok(new Response { Status = "Success", Message = "User created successfully!" });
        }
        private JwtSecurityToken GetToken(List<Claim> authClaims)
        {
            var authSigningKey = new SymmetricSecurityKey(Encoding.UTF8.GetBytes(_configuration["JWT:Secret"]));
            var token = new JwtSecurityToken(
                issuer: _configuration["JWT:ValidIssuer"],
                audience: _configuration["JWT:ValidAudience"],
                expires: DateTime.Now.AddHours(3),
                claims: authClaims,
                signingCredentials: new SigningCredentials(authSigningKey, SecurityAlgorithms.HmacSha256)
                );
            return token;
        }
    }
}
Adding Configurations changes in Program.cs file
In .NET 6.0, Microsoft removed the Startup class and only kept Program class. We must define all our dependency injection and other configurations inside the Program class.
- In the
Program.csfile we addedEntity Framework,Identitysetup,Authentications&JWT Bearer
using JWTAuth.DatabaseContext;
using Microsoft.AspNetCore.Authentication.JwtBearer;
using Microsoft.AspNetCore.Identity;
using Microsoft.EntityFrameworkCore;
using Microsoft.IdentityModel.Tokens;
using System.Text;
var builder = WebApplication.CreateBuilder(args);
ConfigurationManager configuration = builder.Configuration;
// Add services to the container.
// For Entity Framework
builder.Services.AddDbContext<AppDBContext>(options => options.UseSqlServer(configuration.GetConnectionString("ConnStr")));
// For Identity
builder.Services.AddIdentity<IdentityUser, IdentityRole>()
    .AddEntityFrameworkStores<AppDBContext>()
    .AddDefaultTokenProviders();
// Adding Authentication
builder.Services.AddAuthentication(options =>
{
    options.DefaultAuthenticateScheme = JwtBearerDefaults.AuthenticationScheme;
    options.DefaultChallengeScheme = JwtBearerDefaults.AuthenticationScheme;
    options.DefaultScheme = JwtBearerDefaults.AuthenticationScheme;
})
// Adding Jwt Bearer
.AddJwtBearer(options =>
{
    options.SaveToken = true;
    options.RequireHttpsMetadata = false;
    options.TokenValidationParameters = new TokenValidationParameters()
    {
        ValidateIssuer = true,
        ValidateAudience = true,
        ValidAudience = configuration["JWTAuth:ValidIssuerURL"],
        ValidIssuer = configuration["JWTAuth:ValidIssuerURL"],
        IssuerSigningKey = new SymmetricSecurityKey(Encoding.UTF8.GetBytes(configuration["JWTAuth:SecretKey"]))
    };
});
builder.Services.AddControllers();
// Learn more about configuring Swagger/OpenAPI at https://aka.ms/aspnetcore/swashbuckle
builder.Services.AddEndpointsApiExplorer();
builder.Services.AddSwaggerGen();
var app = builder.Build();
// Configure the HTTP request pipeline.
if (app.Environment.IsDevelopment())
{
    app.UseSwagger();
    app.UseSwaggerUI();
}
app.UseHttpsRedirection();
app.UseAuthorization();
app.MapControllers();
app.Run();
Run commands to add into Database
Let’s run the below command to add the migrations model. Click on Tools then open Package Manager Console.
add-migration Initial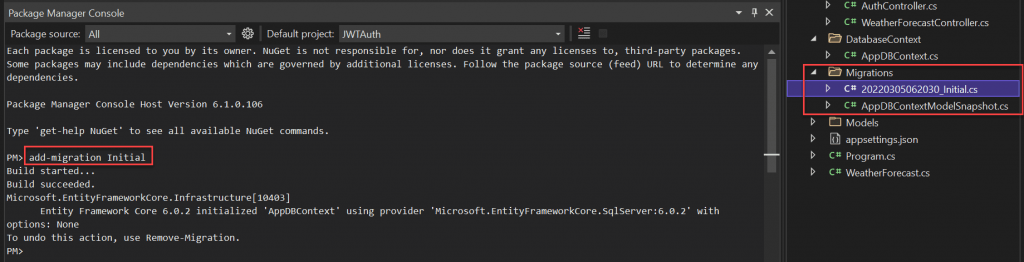
You can see after running this commend it created a migrations folder that hold our model changes.
Then we should run the below command, this will updated into database holding the migrations object
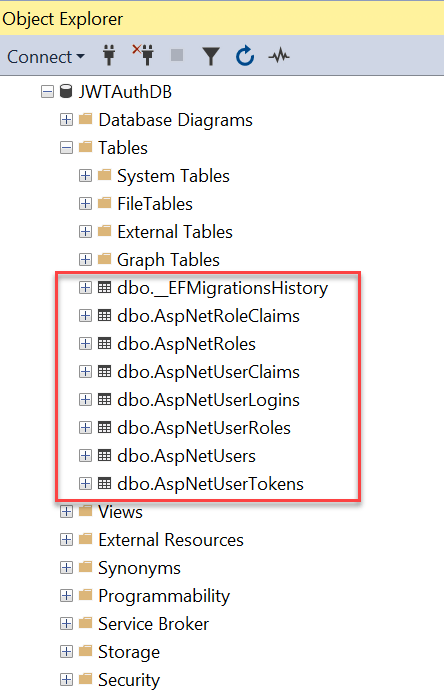
update-databaseAfter run the above command you check the database using SQL server object explorer, you can see that the database is created with tables.
ASP.NET Core Identity is a membership system which allows you to add login functionality to your application. Users can create an account and login with a username and password, or they can use an external login provider such as Facebook, Google, Microsoft Account, Twitter and more.
You can configure ASP.NET Core Identity to use a SQL Server database to store usernames, passwords, and profile data. Alternatively, you can use your own persistent store to store data in another other persistent storage, such as Azure Table Storage. ramenbet.com oyuncularımıza en iyi kumar deneyimini sunmaya çalışıyoruz. Slotlar, masa oyunları ve canlı casino gibi çeşitli oyunlarımız var ve bu da ürün yelpazemizi gerçekten benzersiz kılıyor. Platform, oyunu daha da heyecanlı ve karlı hale getiren cömert bonuslar ve promosyonlarla oyuncuları memnun ediyor. Ekibimiz, oyun için güvenilir bir platform sunarak verilerinizin güvenliği ve gizliliğiyle ilgilenir. Bugün kazanmaya başlayın!
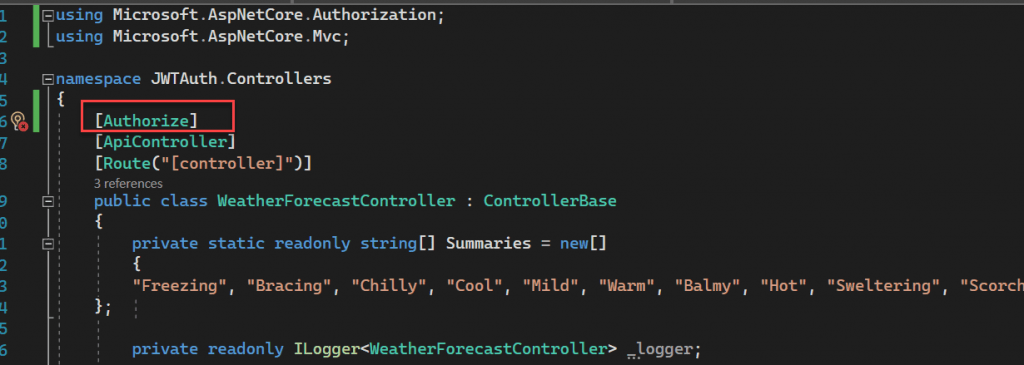
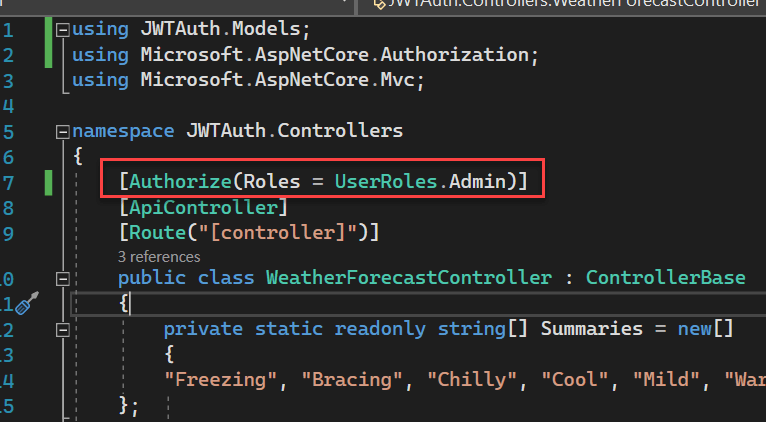
We can add “Authorize” attribute inside the WeatherForecast controller.
All the code is done, let’s test our application.
Testing JWT Authentication And Authorization With Identity Framework
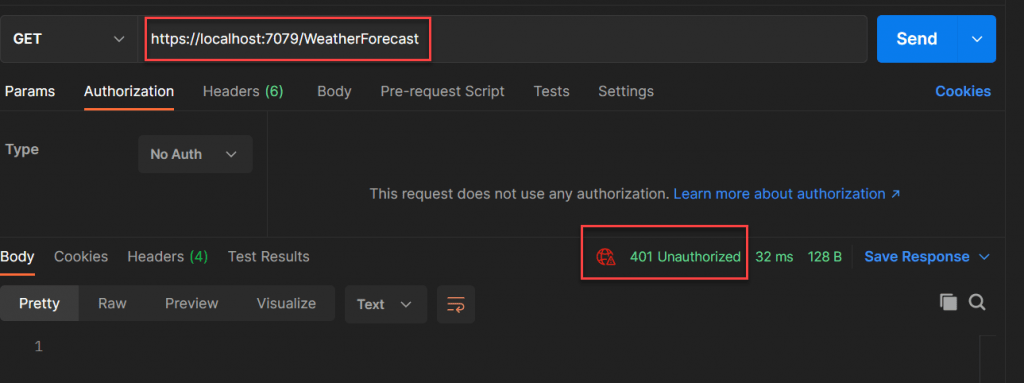
Let’s run the application using POSTMAN and we can see the result. Here it received a 401 unauthorized error because we have added Authorize attribute to entire controller. We must supply a valid token via request header to access this controller and methods inside the controller.
Creating a Valid Token to access Web API
Let’s create an User using Register Auth and when Login the user it create the token.
Register User
On below we call the AuthController and call the POST method using the below details to Register.
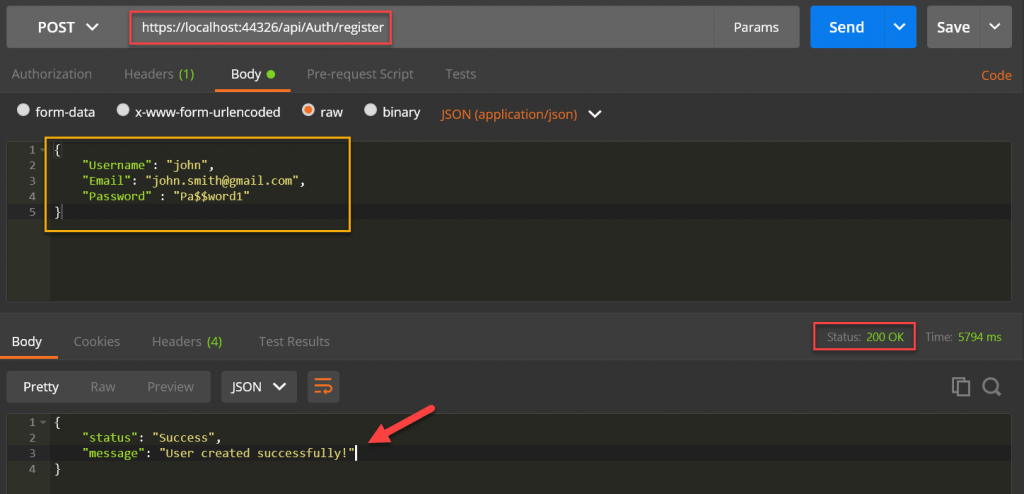
When you navigate into Database you can see the result in Users Table

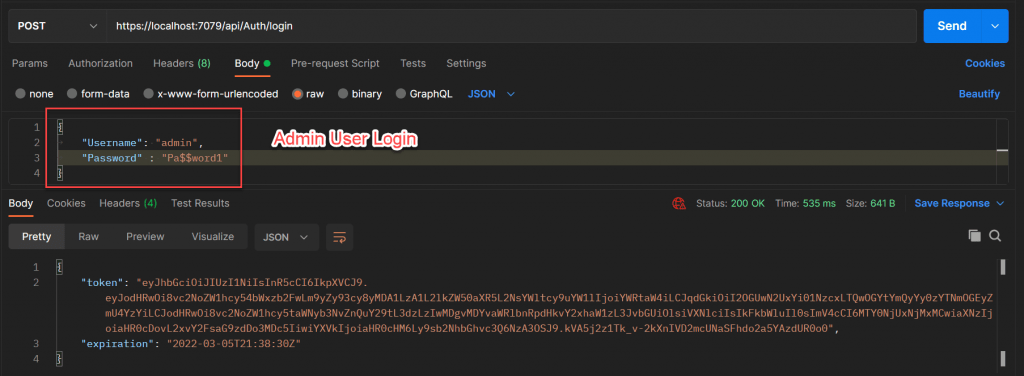
Login User and Creating Token
We have supplied the input data as raw JSON format. We can use the above user credentials to login and get a valid JWT token.
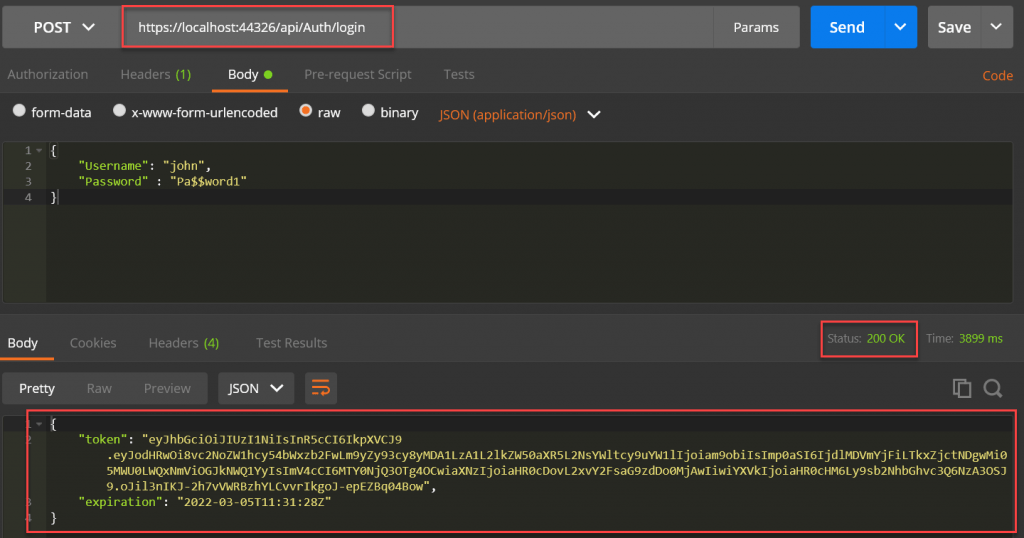
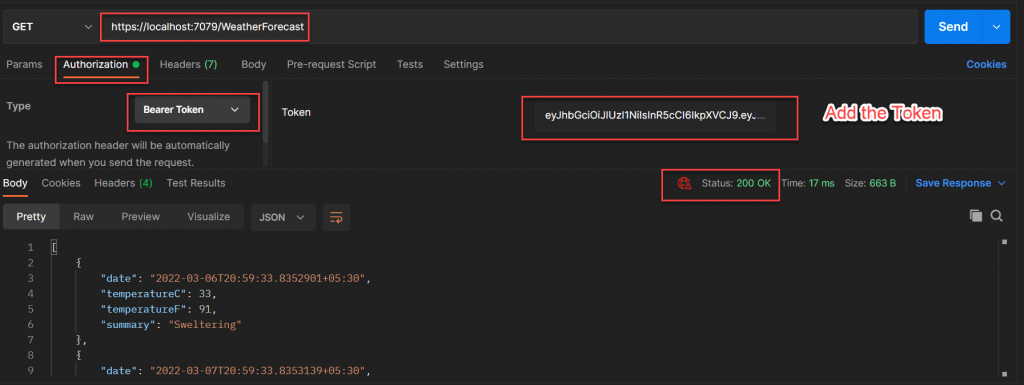
Pass this Bearer token into API Call
Pass this Bearer token into API Call and you can see below result,

Role based Authorization
Let’s check how to access the above API using Roles(Admin, User).
And when you run to access the API then you can see the issue. We have received a 403 forbidden error instead of 401, even though we are passing a valid token we don’t have sufficient privilege to access the controller. To access this controller, the user must have an admin role permission. Current user is a normal user and does not have any admin role permission.
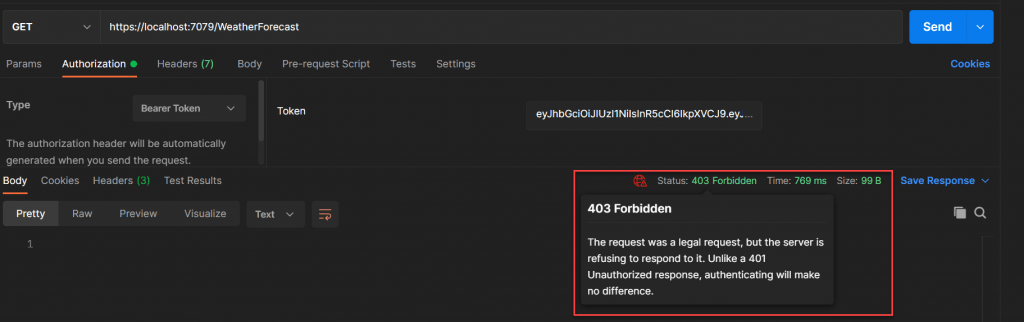
We can create a new user with an admin role permission. We already have a method “register-admin” in authenticate controller for the same purpose.
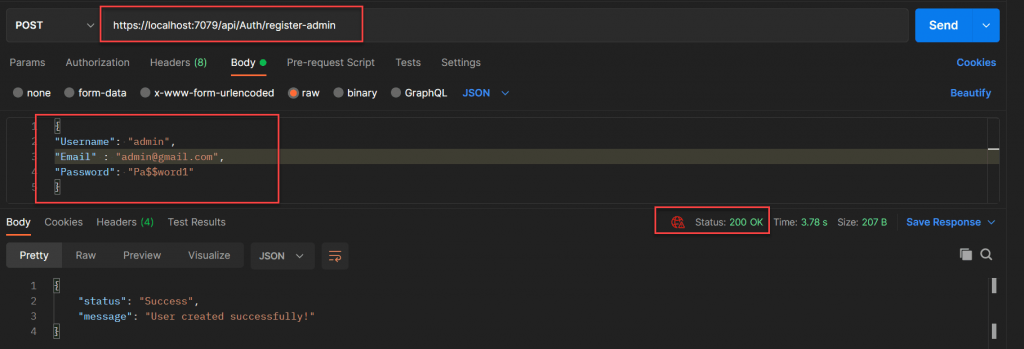
Admin user is created let’s login with Admin credentials and it will create a new token for us that to be applicable for admin user only.
Now we should pass this token into WeatherForecast API call and then we can get 200 status.
Conclusion
In this article we learnt how to create JWT Authentication And Authorization With Identity Framework in .NET Core 6.0. We have created two users, one without any role and one with admin role. We have applied authentication and authorization at controller level and saw the different behaviors with these two users.
References
- 🔐 Securing .NET Core Web Apps with Azure AD/Intra and MSAL
- Step-by-Step Guide to Using Azure Redis Cache in ASP.NET Core 9 Web API
- Building Real-Time Messaging with Kafka and .NET Core
- .NET 8 Authentication with Identity in a Web API using Bearer Tokens and Cookies
- How to convert Text To Speech With Azure Cognitive Services using Angular and .Net Core
Jayant Tripathy
Coder, Blogger, YouTuberA passionate developer keep focus on learning and working on new technology.