
In this article, we will learn about How to use Response Compression in .NET Core. In .NET Core, response compression can be used to minimize the amount of HTTP responses sent from your server to clients. This can result in faster load times and decreased bandwidth utilization, particularly for clients that have slower network connections. Please read my previous article on How to send SMS using Amazon Simple Notification Services(SNS).
The HTTP protocol is utilized to perform this compression. The server can compress the data using methods such as Gzip, Deflate, or Brotli. Browsers support these approaches and can extract compressed data and convert it back to its original format.
Application responses can be compressed to minimize payload size and speed up data transfer.
Compression with HTTPS
- The EnableForHttps option manages compressed responses across secure connections.
- Because dynamically produced pages pose security risks, this feature is turned off by default.
- ASP.NET Core employs anti-forgery tokens to defend against BREACH and CRIME attacks.
- Keep in mind that even if EnableForHttps is disabled, IIS, IIS Express, and Azure App Service may still apply gzip to the IIS web server.
When should you use response compression middleware?
- When possible, use server-based response compression technologies (such as IIS, Apache, and Nginx).
- Server modules could surpass response compression middleware in terms of performance.
- At the time, neither the Kestrel nor the HTTP.sys servers support compression by default.
Client and server interaction
- Clients must deliver the Accept-Encoding header to the server, indicating their capabilities.
- To specify how the compressed answer is encoded, servers add information in the Content-Encoding header.
- Gzip and Brotli are supported content encoding designations.
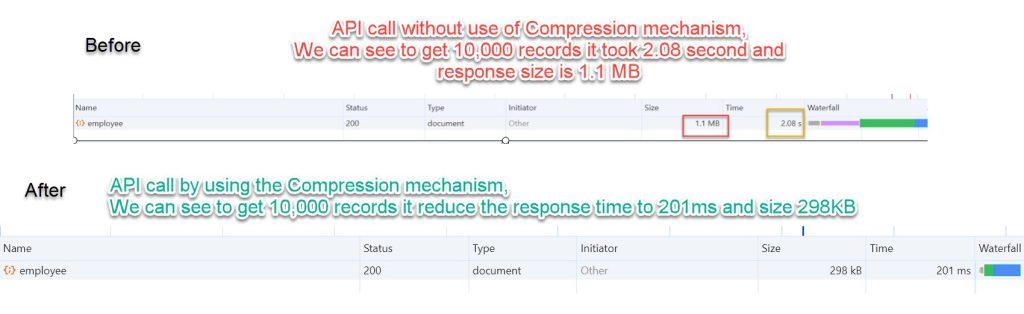
At the end of the post, we can observe how Response Compression helps to compress responses like below.
Creating an ASP.NET Core API Project
- Launch the Visual Studio IDE and click on “Create new project”.
- In the “Create new project” window, select “ASP.NET Core Web API” from the template list.
- Click Next. In the “Configure your new project” window, specify the name and location for the new project and then click Create.
- In the “Create New ASP.NET Core Web API” window shown next, select .NET Core as the runtime and .NET 8.0 from the drop-down list at the top(I’m using .NET 8 .net core SDK). Select “API” as the project template to create a new ASP.NET Core API application.
- Ensure that Authentication is set as “No Authentication” as we won’t be using authentication either and Click Create.
Creating an Employee Model and Create API Controller to return the API Info
 public class Employee
 {
     public Guid EmpId { get; set; }
     public string Name { get; set; }
     public string Address { get; set; }
 }
[Route("api/[controller]")]
[ApiController]
public class EmployeeController : ControllerBase
{
[HttpGet]
public IActionResult Get()
{
var employees = new List<Employee>();
for (int i = 0; i < 10000; i++)
{
employees.Add(new Employee
{
EmpId = Guid.NewGuid(),
Name = $"Employee Name {i}",
Address = $"Employee Address {i}",
});
}
return Ok(new { employees });
}
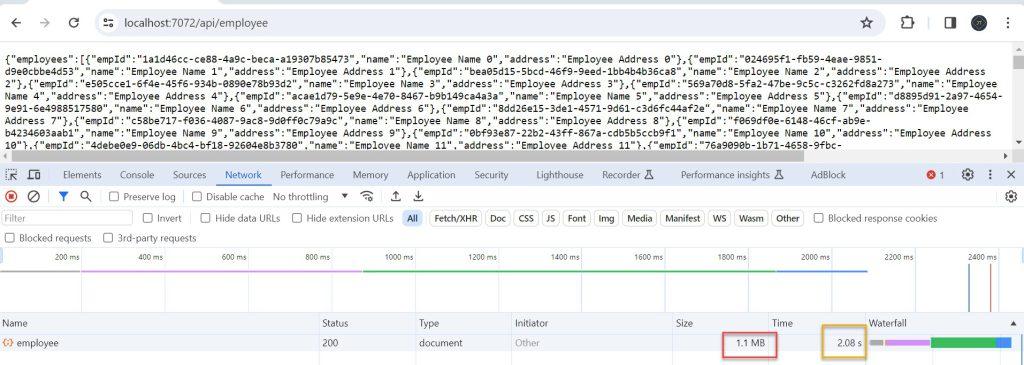
}Let’s run the application and access the employee API and see the responses.
Use Response Compression in .NET Core
Follow below steps to compress the response.
Install the required NuGet packages
We need to install Microsoft.AspNetCore.ResponseCompression package.
Configure Response Compression in Startup.cs
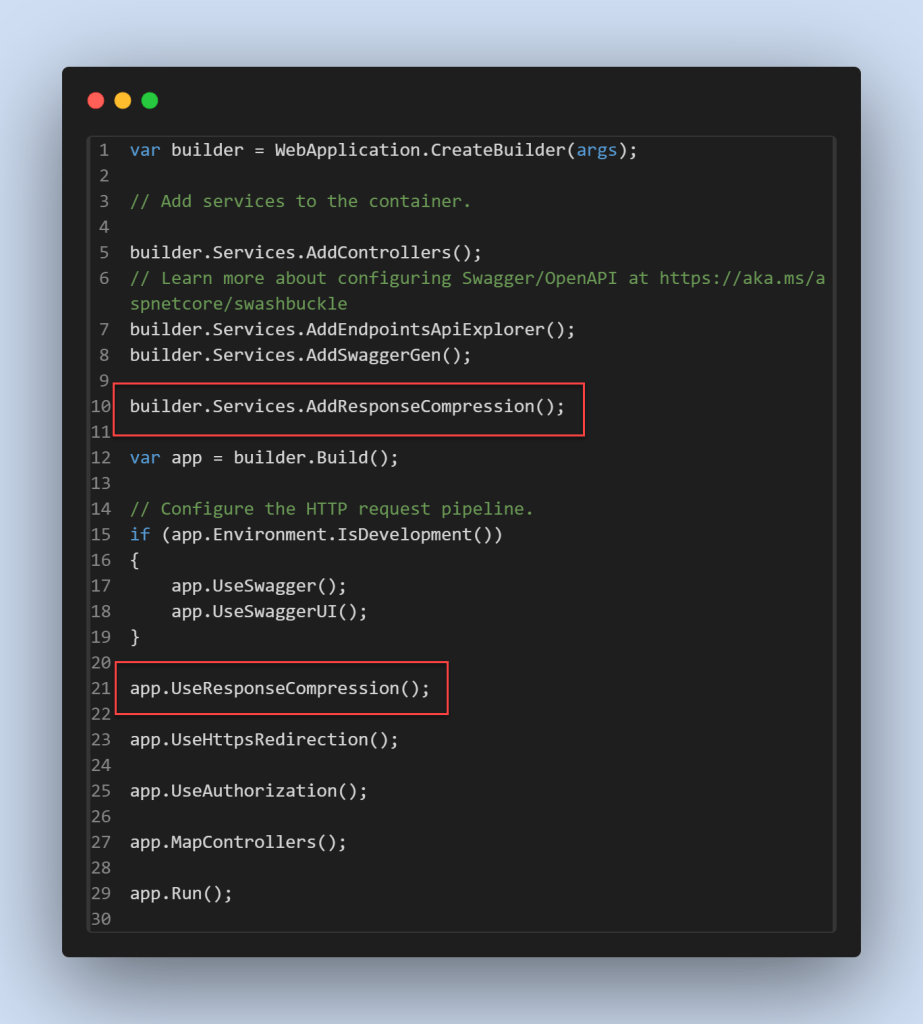
In the ConfigureServices method of your Startup class, add the following code to enable response compression
builder.Services.AddResponseCompression();To enable response compression for HTTPS, add the following code to the program.cs file.
builder.Services.AddResponseCompression(options =>
{
    options.EnableForHttps = true;
    options.Providers.Add<BrotliCompressionProvider>();
    options.Providers.Add<GzipCompressionProvider>();
    options.MimeTypes = ResponseCompressionDefaults.MimeTypes;
});
gzip
First, we must configure the compression option before adding it to the request middleware pipeline. We do it in the Startup’s ConfigureServices() function.
builder.services.Configure<GzipCompressionProviderOptions>(options =>
{
     options.Level = CompressionLevel.Optimal;
});

builder.services.AddResponseCompression(options =>
{
     options.EnableForHttps = true;
     options.Providers.Add<GzipCompressionProvider>();
});
Brotli
Brotli is a new open-source compression algorithm supported by almost all major browsers. It provides better compression than gzip.
builder.services.Configure<BrotliCompressionProviderOptions>(options =>
{
     options.Level = CompressionLevel.Optimal;
});

services.AddResponseCompression(options =>
{
     options.EnableForHttps = true;
     options.Providers.Add<BrotliCompressionProvider>();
});| Compression | Response size (KB) | % |
|---|---|---|
| No compression | 764.99 | 100.00 |
| No compression, from the cache | 11.25 | 1.47 |
| gzip, fastest | 652.62 | 85.31 |
| gzip, optimal | 652.43 | 85.23 |
| Brotli, fastest | 652.74 | 85.32 |
| Brotli, optimal | 651.83 | 85.21 |
Use Response Compression Middleware in Configure method: In the Configure method of your Startup class, add the response compression middleware. Placing app.UseResponseCompression() before other middleware ensures that the response is compressed before it’s sent to the client.
That concludes the adjustment; let us now run the application and see the compression results. It effortlessly reduces both the response time and the size.
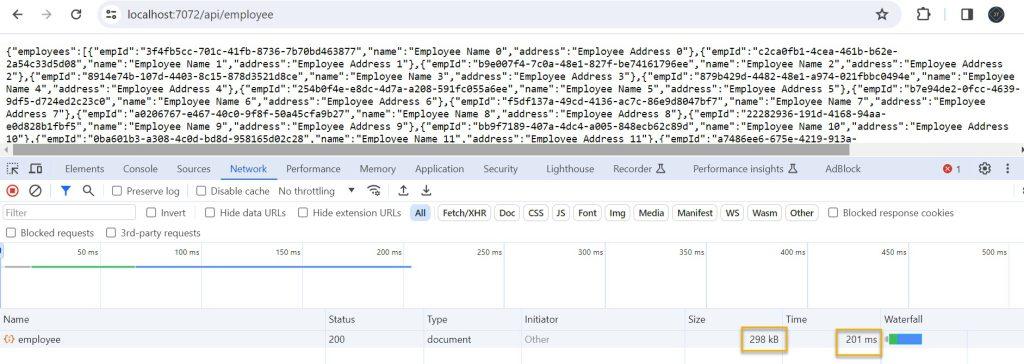
With these steps completed, your.NET Core application should now compress responses before sending them to clients. The middleware automatically evaluates the request headers and returns with compressed content if the client allows it.
Conclusion
In this article we discussed about How to use Response Compression in .NET Core and also discussed step by step process to implement the response compression.
Leave behind your valuable queries and suggestions in the comment section below. Also, if you think this article helps you, do not forget to share this with your developer community. Happy Coding 🙂
Related Post
- Step-by-Step Guide to Using Azure Redis Cache in ASP.NET Core 9 Web API
- .NET 8 Authentication with Identity in a Web API using Bearer Tokens and Cookies
- How to convert Text To Speech With Azure Cognitive Services using Angular and .Net Core
- CRUD operation using the repository pattern with .Net 8, Ef-Core, and MySQL
- How to use Response Compression in .NET Core
- How to Integrate GraphQL in .Net Core
- Upload Download and Delete files in Azure Blob Storage using ASP.NET Core and Angular
- How to upload files to Azure Blob Storage using Asp.Net Core Web API
- How to store app secrets in ASP.NET Core using Secret Manager
- Logging into Azure App Service with ASP.Net Core
SUPPORT ME