
In this article we will learn about WPF Metro Window with MahApps.Metro. We discussed here how to get Metro window using MahApps.Metro in WPF. Please read our previous article WPF Material Design | Getting Started with Material Design In XAML.
WPF Metro Window
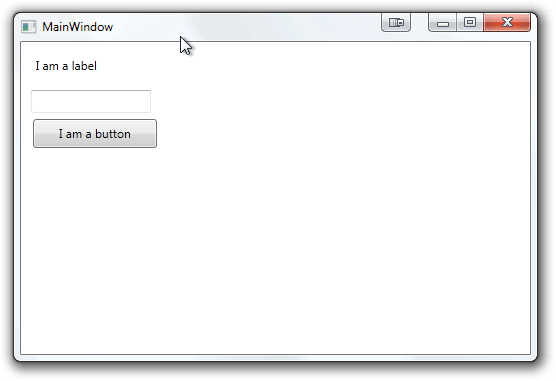
Have you bore with WPF window like this, the typical window look like very traditional chrome browser window like and not stylish as well.
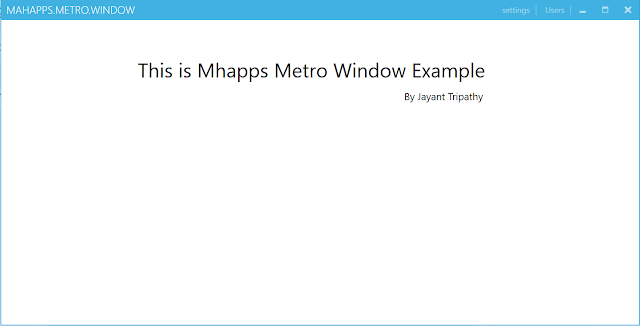
No worry, WPF makes life easier supports Mahapps package with Stylish Window like in WINDOWS -10 applications. After implement the Final window Should like this.
To achieve this type of window we should follow these below steps. Before we implementing Mahapps Metro window we should know about the Features.
What is Mahapps Metro
Mahapps metro is an Open Source and available in Nuget packages as well.
Mahapps.Metro overrides the style of the default controls and gives them a metro-ish look.
MahApps.Metro also includes some custom controls based on concepts from Windows Phone and Windows 8 Apps
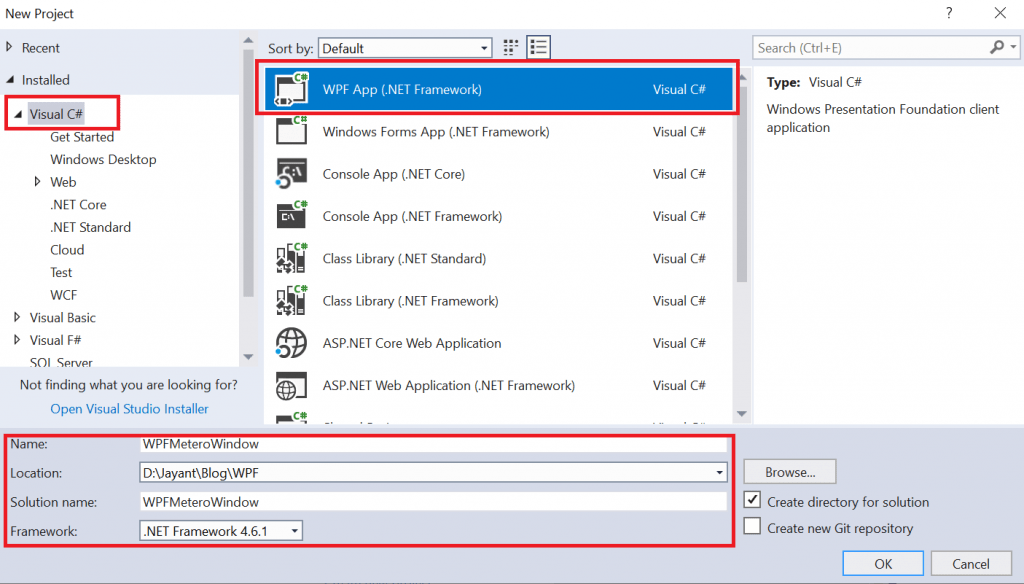
Creating WPF application
Let’s create the WPF application like below,
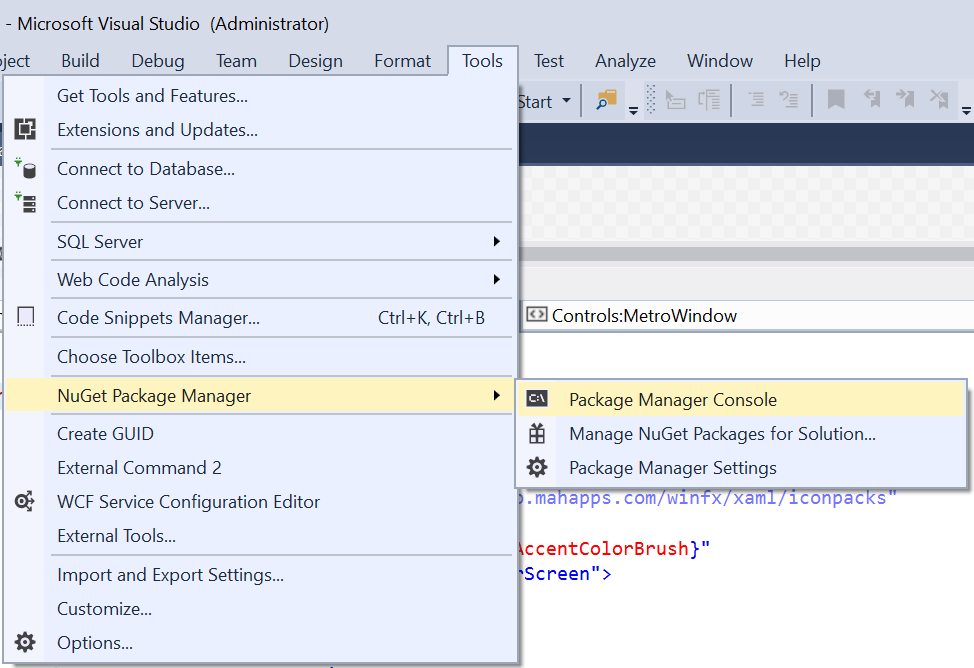
Adding MahApps.Metro package
Install the below package using Nuget Package manager console.
Install-Package MahApps.Metro
Now add the Mahapps metro styles attributes “ResourceDictionary” in App.XAML like below.
<Application x:Class="WPFMeteroWindow.App"
             xmlns="http://schemas.microsoft.com/winfx/2006/xaml/presentation"
             xmlns:x="http://schemas.microsoft.com/winfx/2006/xaml"
             xmlns:local="clr-namespace:WPFMeteroWindow"
             StartupUri="MainWindow.xaml">
    <Application.Resources>
        <ResourceDictionary>
            <ResourceDictionary.MergedDictionaries>
                <!-- MahApps.Metro resource dictionaries. Make sure that all file names are Case Sensitive! -->
                <ResourceDictionary Source="pack://application:,,,/MahApps.Metro;component/Styles/Controls.xaml" />
                <ResourceDictionary Source="pack://application:,,,/MahApps.Metro;component/Styles/Fonts.xaml" />
                <ResourceDictionary Source="pack://application:,,,/MahApps.Metro;component/Styles/Colors.xaml" />
                <!-- Accent and AppTheme setting -->
                <ResourceDictionary Source="pack://application:,,,/MahApps.Metro;component/Styles/Accents/Blue.xaml" />
                <ResourceDictionary Source="pack://application:,,,/MahApps.Metro;component/Styles/Accents/BaseLight.xaml" />
            </ResourceDictionary.MergedDictionaries>
        </ResourceDictionary>
    </Application.Resources>
</Application>
As you see in “App.xaml” the target path is “MainWindow.xaml.cs” we need to add our custom window control at this page. So open the code page and add the namespace, instead of “Window” class implement we need to implement our “MetroWindow” like below.
using MahApps.Metro.Controls;

namespace WPFMeteroWindow
{
    /// <summary>
    /// Interaction logic for MainWindow.xaml
    /// </summary>
    public partial class MainWindow : MetroWindow
    {
        public MainWindow()
        {
            InitializeComponent();
        }
    }
}
Now We modified in “MainWindow.xaml” to add the Mahapps.Metro window style
<Controls:MetroWindow x:Class="WPFMeteroWindow.MainWindow"
                      xmlns="http://schemas.microsoft.com/winfx/2006/xaml/presentation"
                      xmlns:x="http://schemas.microsoft.com/winfx/2006/xaml"
                      xmlns:Controls="http://metro.mahapps.com/winfx/xaml/controls"
                      xmlns:iconPacks="http://metro.mahapps.com/winfx/xaml/iconpacks"
                      Title="MahApps.Metro.Window"
                      GlowBrush="{DynamicResource AccentColorBrush}"
                      WindowStartupLocation="CenterScreen">

    <Controls:MetroWindow.RightWindowCommands>
        <Controls:WindowCommands>
            <Button Content="settings" />
            <Button>
                <StackPanel Orientation="Horizontal">

                    <TextBlock Margin="4 0 0 0" VerticalAlignment="Center" Text="Users" />
                </StackPanel>
            </Button>
        </Controls:WindowCommands>
    </Controls:MetroWindow.RightWindowCommands>

    <Grid>
        <Label Margin="200 50 0 0" FontSize="30">This is Mahapps Metro Window Example</Label>
        <Label Margin="600 100 0 0" FontSize="15">By Jayant Tripathy</Label>
    </Grid>
</Controls:MetroWindow>
As you see instead of <Window>, we take <Controls:MetroWindow>
Now run our application and see the output.
Conclusion
In this article, we learnt about WPF Metro Window with MahApps.Metro. Do share this article with your colleagues and dev circles if you found this interesting.