
In this article we will learn about Building your own AI Assistant Using Python, LangChain, Streamlit & GPT‑4o (Step‑by‑Step Guide). If you’ve been curious about how AI chatbots work and want to build your own, you’re in the right place. In this hands-on guide, you’ll discover how to create a fully functional chatbot using two powerful open-source frameworks: LangChain and Streamlit. These tools make it surprisingly simple to integrate advanced language models and build interactive user interfaces – all with Python.
SUPPORT ME
Throughout this tutorial, you’ll follow clear, step-by-step instructions to assemble a chatbot from scratch. You’ll learn how LangChain helps manage language model logic, conversation flows, and context, while Streamlit gives you the power to design a beautiful, shareable web app for your bot. Whether you want to automate customer service, create a companion for fun conversations, or build a smart assistant for your workflow, you’ll acquire practical skills you can immediately apply.
By the end of this guide, you’ll have a customizable chatbot with a modern, web-based interface—ready for further enhancements, integration with other services, or sharing with friends and colleagues. Let’s dive in and start building your own intelligent assistant!
What will we build in this article?
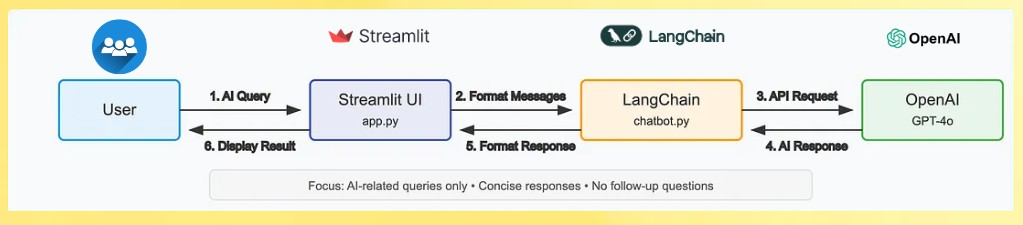
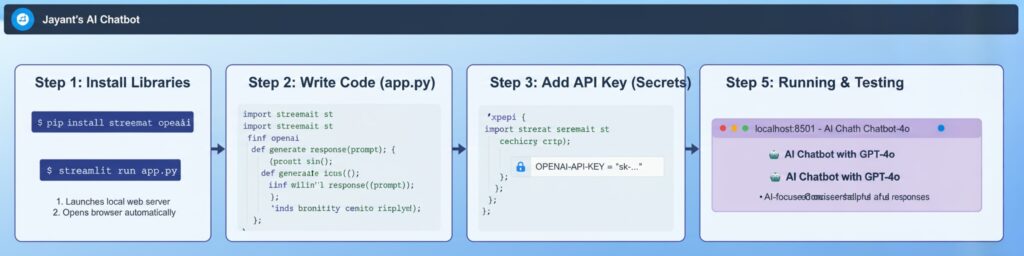
We are going to develop an AI Assistant that responds based on the prompt provided below.
- The user enters a query, which is handled and formatted by the Streamlit UI.
- LangChain processes the formatted message and sends it to OpenAI GPT-4o, then formats the AI’s response for the Streamlit UI to display back to the user.
Understanding LangChain, Streamlit, and LLMs
Understanding LangChain
LangChain is a cutting-edge framework that streamlines the process of building applications powered by large language models (LLMs) such as OpenAI’s GPT-4o. It handles the complex tasks of managing conversational context, constructing multi-step prompt chains, and integrating AI logic with external tools or data sources. LangChain essentially acts as the brain behind AI assistants, allowing developers to focus on crafting natural, meaningful conversations without needing to manage low-level AI operations.
Understanding Streamlit
Streamlit is an open-source Python framework designed to turn data scripts into interactive web apps with minimal effort. It is especially popular among data scientists and AI practitioners for rapidly building powerful, intuitive, and customizable user interfaces. Using Streamlit, you can create a sleek front-end for your AI chatbot that supports real-time queries and displays responses in a friendly, accessible format—all without deep web development experience.
What are Large Language Models (LLMs)?
Large Language Models like GPT-4o are at the core of today’s conversational AI capabilities. These models are trained on massive datasets to generate human-like text, understand natural language inputs, and provide relevant, coherent responses. LLMs can perform a variety of tasks, from answering questions to composing emails, and LangChain helps orchestrate their use in practical applications.
How They Work Together
When combined, LangChain orchestrates the detailed AI logic and context management, Streamlit provides the user-friendly interface, and the LLM powers the intelligent text generation. This trio forms the foundation of modern AI assistant development-enabling you to build scalable, extendable chatbots that can understand and respond to user inputs naturally and effectively.
Understanding LangChain Basics
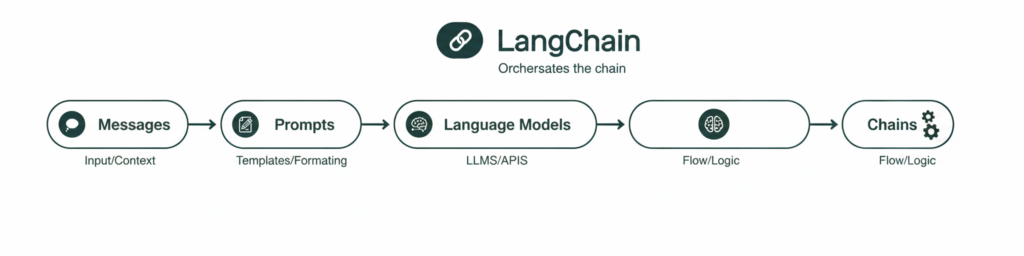
LangChain has evolved significantly since its early days, now embracing a modular and composable design that simplifies AI application development. As of 2025, LangChain focuses on small, intuitive components that you can combine seamlessly using the pipe operator (|). This approach makes building complex chains straightforward and easier to manage.
The core components you’ll frequently encounter include:
- Messages: Different message types such as SystemMessage, HumanMessage, and AIMessage represent distinct participants in a conversation, enabling structured and contextual dialogue.
- Prompts: These are templates that guide how input data is structured and fed into large language models (LLMs). LangChain now adopts a more flexible, message-based system for building these prompts.
- Language Models: Interfaces that connect your application with external APIs like OpenAI’s GPT-4o, handling the heavy lifting of natural language understanding and generation.
- Chains: In modern LangChain, complex logic can be designed by chaining these components together easily using the pipe operator, creating readable and maintainable workflows for AI-driven tasks.
This modular style empowers developers to craft powerful conversational AI experiences without getting bogged down in complex backend logic
Prerequisites
Before we begin, please ensure the following:
- Python 3.9 or higher is installed on your computer.
- You have a basic understanding of Python programming.
- You are comfortable using a text editor or IDE such as VS Code or PyCharm.
- Familiarity with command line operations will be helpful.
No prior experience with LangChain or Streamlit is needed – this guide is beginner-friendly and designed to help you get started from scratch.
Let’s Build your own AI Assistant
Step-1 : Setting Up Your Development Environment
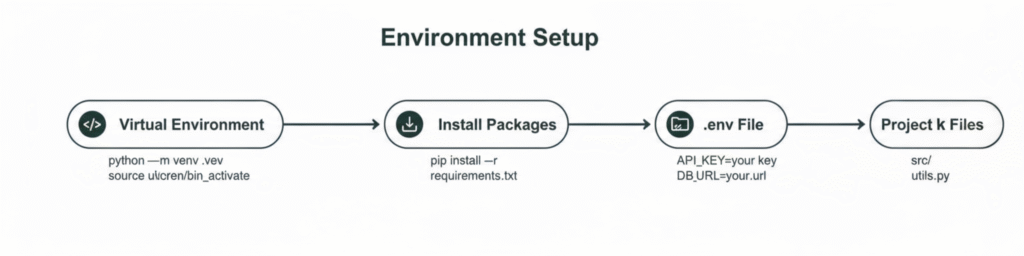
Let’s begin by creating a dedicated project folder and setting up a virtual environment to manage our dependencies. This will help keep your project organized and ensure that the packages you install won’t interfere with other Python projects on your system.
# Create a new project directory
mkdir ai-chat-assistant
cd ai-chatbot-assistant

# Create and activate a virtual environment
python -m venv venv

# On Windows
venv\Scripts\activate

# On macOS/Linux
source venv/bin/activate- Create a new project directory:
mkdir ai-chat-assistant
This command creates a new folder namedai-chat-assistant. This will be your project directory where all your code and files for the AI chatbot will reside.cd ai-chatbot-assistant
This command navigates into the newly created folder so that subsequent commands are run inside this project directory.
- Create and activate a virtual environment:
python -m venv venv
This creates a virtual environment namedvenvinside your project folder. A virtual environment is an isolated Python environment where you can install packages without affecting your global Python installation or other projects.
- Activate the virtual environment:
- On Windows, run:
venv\Scripts\activate
This activates the virtual environment in the current command prompt or PowerShell session. - On macOS/Linux, run:
source venv/bin/activate
This activates the virtual environment on Unix-like systems.
- On Windows, run:
Activating the virtual environment ensures that any Python packages you install afterward (like LangChain or Streamlit) will be installed only within this isolated environment, keeping your project dependencies clean and manageable.
Add requirements.txt and install all dependencies
To add a requirements.txt file and install all dependencies in your Python project, follow these steps:
- Create the
requirements.txtfile:- Inside your project directory, create a plain text file named
requirements.txt. - List all your project dependencies one per line in this file. For example:
- Inside your project directory, create a plain text file named
langchain
langchain-openai
langchain-core
streamlit
dotenv
Install dependencies from requirements.txt:
- Ensure your virtual environment is activated.
- Run the command:
pip install -r requirements.txt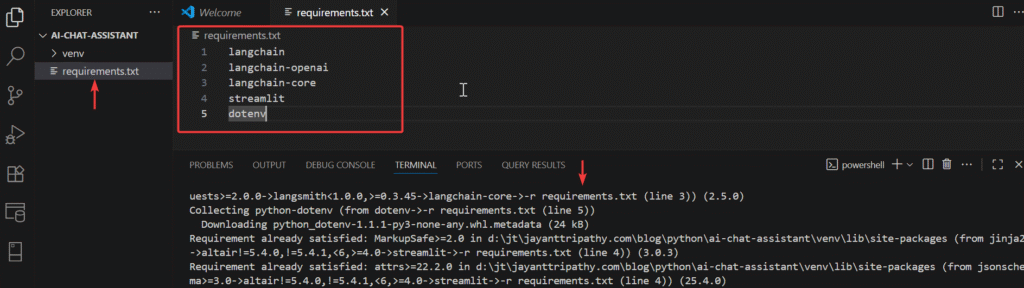
This will tell pip to read from the requirements.txt file and install all listed packages automatically.
- langchain: Core LangChain library providing abstractions and utilities for working with large language models, including chains, prompts, and memory components.
- langchain-openai: Integration with OpenAI models like GPT-4o, handling API communication, response parsing, and authentication with your API key.
- langchain-core: Contains fundamental components and interfaces for LangChain, foundational for chains, prompts, and messages in the modern architecture.
- streamlit: Python library to create web interfaces easily, enabling interactive apps with UI rendering, state management, and server hosting without frontend expertise.
- python-dotenv: Loads environment variables from a .env file, helping securely manage API keys and keep sensitive information out of source code.
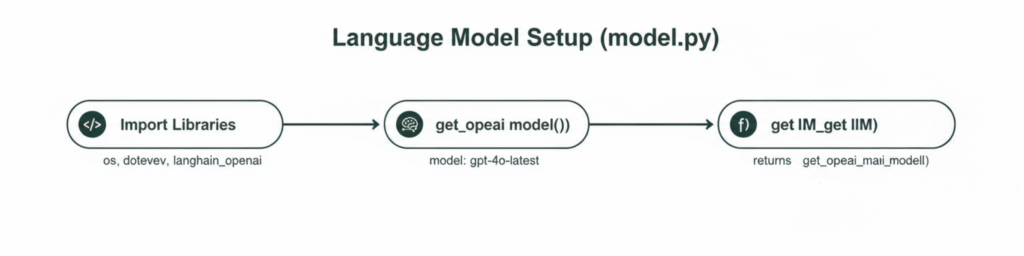
Step-2: Setting Up Access to Language Models
This image illustrates the setup of the language model in model.py, highlighting the import of necessary libraries and the definition of two key functions. It shows how the specified OpenAI model gpt-4o is loaded via get_openai_model() and accessed through get_llm() open ai model.
Create a .env file to store our API keys securely
Let’s create a .env file to store our API keys securely:
# .env file
OPENAI_API_KEY=your_api_key_here
LLM( large language model) setup
Let’s create a model.py file to handle our language model setup.
# model.py
import os
from dotenv import load_dotenv
from langchain_openai import ChatOpenAI

# Load all environment variables from .env file for secure API key handling
load_dotenv()

def initialize_openai_chat_model():
    """
    Initialize and return the OpenAI chat model with specified parameters
    for advanced chatbot generation.
    """
    return ChatOpenAI(
        model_name="gpt-4o-2024-11-20",
        temperature=0.75,  # Slightly creative response variation
        max_tokens=1500    # Set maximum token limit for responses
    )

def get_language_model_instance():
    """
    Provide the initialized OpenAI chat model instance for use in the app.
    """
    return initialize_openai_chat_model()
import os
Import the OS library for interacting with the operating system.from dotenv import load_dotenv
Import the function to load environment variables from a .env file.from langchain_openai import ChatOpenAI
Import LangChain’s OpenAI chat model integration.load_dotenv()
Load environment variables from the .env file into the program’s environment.- Line # 9-18
def initialize_openai_chat_model(): ...- Define a function to create and configure an OpenAI chat model instance with specific parameters.
- Line # 20-24
def get_language_model_instance(): ...- Define a function that returns the initialized OpenAI chat model for usage elsewhere in the app.
This maps directly to each logical block or key statement, making the code purpose clear and unique.
Step-3: Creating the Interaction Workflow
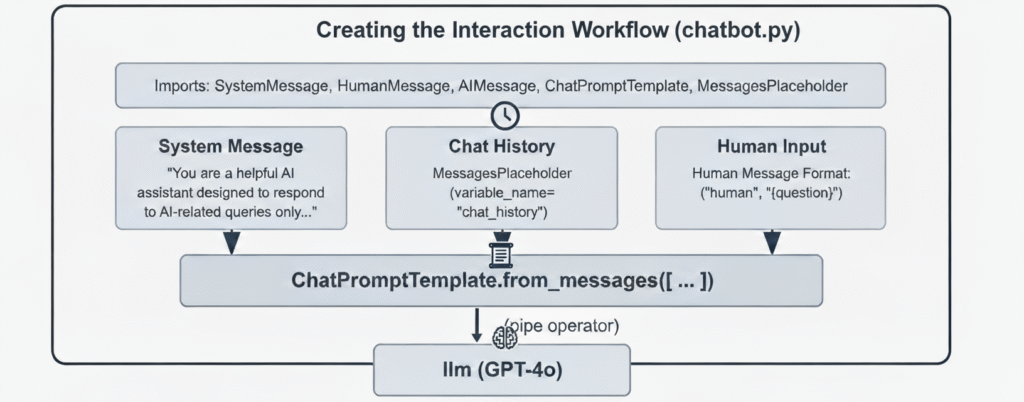
This diagram shows the workflow for constructing a modern conversational agent using LangChain in chatbot.py. It begins by importing core message and prompt components, ensuring robust structure for the dialogue flow. The system message establishes the assistant’s persona and response rules, while chat history tracks ongoing exchanges for context. Human input captures each user’s current question, all of which are then combined via a message-based prompt template. The template connects through a pipe operator to the GPT-4o model, building a streamlined chain that receives conversation data and generates relevant AI-powered responses. This modular approach simplifies the creation and customization of intelligent chatbot workflows.
# chatbot.py
from typing import List, Dict, Union
from langchain_core.messages import SystemMessage, HumanMessage, AIMessage
from langchain_core.prompts import ChatPromptTemplate, MessagesPlaceholder
from model import get_language_model_instance

def build_chatbot_chain():
    """Initialize the chatbot chain using the configured language model."""
    llm_instance = get_language_model_instance()

    system_instructions = """
    You are a helpful and polite AI assistant focused exclusively on Artificial Intelligence topics.
    Please respond clearly and concisely to user queries without asking questions.
    Use bullet points only for clarity and respond courteously to greetings or thanks.
    For unrelated topics, reply: 'I specialize in AI topics only. Could you please ask an AI-related question?'
    """

    prompt_template = ChatPromptTemplate.from_messages([
        SystemMessage(content=system_instructions),
        MessagesPlaceholder(variable_name="chat_history"),
        ("human", "{user_query}")
    ])

    conversation_chain = prompt_template | llm_instance
    return conversation_chain

def generate_chatbot_response(chain, input_text: str, conversation_history: List[Dict[str, Union[str, Dict]]] = None) -> str:
    """Generate a chatbot response for the provided input text and conversation history."""
    try:
        formatted_history = []
        if conversation_history:
            # Skip last user input (will add separately)
            for message in conversation_history[:-1]:
                if message["role"] == "user":
                    formatted_history.append(HumanMessage(content=message["content"]))
                elif message["role"] == "assistant":
                    formatted_history.append(AIMessage(content=message["content"]))

        response = chain.invoke({
            "chat_history": formatted_history,
            "user_query": input_text
        })

        if hasattr(response, "content"):
            return response.content
        return str(response)

    except Exception as error:
        return f"Sorry, I encountered an error: {str(error)}. Please try again."
- Purpose
- Create and run a simple chat pipeline: build a prompt + LLM chain and use it to produce assistant replies given user input and optional history.
- Main pieces
- build_chatbot_chain(): constructs the chat prompt (system instructions + history placeholder + human input) and combines it with the configured LLM.
- generate_chatbot_response(…): formats prior messages into LangChain message objects, invokes the chain with current user input, and returns the assistant text (or an error message on failure).
- Core flow (short)
- Get the LLM instance from model.get_language_model_instance().
- Define system instructions that constrain assistant behavior.
- Build a ChatPromptTemplate that includes system instructions and a MessagesPlaceholder for past conversation.
- Combine the prompt template and LLM into a runnable chain.
- When handling a request, convert stored history entries into HumanMessage/AIMessage objects (skipping the last entry), call chain.invoke with chat_history + user_query, and return the response content.
- Quick caveats (one-liners)
- The prompt uses a raw tuple (“human”, “{user_query}”) which may not match current LangChain APIs.
- The code uses chain.invoke; some LLM wrappers expect .run(), .generate(), or call instead.
- Conversation-history shape is assumed; no validation is performed.
Step-4: Creating the Streamlit Interface
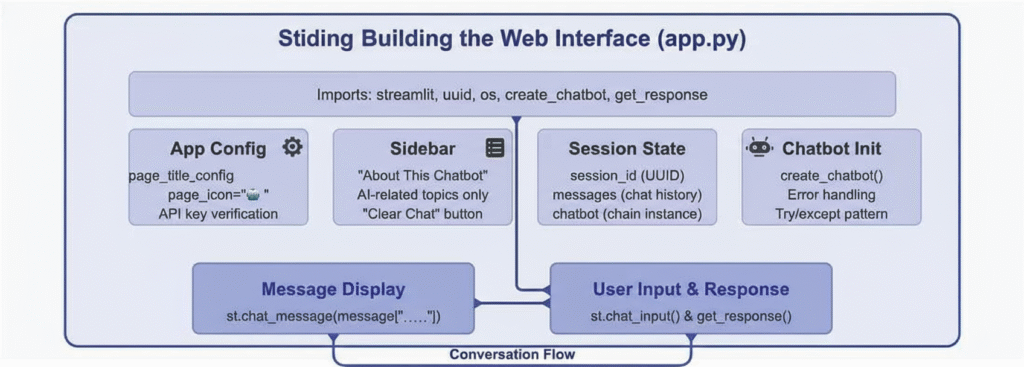
This image presents the high-level architecture for a Streamlit-based chatbot web interface. It shows the main modules such as App Config, Sidebar, Session State, and Chatbot Initialization, highlighting their purposes like config settings, chat history management, and error handling. The top section lists critical imports including Streamlit and utility functions essential for the app’s core flow. The Sidebar provides information and controls, while the Session State maintains user and chatbot data during conversations. Chatbot Init covers the setup and error handling logic using a try/except pattern. At the bottom, the diagram represents how user input and bot responses are processed and displayed through Streamlit chat functions, ensuring a cohesive conversation flow. Overall, it visually summarizes the modular structure needed to build and operate a user-friendly, session-aware AI chat app.
# app.py
import streamlit as st
import uuid
import os
from chatbot import create_chatbot, get_response
# Set up the main page details
st.set_page_config(
page_title="LLM Chat Companion",
page_icon="🧠"
)
# Main header for the web app
st.title("🧠 Conversational AI with GPT-4o")
# API Key Verification
if not os.getenv("OPENAI_API_KEY"):
st.info("Please configure your OpenAI API Key in the environment (.env) file for proper functionality.")
# Sidebar: Details & Controls
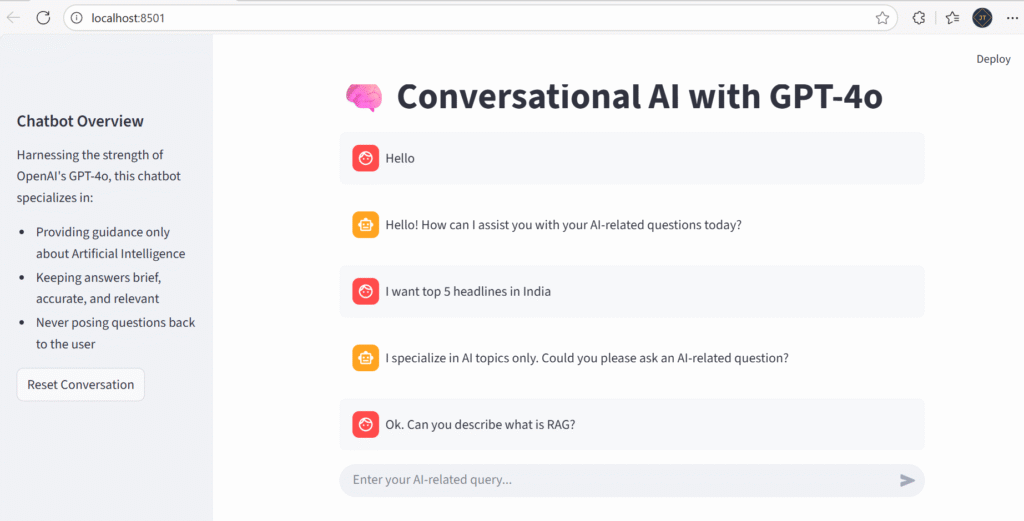
st.sidebar.header("Chatbot Overview")
st.sidebar.markdown("""
Harnessing the strength of OpenAI's GPT-4o, this chatbot specializes in:
- Providing guidance only about Artificial Intelligence
- Keeping answers brief, accurate, and relevant
- Never posing questions back to the user
""")
# Chat Session Initialization
if "conv_id" not in st.session_state:
st.session_state.conv_id = str(uuid.uuid4())
if "chat_log" not in st.session_state:
st.session_state.chat_log = []
# Chatbot Initialization with Exception Management
if "agent" not in st.session_state:
try:
st.session_state.agent = create_chatbot()
except Exception as err:
st.error(f"Startup failed: {str(err)}")
st.session_state.agent = None
# Reset chat through sidebar
if st.sidebar.button("Reset Conversation"):
st.session_state.chat_log = []
st.rerun()
# Render Chat History
for entry in st.session_state.chat_log:
with st.chat_message(entry["role"]):
st.write(entry["content"])
# User Input Section
prompt = st.chat_input("Enter your AI-related query...")
if prompt:
# Record user message
st.session_state.chat_log.append({"role": "user", "content": prompt})
# Show what the user typed
with st.chat_message("user"):
st.write(prompt)
# Generate assistant reply and display
with st.chat_message("assistant"):
with st.spinner("Composing reply..."):
if st.session_state.agent:
reply = get_response(st.session_state.agent, prompt, st.session_state.chat_log)
st.write(reply)
else:
reply = "System error: Chat agent not available. Check OpenAI API Key."
st.error(reply)
# Record AI response
st.session_state.chat_log.append({"role": "assistant", "content": reply})
- Line# 2–14: Imports and Page Setup
- We import the Streamlit library, UUID for generating unique session IDs, and OS for environment variable access.
- We import our custom chatbot functions from the
chatbot.pymodule. - We configure the page title and icon that appear in the browser tab.
- We create a heading for our application with an emoji for visual appeal.
- Line# 17–18: API Key Verification
- We check if the OpenAI API key is available in the environment.
- If not, we display a warning message to help users troubleshoot.
- Line# 21-28: Sidebar Information
- We create a sidebar with information about the chatbot.
- We explain the chatbot’s capabilities and behavior to set user expectations.
- Line #30-41: Session State Initialization
- We initialize a unique session ID for tracking conversations.
- We create an empty message list if it doesn’t exist.
- We initialize the chatbot instance, with error handling.
- Line #44-46 : Clear Chat Button
- We add a button to the sidebar that allows users to clear the conversation.
- This is useful for starting fresh with a new topic.
- Line #49-51: Message Display
- We loop through all previous messages stored in the session state.
- We use Streamlit’s
chat_messagecomponent to display each message with appropriate styling.
- Line #54-74 : User Input Handling
- We create an input field where the user can type their message.
- When a message is submitted, we add it to the message history with the “user” role.
- We display the user’s message in the chat interface.
- We show a “Thinking…” spinner while waiting for the chatbot’s response.
- We get the response from our chatbot, passing the entire message history.
- We display the response in the chat interface and add it to the message history.
This Streamlit interface delivers a streamlined and contemporary chat experience, featuring intuitive messaging, responsive visual feedback, and a sidebar packed with useful information

“I encountered the following issue after connecting: Error Code 429 – ‘You exceeded your current quota.’ To resolve it, I added $5 to my OpenAI billing account for continued usage. It seems that from October 2025 onwards, OpenAI has started requiring paid consumption for API usage“.

Run and Test the Chatbot
Run the chatbot application using below command,
streamlit run app.py“When you execute this command, Streamlit will launch a local web server and automatically open your default browser to display the chatbot interface.”
Check this Video
Project Structure
ai-chat-assistant/
│
├── .env                  # API keys and environment variables
├── model.py              # Language model setup
├── chatbot.py            # Conversation chain and response logic
├── app.py                # Streamlit interface
└── venv/ # Virtual environment (not committed to version control).env– Stores your OpenAI API key securelymodel.py– Handles language model initialization and accesschatbot.py– Implements the conversation logic using LangChainapp.py– Creates the user interface with Streamlit
This is all about the starter AI Assistant chatbot on python, Langchain with strimlit using Open AI GPT‑4o.
Source Code
Conclusion
Here we discussed, Building your own AI Assistant Using Python, LangChain, Streamlit & GPT‑4o (Step‑by‑Step Guide). We covered some theoretical concepts related to LangChain and Streamlit, and also discussed the application flow using helpful diagrams. We explored how to connect with GPT-4o, the challenges we encountered, and the solutions we applied. Finally, we saw the chat AI assistant running successfully and shared the code on GitHub for you to follow.
Leave behind your valuable queries and suggestions in the comment section below. Also, if you think this article helps you, do not forget to share this with your developer community. Happy Coding 🙂
Related Articles
- Run Local LLMs in .NET: Rapid Prototyping with Ollama & Semantic Kernel
- Building your own AI Assistant Using Python, LangChain, Streamlit & GPT‑4o (Step‑by‑Step Guide)
- Building a Chatbot in Angular using Gemini API
SUPPORT ME