
In this article, we will learn about Building a Chatbot in Angular using Gemini API. In this guide, you’ll learn how to leverage Gemini APIs to develop cutting-edge AI-powered Angular applications. Please read my previous article Create a RESTful CRUD API With NodeJS, ExpressJS, And MongoDB – Complete Guide.
Please find the source code here on this GitHub link.
What is Gemini API?
Gemini API is part of Google’s generative AI (Gen AI) ecosystem. It is designed to provide developers access to Google’s Gemini models, which are advanced generative AI systems capable of processing and creating human-like content, such as:
- Text: Generating and understanding human language for applications like chatbots, summarization, or creative writing.
- Images: Creating or modifying visual content through text prompts.
- Code: Assisting with programming tasks like code generation, debugging, and explanation.
- Audio/Video: Enhancing multimedia experiences with AI-driven insights and creation.
The Gemini API integrates these capabilities into a unified platform, enabling developers to build AI-powered solutions across various modalities and industries. It is available through Google Cloud’s Vertex AI, making it a cornerstone of Google’s generative AI offerings.
Below is the sample output of the chatbot integration.
Prerequisites
- Google Cloud Account: Sign up here.
- API Key and Project Setup: Enable the Vertex AI API in your Google Cloud project and generate an API key.
- Basic knowledge of Angular to integrate the Gen AI
Creating the Gemini API Key
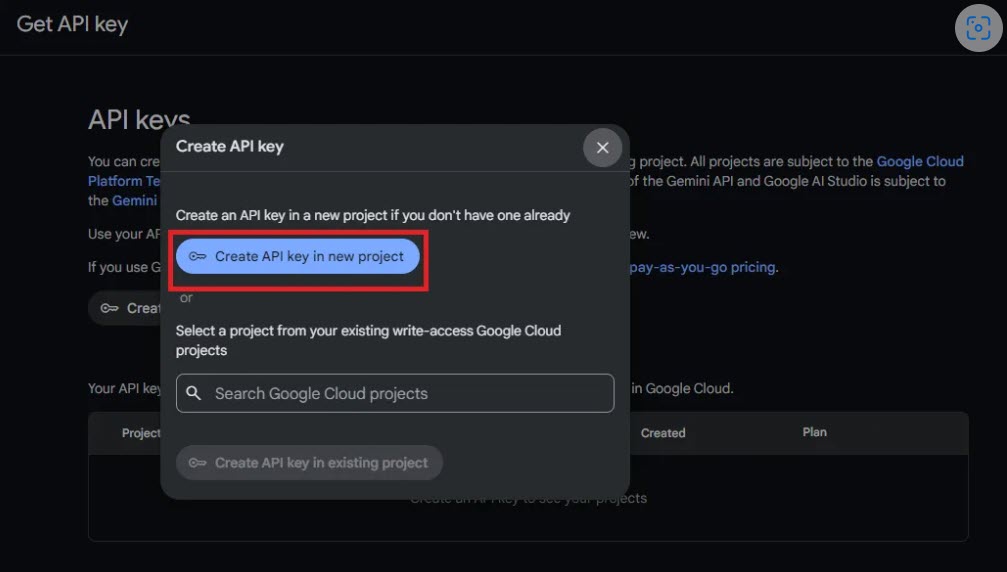
- First, we need to get the Gemini API key. To do so, we need to go to the following URL and create the button “Create API Key” https://aistudio.google.com/app/apikey

- In the next step, you can create a new project or choose from existing ones. here we can go with creating an API key in a new project.
- You will then receive the API key; simply copy it. Don’t forget to keep it safe. Since anyone could access it, don’t expose it in public repositories. Make a copy of the key and preserve it.
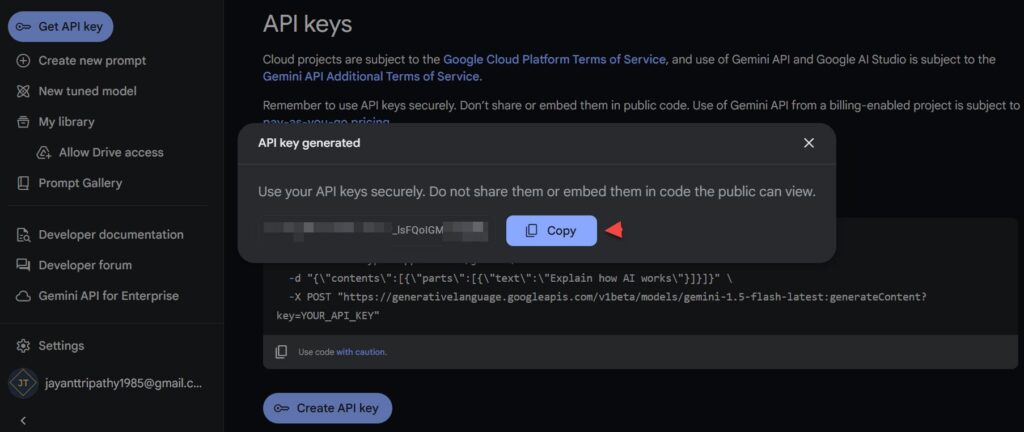
The Gemini API key creation process ends there. We now go to the angular portion.
Creating an Angular Project
Let’s create a sample angular application using the below command and install the fa-icon to use some icons.
ng new gemini-chatbot // creating an angular project

npm install --save font-awesome angular-font-awesome // installing font-awesome
Add the font-awesome CSS styles inside the angular-cli.json
 "styles": [
              "src/styles.css",
              "node_modules/font-awesome/css/font-awesome.css"
            ],
Createing the Chatbot UI
Create a new component named “chatbot.component.ts“. Additionally, the HTML text for themes such as a chatbot that would receive a command from the user, process it using Gemini AI and then provide the assistant’s information.
<section>
  <div class="container py-5">

    <div class="row d-flex justify-content-center">
      <div class="col-md-8 col-lg-6 col-xl-4">
        <div class="card" id="chat1" style="border-radius: 15px; width: 500px;">
          <div class="card-header d-flex align-items-center p-3 bg-info text-white border-bottom-0"
            style="border-top-left-radius: 15px; border-top-right-radius: 15px;justify-content: center;">
            <p class="mb-0 fw-bold">Gemini Chatbot AI with Angular</p>
          </div>
          <div class="card-body">

            <div class="chatbot-messages">
              <div class="d-flex flex-row justify-content-start mb-4">
                <i class="fa-solid fa-robot" style="font-size: x-large; color: #0056b3;"></i>
                <div class="p-3 ms-3 subText">
                  <p class="small mb-0">
                    Hey there <i class="fa-duotone fa-solid fa-hands-bubbles"></i> <br>
                    How I can help you today?
                  </p>
                </div>
              </div>

              <div *ngFor="let message of messages"
                [ngClass]="{'chatbot-message': true, user: message.role === 'user', assistant: message.role === 'assistant'}">

                <span *ngIf="!message.isCodeBlock && message.role === 'user'" style="justify-self: flex-end;">{{
                  message.content}}</span>
                <div class="d-flex flex-row justify-content-start mb-4" style="margin-top: 50px;width: 409px;"
                  *ngIf="!message.isCodeBlock && message.role != 'user'">

                  <i class="fa-solid fa-robot" style="font-size: x-large; color: #0056b3;"></i>

                  <div class="p-3 ms-3 subText">
                    <p class="small mb-0">
                      {{ message.content}}
                    </p>
                  </div>
                </div>
                <pre *ngIf="message.isCodeBlock" class="code-block">
                    <code>{{ message.content.slice(3, -3) }}</code>
                  </pre>
              </div>
              <div #messagesEnd></div>
            </div>

            <div class="chatbot-form">
              <input type="text" #inputBox class="chatbot-input" [(ngModel)]="input"
                (keydown.enter)="sendMessage(inputBox.value)" placeholder="Type your message..." />
              <button type="submit" class="chatbot-button" (click)="sendMessage(inputBox.value)">Send</button>
            </div>

          </div>
        </div>

      </div>
    </div>

  </div>
</section>
The UI looks like below, the custom CSS I have used for styling you can get it from GitHub.

Communicate with Gemini API when the user sends a prompt
When a user types the message and hits enter, it calls to the Gemini API and returns the appropriate result.
  geminiApiKey = '********lsFQoIGMxCe*****'; // Add your copied gemini API Key
  geminiEndpoint = 'https://generativelanguage.googleapis.com/v1/models/gemini-pro:generateContent';
  messages: any[] = [];
  input: string = '';
  @ViewChild('messagesEnd') messagesEnd!: ElementRef;
  constructor(private http: HttpClient) { }
  sendMessage(userInput: string) {
    const headers = new HttpHeaders({
      'x-goog-api-key': this.geminiApiKey,
      'Content-Type': 'application/json',
    });
    const payload = {
      contents: [
        {
          parts: [
            {
              text: userInput,
            },
          ],
        },
      ],
};- Here we have added the Gemini Key(Add your Gemini API Key that you have created) and Endpoint.
Why the payload is formatted like this?
As you can see in the image below, the anticipated payload is as shown in the curl section, therefore we converted it accordingly.
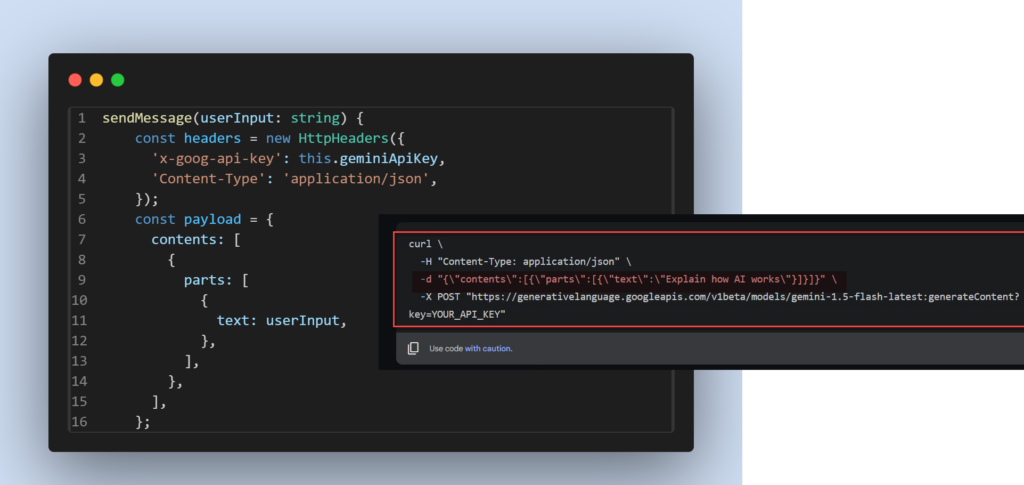
And on the below code, when the user provides the input it processes with the POST method and returns the result.
- The response comes through a format like
response?.candidates?.[0]?.content?.parts?.[0]?.text
this.http.post(this.geminiEndpoint, payload, { headers }).subscribe(
      (response:any) => {
        console.log('API Response:', response);
        const responseText = response?.candidates?.[0]?.content?.parts?.[0]?.text || 'No response from API'
        const isCodeBlock = responseText.startsWith('```') && responseText.endsWith('```');
        this.messages.push({ role: 'assistant', content: responseText.toString(), isCodeBlock });
        console.log(this.messages);
        this.scrollToBottom();
      },
      (error) => {
        console.error('Error handling user message:', error);
        this.messages.push({ role: 'assistant', content: 'Sorry, something went wrong.' });
        this.scrollToBottom();
      }
    );
Source Code
You can find the entire code for this project on GitHub here. Feel free to clone, change, and use it as the foundation for your projects.
Conclusion
In this article, we discussed Building a Chatbot in Angular using Gemini API. Hope you found this blog informative and enjoyed creating your own chatbot with the Gemini API. Following these instructions should result in a fully functional chatbot application running in angular. If you have any questions or need any support, please do not hesitate to inquire.
Leave behind your valuable queries and suggestions in the comment section below. Also, if you think this article helps you, do not forget to share this with your developer community. Happy Coding 🙂
Latest Articles
- Deploying Angular apps in Azure Blob Storage with CI/CD Integration 🚀
- Building a Chatbot in Angular using Gemini API
- Create a responsive sidebar with Angular Material- Angular 18 Example Series
- How to Deploy Angular 17/18 App in GitHub Pages
- How to convert Text To Speech With Azure Cognitive Services using Angular and .Net Core
- Angular Interceptors- The Complete Guide
- Upload Download and Delete files in Azure Blob Storage using ASP.NET Core and Angular
- How to use Policy-based Authorization using JWT in .Net Core 7 and Angular
- How to deploy Angular App in Azure Static Web App
- Global Error Handling in Angular
- How to host Angular app on AWS S3 bucket using CloudFront
- How to Deploy Angular App in GitHub Pages
- How to use Signature Pad Component in Angular
- How to use Drag and Drop items in Angular
- Ionic Framework Tutorial: Build your first Ionic cross-platform mobile app