
In this article we will learn about how to use Child/Nested component use in Angular. The Angular follows component-based Architecture, where each Angular Components manages a specific task or workflow. Each Angular Components is an independent block of the reusable unit.
What is a nested component?
Angular allows us to have a different child, or nested component, which is the same component we normally use in an Angular application. The difference between them is that this child component contains the logic which can be used into the parent component as a single unit.
Every child component associated with a parent component is called a nested component.
What is a container component?
Container components are similar to Parent-Child components. A container component acts as a Parent and the “Presentation component” is like a child component. Container components will manage and retrieve object/model states, whereas Presentation components are just present or render the state.
How to add Child Component?
Create the Child Component
- In the child Component, metadata specify the selector to be used.
- Import the Child Component in the module class and declare it in declaration Array.
- Use the CSS Selector to specify in the Parent Component Template, where you want to display the Child Component.
Adding a Child Component in Angular
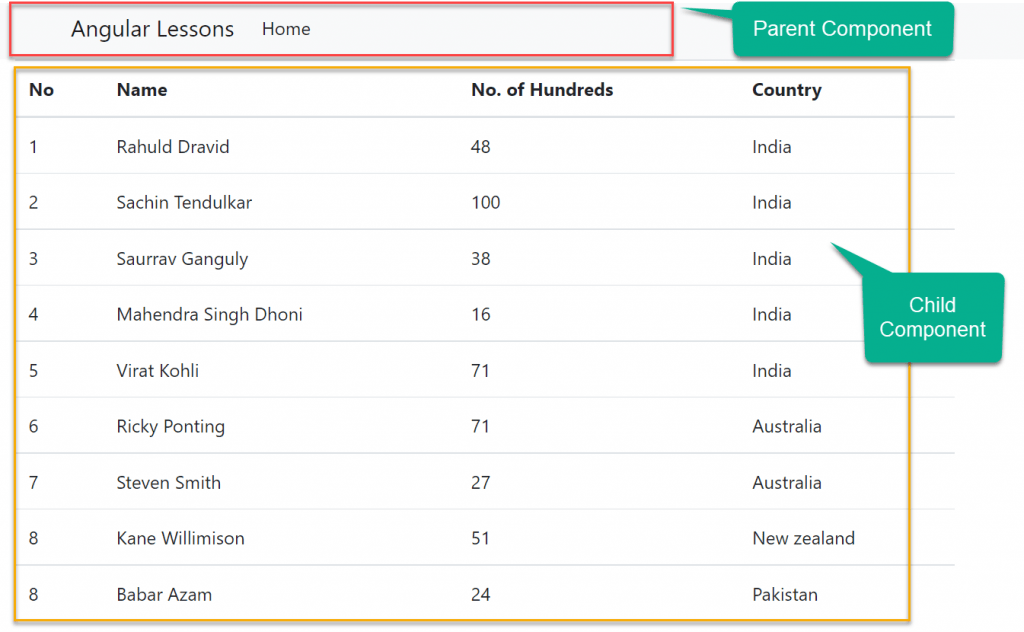
Now, let us add a Child Component to our project. In our child component, let us display a list of cricketers and according to their Country we filter the cricketers Name. At the end of article we will see the below UI result,
Let’s create the component named as “cricketer-list” that display the list of cricketers to adding the component into parent.
ng g c cricketer-listImport the Child Component in the Module
Go to the app.module.ts and you can add the below file, if you create using above command then it will automatically add for you.
import { CricketerListComponent } from './cricketer-list/cricketer-list.component';
@NgModule({
  declarations: [
    AppComponent,
    EmployeeComponent,
    CricketerListComponent
  ],
Here we added the cricketer-list that contains some dummy data like below.[The dummy data may be differ to actual]
import { Component, OnInit } from '@angular/core';

@Component({
  selector: 'app-cricketer-list',
  templateUrl: './cricketer-list.component.html',
  styleUrls: ['./cricketer-list.component.css']
})
export class CricketerListComponent implements OnInit {

  cricketerList: Cricketer[] = [

    {id: 1, name: 'Rahuld Dravid', hundreds: 48, country: 'India'},
    {id: 2, name: 'Sachin Tendulkar', hundreds: 100, country: 'India'},
    {id: 3, name: 'Saurrav Ganguly', hundreds: 38, country: 'India'},
    {id: 4, name: 'Mahendra Singh Dhoni', hundreds: 16, country: 'India'},
    {id: 5, name: 'Virat Kohli', hundreds: 71, country: 'India'},
    {id: 6, name: 'Ricky Ponting', hundreds: 71, country: 'Australia '},
    {id: 7, name: 'Steven Smith', hundreds: 27, country: 'Australia'},
    {id: 8, name: 'Kane Willimison', hundreds: 51, country: 'New zealand'},
    {id: 8, name: 'Babar Azam', hundreds: 24, country: 'Pakistan'}
  ]
  constructor() { }

  ngOnInit(): void {
  }
}
export class Cricketer {
  id: number=0;
  name:string= '' ;
  hundreds: number=0;
  country:string = '';
}
The next step is to create the View to display the list of cricketers. To iterate through the cricketers collection, we have used the ngFor Directive provided by the Angular. We see in our upcoming article, which discusses the ngFor Directive
The syntax for ngFor directive starts with *ngFor. The * indicates that it is a structural directive. i.e a directive that adds or removes the HTML elements to or from the DOM.
<table class='table table-stripped'>
    <thead>
      <tr>
        <th>No</th>
        <th>Name</th>
        <th>No. of Hundreds</th>
        <th>Country</th>
      </tr>
    </thead>
    <tbody>
      <tr *ngFor="let cricketer of cricketerList;">
        <td>{{cricketer.id}}</td>
        <td>{{cricketer.name}}</td>
        <td>{{cricketer.hundreds}}</td>
        <td>{{cricketer.country}}</td>
      </tr>
    </tbody>
  </table>
Add the child component into the Parent component
Open app.component.html and add register the component like below, it means here the parent component is app.component.html and register the child component app-cricketer-list.
<app-cricketer-list></app-cricketer-list>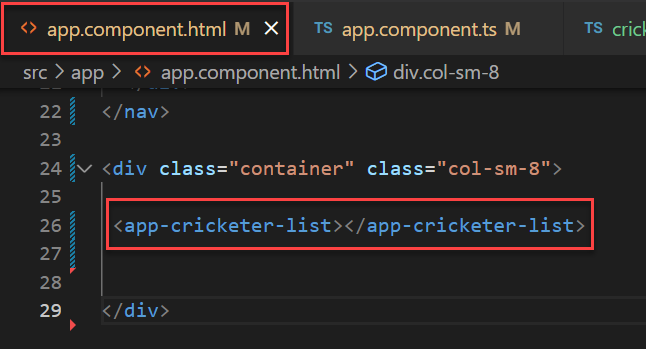
Now run the application and you can see the output print like below,
Filter data from list to adding another nested component
Let’s add the another component named as “filtered-list” that is responsible to filter from the cricketer-list and we have added some static data-point to count no. of cricketers.
import { Component, OnInit } from '@angular/core';

@Component({
  selector: 'app-filtered-list',
  templateUrl: './filtered-list.component.html',
  styleUrls: ['./filtered-list.component.css']
})
export class FilteredListComponent implements OnInit {
  all: number = 8;
  india: number = 5;
  australia: number = 2;
  newzealand: number = 1;
  pakistan: number = 1;
  constructor() { }

  ngOnInit(): void {
  }
}
<span class="radioClass">Cricketers : </span>
<input type="radio" name="options" />
<span class="radioClass">{{"All(" + all + ")"}}</span>
<span style="border: 1px solid gray;" >
<input name="options" type="radio" class="ml-2">
<span class="radioClass">{{"India(" + india + ")"}}</span>
<input name="options" type="radio" class="ml-2">
<span class="radioClass">{{"Australia(" + australia + ")"}}</span>
<input name="options" type="radio" class="ml-2">
<span class="radioClass">{{"NewZealand(" + newzealand + ")"}}</span>
<input name="options" type="radio" class="ml-2">
<span class="radioClass">{{"Pakistan(" + pakistan + ")"}}</span>
</span>
Finally add this component into the parent component like below,
<div class="container" class="col-sm-8">

<app-filtered-list></app-filtered-list>

<app-cricketer-list></app-cricketer-list>


</div>
Run again the application and you can see the output like below, Here the app.component is the parent placeholder where we added two components, filterdlist.component and cricketerslist.component.
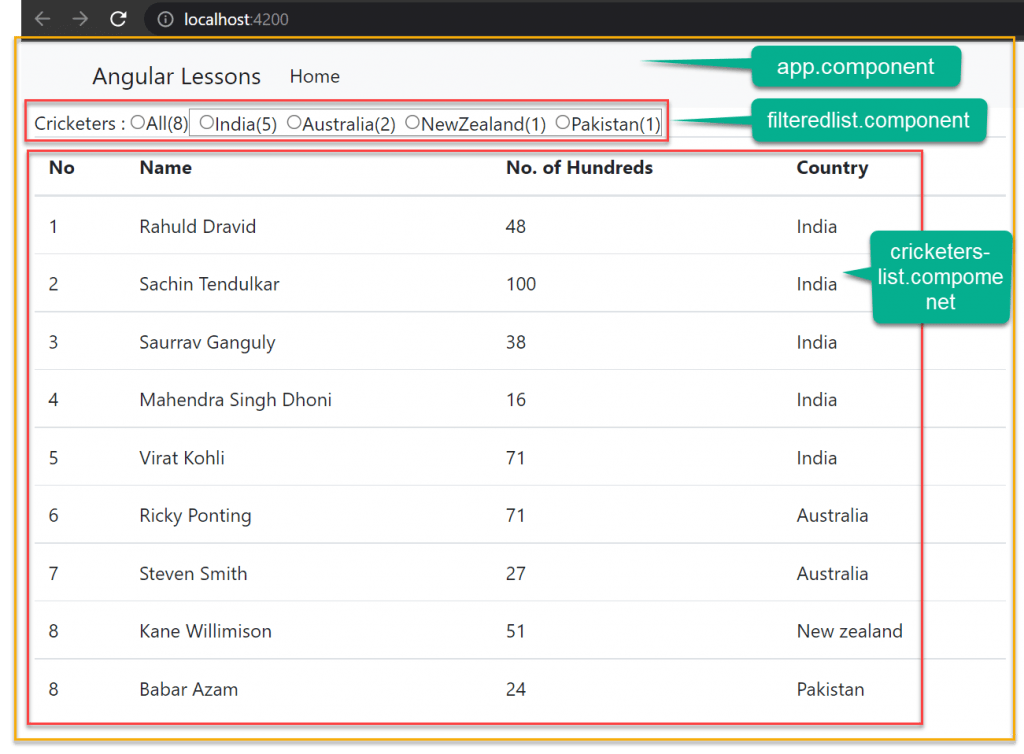
In the above example, we have hardcoded the filtered cricketers counts according to their countries within the filteredComponent. In the next article, we will discuss how to pass the count values dynamically from the container component i.e. from the CricketerListComponent to the nested component i.e. filteredComponent.
Conclusion
Here we discussed about how to use Child/Nested component use in Angular. The Angular follows component-based Architecture, where each Angular Components manages a specific task or workflow.
Leave behind your valuable queries and suggestions in the comment section below. Also, if you think this article helps you, do not forget to share this with your developer community. Happy Coding 🙂
Related Articles
- Deploying Angular apps in Azure Blob Storage with CI/CD Integration 🚀
- Building a Chatbot in Angular using Gemini API
- Create a responsive sidebar with Angular Material- Angular 18 Example Series
- How to Deploy Angular 17/18 App in GitHub Pages
- How to convert Text To Speech With Azure Cognitive Services using Angular and .Net Core
Jayant Tripathy
Coder, Blogger, YouTuberA passionate developer keep focus on learning and working on new technology.