In this article we learn how to export the data into MS Excel in ASP.NET MVC without using any 3rd party libraries. Please read my previous article Integrate Razorpay Payment Gateway in ASP.NET Core.
We take an example to print the dummy data into a ASP .NET MVC page and there we apply to export data into MS Excel.
- Create a ASP.NET MVC application using Visual Studio.
- We select as Empty project with ASP.NET MVC
- Create a Controller inside the controllers folder, let’s name as “CustomerController.cs”
- Add a customer model class in Models folder.
- In the “CustomerController” we create a dummy list that contains multiple customers. You can connect with database and fetch the real-time data.
Customer Model Class
public class Customer
    {
        public int CustomerId { get; set; }

        public string CustomerName { get; set; }

        public string CustomerAddress { get; set; }

        public string CustomerMobile { get; set; }
    }
Customer Controller
 public ActionResult Index()
        {
            return View(GetCustomer());
        }
        public dynamic GetCustomer()
        {
            return new List<Customer>()
            {
                new Customer{ CustomerId=001, CustomerName="John Smith", CustomerAddress="USA", CustomerMobile="7854378560" },
                new Customer{ CustomerId=002, CustomerName="Lori orona", CustomerAddress="UK", CustomerMobile="3484767830" },
                new Customer{ CustomerId=003, CustomerName="Aakash Singh", CustomerAddress="India", CustomerMobile="6484789045" },
                new Customer{ CustomerId=004, CustomerName="Alex Hex", CustomerAddress="Finland", CustomerMobile="2746789045" },
                new Customer{ CustomerId=005, CustomerName="Albie Michell", CustomerAddress="USA", CustomerMobile="7643897640" },
            };
        }
Code Explanation
- We take a dummy data to return the customer details inside the view page.
- GetCustomer() holds the customer information.
- When Index() action method is called it collect the customer information and send to the view.
- We use the scaffolding technique to generate the list of HTML using customer model class
Customer View
@model IEnumerable<ExportExcel_ASPNETMVC.Models.Customer>
@{
    ViewBag.Title = "Index";
}
<h2>Index</h2>
<p>
    @Html.ActionLink("Create New", "Create")
</p>
@using (Html.BeginForm("Export", "Customer", FormMethod.Post))
{
    <div class="container">
        <input type="submit" value="Export to Excel" class="btn btn-primary" />
    </div>
    <table class="table">
        <tr>
            <th>
                @Html.DisplayNameFor(model => model.CustomerName)
            </th>
            <th>
                @Html.DisplayNameFor(model => model.CustomerAddress)
            </th>
            <th>
                @Html.DisplayNameFor(model => model.CustomerMobile)
            </th>
            <th></th>
        </tr>

        @foreach (var item in Model)
        {
            <tr>
                <td>
                    @Html.DisplayFor(modelItem => item.CustomerName)
                </td>
                <td>
                    @Html.DisplayFor(modelItem => item.CustomerAddress)
                </td>
                <td>
                    @Html.DisplayFor(modelItem => item.CustomerMobile)
                </td>
                <td>
                    @Html.ActionLink("Edit", "Edit", new { id = item.CustomerId }) |
                    @Html.ActionLink("Details", "Details", new { id = item.CustomerId }) |
                    @Html.ActionLink("Delete", "Delete", new { id = item.CustomerId })
                </td>
            </tr>
        }
    </table>
}
Code Explanation
- The customer information is printed using scaffold.
- We create here a Export button and when it click it generate the Excel.
- The view screen look like below;

Create Export Post method to convert the data into Excel
As we already discuss we are not using any 3rd party libraries to export excel, here we can simply GridView control of the System.Web.UI.WebControls namespace that is part of ASP.NET Web Form and it do conversion of MS Excel following below steps.
 [HttpPost]
        public ActionResult Export()
        {
            // Step 1 - get the data from database
            var data = GetCustomer();

            // instantiate the GridView control from System.Web.UI.WebControls namespace
            // set the data source
            GridView gridview = new GridView();
            gridview.DataSource = data;
            gridview.DataBind();

            // Clear all the content from the current response
            Response.ClearContent();
            Response.Buffer = true;
            // set the header
            Response.AddHeader("content-disposition", "attachment;filename = data.xls");
            Response.ContentType = "application/ms-excel";
            Response.Charset = "";
            // create HtmlTextWriter object with StringWriter
            using (StringWriter sw = new StringWriter())
            {
                using (HtmlTextWriter htw = new HtmlTextWriter(sw))
                {
                    // render the GridView to the HtmlTextWriter
                    gridview.RenderControl(htw);
                    // Output the GridView content saved into StringWriter
                    Response.Output.Write(sw.ToString());
                    Response.Flush();
                    Response.End();
                }
                return View();
            }
        }
Code Explanation
- On Export() we fetch the data from customer list.
- Using help of GridView control of the System.Web.UI.WebControls namespace append the customer data into Gridview.
- Rendering the GridView conent using HtmlTextWriter and StringWriter.
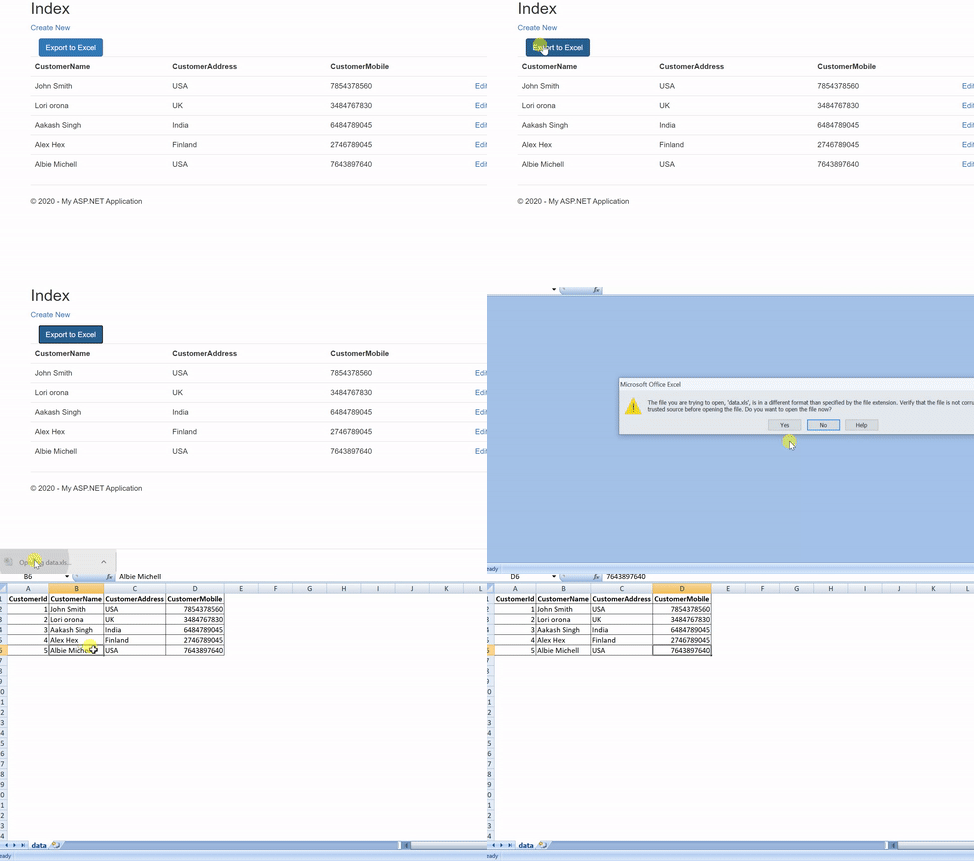
Everything is okay now, so let’s run the application and see the output like below;

You can see like above image we do code for export data into excel format in ASP.NET MVC without using any 3rd part library, we just use the Grid-view Controls that are present in System.Web.UI.WebControls.
Conclusion
Leave behind your valuable queries and suggestions in the comment section below. Also, if you think this article helps you, do not forget to share this with your developer community. Happy Coding 🙂
Jayant Tripathy
Coder, Blogger, YouTuberA passionate developer keep focus on learning and working on new technology.
