
In this article we will learn how to Integrate Razorpay Payment Gateway in ASP.Net Core. We discuss here about Razor Pay with learn how to integrate it in ASP.Net Core MVC. Please go through my previous article Build CRUD REST APIs with ASP.NET Core 5.0 with EF Core 5.0. At the end of this article you can see output like this, we integrate the Razorpay in ASP.Net Core MVC.
Prerequisites
— Razorpay payment Gateway Account ( You can check with free account)
— Visual Studio 2019/2022
What is Razorpay Payment Gateway?
A payment gateway is an online service that authorizes and processes payments for online businesses. It is the glue between the customer and the merchant. Some popular payment Gateway are below,
- PayPal
- Stripe
- Authorize.net
- Amazon Payments
- 2Checkout
The Razorpay Payment Gateway enables to accept payments via debit card, credit card, net banking, UPI and popular supported wallets.
Creating Razorpay Payment Gateway Account Setup
- Let’s signup Razorpay payment Gateway using this link, You can sign up using your Google account also.
- After sign up it ask the “business type” along with your name and mobile number.
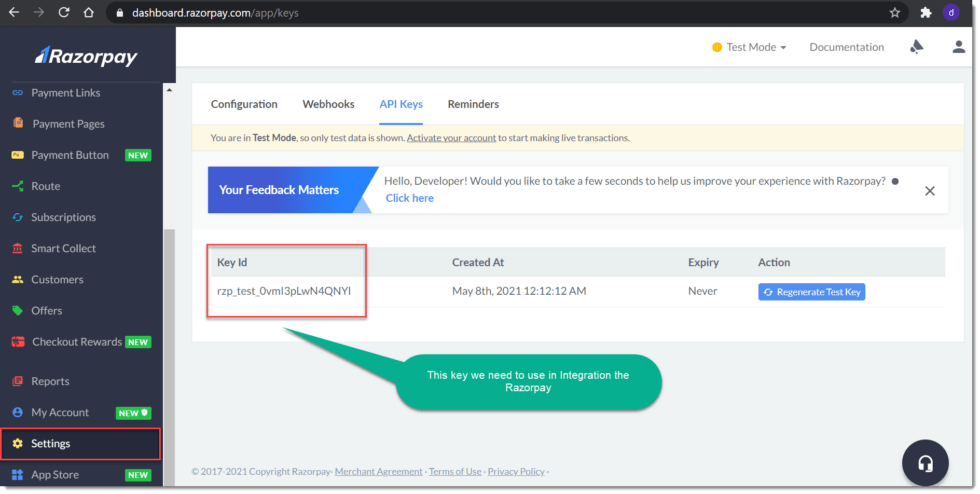
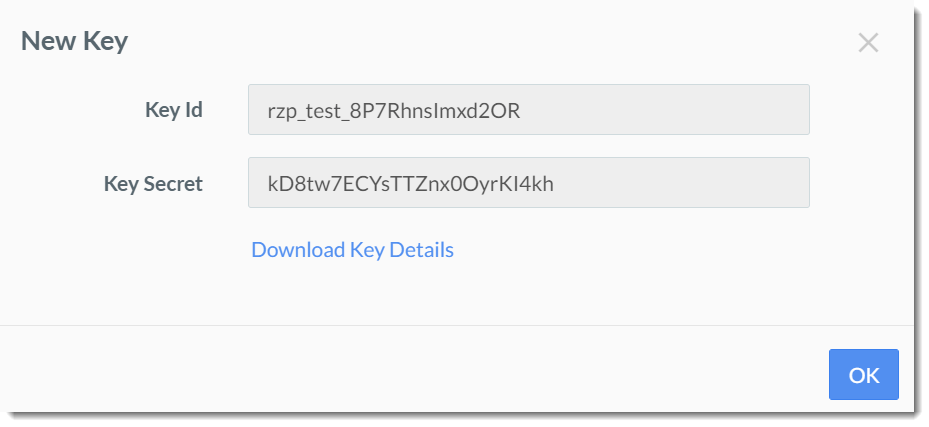
- Then move Razorpay account dashboard and go to Settings then API Keys Tab and Generate a key for the selected mode (Test or Live) as shown below:
Integrate Razorpay Payment Gateway in ASP.NET Core
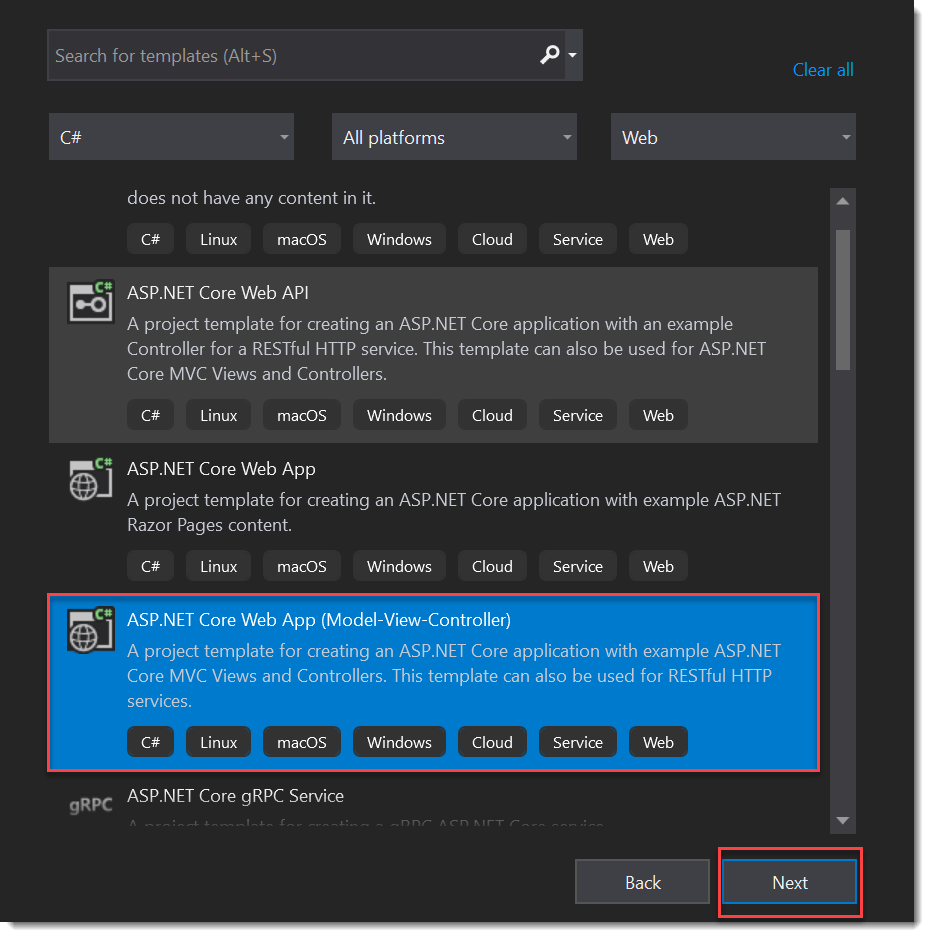
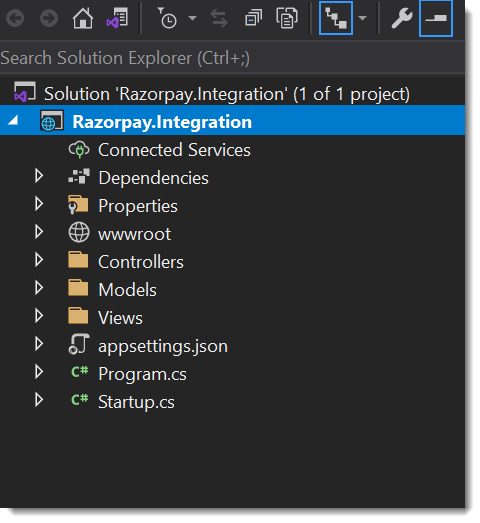
- Let’s create ASP.NET Core MVC 5.0 project using Visual studio 2019.
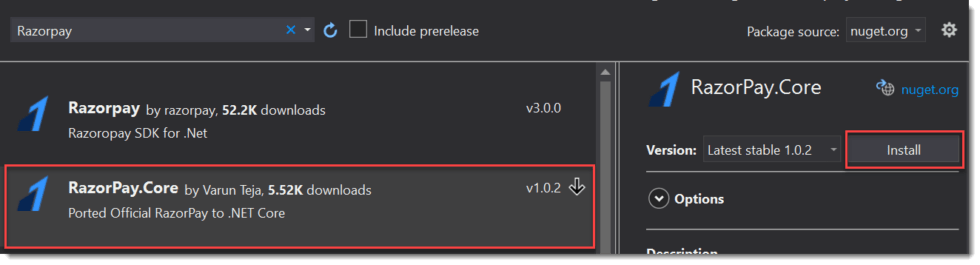
Add Razorpay package in Nuget
Create Model/Entity Class
Let’s create the 2 entitles that holds the Payment Request and Merchant Order details.
public class MerchantOrder
    {
        public string OrderId { get; set; }
        public string RazorpayKey { get; set; }
        public int Amount { get; set; }
        public string Currency { get; set; }
        public string Name { get; set; }
        public string Email { get; set; }
        public string PhoneNumber { get; set; }
        public string Address { get; set; }
        public string Description { get; set; }
    }
public class PaymentRequest
{
[Required]
public string Name { get; set; }
[Required]
public string Email { get; set; }
[Required]
public string PhoneNumber { get; set; }
[Required]
public string Address { get; set; }
[Required]
public int Amount { get; set; }
}Create the Business Logic to Integrate Razorpay
Create the Service method that holds the business logic. Let’s create a folder name as “Service” inside the Razorpay project.
Create Interface
public interface IPaymentService
    {
         Task<MerchantOrder> ProcessMerchantOrder(PaymentRequest payRequest);
         Task<string> CompleteOrderProcess(IHttpContextAccessor _httpContextAccessor);
    }
Implement Interface inside “PaymentService”
public class PaymentService : IPaymentService
    {

        public Task<MerchantOrder> ProcessMerchantOrder(PaymentRequest payRequest)
        {
            try
            {
                // Generate random receipt number for order
                Random randomObj = new Random();
                string transactionId = randomObj.Next(10000000, 100000000).ToString();
                Razorpay.Api.RazorpayClient client = new Razorpay.Api.RazorpayClient("rzp_test_8P7RhnsImxd2OR", "kD8tw7ECYsTTZnx0OyrKI4kh");
                Dictionary<string, object> options = new Dictionary<string, object>();
                options.Add("amount", payRequest.Amount * 100);
                options.Add("receipt", transactionId);
                options.Add("currency", "INR");
                options.Add("payment_capture", "0"); // 1 - automatic  , 0 - manual
                //options.Add("Notes", "Test Payment of Merchant");
                Razorpay.Api.Order orderResponse = client.Order.Create(options);
                string orderId = orderResponse["id"].ToString();
                MerchantOrder order = new MerchantOrder
                {
                    OrderId = orderResponse.Attributes["id"],
                    RazorpayKey = "rzp_test_8P7RhnsImxd2OR",
                    Amount = payRequest.Amount * 100,
                    Currency = "INR",
                    Name = payRequest.Name,
                    Email = payRequest.Email,
                    PhoneNumber = payRequest.PhoneNumber,
                    Address = payRequest.Address,
                    Description = "Order by Merchant"
                };
                return Task.FromResult(order);
            }
            catch (Exception ex)
            {
                throw;
            }
        }
        public async Task<string> CompleteOrderProcess(IHttpContextAccessor _httpContextAccessor)
        {
            try
            {
                string paymentId = _httpContextAccessor.HttpContext.Request.Form["rzp_paymentid"];
                // This is orderId
                string orderId = _httpContextAccessor.HttpContext.Request.Form["rzp_orderid"];
                Razorpay.Api.RazorpayClient client = new Razorpay.Api.RazorpayClient("rzp_test_8P7RhnsImxd2OR", "kD8tw7ECYsTTZnx0OyrKI4kh");
                Razorpay.Api.Payment payment = client.Payment.Fetch(paymentId);
                // This code is for capture the payment
                Dictionary<string, object> options = new Dictionary<string, object>();
                options.Add("amount", payment.Attributes["amount"]);
                Razorpay.Api.Payment paymentCaptured = payment.Capture(options);
                string amt = paymentCaptured.Attributes["amount"];
                return paymentCaptured.Attributes["status"];
            }
            catch (Exception)
            {
                throw;
            }
        }
    }
Code Explanation
- Line #4 : ProcessMerchantOrder is use to collect the order details.
- Line #9-10 : Random transaction id is generate.
- Line #12-21 : This is use for to collect and generate the order. Here we need to use Razor Key and Secret Key.
- Line #23-35 : Is used to return the Order details.
- Line #43-61 : According to the payment info it complete the payment.
Add the Dependency services inside Startup class
public void ConfigureServices(IServiceCollection services)
        {
            services.AddControllersWithViews();
            services.AddTransient<IPaymentService, PaymentService>();
            services.AddSingleton<IHttpContextAccessor, HttpContextAccessor>();
        }
Create a Controller as PaymentController
public class PaymentController : Controller
    {
        private readonly ILogger<PaymentController> _logger;
        private readonly IPaymentService _service;
        private IHttpContextAccessor _httpContextAccessor;
        public PaymentController(ILogger<PaymentController> logger, IPaymentService service, IHttpContextAccessor httpContextAccessor)
        {
            _logger = logger;
            _service = service;
            _httpContextAccessor = httpContextAccessor;
        }
        public IActionResult Index()
        {
            return View();
        }
        [HttpPost]
        public async Task<IActionResult> ProcessRequestOrder(PaymentRequest _paymentRequest)
        {
            MerchantOrder _marchantOrder = await _service.ProcessMerchantOrder(_paymentRequest);
            return View("Payment", _marchantOrder);
        }
        [HttpPost]
        public async Task<IActionResult> CompleteOrderProcess()
        {
            string PaymentMessage =await _service.CompleteOrderProcess(_httpContextAccessor);
            if (PaymentMessage == "captured")
            {
                return RedirectToAction("Success");
            }
            else
            {
                return RedirectToAction("Failed");
            }
        }
        public IActionResult Success()
        {
            return View();
        }
        public IActionResult Failed()
        {
            return View();
        }
    }
Code Explanation
- Line #3-11 : The controller implements dependency injection.
- Line #17-20 : Process the merchant order information.
- Line #23-38 : This is use for the payment is success or failure.
Create Require Razor Pay cshtml
Index.cshtml that hold the payment page information.
@model Razorpay.Integration.Models.PaymentRequest
@{
    ViewData["Title"] = "Payment Page";
}
<link rel="stylesheet" href="https://maxcdn.bootstrapcdn.com/bootstrap/3.2.0/css/bootstrap.min.css">
<link rel="stylesheet" href="https://cdnjs.cloudflare.com/ajax/libs/font-awesome/4.7.0/css/font-awesome.min.css">
    <form class="well form-horizontal" asp-action="ProcessRequestOrder" method="post" id="contact_form">
        <center><h2><b>Razorpay Payment Gateway Integration</b></h2></center>
        <div class="form-group">
            <label class="col-md-4 control-label">Customer Name</label>
            <div class="col-md-4 inputGroupContainer">
                <div class="input-group">
                    <span class="input-group-addon"><i class="fa fa-user"></i></span>
                    <input placeholder="Name" class="form-control" type="text" asp-for="Name" autocomplete="off" required>
                </div>
            </div>
        </div>
        <div class="form-group">
            <label class="col-md-4 control-label">E-Mail</label>
            <div class="col-md-4 inputGroupContainer">
                <div class="input-group">
                    <span class="input-group-addon"><i class="fa fa-envelope" style="font-size:11px"></i></span>
                    <input placeholder="E-Mail Address" class="form-control" type="text" asp-for="Email" autocomplete="off" required>
                </div>
            </div>
        </div>
        <div class="form-group">
            <label class="col-md-4 control-label">Phone Number</label>
            <div class="col-md-4 inputGroupContainer">
                <div class="input-group">
                    <span class="input-group-addon"><i class="fa fa-phone"></i></span>
                    <input placeholder="Phone" class="form-control" type="text" asp-for="PhoneNumber" autocomplete="off" required>
                </div>
            </div>
        </div>
        <div class="form-group">
            <label class="col-md-4 control-label">Address</label>
            <div class="col-md-4 inputGroupContainer">
                <div class="input-group">
                    <span class="input-group-addon"><i class="fa fa-address-book-o" style="font-size:11px"></i></span>
                    <input placeholder="Address" class="form-control" type="text" asp-for="Address" autocomplete="off" required>
                </div>
            </div>
        </div>
        <div class="form-group">
            <label class="col-md-4 control-label">Amount (INR)</label>
            <div class="col-md-4 inputGroupContainer">
                <div class="input-group">
                    <span class="input-group-addon"><i class="fa fa-inr" style="font-size:19px"></i></span>
                    <input placeholder="Amount (INR)" class="form-control" type="text" asp-for="Amount" autocomplete="off" required>
                </div>
            </div>
        </div>
        <div class="form-group">
            <label class="col-md-4 control-label"></label>
            <div class="col-md-4" style="text-align:center;">
                <button type="submit" class="btn btn-warning">SUBMIT <span class="glyphicon glyphicon-send"></span></button>
            </div>
        </div>
    </form>
After input all the information then click on Submit button it redirect to payment.cshtml page like below;
@model Razorpay.Integration.Models.MerchantOrder
<button id="RzP_btn" hidden>Pay</button>
//<!--<script src="https://checkout.razorpay.com/v1/checkout.js"></script>-->
<script>
var options = {
    "key": "@Html.DisplayFor(model => model.RazorpayKey)", // Enter the Key ID generated from the Dashboard
    "amount": "@Html.DisplayFor(model => model.Amount)", // Amount is in currency subunits. Default currency is INR. Hence, 50000 refers to 50000 paise
    "currency": "@Html.DisplayFor(model => model.Currency)",
    "name": "@Html.DisplayFor(model => model.Name)",
    "description": "@Html.DisplayFor(model => model.Description)",
    "image": "https://avatars.githubusercontent.com/u/65504583?v=4", // You can give your logo url
    "order_id": "@Html.DisplayFor(model => model.OrderId)",
    "handler": function (response){
        // After payment successfully made response will come here
        // Set the data in hidden form
        document.getElementById('rzp_paymentid').value = response.razorpay_payment_id;
        document.getElementById('rzp_orderid').value = response.razorpay_order_id;
        // // Let's submit the form automatically
        document.getElementById('rzp-paymentresponse').click();
    },
    "prefill": {
        "name": "@Html.DisplayFor(model => model.Name)",
        "email": "@Html.DisplayFor(model => model.Email)",
        "contact": "@Html.DisplayFor(model => model.PhoneNumber)"
    },
    "notes": {
        "address": "@Html.DisplayFor(model => model.Address)"
    },
    "theme": {
        "color": "#F37254"
    }
};
    var rzp1 = new Razorpay(options);
    //<!-- onload function -->
    window.onload = function(){
        document.getElementById('RzP_btn').click();
    };
    document.getElementById('RzP_btn').onclick = function(e){
    rzp1.open();
    e.preventDefault();
}
</script>
<form action="CompleteOrderProcess" method="post" asp-antiforgery="true">
    <input type="hidden" id="rzp_paymentid" name="rzp_paymentid" />
    <input type="hidden" id="rzp_orderid"  name="rzp_orderid"/>
    <button type="submit" id="rzp-paymentresponse" class="btn btn-primary" hidden>Submit</button>
</form>
That’s it. Let run the application and see the result.
Conclusion
Leave behind your valuable queries and suggestions in the comment section below. Also, if you think this article helps you, do not forget to share this with your developer community. Happy Coding 🙂
Related Articles
- Step-by-Step Guide to Using Azure Redis Cache in ASP.NET Core 9 Web API
- .NET 8 Authentication with Identity in a Web API using Bearer Tokens and Cookies
- How to convert Text To Speech With Azure Cognitive Services using Angular and .Net Core
- CRUD operation using the repository pattern with .Net 8, Ef-Core, and MySQL
- How to use Response Compression in .NET Core
Jayant Tripathy
Coder, Blogger, YouTuberA passionate developer keep focus on learning and working on new technology.
I created the project with the given code as you explained. But not ab;e to start. one error like no web page was found for the web address:
https://localhost:44314
i do not know what to do
if it is working very helpful to me
In your project, go to properties -> launchSettings.json (double click)
in iisSettings -> iisExpress -> applicationUrl (change the port number for your localhost)
and try again, issue should be solved successfully.
If it is not solve using above, please check below link
https://stackoverflow.com/questions/43468715/asp-net-core-this-localhost-page-can-t-be-found
https://stackoverflow.com/questions/69644265/asp-net-core-this-localhost-page-can-t-be-found-http-error-404