
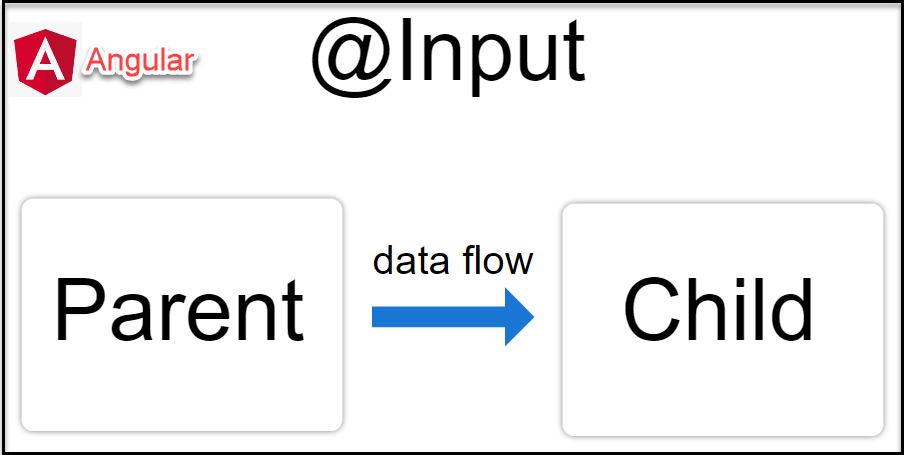
In this article we will learn about how we pass data from Parent to Child Communication in Angular. Here we learn how Angular Passes the data to the child component. The Angular Components communicate with each other using @Input Decorator. This is the continuation of the previous article example of Child/Nested component use in Angular. Please read my previous article Angular Component Communication.
How to Pass data to a child component
In Angular, the Parent Component can communicate with the child component by setting its Property. To do that the Child component must expose its properties to the parent component. The Child Component does this by using the @Input decorator.
Steps to follow to accommodate to pass parent to child component
In the Child Component
Import the @Input module from @angular/Core Library
Mark those property, which you need data from the parent as input property using @Input decorator.
In the Parent Component
Bind the Child component property in the Parent Component when instantiating the Child.
Pass data from Parent to Child Example in Angular
On the below screen-print, you can see we have the child component “filtered-list component” that the data count according countries is static ( this example we discussed in this link) and we have Parent Component “cricketer-list component”.
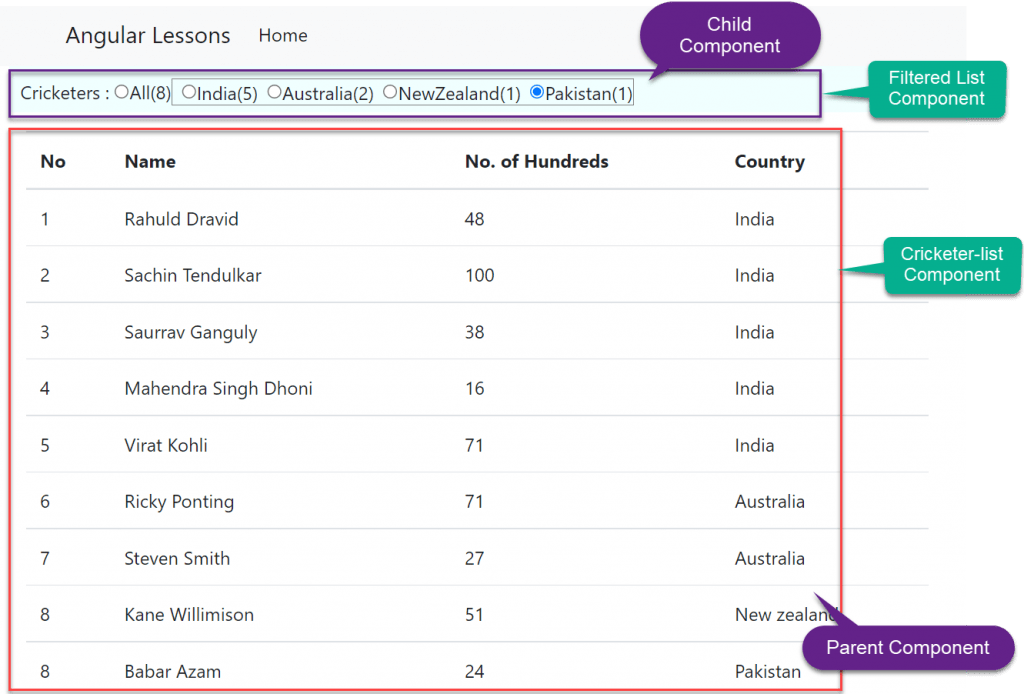
Let us understand how we can use the above static filtered-list component to getting values dynamically. Remember here Parent component is “cricketer-list” and child component is “filter-list”. We would here dynamically count the above radio button counts by passing data from parent to child. With below change we can accommodate the result.
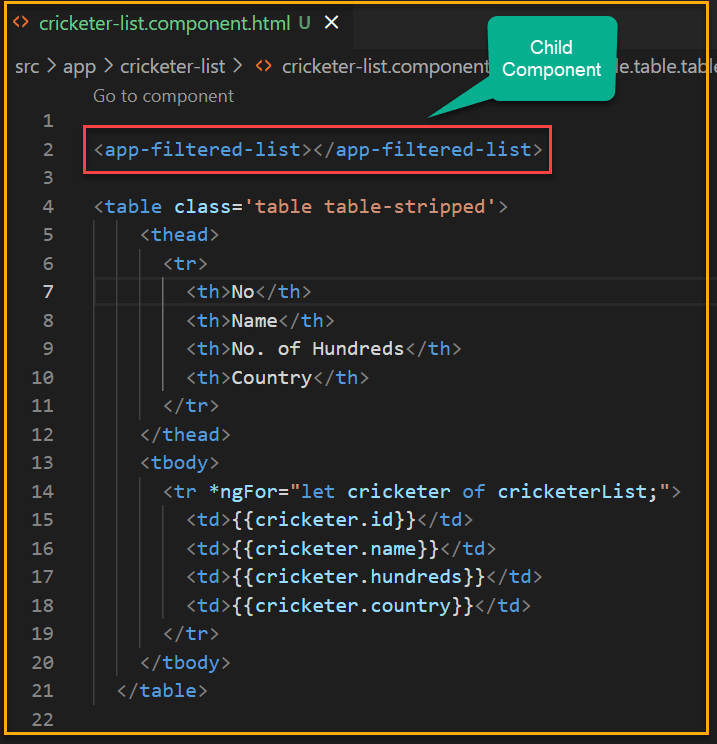
Child Component(filter-list)
We need to add the @Input properties like below.
- Here we have added two input properties,
@Input alland@Input crickersListthat come from Parent Component. - getCricketerListByCountry() method we use to filter the count of data according to passing country name.
- Below are the typescript and HTML files.
import { Component, Input, OnInit } from '@angular/core';

@Component({
  selector: 'app-filtered-list',
  templateUrl: './filtered-list.component.html',
  styleUrls: ['./filtered-list.component.css']
})
export class FilteredListComponent implements OnInit {
  @Input() all: number | undefined;
  @Input() cricketersList: any[] | undefined;
  constructor() { }

  ngOnInit(): void {
  }
  getCricketerListByCountry(country: string): any {
    return this.cricketersList?.filter(x => x.country === country)?.length;
  }
}
<div class="custom">
<span class="radioClass">Cricketers : </span>
<input type="radio" name="options" />
<span class="radioClass">{{"All(" + all + ")"}}</span>
<span style="border: 1px solid gray;">
<input name="options" type="radio" class="ml-2">
<span class="radioClass">{{"India(" + getCricketerListByCountry('India') + ")"}}</span>
<input name="options" type="radio" class="ml-2">
<span class="radioClass">{{"Australia(" + getCricketerListByCountry('Australia') + ")"}}</span>
<input name="options" type="radio" class="ml-2">
<span class="radioClass">{{"NewZealand(" + getCricketerListByCountry('Newzealand') + ")"}}</span>
<input name="options" type="radio" class="ml-2">
<span class="radioClass">{{"Pakistan(" + getCricketerListByCountry('Pakistan') + ")"}}</span>
</span>
</div>Parent Component(cricketers-list)
Here we have the list of cricketers list. We have created two methods getAllCricketerListCount() that returns all the Countries list, getAllCricketerList() return the list of cricketers.
import { Component, OnInit } from '@angular/core';

@Component({
  selector: 'app-cricketer-list',
  templateUrl: './cricketer-list.component.html',
  styleUrls: ['./cricketer-list.component.css']
})
export class CricketerListComponent implements OnInit {

  cricketerList: Cricketer[] = [

    { id: 1, name: 'Rahuld Dravid', hundreds: 48, country: 'India' },
    { id: 2, name: 'Sachin Tendulkar', hundreds: 100, country: 'India' },
    { id: 3, name: 'Saurrav Ganguly', hundreds: 38, country: 'India' },
    { id: 4, name: 'Mahendra Singh Dhoni', hundreds: 16, country: 'India' },
    { id: 5, name: 'Virat Kohli', hundreds: 71, country: 'India' },
    { id: 6, name: 'Ricky Ponting', hundreds: 71, country: 'Australia ' },
    { id: 7, name: 'Steven Smith', hundreds: 27, country: 'Australia' },
    { id: 8, name: 'Kane Willimison', hundreds: 51, country: 'Newzealand' },
    { id: 8, name: 'Babar Azam', hundreds: 24, country: 'Pakistan' }
  ]
  constructor() { }

  ngOnInit(): void {

  }
  getAllCricketerListCount(): number {
    return this.cricketerList.length;
  }
  getAllCricketerList(): any {
    return this.cricketerList;
  }
}
export class Cricketer {

  id: number = 0;
  name: string = '';
  hundreds: number = 0;
  country: string = '';
}
We used here the child component <app-filtered-list>, using property binding to bind the properties that we want to return to child component.
<app-filtered-list [all]="getAllCricketerListCount()"
[cricketersList]="getAllCricketerList()"></app-filtered-list>

<table class='table table-stripped'>
    <thead>
      <tr>
        <th>No</th>
        <th>Name</th>
        <th>No. of Hundreds</th>
        <th>Country</th>
      </tr>
    </thead>
    <tbody>
      <tr *ngFor="let cricketer of cricketerList;">
        <td>{{cricketer.id}}</td>
        <td>{{cricketer.name}}</td>
        <td>{{cricketer.hundreds}}</td>
        <td>{{cricketer.country}}</td>
      </tr>
    </tbody>
  </table>
Now we can see the child component is dynamically bind the countries count to getting the value from parent.
Nothing happens right now when we click on the radio buttons. So, in the next article, we will discuss how to pass data from the child component to the parent component. For example, when a radio button’s checked event is raised in the child component, FilteredComponent, we want to know about it in the parent component, CricketersListComponent, so that we can react to it and then decide which students to show in the table based on the radio button selection.
Conclusion
Here we discussed about how we pass data from Parent to Child Communication in Angular. Here we learn how Angular Passes the data to the child component. The Angular Components communicate with each other using @Input Decorator.
Leave behind your valuable queries and suggestions in the comment section below. Also, if you think this article helps you, do not forget to share this with your developer community. Happy Coding 🙂
Related Articles
- Deploying Angular apps in Azure Blob Storage with CI/CD Integration 🚀
- How to resolve Function App Cannot Create within Azure Portal
- Building a Chatbot in Angular using Gemini API
- Create a responsive sidebar with Angular Material- Angular 18 Example Series
- How to Deploy Angular 17/18 App in GitHub Pages
Jayant Tripathy
Coder, Blogger, YouTuberA passionate developer keep focus on learning and working on new technology.