
In this article we will learn about How to Create a Blazor Web-Assembly App using Azure Function and deploy it as an Azure Static App. Microsoft has developed various web-based frameworks for web development throughout the years, including Asp.Net MVC, Asp.Net Web Page, and, most recently, Asp.Net Core. However, developers continue to choose Asp.Net Web Forms since it is much simpler, more stable, and more productive than the other framework. Asp.Net WebForms is still utilized by around 500,000 web developers today. Microsoft released Blazor, a new web-based framework, in 2018. Please read my previous article of How to Deploy Blazor WebAssembly to AWS Amplify.
Find the Source Code here on this link.
What is Blazor WebAssembly?
In May 2020, Microsoft will launch the Blazor WebAssembly Hosting Model. Blazor WebAssembly or Blazor – WASM-based applications are mostly run on client-side browsers using the WebAssembly-based.NET runtime. When we open the web application in the browser, the Blazor program, its dependencies, and the.Net runtime libraries are downloaded to the client machine. The program always runs on the browser’s UI thread and handles event-related operations. Application assets such as CSS, JavaScript, picture files, and so on are considered static files in the web server section of the Blazor Web-Assembly application. As a result, we can build the Blazor WebAssembly program in two ways. If we create the application without the Asp.Net Core back-end app’s support for its server-type files, it is treated as a standalone Blazor WebAssembly app. When we use the back-end app options to provide the application’s server-side files, it is treated as a hosted Blazor WebAssembly program.
In the case of a Blazor WebAssembly app, we can create it as a Progressive Web App (PWA) to take advantage of modern browser API support. So that we may allow various native client app functions such as offline work, running the application in a separate window, enabling push notifications, and automatic version upgrades as a background process. We may use the full-stack web development process using.Net Core with the help of Blazor WebAssembly. We can utilize the same code between the client and server applications and integrate with MVC and Razor pages during the process. While the client app is housed on a server, it can communicate with the back-end server application using several protocols or messaging frameworks like Web API, SignalR, and gRPC-Web.
Benefits to use Blazor WebAssembly
- There is no dependency in the case of Blazor WebAssembly after the software is downloaded from the server to the client machine. As a result, even if the server goes down, the app will continue to function.
- The application does not have to be hosted on an Asp.Net Core web server. Instead, we can host the application using a server less deployment mechanism such as a CDN.
- We can fully utilize the client’s resources and competencies.
- Despite the benefits listed above, the Blazor WebAssembly app has several restrictions, such as – The program is dependent on the browser’s functionality.
- When the program is accessed in the client browser for the first time, it downloads all app-related resources, including runtime libraries and dependencies. As a result, depending on the size of the program, it may take longer to load the application for the first time.
Creating a Blazor Web Assembly App
In this project, we will use a dummy json file to construct the crickeres list card.
To create the Blazor Web Assembly App follow these below steps:
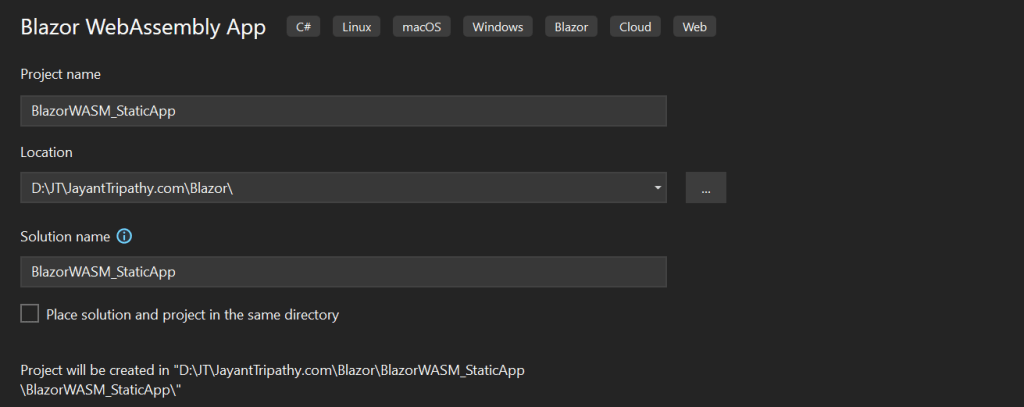
- Launch the Visual Studio IDE and click on “Create new project”.
- In the “Create new project” window, select “
Blazor Web Assembly App” from the list of templates displayed. - Click Next. In the “Configure your new project” window, specify the name and location for the new project and then click Create.
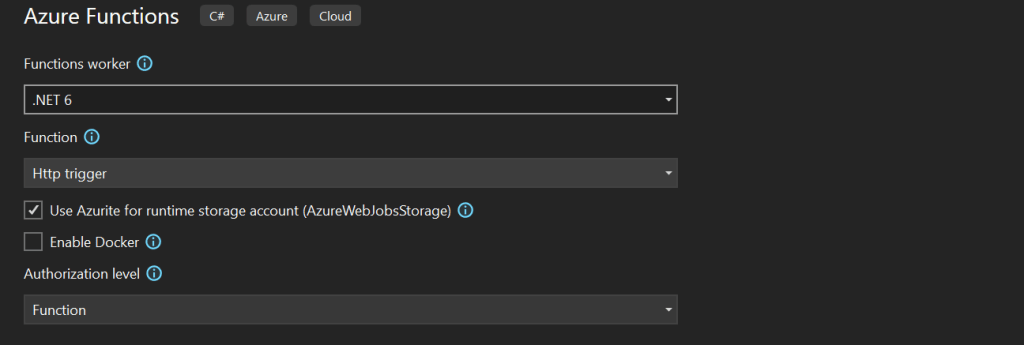
- In the “Blazor Web Assembly App” window shown next, select .NET Core as the runtime and
.NET 6.0from the drop-down list at the top. Select “API” as the project template to create a new ASP.NET Core API application. - Ensure that the check boxes “Enable Docker Support” is disabled s we won’t be using the default feature we will add it manually later and “Configure for HTTPS” are checked.
- Make Authentication type as “None” as we are not using any authentication mode here.
Creating a Model Class
We have create the model class of cricketers like below under Models folder.
 public class Cricketer
    {
        public int id { get; set; }
        public string? image { get; set; }
        public string? name { get; set; }
        public string? country { get; set; }
        public string? description { get; set; }
    }
Creating the sample Json file
- Add a
cricketers.jsonfile to the wwwroot data folder, and fill it with JSON-formatted data based on the cricketer model class. You can get comeplete json file in GitHub shared link. - Also we have added images to wwwroot folder and mentioned on the json file to display on the card.
[
  {
    "id": 1,
    "image": "msd.jpg",
    "name": "MS Dhoni",
    "country": "India",
    "description": "Mahendra Singh Dhoni is an Indian professional cricketer. He was captain of the Indian national team in limited-overs formats from 2007 to 2017 and in Test cricket from 2008 to 2014. Dhoni is widely considered one of the greatest cricket captains, wicket-keeper-batsman and finishers in the history of cricket."
  },
  {
    "id": 2,
    "image": "vk.jpg",
    "name": "Virat Kohli",
    "country": "India",
    "description": "Virat Kohli is an Indian international cricketer and the former captain of the Indian national cricket team who plays as a right-handed batsman for Royal Challengers Bangalore in the IPL and for Delhi in Indian domestic cricket."
  }
]
Creating the Card Component
Select the Pages folder and add a new component called CardComponent.razor and add the below code into that file
<div class="card-group">
    <div class="card">
        <img class="card-img-top" src="images/@image" alt="Card image cap">
        <div class="card-body">
            <h5 class="card-title">@name</h5>
            <p class="card-text" title="@description">@description.Substring(0,80) ... </p>
        </div>
        <div class="card-footer">
            <small class="text-muted">Country : <span>@country</span></small>
        </div>
    </div>
</div>

@code
{

    [Parameter]
    public RenderFragment ChildContent { get; set; }

    [Parameter(CaptureUnmatchedValues = true)]
    public Dictionary<string, object> InputAttributes { get; set; }

    [Parameter]
    public int id { get; set; }

    [Parameter]
    public string image { get; set; }

    [Parameter]
    public string name { get; set; }

    [Parameter]
    public string country { get; set; }

    [Parameter]
    public string description { get; set; }
}- The list of data from the JSON file is bind the cards here.
Modifying the Index.razor file
@page "/"
@using BlazorWASM_StaticApp.Extensions;
@using BlazorWASM_StaticApp.Models;
@using System.Text.Json;
@using System.Text.Json.Serialization;
@inject HttpClient Http;
<PageTitle>Cricketers List</PageTitle>

<h1>Top Cricketers List</h1>

<div class="row">
    @foreach (var cricketer in CricketersList)
    {
        <div class="col-xs-12 col-sm-6 col-md-4 col-lg-3">
            <CardComponent id="@cricketer.id"
                           name="@cricketer.name"
                           description="@cricketer.description"
                           country="@cricketer.country"
                           image="@cricketer.image" />
        </div>

    }
</div>

@code
{
    public List<Cricketer> CricketersList { get; set; } = new List<Cricketer>();
    private List<Cricketer>? cricketers;
    protected override async Task OnInitializedAsync()
    {
        await GetProducts();
    }

    private async Task GetProducts()
    {
        try
        {
            var options = new JsonSerializerOptions()
                {
                    ReferenceHandler = ReferenceHandler.Preserve,
                    PropertyNameCaseInsensitive = true
                };
            cricketers = await Http.GetFromJsonAsync<List<Cricketer>>("sample-data/cricketers.json", options);
            // CricketersList = cricketers.Shuffle<Cricketer>().ToList();
            CricketersList = cricketers.ToList();
        }
        catch(Exception ex)
        {

        }

    }
}GetProducts()method is returned data from sample json file that we have created.- From Line #12-22: the cricketers list data iterate through the
CardCompmentthat we created earlier.
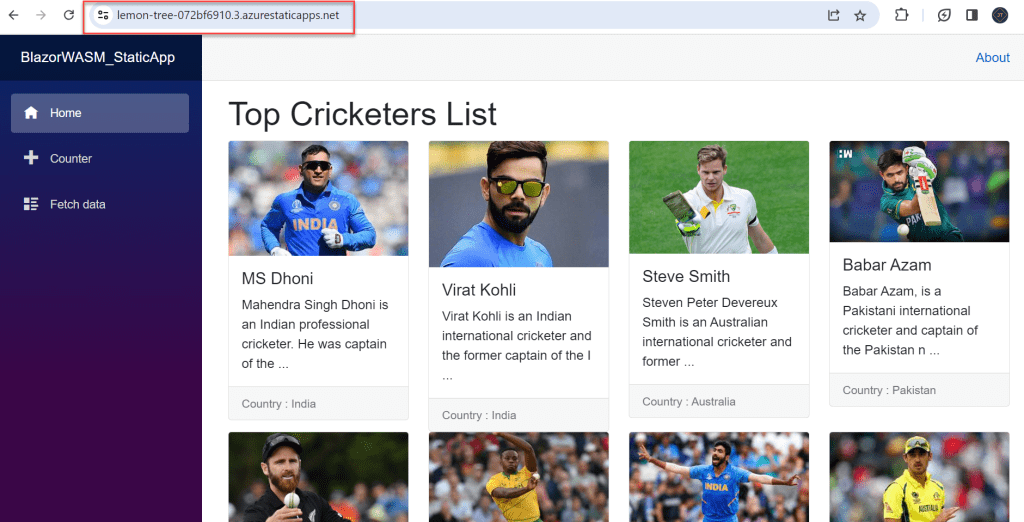
That’s it. Run the application and we can see the card component display like below on localhost,

Creating Azure Function App for Server Side Code
- Choose the solution file and then click Add New Project Option.
- Select the Azure Function option and then press the Next button.
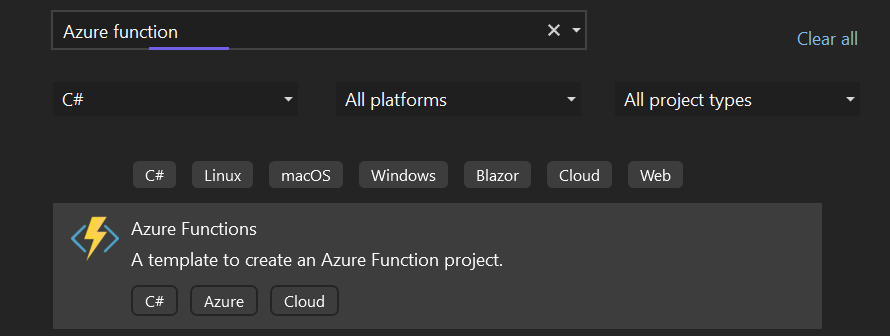
- Select the Function trigger type as Http Trigger from the list and click Add Button
Modify the Azure function code and here we implemented the cricketers Json list like below.
public class Function1
    {

        [FunctionName("GetCricketers")]
        public async Task<HttpResponseMessage> Run(
            [HttpTrigger(AuthorizationLevel.Function, "get", "post", Route = null)] HttpRequest req,
            ILogger log)
        {
            try
            {
                log.LogInformation("C# HTTP trigger function processed a request.");

                var jsondata = File.ReadAllText("cricketers.json");

                var result = JsonConvert.DeserializeObject<List<Cricketer>>(jsondata);

                var json = JsonConvert.SerializeObject(result, Formatting.Indented);

                return new HttpResponseMessage(HttpStatusCode.OK)
                {
                    Content = new StringContent(json, Encoding.UTF8, "application/json")
                };
            }
            catch (Exception ex)
            {
                return null;
            }
        }
    }
Let’s run the Function Project and test the URL mentioned in the command prompt in the browser.
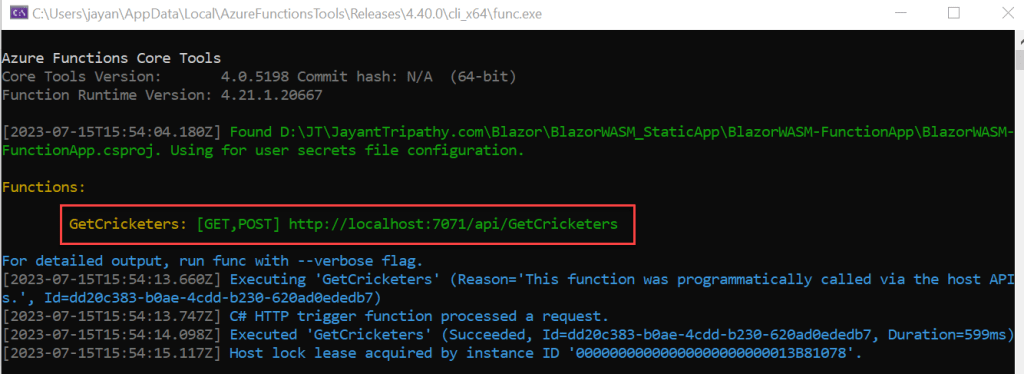
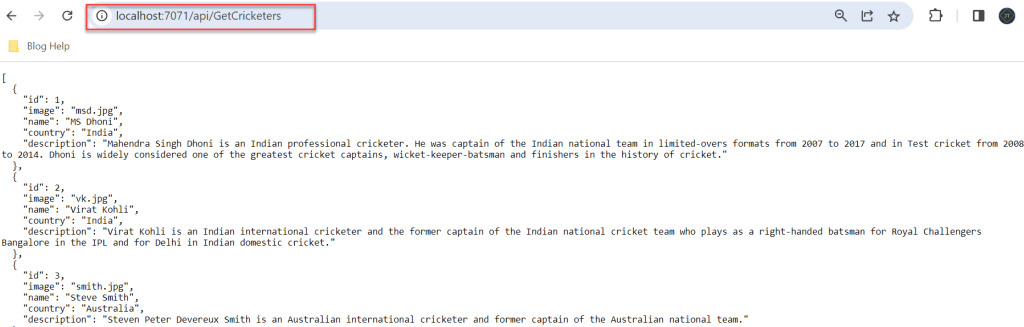
You can see on below URL, it access the cricketer list using Azure function.
Open the Index.razor file and connect the Azure function to get the cricketers data.
  private async Task GetProducts()
    {
        try
        {
            cricketers = await Http.GetFromJsonAsync<List<Cricketer>>("/api/GetCricketers");
            CricketersList = cricketers.ToList();
        }
        catch(Exception ex)
        {
        }
    }
Deploy the Blazor WASM and Azure Function in Azure Static Web App
Both the Blazor WebAssembly and Azure Function projects are completed and ready for deployment within the Azure Static Web App. To accomplish this, we must first log into the Azure Portal and then perform the following activities –
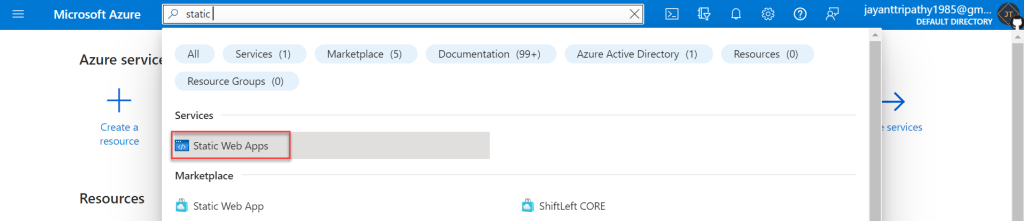
Step-1: Open the Azure portal and search for Azure Static Web App
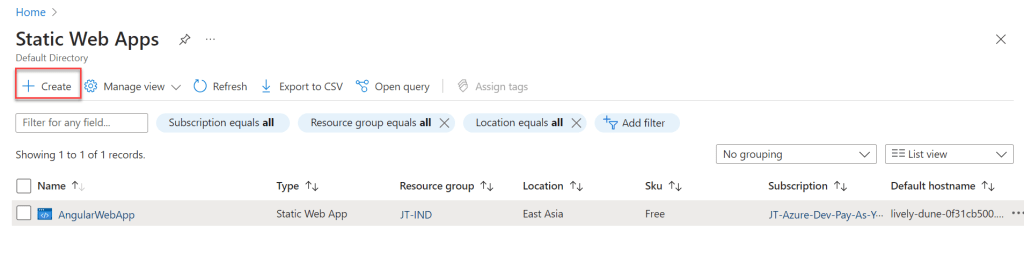
Step-2: After clicking it navigate to the below page and Create the New Static Web App.
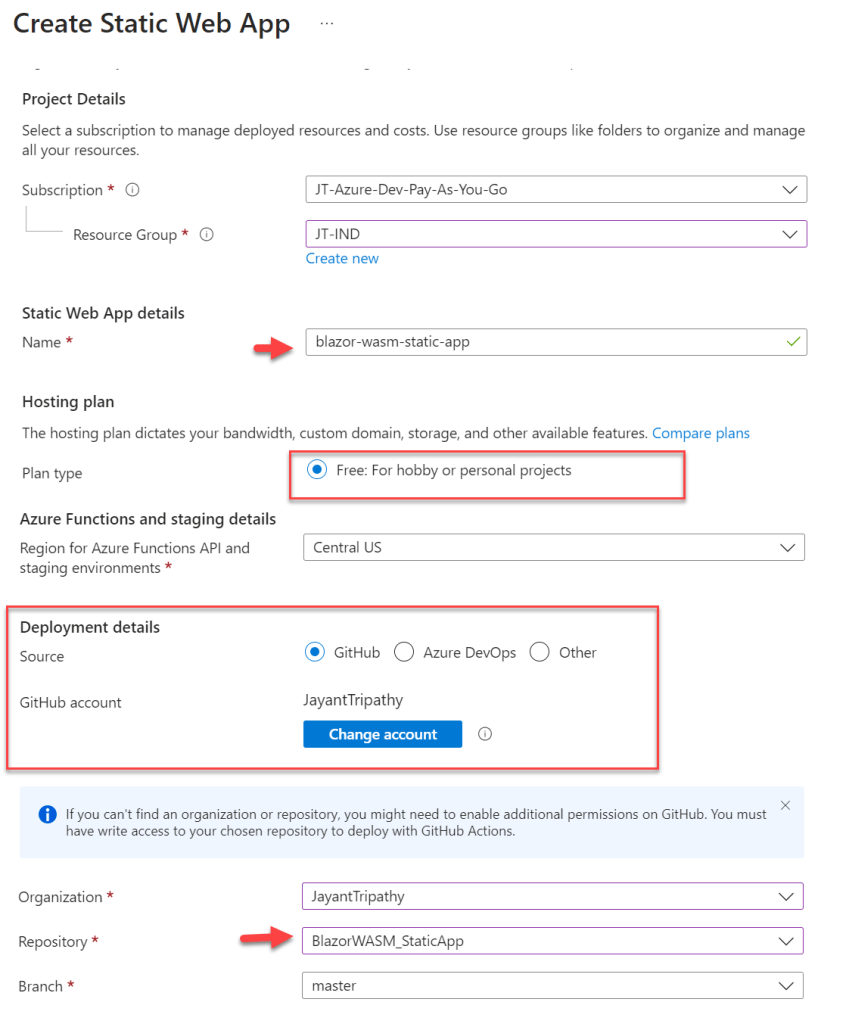
Step-3: When we select the Create button, the following Static Web Apps-related options appear.
- We have selected my subscription along with Resource Group.
- Select the name of your static web app.
- Select the GitHub details as well, so that when we edit and post the code into the GitHub repository, it will immediately deploy into Azure Static Web App.
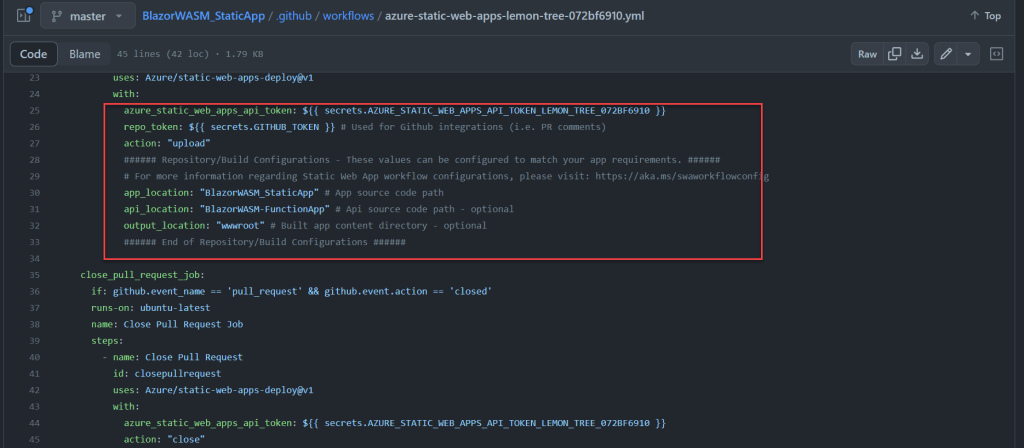
Step-4: When we have completed all of the marked details, the option to select Blazor in the Build Details section will show below:
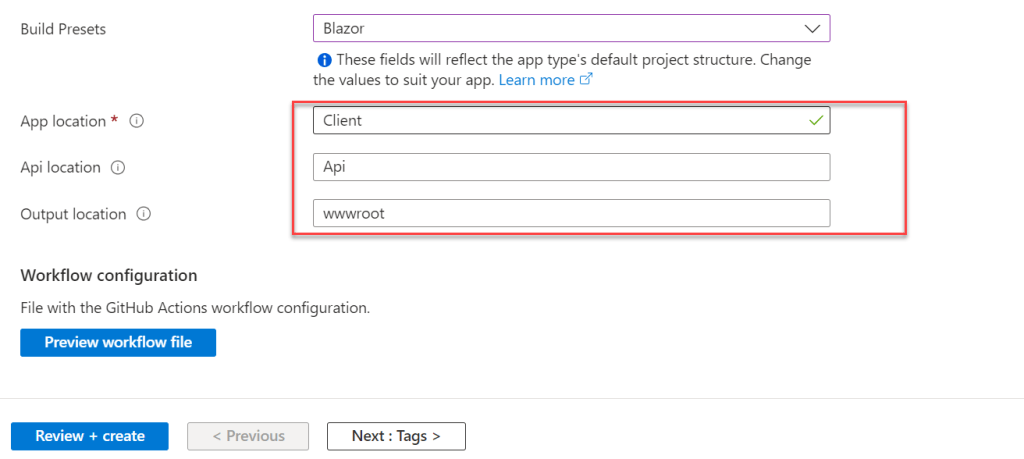
In the above section, we need to provide the below information –
- We need to set the Build Presets as Blazor as we are working on Blazor WASM.
- In the App location we have selected the Blazor WASM project location, for me “
BlazorWASM_StaticApp“ - You must enter the API project’s location path( Azure Function), for me it is “
BlazorWASM-FunctionApp“
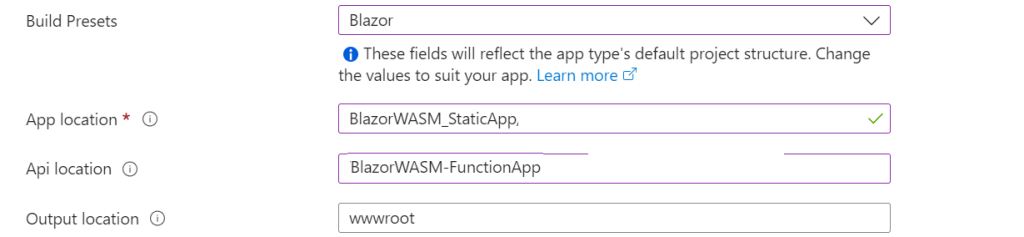
Step-5: Once we provide all the information, we can click the Preview Workflow File button to check the workflow file details.
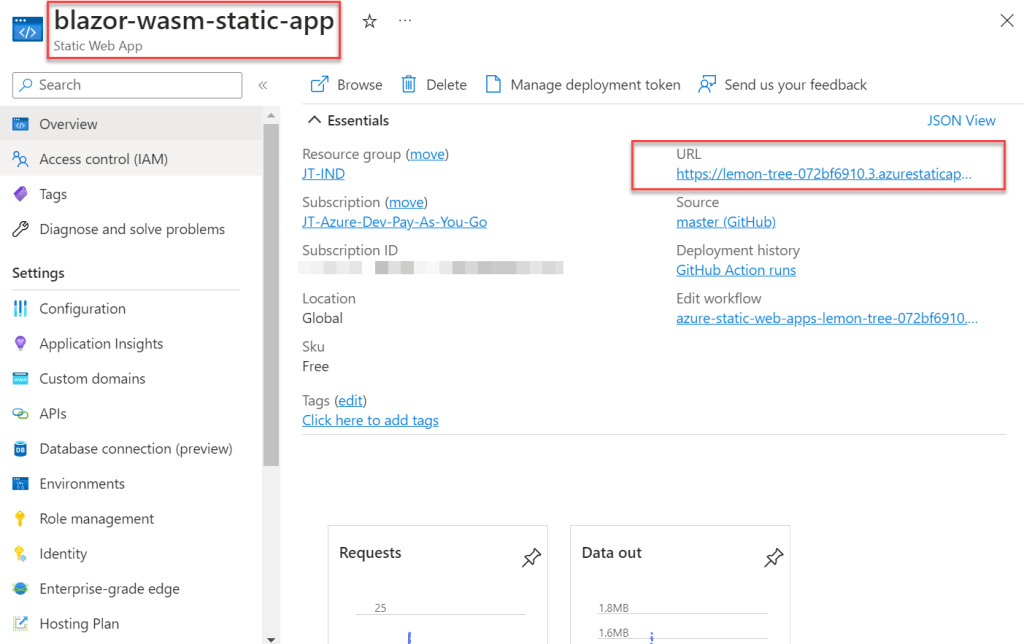
Now, Click the Review + Create Button to complete the Create Process.
Once the Static web app is created, it takes 2-3 minutes to complete the application deployment. Once the deployment is complete we can see it created the URL to get the Azure Static Web App.
We ran into some problems to getting the JSON file, so I made the changes listed below to the Azure function to get the data.
 public static class Function
    {
        [FunctionName("GetCricketers")]
        public static async Task<IActionResult> Run(
            [HttpTrigger(AuthorizationLevel.Function, "get", "post", Route = null)] HttpRequest req,
            ILogger log)
        {
            log.LogInformation("HTTP trigger function to get the cricketers list.");
            var result = JsonConvert.DeserializeObject<List<Cricketer>>(GetJsonData());

            return new OkObjectResult(result);
        }
        public static string GetJsonData()
        {
            return @"[
  {
    ""id"": 1,
    ""image"": ""msd.jpg"",
    ""name"": ""MS Dhoni"",
    ""country"": ""India"",
    ""description"": ""Mahendra Singh Dhoni is an Indian professional cricketer. He was captain of the Indian national team in limited-overs formats from 2007 to 2017 and in Test cricket from 2008 to 2014. Dhoni is widely considered one of the greatest cricket captains, wicket-keeper-batsman and finishers in the history of cricket.""
  },
  {
    ""id"": 2,
    ""image"": ""vk.jpg"",
    ""name"": ""Virat Kohli"",
    ""country"": ""India"",
    ""description"": ""Virat Kohli is an Indian international cricketer and the former captain of the Indian national cricket team who plays as a right-handed batsman for Royal Challengers Bangalore in the IPL and for Delhi in Indian domestic cricket.""
  },
  {
    ""id"": 3,
    ""image"": ""smith.jpg"",
    ""name"": ""Steve Smith"",
    ""country"": ""Australia"",
    ""description"": ""Steven Peter Devereux Smith is an Australian international cricketer and former captain of the Australian national team.""
  },
  {
    ""id"": 4,
    ""image"": ""babar-azam.jpg"",
    ""name"": ""Babar Azam"",
    ""country"": ""Pakistan"",
    ""description"": ""Babar Azam, is a Pakistani international cricketer and captain of the Pakistan national cricket team who is widely regarded as one of the finest batters in contemporary cricket being the only cricketer in the world to be in the top 3 rankings across all formats.""
  },
  {
    ""id"": 5,
    ""image"": ""Kane-Williamson.jpg"",
    ""name"": ""Kane Williamson"",
    ""country"": ""New Zealand"",
    ""description"": ""Kane Williamson is a New Zealand cricketer who is currently the captain of the New Zealand national team in limited overs cricket. On 27 February 2023, Williamson became the all-time leading runscorer for New Zealand in test cricket. He is a right-handed batsman and an occasional off spin bowler.""
  },
  {
    ""id"": 6,
    ""image"": ""rabada.jpg"",
    ""name"": ""Kagiso Rabada"",
    ""country"": ""South Africa"",
    ""description"": ""Kagiso Rabada is a South African international cricketer who plays all formats of the game. He is a right arm fast bowler. He made his international debut in November 2014 in limited-overs cricket before going on to make his Test debut in November 2015""
  },
  {
    ""id"": 7,
    ""image"": ""bumrah.jpg"",
    ""name"": ""Jasprit Bumhra"",
    ""country"": ""India"",
    ""description"": ""Jasprit Bumrah is an Indian international cricketer who played for the Indian cricket team in all formats of the game. A right-arm fast bowler with a unique bowling action, Bumrah is considered one of the best bowlers in the world.""
  },
  {
    ""id"": 8,
    ""image"": ""starc.jpg"",
    ""name"": ""Mitchell Starc"",
    ""country"": ""Australian"",
    ""description"": ""Mitchell Starc is an Australian international cricketer who plays for the Australian national team and New South Wales in domestic cricket.""
  },
  {
    ""id"": 9,
    ""image"": ""shaheen.jpg"",
    ""name"": ""Shaheen Afridi"",
    ""country"": ""Pakistan"",
    ""description"": ""Shaheen Shah Afridi is a Pakistani professional cricketer who plays for the Pakistan national cricket team and captains PSL franchise Lahore Qalandars. He is regarded as one of the best bowlers in contemporary world cricket across all formats.""
  },
  {
    ""id"": 10,
    ""image"": ""Rohit-Sharma.jpg"",
    ""name"": ""Rohit Sharma"",
    ""country"": ""India"",
    ""description"": ""Rohit Sharma, is an Indian international cricketer and the current captain of India men’s cricket team in all formats. Considered one of the best batsmen of his generation and one of greatest opening batters of all time, Sharma is known for his timing, elegance, six-hitting abilities and leadership skills.""
  }
]";
        }
}- That’s it the change and push the file into GitHub. We can in the GitHub action the CI/CD connected through Azure Static Web App and it deployed automatically.
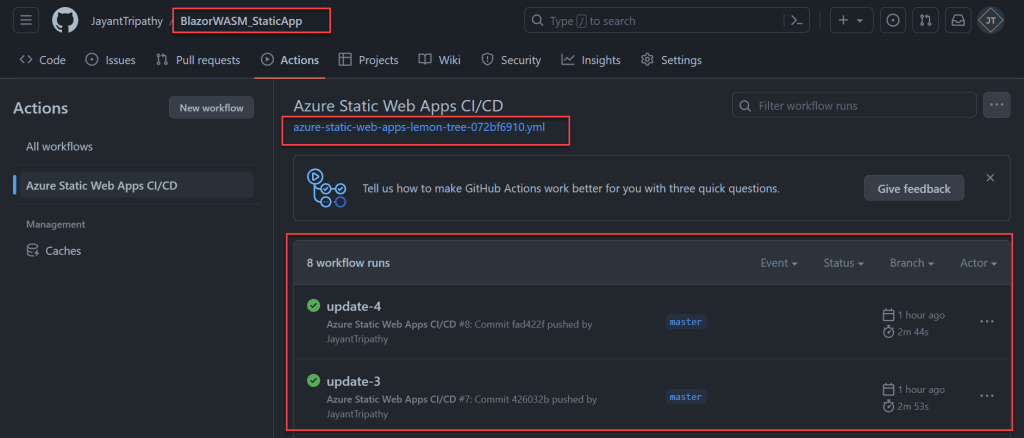
- All of the parameters are contained in the yaml file, and if you need to alter anything to CI/CD, you can do so by editing the file.
Everything has been completed. Examine the API of Azure functions installed in Azure Static Web App.
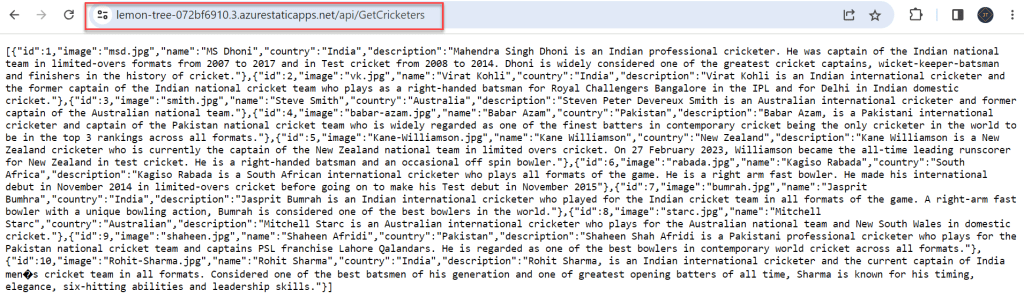
Now, we can view the required output by visiting the link, where we can get the Blazor Web-Assembly App using Azure Function and published on Azure Static App.
That’s it for this this article, I hope it helps to understand step by step to Blazor Web-Assembly App using Azure Function and deploy it as an Azure Static App.
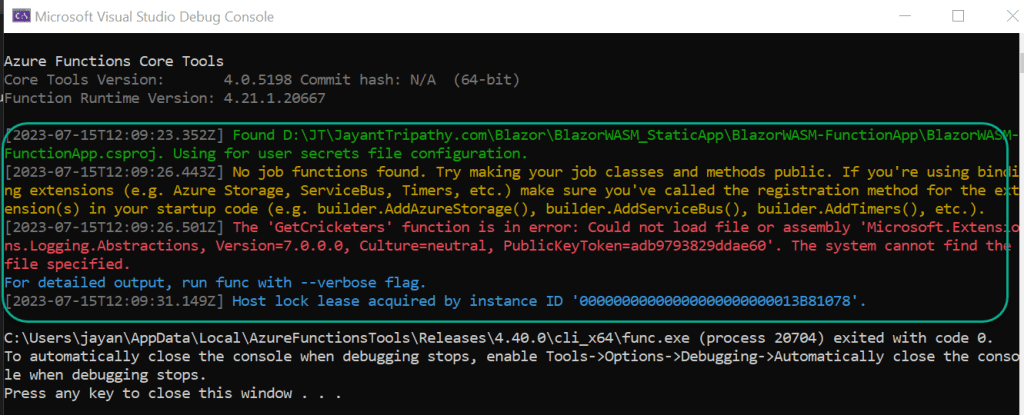
What problem did I encounter using Azure Function?
Previously, I did the Azure function in.NET 7, but I kept getting the following error, which I couldn’t resolve, so I downgraded both the project Blazor WASM and the Azure function to.NET 6.0, and it worked.
If you have a solution for the work Azure function targeting to .NET 7, please notify me in the comment box below.
Find the Source Code here on this link.
Conclusion
In this article we learned about how to Create a Blazor Web-Assembly App using Azure Function and deploy it as an Azure Static App.
Leave behind your valuable queries and suggestions in the comment section below. Also, if you think this article helps you, do not forget to share this with your developer community. Happy Coding 🙂
Related Articles
- Create a Blazor Web-Assembly App using Azure Function and deploy it as an Azure Static App
- How to Deploy Blazor WebAssembly to AWS Amplify
SUPPORT ME