

In this article, we will learn about 🔐 Securing .NET Core Web Apps with Azure AD/Intra and MSAL. In today’s cloud-based environment, secure online apps with strong authentication and permission systems are more important than ever. Microsoft offers sophisticated tools for developers, such as Azure Active Directory (Azure AD) and the Microsoft Authentication Library (MSAL), to help them secure their apps efficiently. This article will introduce you to these tools and walk you through a step-by-step process to protect your.NET Core web apps. Please read my previous article on Step-by-Step Guide to Using Azure Redis Cache in ASP.NET Core 9 Web API.
What is Azure Active Directory (Azure AD) and Azure AD Intra?
Azure Active Directory (Azure AD) is Microsoft’s cloud identity and access management solution. It helps your applications to securely authenticate users and grant access to resources. Azure AD acts as a centralized identity provider for both cloud and on-premises environments.
- Azure AD controls user, group, and application registrations, giving you control over who may access your apps.
- Azure AD Intra (or Azure Active Directory for internal Enterprise situations) refers to the use of Azure AD for internal corporate apps, which allows employees to sign in once and access various internal resources via Single Sign-On (SSO).
Azure AD supports modern authentication protocols like OpenID Connect (OIDC) and OAuth 2.0, making it a powerful backbone for secure authentication flows.
What is MSAL (Microsoft Authentication Library)?
MSAL is a library provided by Microsoft that simplifies integrating Azure AD authentication into applications. It handles acquiring access tokens for users to authenticate and authorize them against Azure AD. MSAL supports a variety of platforms, including .NET, JavaScript, Angular, and more.
Key features of MSAL include:
- Handling user sign-in and token acquisition with ease.
- Supporting secure OAuth 2.0 and OpenID Connect flows.
- Managing token caching and refresh automatically.
- Enabling single sign-on across different applications.
- Supporting advanced security features like PKCE (Proof Key for Code Exchange).
In a web app context, MSAL helps your application acquire tokens needed to access protected APIs securely without exposing user credentials.
Step-by-Step Implementation: Securing a .NET Core Web Application with Azure AD and MSAL
Step 1: Creating a .NET Core Web Application
Using below steps we can create a .NET Core Web application to authenticate Azure AD
- Launch the Visual Studio IDE and click on “Create new project”.
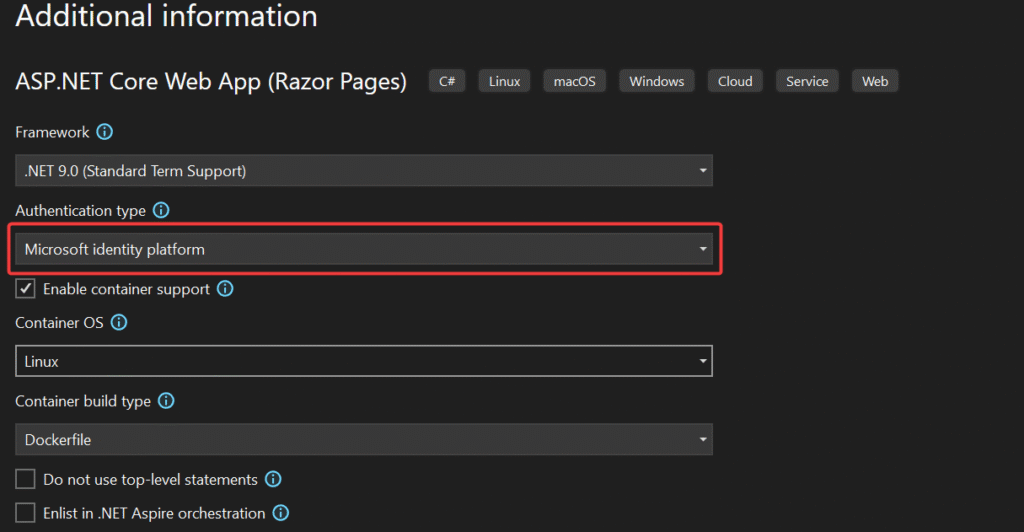
- In the “Create new project” window, select “ASP.NET Core Web App(Razor Pages)” from the template list.
- Click Next. In the “Configure your new project” window, specify the name and location for the new project and then click Create.
- In the “Create New ASP.NET Core Web App(Razor Pages)” window shown next, select .NET Core as the runtime and .NET 9.0 from the drop-down list at the top(I’m using .NET 9 .Net core SDK). Authentication choose as Microsoft Identity platform as we are going to authenticate through Microsoft Azure.

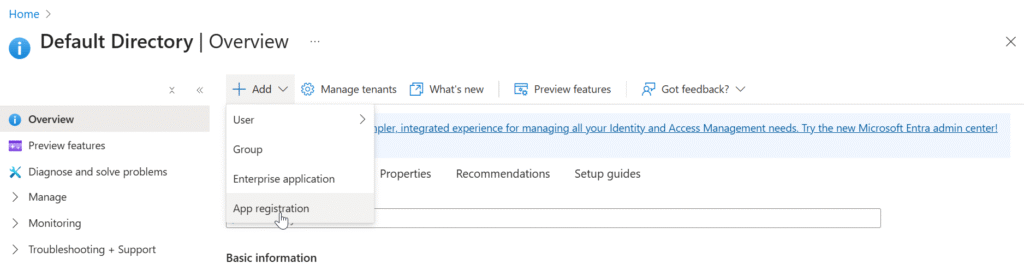
Step 2: Register Your Web Application in Azure AD
- Log in to the Azure portal and navigate to Azure Active Directory > App registrations.
- Click New registration.
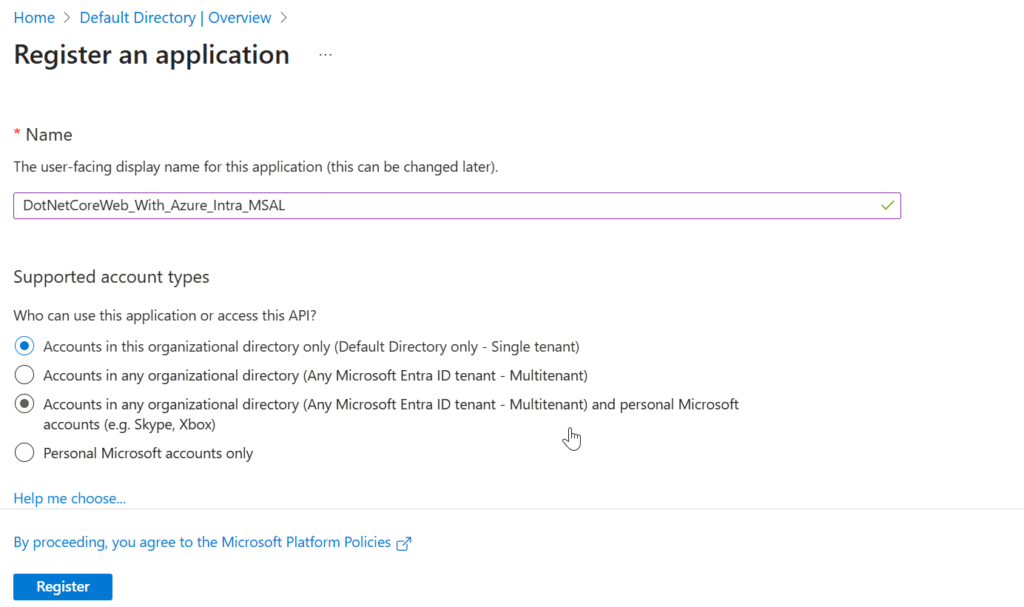
- Enter a meaningful name for your app.
- Select supported account types (e.g., single tenant or multi-tenant).
- Set the redirect URI for the web application, typically
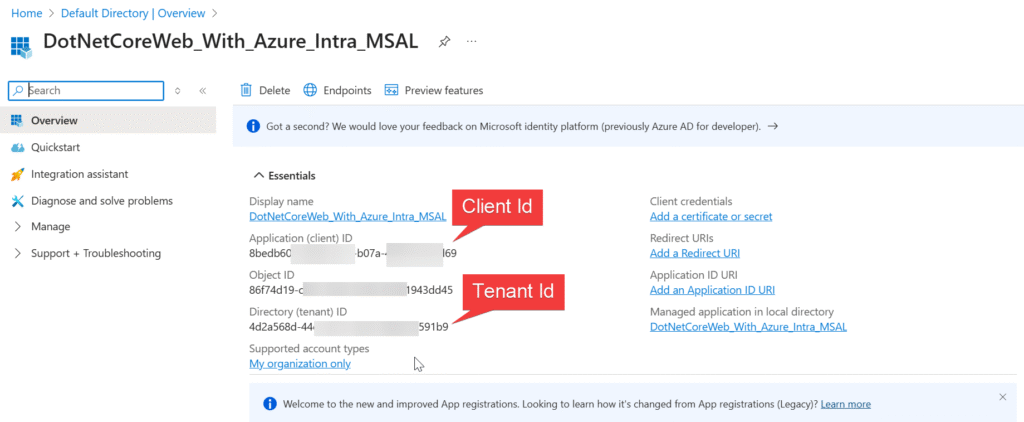
https://localhost:7112/signin-oidcfor local testing. - Click Register and note down the Application (client) ID and Directory (tenant) ID
Azure AD App Auth Settings
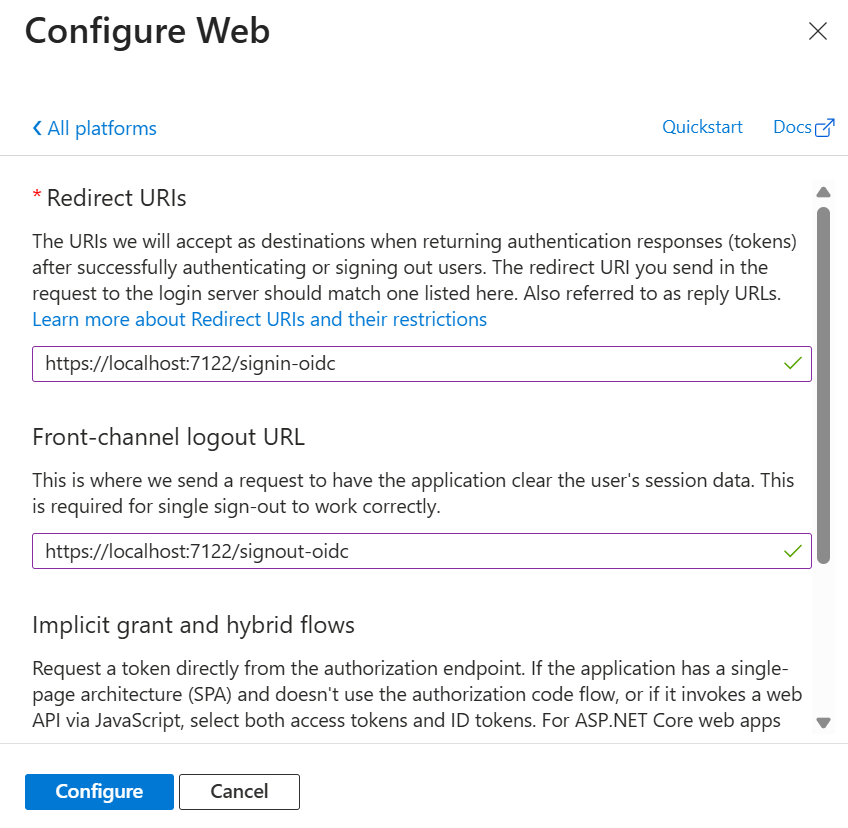
Again go to App Registrations and you will be able to see all the applications registered in Azure AD. Select DotNetCoreWeb_With_Azure_Intra_MSAL which we registered in previous step. Then click on Authentication menu option from left side pane. It will show a panel where you can see Add a platform button. Click on it and Select Web.

Next, you will be shown a panel where you need to enter two important inputs:
- Redirect URI – this is the URL where the response will be redirected after successful authentication. Enter the application URL suffixed with “signin-oidc”. e.g.
https://localhost:7112/signin-oidc. - Logout URI – this is the URL where the flow should be redirected after logout to clear session. Enter the application URL suffixed with “signout-oidc”. e.g.
https://localhost:7112/signout-oidc - Implicit Grant – Type of token you want. As stated in the help text in Azure Portal, both check-boxes should be checked only if you are working on Single Page Applications. If you are working with Web App, then you should check only ID Token checkbox.
Now click on Configure button to close the Configure Web panel. Then, click on Save button on Authentication panel to save the settings.

Now we should collect the Client Id and Tenant Id from the below and we should use it into our web app.
Step 3: Configure Azure AD/Intra into .NET Core Web APP
We have done Azure AD configuration and creation of .NET Core Web App. Let’s configure the AD into web app razor.
appsettings.json
Replace your Tenant Id and Client Id.
 "AzureAd": {
   "Instance": "https://login.microsoftonline.com/",
   "Domain": "yourtenant.onmicrosoft.com",
   "TenantId": "4d2a568d-************-2f9e51d591b9",
   "ClientId": "8bed--**********************3ed69",
   "CallbackPath": "/signin-oidc"
 }
program.cs
var builder = WebApplication.CreateBuilder(args);

// Add services to the container.
builder.Services.AddAuthentication(OpenIdConnectDefaults.AuthenticationScheme)
    .AddMicrosoftIdentityWebApp(builder.Configuration.GetSection("AzureAd"));

builder.Services.AddAuthorization(options =>
{
    // By default, all incoming requests will be authorized according to the default policy.
    options.FallbackPolicy = options.DefaultPolicy;
});

builder.Services.Configure<OpenIdConnectOptions>(OpenIdConnectDefaults.AuthenticationScheme, options =>
{
    options.Events.OnSignedOutCallbackRedirect = context =>
    {
        context.Response.Redirect("/MicrosoftIdentity/Account/SignIn");
        context.HandleResponse();
        return Task.CompletedTask;
    };
});

builder.Services.AddRazorPages()
    .AddMicrosoftIdentityUI();

var app = builder.Build();

// Configure the HTTP request pipeline.
if (!app.Environment.IsDevelopment())
{
    app.UseExceptionHandler("/Error");
    // The default HSTS value is 30 days. You may want to change this for production scenarios, see https://aka.ms/aspnetcore-hsts.
    app.UseHsts();
}

app.UseHttpsRedirection();

app.UseRouting();

app.UseAuthorization();

app.MapStaticAssets();
app.MapRazorPages()
   .WithStaticAssets();
app.MapControllers();

app.Run();- Line #4-5 : Specifies OpenID Connect (
OpenIdConnectDefaults.AuthenticationScheme) as the authentication scheme. Integrates Azure AD authentication using Microsoft Identity Web (AddMicrosoftIdentityWebApp), which: Reads Azure AD config (ClientId, TenantId, etc.) from theAzureAdsection ofappsettings.json. - Line #13-21: Allows customizing OIDC events. Here, it overrides the default sign-out callback redirect behavior. After signing out, users are redirected to the sign-in page (
/MicrosoftIdentity/Account/SignIn) instead of the default post-logout page.context.HandleResponse()stops further processing of the response. - Line #23-24: Adds UI components (sign-in, sign-out, error pages) from Microsoft.Identity.Web to handle user authentication flows automatically.
NuGet Packages
Now, let’s move back to Visual Studio and add references of two nuget packages to your project.
Login and Logout Options
In the _LoginPartial.cshtml the sign in and sign-out options are like below, if the user has logged in then it should get the Azure Email id like below.
@using System.Security.Principal

<ul class="navbar-nav">
@if (User.Identity?.IsAuthenticated == true)
{
        <span class="navbar-text text-dark">Hello @User.Identity?.Name!</span>
        <li class="nav-item">
            <a class="nav-link text-dark" asp-area="MicrosoftIdentity" asp-controller="Account" asp-action="SignOut">Sign out</a>
        </li>
}
else
{
        <li class="nav-item">
            <a class="nav-link text-dark" asp-area="MicrosoftIdentity" asp-controller="Account" asp-action="SignIn">Sign in</a>
        </li>
}
</ul>
Everything is done, now test the application. When you run the Web App you can see it would navigate into Azure AD Login page, once we provided the Microsoft login then it would navigate into our web App.

Source Code
Conclusion
In this article we learned about Securing .NET Core Web Apps with Azure AD/Intra and MSAL. We discussed below steps. Securing .NET Core web apps with Azure AD and MSAL provides a modern, secure, and scalable authentication solution. Azure AD centralizes identity management, while MSAL streamlines token acquisition and session management. Following this guide, developers can build secure applications with minimal effort that support robust enterprise-grade security features like SSO and Conditional Access.
Leave behind your valuable queries and suggestions in the comment section below. Also, if you think this article helps you, do not forget to share this with your developer community. Happy Coding 🙂
Latest Post
- Run Local LLMs in .NET: Rapid Prototyping with Ollama & Semantic Kernel
- Building your own AI Assistant Using Python, LangChain, Streamlit & GPT‑4o (Step‑by‑Step Guide)
- How to Secure React.js application with Azure AD Authentication Using MSAL Library
- 🔐 Securing .NET Core Web Apps with Azure AD/Intra and MSAL
- Step-by-Step Guide to Using Azure Redis Cache in ASP.NET Core 9 Web API
- 🤖 Build a Full-Stack AI App with React, Node.js & Azure OpenAI
- Running Microsoft SQL Server in Docker | VS Code MSSQL Extension
- Building Real-Time Messaging with Kafka and .NET Core
- Effortless React Deployment 🚀: CI/CD with GitHub Actions & Azure Static Web Apps
- How to Set up an Amazon CloudFront Distribution for Amazon S3 Bucket 🚀
- Deploying Angular apps in Azure Blob Storage with CI/CD Integration 🚀
- How to Build a serverless CRUD app with Azure function and Cosmos DB
- How to resolve Function App Cannot Create within Azure Portal
- Building a Chatbot in Angular using Gemini API
- Create a RESTful CRUD API With NodeJS, ExpressJS And MongoDB – Complete Guide
SUPPORT ME