
In this article we will learn about Child to Parent Communication in Angular. As in the real-time application many times we need parent-child and child-parent communication through Angular. The previous article we discussed about Parent to Child Communication in Angular. The Child can send data to Parent by raising an event using @Output decorator.
What are Angular Component Output Properties?
The Angular Component Output Properties are used to to pass the data from the nested component to the container component.
@Output Decorator
Using the EventEmitter Property gives the components ability to raise an event. But to make that event accessible from parent component, must decorate the property with @Output decorator.
How to Pass data to parent component using @Output
Child Component
- Declare a property of type
EventEmitterand instantiate it. - Mark it with a
@OutputDecorator. - Raise the event passing it with the desired data
Parent Component
- Bind to the Child Component using Event binding and listen to the child events.
- Define the event handler function.
Let’s prove by example how we can send data form child to parent component using @output decorator.
In the previous example Parent to Child Communication in Angular we see that we used here tow components. We managed to get count the cricketers using parent-child communication using @Input properties. But when the radio button is changed nothing is worked due to the we didn’t make the communication between child component to parent’s communication.
- Child component is “filtered-list”
- Parent Component is “cricketers-list”
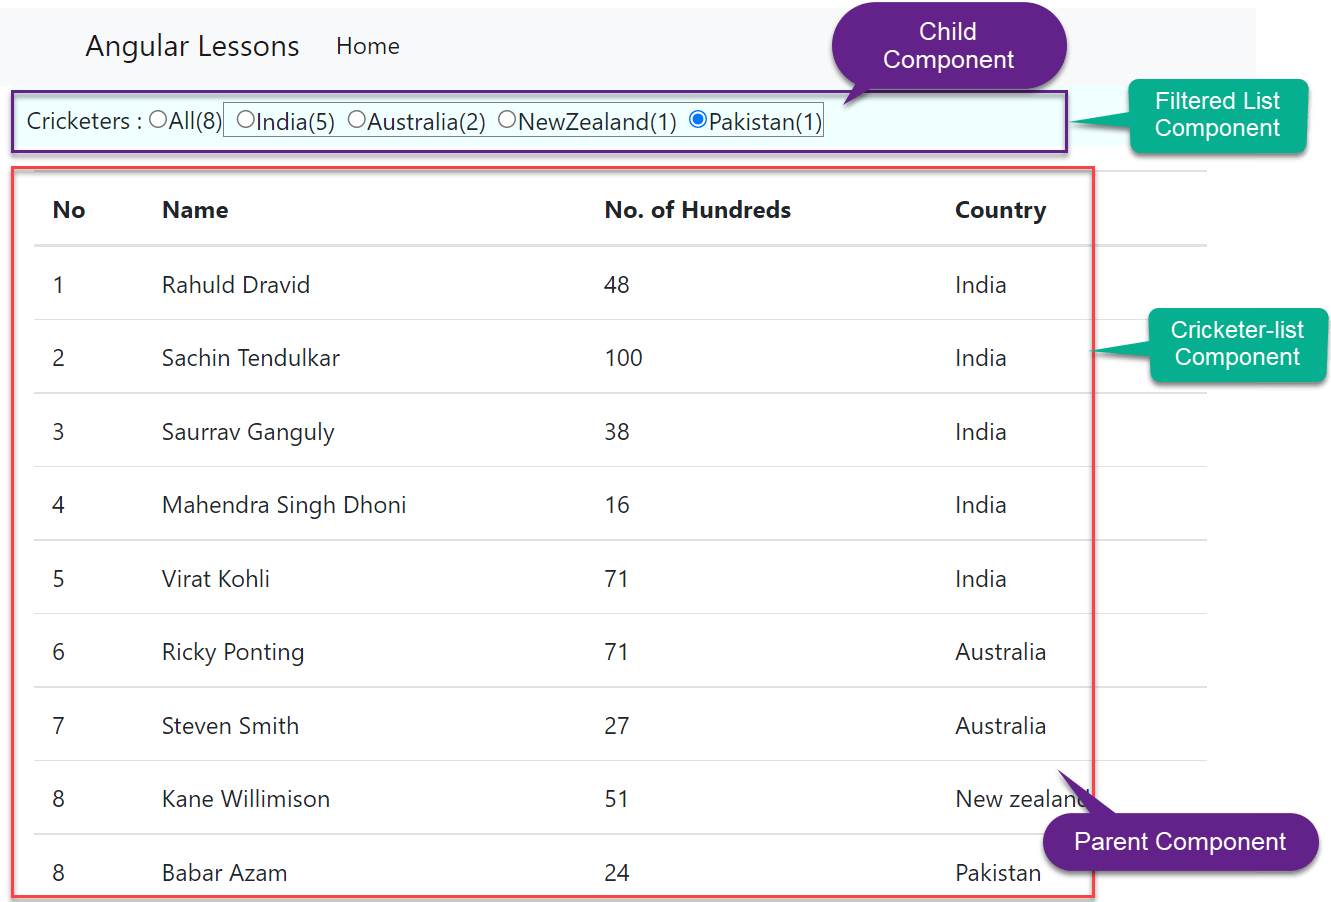
The final Result we expect in this article that when the Radio button is click it filter the cricketers-list according to their countries.
Modify in the Child Component
Let’s add the @Output properties in child component i.e filtered-list component.
- Line no.-13, holds the selected variable of radio button. By default we checked the radio button values as “All”.
- Line no. 20-21, The Output decorator makes the property of an Component as an Output property. The EventEmitter class in Angular is used to create the custom event, When the radio button selection changes, the selected radio button value which is a string gets passed to the event handler method.
- Line no. 32-35, This method raises the custom event. We will bind this method to the change event of all the radio buttons.
import { Component, EventEmitter, Input, OnInit, Output } from '@angular/core';

@Component({
  selector: 'app-filtered-list',
  templateUrl: './filtered-list.component.html',
  styleUrls: ['./filtered-list.component.css']
})
export class FilteredListComponent implements OnInit {
  @Input() all: number | undefined;
  @Input() cricketersList: any[] | undefined;

  // This variable holds the selected value of the radio button
  selectedRadioButtonValue: string = 'All';

  // The Output decorator makes the property of an Component as an Output property
  // The EventEmitter class in Angular is used to create the custom event
  // When the radio button selection changes, the selected radio button
  // value which is a string gets passed to the event handler method.
  // Hence, the event payload is string.
  @Output()
  countRadioButtonSelectionChanged: EventEmitter<string> =
    new EventEmitter<string>();

  constructor() { }
  ngOnInit(): void {
  }
  getCricketerListByCountry(country: string): any {
    return this.cricketersList?.filter(x => x.country === country)?.length;
  }
  // This method raises the custom event. We will bind this
  // method to the change event of all the radio buttons
  RadioButtonSelectionChange() {
    this.countRadioButtonSelectionChanged
      .emit(this.selectedRadioButtonValue);
  }
}
Modify corresponding Child component HTML Markup
- Here we implemented the 2-way data-binding using the
ngModeldirective. Notice the ngModel is bound to selectedRadioButtonValue property of the component class. This 2-way data-binding ensures whenever the radio button selection changes, the selectedRadioButtonValue property is updated with the value of the selected radio button. - The onRadioButtonSelectionChange() method is binded to the “change” event of the radio button. That means whenever, the selection of the radio button changes, onRadioButtonSelectionChange() method raises the custom event “countRadioButtonSelectionChanged”. We defined this custom event using Angular EventEmitter class.
- We applied according countries by passing model change and values.
<div class="custom">
    <span class="radioClass">Cricketers : </span>
    <input type="radio" name="options" value="All"
    [(ngModel)]="selectedRadioButtonValue"
    (change)="RadioButtonSelectionChange()" />
    <span class="radioClass">{{"All(" + all + ")"}}</span>
    <span style="border: 1px solid gray;">
        <input name="options" type="radio" class="ml-2" value="India"
        [(ngModel)]="selectedRadioButtonValue"
        (change)="RadioButtonSelectionChange()">
        <span class="radioClass">{{"India(" + getCricketerListByCountry('India') + ")"}}</span>

        <input name="options" type="radio" class="ml-2" value="Australia"
        [(ngModel)]="selectedRadioButtonValue"
        (change)="RadioButtonSelectionChange()">
        <span class="radioClass">{{"Australia(" + getCricketerListByCountry('Australia') + ")"}}</span>

        <input name="options" type="radio" class="ml-2" value="Newzealand"
        [(ngModel)]="selectedRadioButtonValue"
        (change)="RadioButtonSelectionChange()">
        <span class="radioClass">{{"NewZealand(" + getCricketerListByCountry('Newzealand') + ")"}}</span>

        <input name="options" type="radio" class="ml-2" value="Pakistan"
        [(ngModel)]="selectedRadioButtonValue"
        (change)="RadioButtonSelectionChange()">
        <span class="radioClass">{{"Pakistan(" + getCricketerListByCountry('Pakistan') + ")"}}</span>
    </span>
</div>
Modify in the Parent Component
- Line no. 22 – we declared the string of radio button that holds radio button string.
- Line no. 39-41- Depending on the radio button which is selected, this method updates the selectedStudentCountRadioButton property. This method is going to called when the child component (filteredListComponent) raises the custom event – countRadioButtonSelectionChanged. The event binding is specified in CricketerList.component.html
import { Component, OnInit } from '@angular/core';

@Component({
  selector: 'app-cricketer-list',
  templateUrl: './cricketer-list.component.html',
  styleUrls: ['./cricketer-list.component.css']
})
export class CricketerListComponent implements OnInit {

  cricketerList: Cricketer[] = [

    { id: 1, name: 'Rahuld Dravid', hundreds: 48, country: 'India' },
    { id: 2, name: 'Sachin Tendulkar', hundreds: 100, country: 'India' },
    { id: 3, name: 'Saurrav Ganguly', hundreds: 38, country: 'India' },
    { id: 4, name: 'Mahendra Singh Dhoni', hundreds: 16, country: 'India' },
    { id: 5, name: 'Virat Kohli', hundreds: 71, country: 'India' },
    { id: 6, name: 'Ricky Ponting', hundreds: 71, country: 'Australia ' },
    { id: 7, name: 'Steven Smith', hundreds: 27, country: 'Australia' },
    { id: 8, name: 'Kane Willimison', hundreds: 51, country: 'Newzealand' },
    { id: 8, name: 'Babar Azam', hundreds: 24, country: 'Pakistan' }
  ];
  selectedCricketersCountRadioButton: string = 'All';
  constructor() { }

  ngOnInit(): void {

  }
  getAllCricketerListCount(): number {
    return this.cricketerList.length;
  }
  getAllCricketerList(): any {
    return this.cricketerList;
  }
    // Depending on the radio button which is selected, this method updates
    // the selectedStudentCountRadioButton property
    // This method is going to called when the child component (filteredListComponent)
    // raises the custom event - countRadioButtonSelectionChanged
    // The event binding is specified in CricketerList.component.html
    onCricketersCountRadioButtonChange(selectedRadioButtonValue: any): void {
      this.selectedCricketersCountRadioButton = selectedRadioButtonValue;
  }
}
export class Cricketer {

  id: number = 0;
  name: string = '';
  hundreds: number = 0;
  country: string = '';
}
Modify Parent component HTML Markup
- The onCricketersCountRadioButtonChange($event) method is bound to the custom event – countRadioButtonSelectionChanged. The $event object will have the selected radio button value as that is what is passed as the event payload from the nested component.
- The event handler method (onCricketersCountRadioButtonChange()) in the component class updates the property “selectedCricketersCountRadioButton”. This property is then used along with the *ngIf structural directive to decide which student objects to display in the table.
- Line no. 14- ng-container is the placeholder to use the *ngFor loop to bind all the cricketers-list.
<trwe bind the *ngIf with selectedCricketersCountRadioButton either All or according to countries.
<app-filtered-list [all]="getAllCricketerListCount()" [cricketersList]="getAllCricketerList()"
  (countRadioButtonSelectionChanged)="onCricketersCountRadioButtonChange($event)"></app-filtered-list>

<table class='table table-stripped'>
  <thead>
    <tr>
      <th>No</th>
      <th>Name</th>
      <th>No. of Hundreds</th>
      <th>Country</th>
    </tr>
  </thead>
  <tbody>
    <ng-container *ngFor="let cricketer of cricketerList;">
      <tr *ngIf="selectedCricketersCountRadioButton=='All' ||
      selectedCricketersCountRadioButton==cricketer.country">
        <td>{{cricketer.id}}</td>
        <td>{{cricketer.name}}</td>
        <td>{{cricketer.hundreds}}</td>
        <td>{{cricketer.country}}</td>
      </tr>
    </ng-container>
  </tbody>
</table>
That’s it. Let’s run the application and we can see the below result.
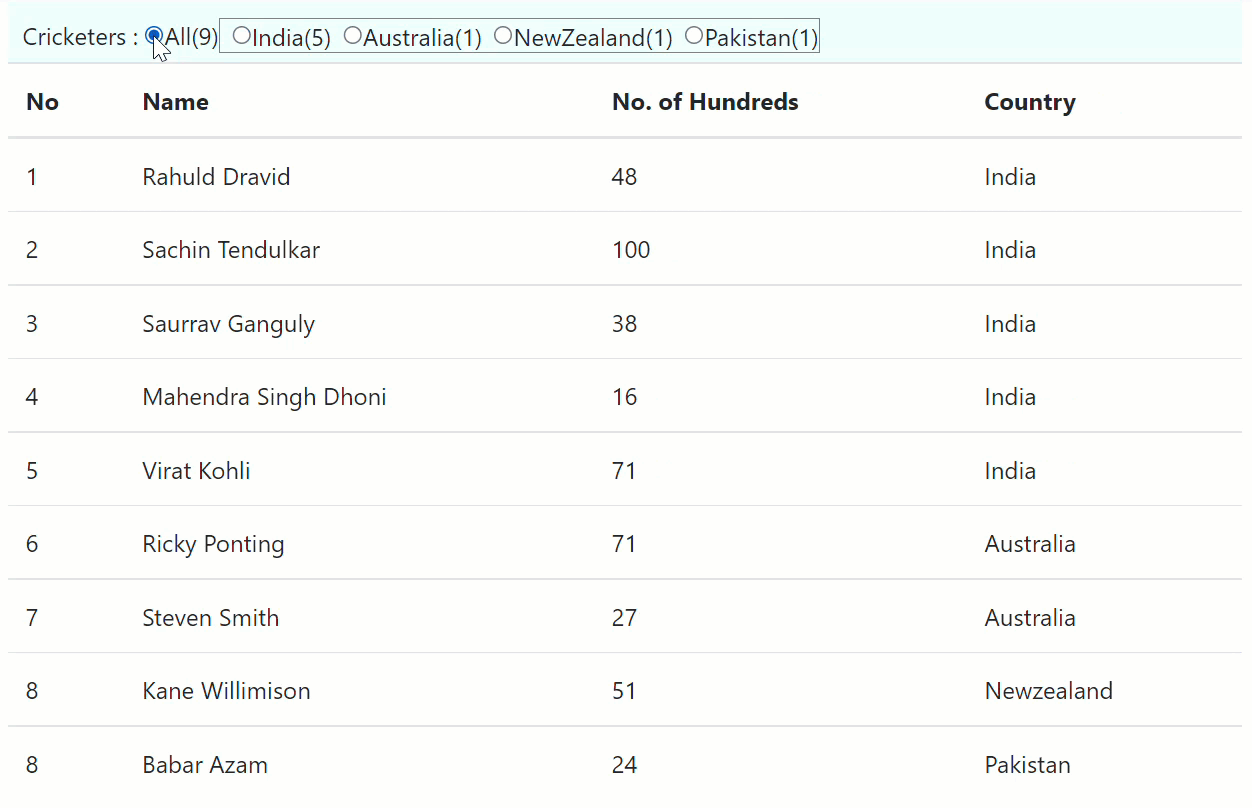
Conclusion
Here we discussed about Child to Parent Communication in Angular. As in the real-time application many times we need parent-child and child-parent communication through Angular. The Angular Component Output Properties are used to to pass the data from the nested component to the container component.
Leave behind your valuable queries and suggestions in the comment section below. Also, if you think this article helps you, do not forget to share this with your developer community. Happy Coding 🙂
Related Articles
- Deploying Angular apps in Azure Blob Storage with CI/CD Integration 🚀
- How to resolve Function App Cannot Create within Azure Portal
- Building a Chatbot in Angular using Gemini API
- Create a responsive sidebar with Angular Material- Angular 18 Example Series
- How to Deploy Angular 17/18 App in GitHub Pages
- How to convert Text To Speech With Azure Cognitive Services using Angular and .Net Core
- Angular Interceptors- The Complete Guide
- Upload Download and Delete files in Azure Blob Storage using ASP.NET Core and Angular
- Introduction to Azure Cosmos DB
- How to create Cosmos DB in Azure
Jayant Tripathy
Coder, Blogger, YouTuberA passionate developer keep focus on learning and working on new technology.