
In this article we are going to discuss CRUD Operation in ASP.Net Web API with Entity framework. we will learn how to perform CRUD operations with ASP.NET Web API and Entity Framework. We’ll go step by step in the form of a tutorial to set up a basic Web API project and we’ll use the code-first approach of Entity Framework to generate the database and perform CRUD operations and this ASP .NET Web API CRUD operation is to be test in Postman tool. Please read my previous article Migrate from ASP.NET Core 3.1 to 5.0- Beginners guide.
At the end of article we have got idea how to use CRUD Operation in ASP.Net Web API with Entity Framework.
What is ASP .NET Web API ?
ASP.NET Web API is a framework that makes it easy to build HTTP services that reach a broad range of clients, including browsers and mobile devices. ASP.NET Web API is an ideal platform for building RESTful applications on the . NET Framework.
“HTTP is not just for serving up web pages. HTTP is also a powerful platform for building APIs that expose services and data. HTTP is simple, flexible, and ubiquitous. Almost any platform that you can think of has an HTTP library, so HTTP services can reach a broad range of clients, including browsers, mobile devices, and traditional desktop applications.ASP.NET Web API is a framework for building web APIs on top of the .NET Framework.”
The above reference was taken from Microsoft Documents.
What is Entity Framework ?
Microsoft Entity Framework is an ORM (Object-relational mapping). The definition from Wikipedia is very straightforward for ORM and petty much self-explanatory,
“Object-relational mapping (ORM, O/RM, and O/R mapping tool) in computer science is a programming technique for converting data between incompatible type systems using object-oriented programming languages. This creates, in effect, a “virtual object database” that can be used from within the programming language.”
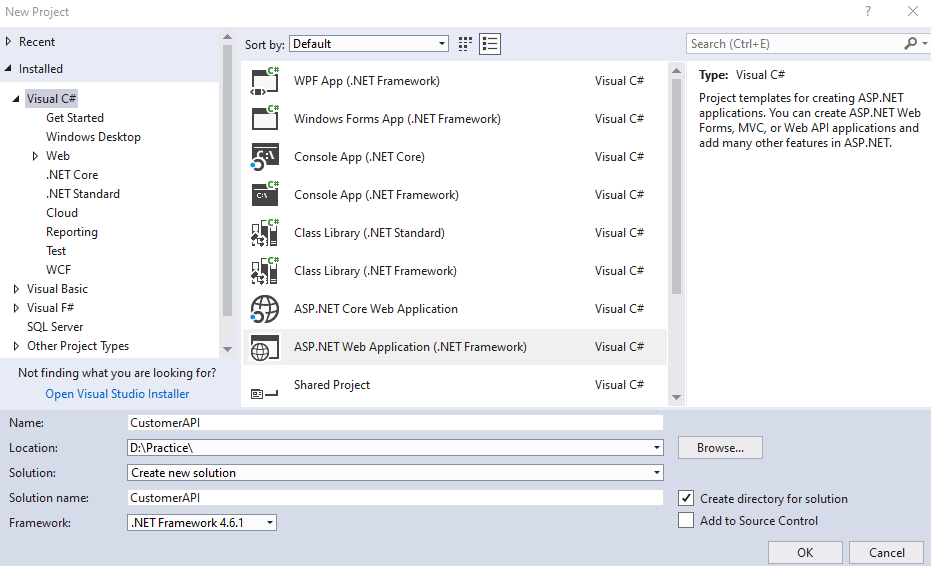
Create ASP .NET Web API Project
We do the project form scratch and Use Visual studio 2017 with .NET Version 4.6.1
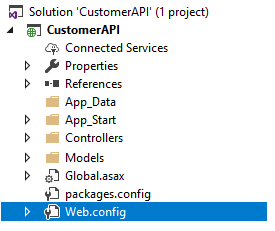
After click the OK button it create the empty API project like below.
Create the Model Class
Here we create the model class that treated as entity of customer object that should be done database operations. Right click on the Models folder and add the class named as Customer with following properties.
namespace CustomerAPI.Models
{
    [Table("Customer")]
    public class Customer
    {
        [Key]
        public int CustId { get; set; }
        public string Name { get; set; }
        public string Address { get; set; }
        public string Mobile { get; set; }
        public string Email { get; set; }
    }
}
Customer Model
- Here we create the Customer Model with above properties.
- [Table(“Customer”)] is belong to System.ComponentModel.DataAnnotations.Schema namespace. Here Customer is the table name that we want to create dynamically using EF code first.
- CustId is the primary key of our entity table so we added as [Key]
After creating the Models class must rebuild the applications. To rebuild the project right click on Project and then click Rebuild.
Adding the API Controller
To do database operations to create, update,read and delete over model class we need to create the controller that should do the CRUD operations for us. To create the Controller right click on the Controllers folder and add a new Controller and in the prompt choose as Web API2 controller with actions, using Entity framework like below. Here we can use in-built entity framework scaffold technique to create CRUD query for us.
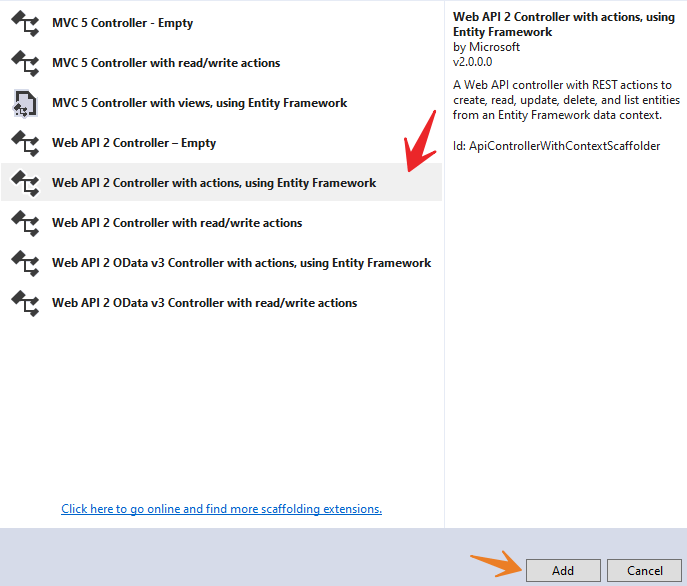
After click the Add button a prompt will open to scaffold the model to create CRUD operations and choose Web API2 controller with actions, using Entity Framework.
Model Scaffold to create Web API Controller
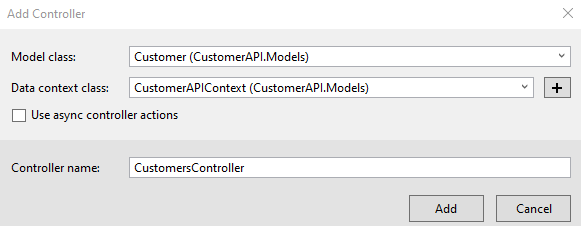
- In the Model Class choose the Model, in our case it is customer model class.
- In the Data Context class, add + symbol and add the CustomerAPI Context.
- Controller name in our case is CustomerController
After create the scaffold controller automatically it create the CRUD ( Create, Read, Update, Delete ) operations using Customer Model class and CustomerAPI Context class like below.
public class CustomersController : ApiController
    {
        private CustomerAPIContext db = new CustomerAPIContext();
        // GET: api/Customers
        public IQueryable<Customer> GetCustomers()
        {
            return db.Customers;
        }
        // GET: api/Customers/5
        [ResponseType(typeof(Customer))]
        public IHttpActionResult GetCustomer(int id)
        {
            Customer customer = db.Customers.Find(id);
            if (customer == null)
            {
                return NotFound();
            }
            return Ok(customer);
        }
        // PUT: api/Customers/5
        [ResponseType(typeof(void))]
        public IHttpActionResult PutCustomer(int id, Customer customer)
        {
            if (!ModelState.IsValid)
            {
                return BadRequest(ModelState);
            }
            if (id != customer.CustId)
            {
                return BadRequest();
            }
            db.Entry(customer).State = EntityState.Modified;
            try
            {
                db.SaveChanges();
            }
            catch (DbUpdateConcurrencyException)
            {
                if (!CustomerExists(id))
                {
                    return NotFound();
                }
                else
                {
                    throw;
                }
            }
            return StatusCode(HttpStatusCode.NoContent);
        }
        // POST: api/Customers
        [ResponseType(typeof(Customer))]
        public IHttpActionResult PostCustomer(Customer customer)
        {
            if (!ModelState.IsValid)
            {
                return BadRequest(ModelState);
            }
            db.Customers.Add(customer);
            db.SaveChanges();
            return CreatedAtRoute("DefaultApi", new { id = customer.CustId }, customer);
        }
        // DELETE: api/Customers/5
        [ResponseType(typeof(Customer))]
        public IHttpActionResult DeleteCustomer(int id)
        {
            Customer customer = db.Customers.Find(id);
            if (customer == null)
            {
                return NotFound();
            }
            db.Customers.Remove(customer);
            db.SaveChanges();
            return Ok(customer);
        }
        protected override void Dispose(bool disposing)
        {
            if (disposing)
            {
                db.Dispose();
            }
            base.Dispose(disposing);
        }
        private bool CustomerExists(int id)
        {
            return db.Customers.Count(e => e.CustId == id) > 0;
        }
    }
API Context Class
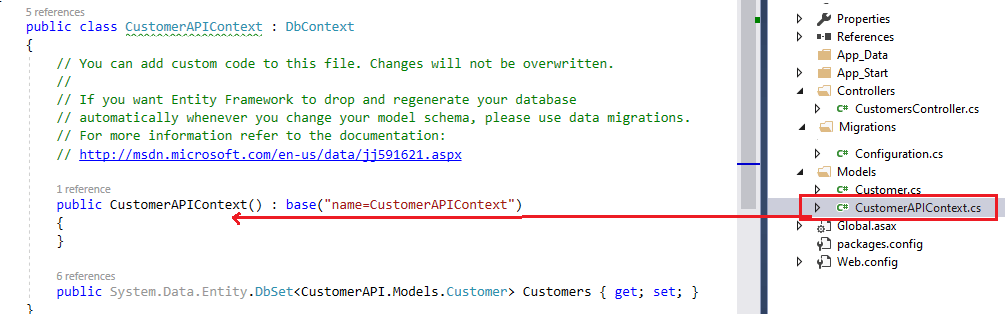
After adding the scaffold controller the API context class is also created inside the Model folder like below, that should contains the context of database schema. Here you can see CustomerAPIContext class implement the DbContext and base(“name=CustomerAPIContext”) is the name of the connection string to communicate with DB.
public class CustomerAPIContext : DbContext
    {
        // You can add custom code to this file. Changes will not be overwritten.
        //
        // If you want Entity Framework to drop and regenerate your database
        // automatically whenever you change your model schema, please use data migrations.
        // For more information refer to the documentation:
        // http://msdn.microsoft.com/en-us/data/jj591621.aspx

        public CustomerAPIContext() : base("name=CustomerAPIContext")
        {
        }
        public System.Data.Entity.DbSet<CustomerAPI.Models.Customer> Customers { get; set; }
    }
Entity Framework Code First Migrations
Code first migrations here help you to update the existing database with your newly added model classes and your existing database remains intact with the existing data.
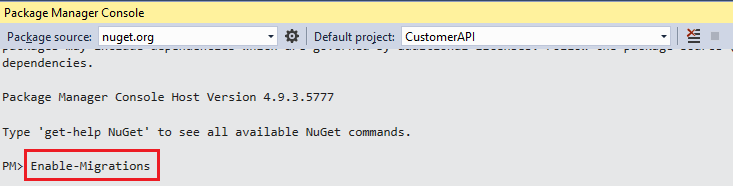
- Open Package manager console of the API project and type the command Enable-Migrations and hit enter.
After adding this command a Migrations folder is generated like blow with crating the Configuration.cs class. This class is derived from DbMigrationsConfiguration class. This class contains a Seed method having the parameter as the context class that we got generated in the Models Seed is an overridden method that means it contains a virtual method in a base class and a class driven from DbMigrationsConfiguration can override that and add custom functionality.

internal sealed class Configuration : DbMigrationsConfiguration<CustomerAPI.Models.CustomerAPIContext>
    {
        public Configuration()
        {
            AutomaticMigrationsEnabled = false;
        }
        protected override void Seed(CustomerAPI.Models.CustomerAPIContext context)
        {
            //  This method will be called after migrating to the latest version.
            //  You can use the DbSet<T>.AddOrUpdate() helper extension method
            //  to avoid creating duplicate seed data. E.g.
            //
            //    context.People.AddOrUpdate(
            //      p => p.FullName,
            //      new Person { FullName = "Andrew Peters" },
            //      new Person { FullName = "Brice Lambson" },
            //      new Person { FullName = "Rowan Miller" }
            //    );
            //
        }
    }
The next step is to execute the command named “Add-Migrations”. In the package manager console. The command would be Add-Migrations Initial “Initial” is the parameter we have use, you may be use any other text as per your choice.

After executing the command it adds a new file with the name “Initial” prefixed with the date time stamp. It prefixes the date time stamp so that it could track the various migrations added during development and segregate between those. Open the file and we see the class named “Initial” deriving from DbMigration class. This class contains two methods that are overridden from DbMigration class i.e. the base class. The method names are Up() and Down().
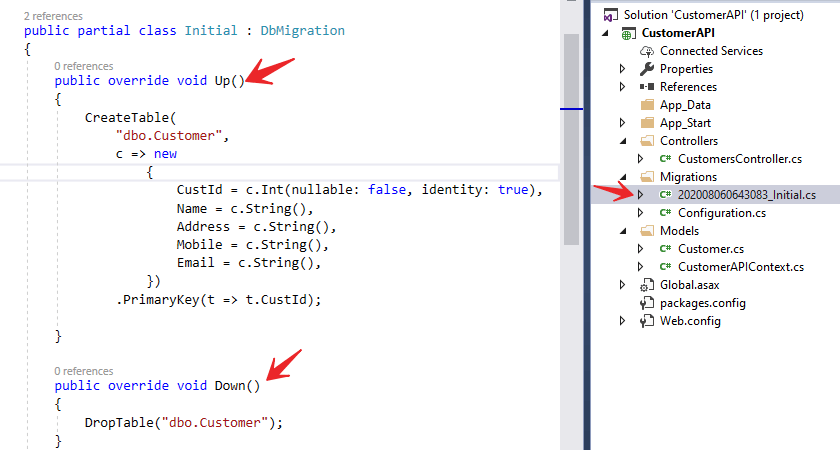
The Up method is executed to add all the initial configuration to the database and contains the create command in LINQ format. This helps to generate tables and all the modifications done over the model. Down command is the opposite of Up command. The code in the file is self-explanatory. The Up command here is having the code that creates the Students table and setting Id as its primary key. All this information is derived from the model and its changes.
- The final command that creates the database and respective tables out of our context and model. It executes the Initial migration that we added and then runs the seed method from the configuration class. This command is smart enough to detect which migrations to run. For example it will not run previously executed migrations and all the newly added migrations each time will be taken in to account to be executed to update the database. It maintains this track as the database firstly created contains an additional table named __MigrationHistory that keeps track of all the migrations done.
- The command is Update-Database

After the command execution, it creates the database in the specified server as per your server and adds the corresponding connection string to the Web.Config file. The name of the connection string is the same as the name of our context class and that’s how the context class and connection strings are related.
<connectionStrings>
<add name="CustomerAPIContext" connectionString="Data Source=ServerName; Initial Catalog=customers; User ID=sa;password=*****;"
providerName="System.Data.SqlClient" />
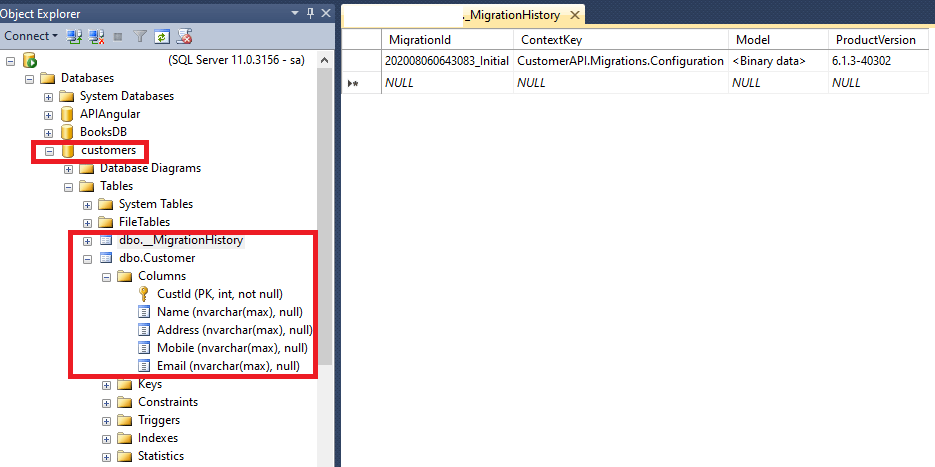
</connectionStrings>Now it automatically create the database named as “customers” with table name “customer”. Also it holds the migration history in the tables.
Exploring the Generated Database
You can see when navigate to SQL Server, find their the database is created for us.
Test the CRUD operation using Postman
What is Postman ?
Postman is an API(application programming interface) development tool which helps to build, test and modify APIs. Almost any functionality that could be needed by any developer is encapsulated in this tool. It is used by over 5 million developers every month to make their API development easy and simple. It has the ability to make various types of HTTP requests(GET, POST, PUT, PATCH). It can be downloaded into the system or you can use it by using Google chrome extension.

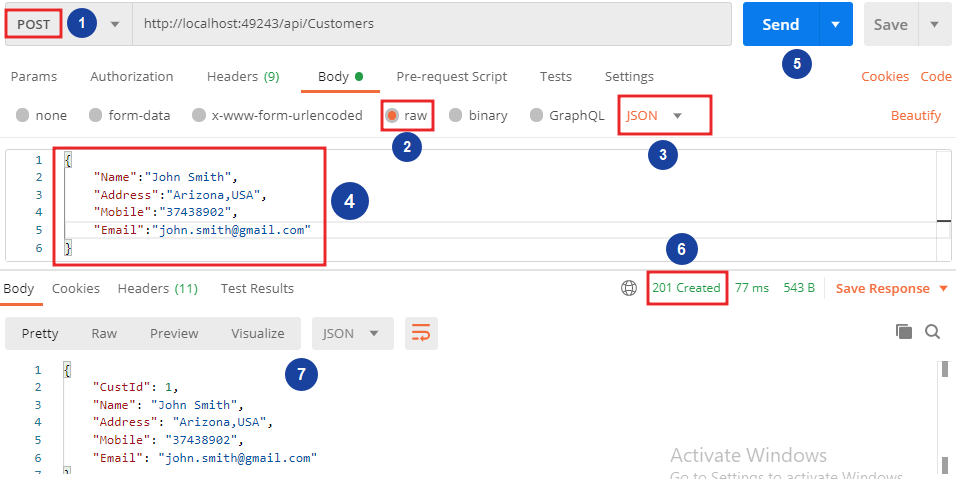
Web API CREATE method test using Postman
Open the Postman tool and run the application and here we want to create the customer data that means we push the customer information so like below we can push the data.
- Here http://localhost:49243/api/Customers is the URL to create CRUD operation.
- /api/Customers customers is the controller that we have created.
- Here we want push the information to database so need to choose POST method in Postman.
- In the Body section append the inputs in json format as formatted above.
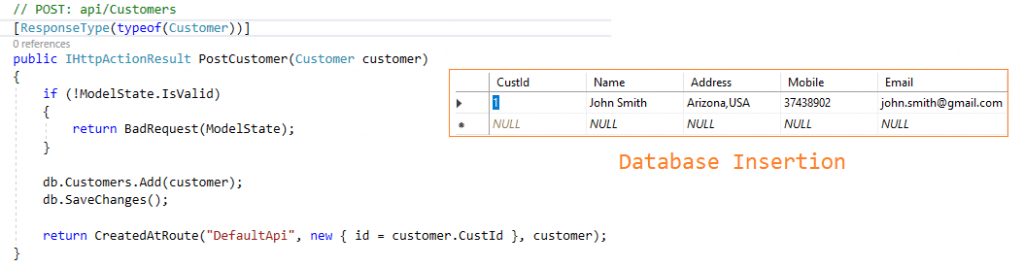
- Click the send button and then the data is pushed to database using post method like below;
[ResponseType(typeof(Customer))]
        public IHttpActionResult PostCustomer(Customer customer)
        {
            if (!ModelState.IsValid)
            {
                return BadRequest(ModelState);
            }
            db.Customers.Add(customer);
            db.SaveChanges();
            return CreatedAtRoute("DefaultApi", new { id = customer.CustId }, customer);
        }
ASP NET WEB API POST Operation
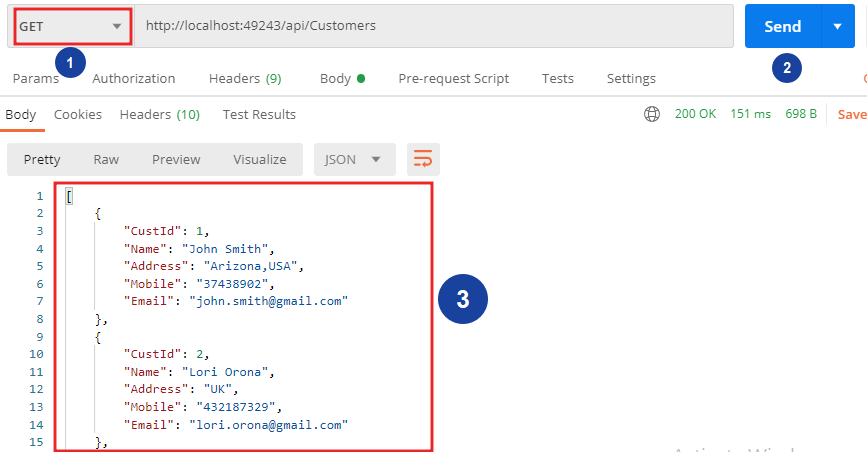
Web API READ method test using Postman
Her we see how to read the data using postman in GET method. In postman we can change the method type to GET and call the below mentioned Web API URL.
- Below you can see we call the same URL http://localhost:49243/api/Customers with changing the method as GET to READ the data.
- It call the get method and fetch the result set as JSON format in below.
// GET: api/Customers
public IQueryable<Customer> GetCustomers()
 {
  return db.Customers;
 }
ASP NET Web API GET Customers data
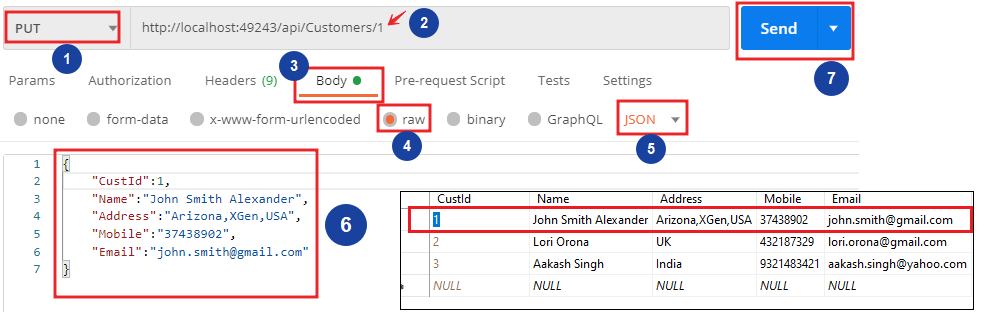
Web API UPDATE method test using Postman
Her we see how to update the data using postman in PUT method. In postman we can change the method type to PUT and call the below mentioned Web API URL.
- Below you can see we call the same URL http://localhost:49243/api/Customers with changing the method as PUT to UPDATE the data by passing the Id.
- To get the corresponding Id it can update the request.
[ResponseType(typeof(void))]
        public IHttpActionResult PutCustomer(int id, Customer customer)
        {
            if (!ModelState.IsValid)
            {
                return BadRequest(ModelState);
            }
            if (id != customer.CustId)
            {
                return BadRequest();
            }
            db.Entry(customer).State = EntityState.Modified;
            try
            {
                db.SaveChanges();
            }
            catch (DbUpdateConcurrencyException)
            {
                if (!CustomerExists(id))
                {
                    return NotFound();
                }
                else
                {
                    throw;
                }
            }
            return StatusCode(HttpStatusCode.NoContent);
        }
ASP NET WEB API Update Operation Code
Web API DELETE method test using Postman
Her we see how to delete the data using postman in DELETE method. In postman we can change the method type to DELETE and call the below mentioned Web API URL.
- Below you can see we call the same URL http://localhost:49243/api/Customers with changing the method as DELETE to delete the data from database.
- To delete the request we follow the below code in controllers.
[ResponseType(typeof(Customer))]
        public IHttpActionResult DeleteCustomer(int id)
        {
            Customer customer = db.Customers.Find(id);
            if (customer == null)
            {
                return NotFound();
            }
            db.Customers.Remove(customer);
            db.SaveChanges();
            return Ok(customer);
        }
ASP NET Web API Delete Operation

ASP NET Web API Delete Result
- On above we pass the delete item id as 2 so it delete the record and for confirmation we bind the deleted data inn response body tag.
- When we move to database and refresh the table and find their the item is deleted for id 2.

Web API GET by ID method test using Postman
 [ResponseType(typeof(Customer))]
        public IHttpActionResult GetCustomer(int id)
        {
            Customer customer = db.Customers.Find(id);
            if (customer == null)
            {
                return NotFound();
            }
            return Ok(customer);
        }
ASP NET Crud Operation Customer By ID
- By passing only Id you can fetch the result of the one customer.
Conclusion
Leave behind your valuable queries and suggestions in the comment section below. Also, if you think this article helps you, do not forget to share this with your developer community. Happy Coding 🙂
Helpful Thank You
it was helpful !! thanks