
This article will teach us about Logging into Azure App Service with ASP.Net Core. You can use the built-in logging capabilities of.NET Core, specifically the Microsoft.Extensions.Logging library, to log a.NET Core application to the Azure App Service logs filesystem. Azure App Service provides a file system where you can store application logs, and you can configure your.NET Core application to write records to this file system. Please read my previous article on Create CRUD Operation using ReactJs and ASP.Net Core API- Starter Template.
Creating ASP.Net Core Web API Application
Using the below steps we can create an ASP.Net Core Angular Application.
- Launch the Visual Studio IDE and click on “Create new project”.
- In the “Create new project” window, select “ASP.NET Core Web API” from the list of templates displayed.
- Click Next. In the “Configure your new project” window, specify the name and location for the new project and then click Create.
- In the “Create New ASP.NET Core Web API” window shown next, select .NET Core as the runtime and .NET 7.0 from the drop-down list at the top. Select “API” as the project template to create a new ASP.NET Core API application.
- You can check/uncheck “Enable Docker Support” according to your choice.
- Ensure that Authentication is set as “No Authentication” as we won’t be using authentication either and Click Create.
Add the Package
Right-click on the project and select Manage Nuget Packages. In that tab search for Microsoft.Extensions.Logging.AzureAppServices.

Modify and Implement Logging in the controller
namespace Logging.AzureAppService.Controllers
{
    [ApiController]
    [Route("[controller]")]
    public class WeatherForecastController : ControllerBase
    {
        private static readonly string[] Summaries = new[]
        {
        "Freezing", "Bracing", "Chilly", "Cool", "Mild", "Warm", "Balmy", "Hot", "Sweltering", "Scorching"
    };

        private readonly ILogger<WeatherForecastController> _logger;

        public WeatherForecastController(ILogger<WeatherForecastController> logger)
        {
            _logger = logger;
        }

        [HttpGet]
        public IEnumerable<WeatherForecast> Get()
        {
            _logger.LogInformation("Received Request of Weather");
            _logger.LogInformation("Processing your WeatherForecast request");

            return Enumerable.Range(1, 5).Select(index => new WeatherForecast
            {
                Date = DateOnly.FromDateTime(DateTime.Now.AddDays(index)),
                TemperatureC = Random.Shared.Next(-20, 55),
                Summary = Summaries[Random.Shared.Next(Summaries.Length)]
            })
            .ToArray();
        }


        [HttpGet("{id}")]
        public string Get(int id)
        {
            _logger.LogInformation("Received Request of Weather by Id", id);
            _logger.LogInformation("Processing your WeatherForecast request By Id");
            try
            {
                throw new DivideByZeroException();
            }
            catch (DivideByZeroException ex)
            {
                _logger.LogError("Some Errors occcured.", ex);
            }
            return $"Hello " + id;
        }
    }
}- Here we have implemented the
ILoggerinterface on the constructor. - Added the _logger.LogInformation and _logger.LogError in the two of the methods.
Configure the Logging in Program.cs
By doing so, we are adding logging to our application, which will be monitored by Azure App Service.
var builder = WebApplication.CreateBuilder(args);

builder.Logging.ClearProviders();
builder.Logging.AddAzureWebAppDiagnostics();
builder.Logging.AddConsole();
What you must decide is the Log level at which you will log. One of the most important aspects of logging is ensuring that you are logging the correct information. For example, the Debug level would be excessive for production. Furthermore, it may reveal sensitive information. The amount of logging in production should only be essential information that does not impair the application’s performance. So would be cautious on the logging what need to make the log.
Publish this application to Azure App Service
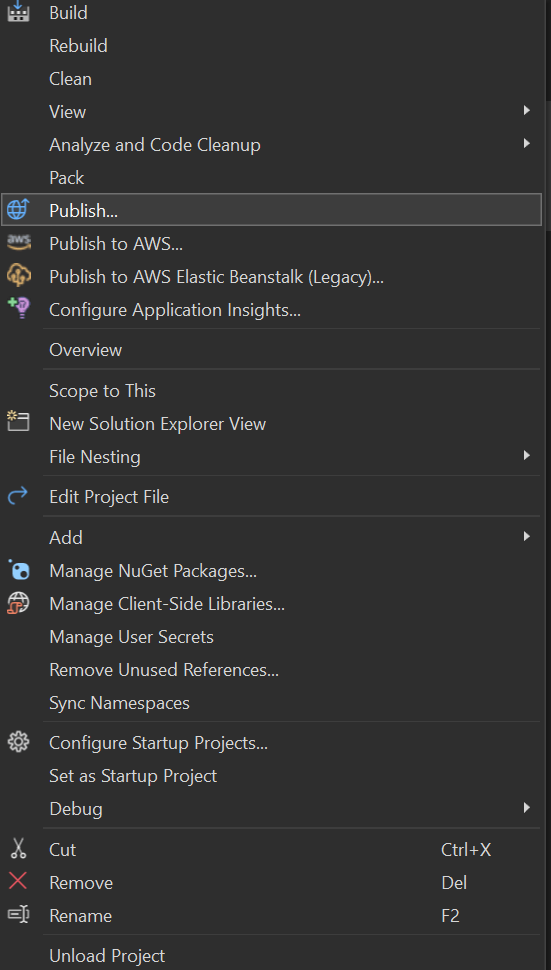
For publishing the Web API, we are using the Visual Studio. Please check the below steps.
- Right-click on the project and click on publish
- It open the below prompt and select Azure and click on Next
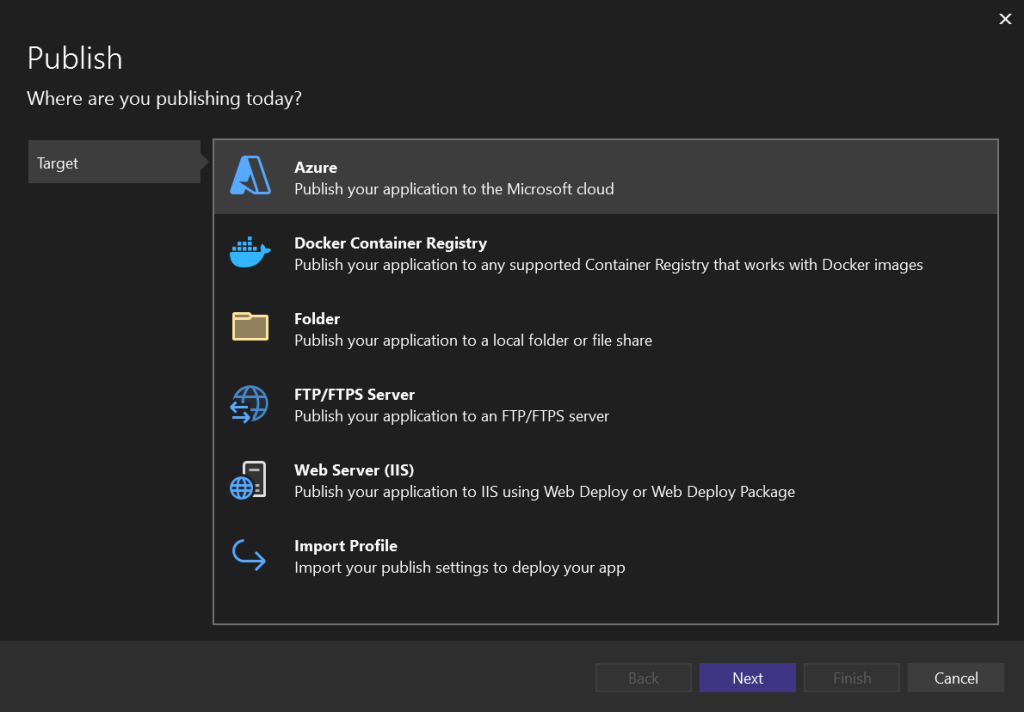
- It asks on the next window what service we want to use, we choose here
Azure App Service (Windows)and click Next

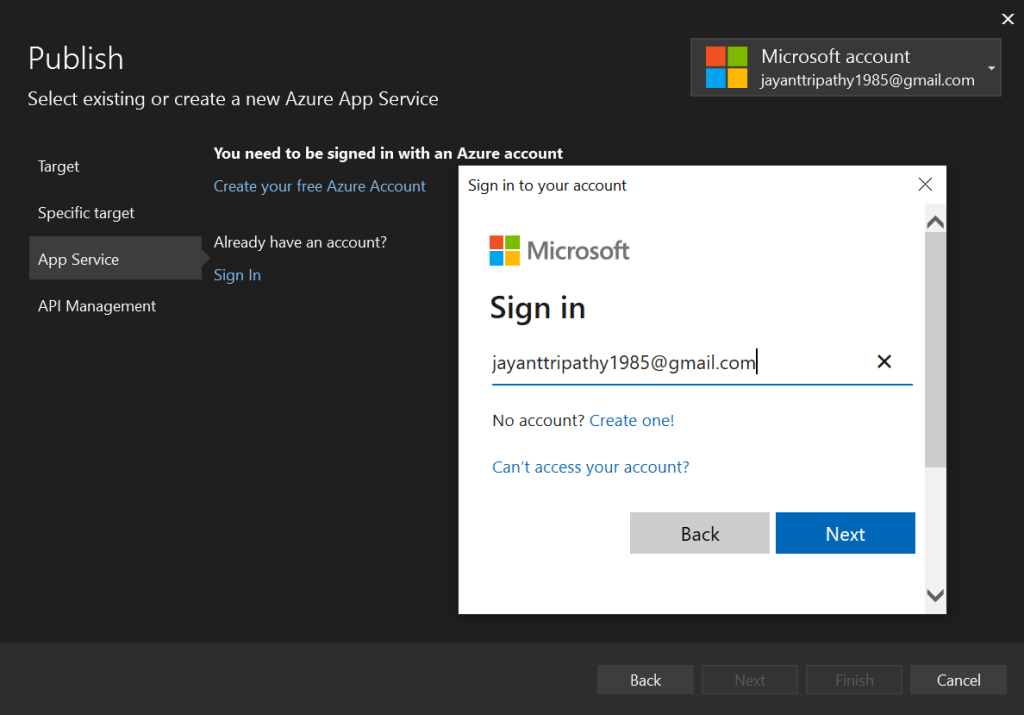
- Click Sig In with your Azure account here.
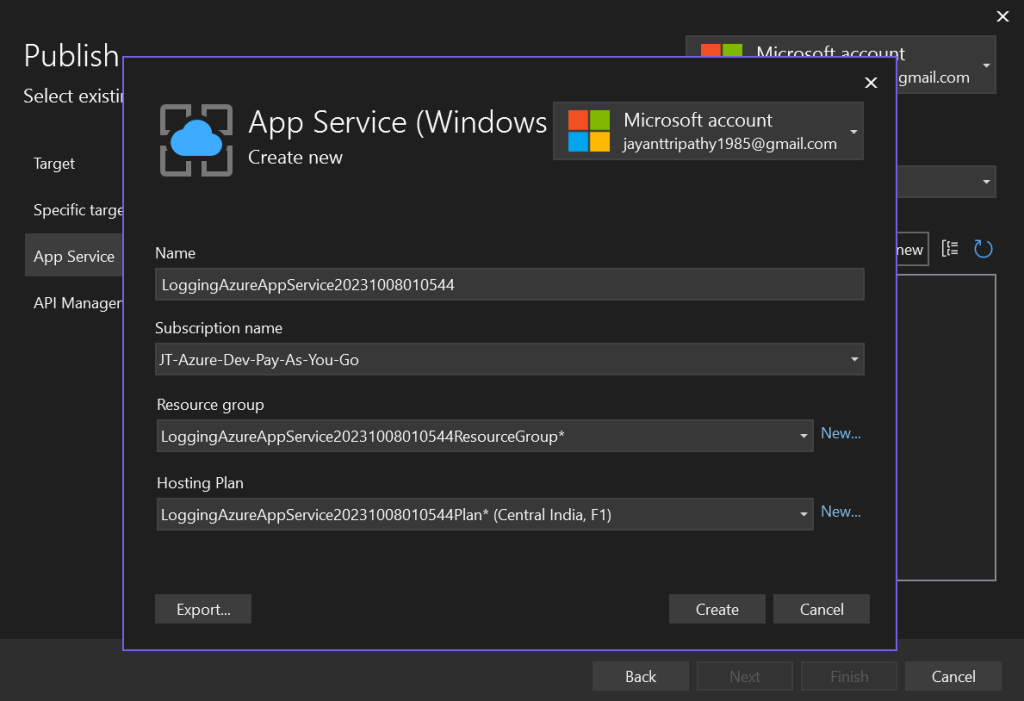
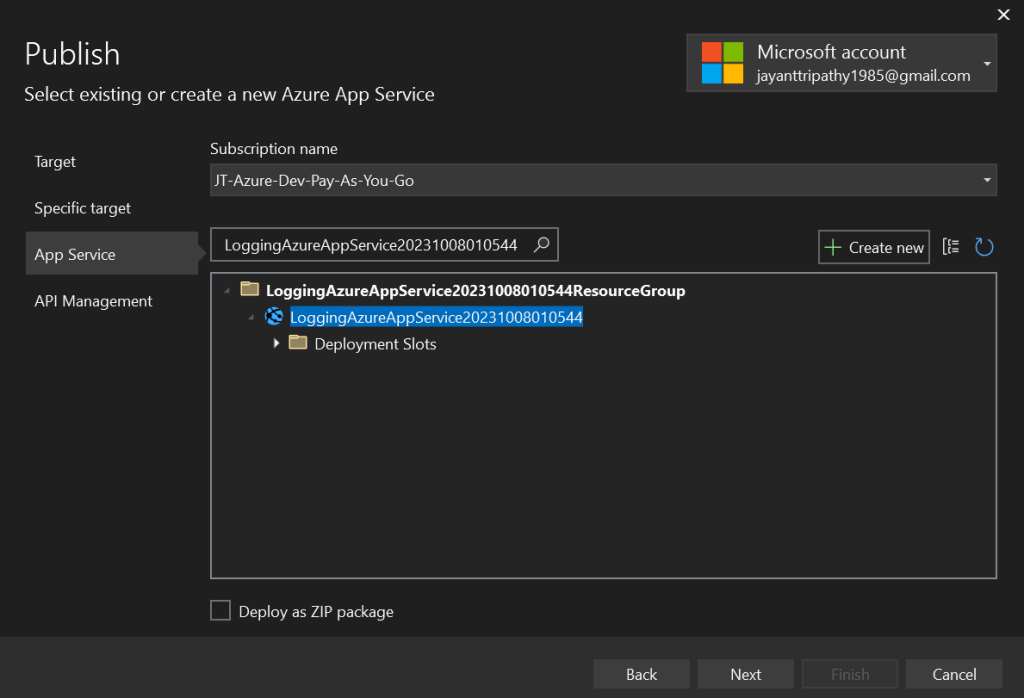
- After Sign In you can see, we have selected the App name, Resource group and Hosting Plan.
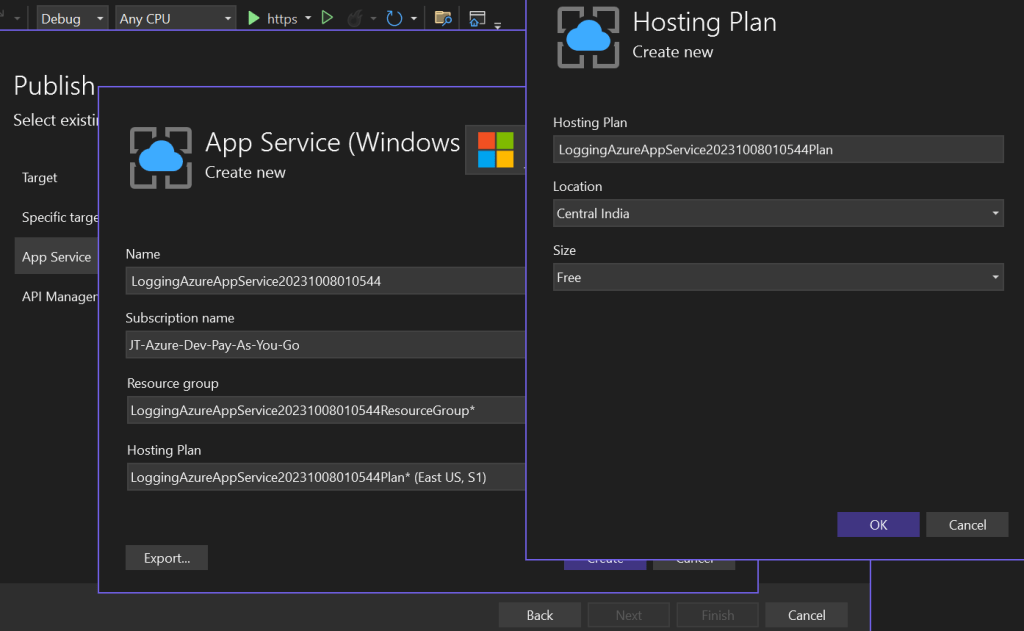
- Click on the create button on the below screen and click next and next.
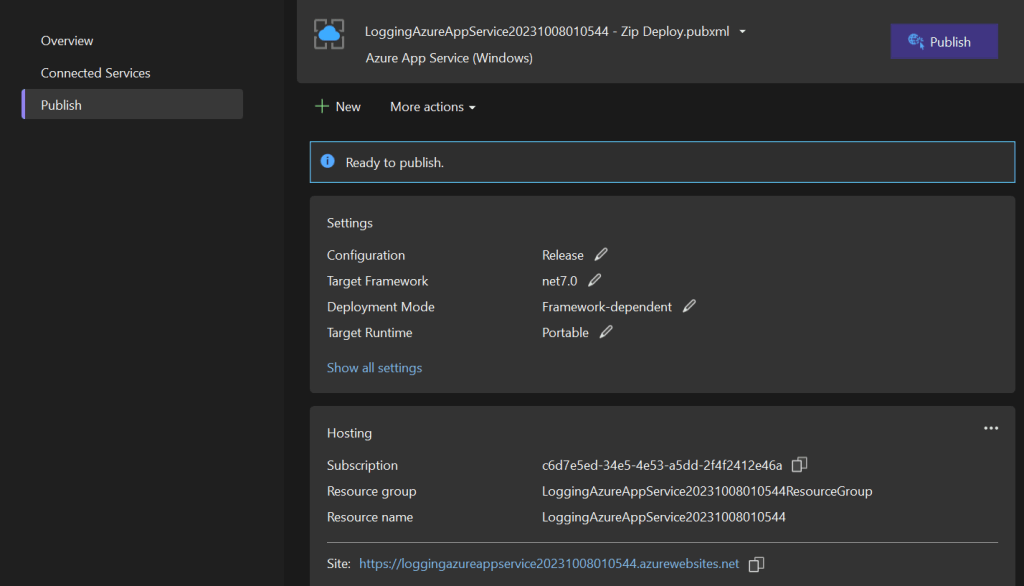
- It’s ready to publish the ASP.Net Core web API into Azure App Service and click on the Publish button.
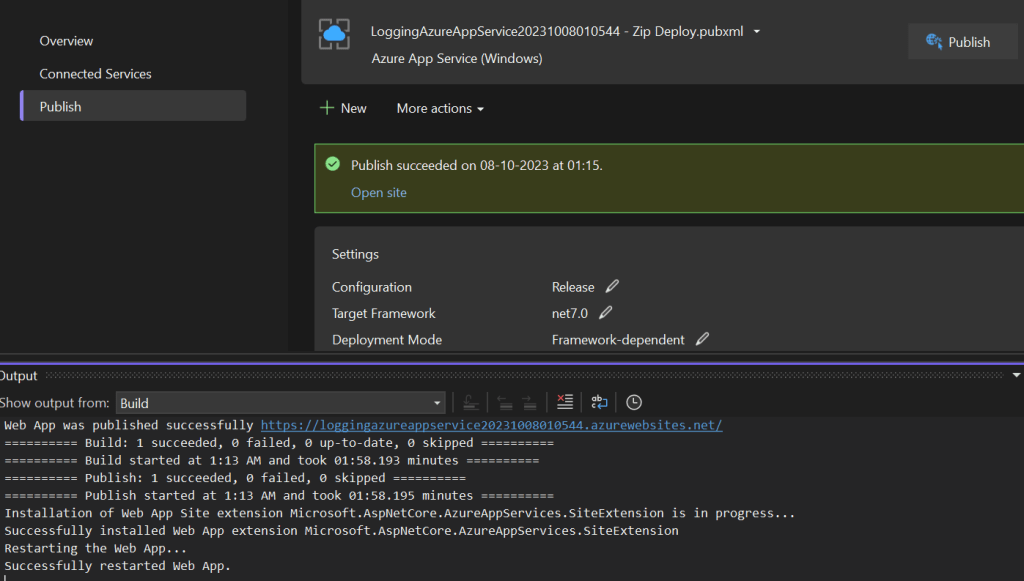
- Here you can see the publish has been successfully to Azure App Service.
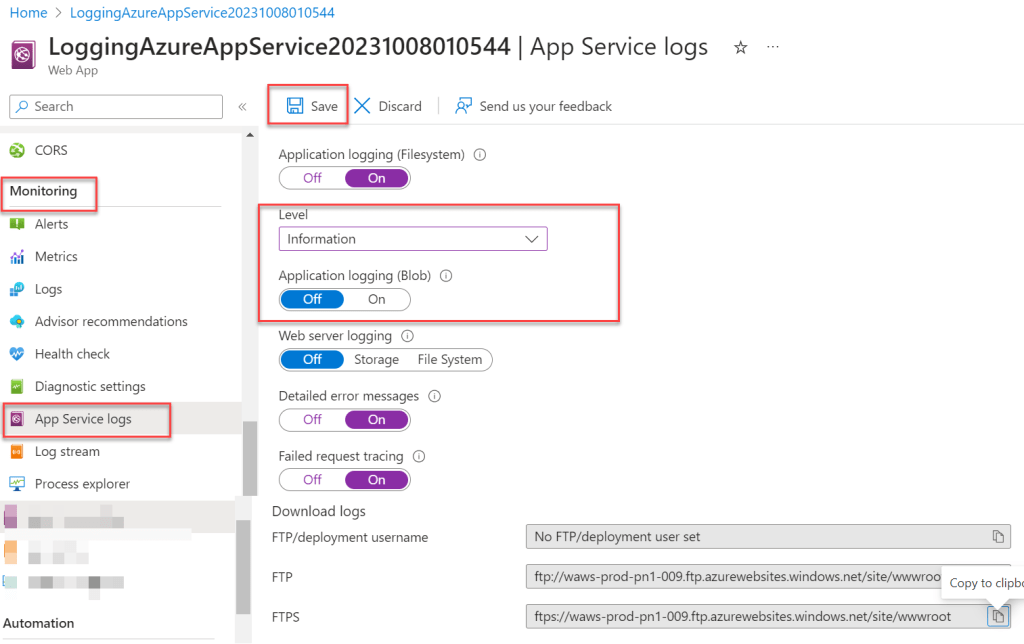
The publish has been done, let’s move to Azure Portal and there we can find that under the Azure App Service, the Logging Application is published. Scroll to the Monitoring section and select App Service logs, Enable Application Logging.
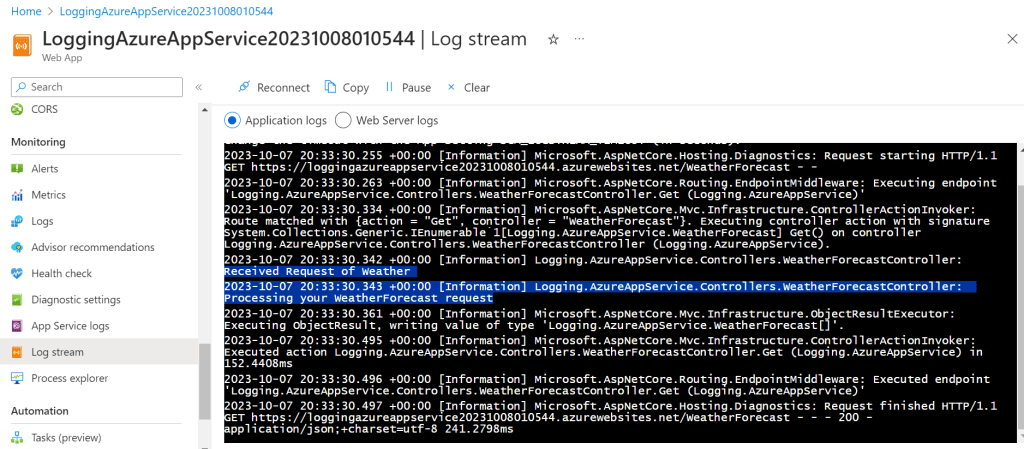
Let’s run the application and we can see logs are recorded in Azure App Service.

Once there, look for a line with the Information Log level and the message we added to the controller.
Conclusion
In this article, we discuss Logging into Azure App Service with ASP.Net Core. We can use the built-in logging capabilities of.NET Core, specifically the Microsoft.Extensions.Logging library.
Leave behind your valuable queries and suggestions in the comment section below. Also, if you think this article helps you, do not forget to share this with your developer community. Happy Coding 🙂
Related Articles
- Building an AI Knowledge Base Search with Azure AI Foundry: Step-by-Step Guide
- How to Secure React.js application with Azure AD Authentication Using MSAL Library
- 🔐 Securing .NET Core Web Apps with Azure AD/Intra and MSAL
- Step-by-Step Guide to Using Azure Redis Cache in ASP.NET Core 9 Web API
- 🤖 Build a Full-Stack AI App with React, Node.js & Azure OpenAI
- Effortless React Deployment 🚀: CI/CD with GitHub Actions & Azure Static Web Apps
- Deploying Angular apps in Azure Blob Storage with CI/CD Integration 🚀
- How to Build a serverless CRUD app with Azure function and Cosmos DB
- How to resolve Function App Cannot Create within Azure Portal
- How to convert Text To Speech With Azure Cognitive Services using Angular and .Net Core
SUPPORT ME