
This article explains how to build CRUD REST APIs with ASP.Net Core 5.0 with EF Core 5.0 code first approach. Also we learn how to secure APIs using JWT authentication token and test the CRUD APIs using POSTMAN. Please read my previous article Angular 10 with ASP.NET Web API-CRUD Operations. At the end of articles we should learn about CRUD REST APIs with ASP.Net Core.
Prerequisites
– Visual Studio 2019 16.8 or later
– .NET 5.0 SDK or later
– SQL Server 2014 (You can use higher version of SQL)
– Postman to test API
What is REST API ?
REST stands for representational state transfer. REST APIs are the HTTP-based protocol that provides to communicate with other application using lightweight JSON format. As you know in current era there is no. of clients (mobile apps, browser-based SPAs, desktop apps, IOT apps, etc.), we need better ways for transferring data from servers to clients, independent of technology and server stacks. In this case REST API is the good benchmark among the application.
What is JWT Token ?
JWT stands for JSON Web Token, It is open standard and transfer data securely between two entities (client and server). A JWT is digitally signed using a secret key by a token provider or authentication server. A JWT helps the resource server verify the token data using the same secret key, so that you can trust the data.
JWT consists of the following three parts:
Header: encoded data of token type and the algorithm used to sign the data.
Payload: encoded data of claims intended to share.
Signature: created by signing (encoded header + encoded payload) using a secret key.
The final JWT token will be like this: Header.Payload.Signature. In below we described how JWT works.
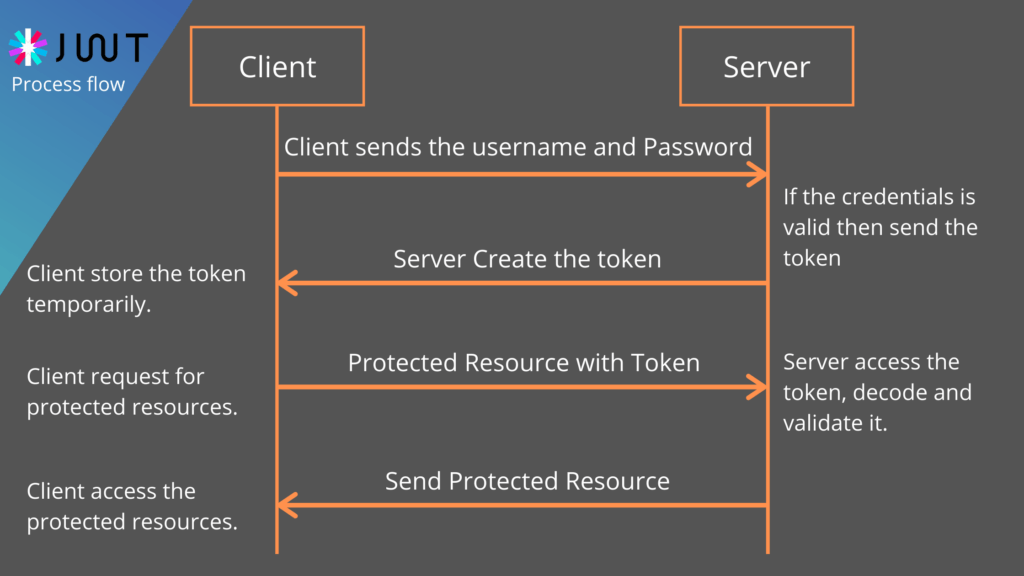
Step 1: Client requesting token
The client sends a request to the authentication server with the necessary information like username and password to prove its identity. If the credential is valid then the server create a token with the necessary claims, and a JWT token will be sent back to the client.
Step 2: Client sends token to resource server
Client Stores the token temporarily and for each request to Resource or the API server, the client needs to include a token in the header and request the resource using its URI. Then the Server access the token decode and validate it.
Step 3: Resource server verifies the token
To verify the token below are the few steps.
- Read the token from authentication header then Split the header, payload and signature from token.
- Create signature of received header and payload using the same secret key used when creating the token.
- Check whether both newly created signature and signature received from token are valid.
- If the signatures are the same, the tokens are valid (not altered in the middle) and they provide access to the requested resource.
- If the signatures are different, an unauthorized response will be sent back to the client. (In the middle, if claims are alerted, they will generate a different signature, hence resource access will be restricted.)
Create an CRUD REST APIs with ASP.Net Core
To create an ASP.NET Core 5.0 Rest API application follow below steps.
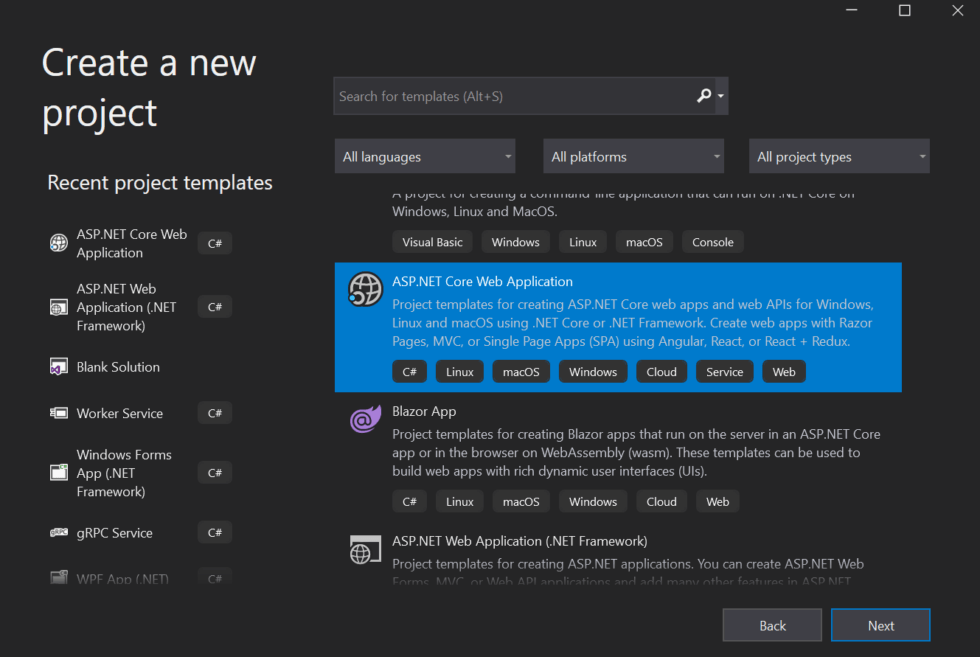
- Open Visual Studio 2019, Create New Project
- Choose ASP.NET Core Web Application and then set Project location and project path.
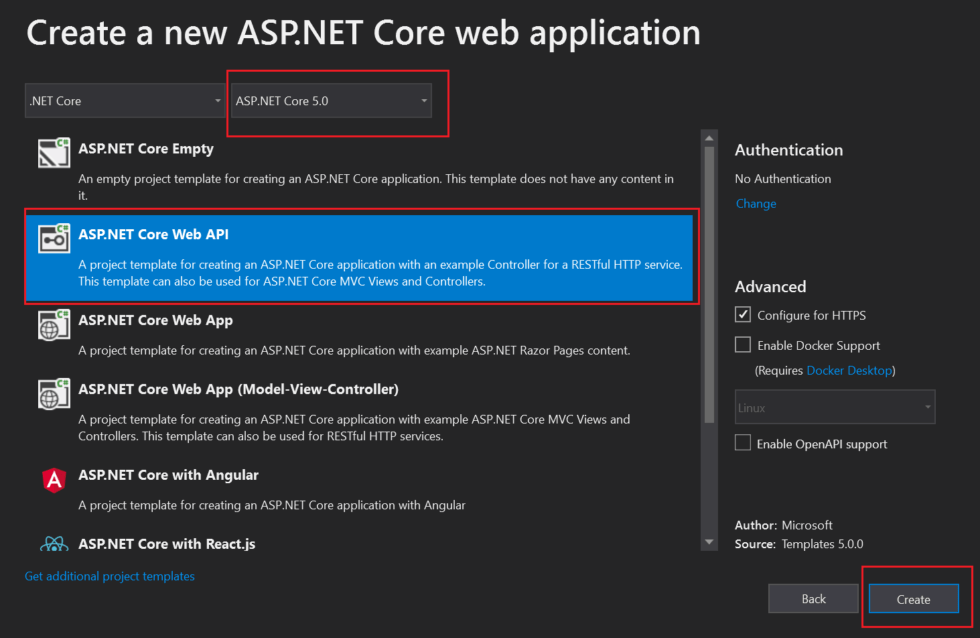
- Select ASP.NET Core SDK 5.0 and then select ASP.NET Core Web API project.
Install required Nuget Packages
Install below required packages using package manager console or you can install using Manage Nuget packages.
Install-Package Microsoft.EntityFrameworkCore-Version 5.0.0
Install-Package Microsoft.EntityFrameworkCore.Sqlite-Version 5.0.0
Install-Package Microsoft.EntityFrameworkCore.SqlServer-Version 5.0.0
Install-Package Microsoft.EntityFrameworkCore.SqlServer.Design-Version 1.1.6
Install-Package Microsoft.EntityFrameworkCore.Tools-Version 5.0.0
Install-Package Microsoft.VisualStudio.Web.CodeGeneration.Design-Version 5.0.0
Creating the Model Class
To do EF core 5.0 we do create the model class that treated as entity of product object and user object that should be done database operations. Right click on the Models folder and add the class name with following properties.
Product.cs
[Table("Products")]
    public class Product
    {
        [Key]
        public int ProductId { get; set; }
        public string Name { get; set; }
        public string Category { get; set; }
        [Column(TypeName = "decimal(18,2)")]
        public decimal Price { get; set; }
        public int Quantity { get; set; }
        [DatabaseGenerated(DatabaseGeneratedOption.Computed)]
        public DateTime CreateDate { get; set; }
}- The product model consist the object of product information.
- [Table(“Products”)] is belong to
System.ComponentModel.DataAnnotations.Schemanamespace. Here Products is the table name that we want to create dynamically using EF code first. - ProductId is the primary key of the table object.
- Price column is set as default value.
- CreateDate column is the computed value means it set as default date for this field.
User.cs
[Table("Users")]
    public class User
    {
        public int UserId { get; set; }
        public string FullName { get; set; }
        public string UserName { get; set; }
        public string Password { get; set; }
        public string Email { get; set; }
        [DatabaseGenerated(DatabaseGeneratedOption.Computed)]
        public DateTime CreateDate { get; set; }
}- The user model consist the object of user information.
- [Table(“Users”)] is belong to
System.ComponentModel.DataAnnotations.Schemanamespace. Here Users is the table name that we want to create dynamically using EF code first. - UserId is the primary key of the table object.
- CreateDate column is the computed value means it set as default date for this field.
- User table is use as JWT claim and role based.
After creating the Models class must rebuild the applications. To rebuild the project right click on Project and then click Rebuild.
The user database script look like below.
SET IDENTITY_INSERT [dbo].[Users] ON

INSERT [dbo].[Users] ([UserId], [FullName], [UserName], [Password], [Email], [CreateDate], [UserRole]) VALUES (1, N'John Doe', N'john', N'john$321', N'john.doe@gmail.com', CAST(N'2020-11-26T00:00:00.0000000' AS DateTime2), N'Admin')
SET IDENTITY_INSERT [dbo].[Users] OFF
Adding the Product API Controller for CRUD REST API
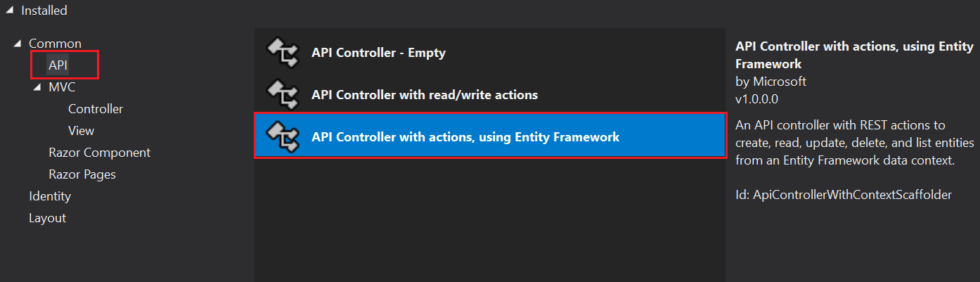
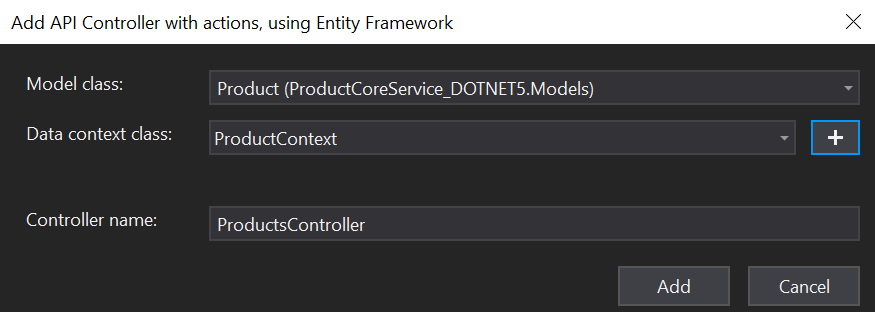
To do database operations to create, update, read and delete over model class we need to create the controller that should do the CRUD operations for us. To create the Controller right click on the Controllers folder and add a new Controller and in the prompt choose as API controller with actions, using Entity framework like below. Here we can use in-built entity framework scaffold technique to create CRUD query for us.
After select the API controller with actions, using Entity framework click the OK button then a new prompt comes again.
- We select model class is product as we create the model class Product CRUD.
- DataContext we select as ProductContext, you may change it according to your choice.
- Then our controller name is ProductsController.
After create the scaffold controller automatically it create the CRUD ( Create, Read, Update, Delete ) operations using Customer Model class and ProductContext class like below.
ProductContext.cs
public class ProductContext : DbContext
    {
        public ProductContext (DbContextOptions<ProductContext> options)
            : base(options)
        {
        }
        public DbSet<ProductCoreService_DOTNET5.Models.Product> Product { get; set; }
        public DbSet<ProductCoreService_DOTNET5.Models.User> User { get; set; }
    }
And it automatically add the DBContext inside the service class of startup.cs like below.
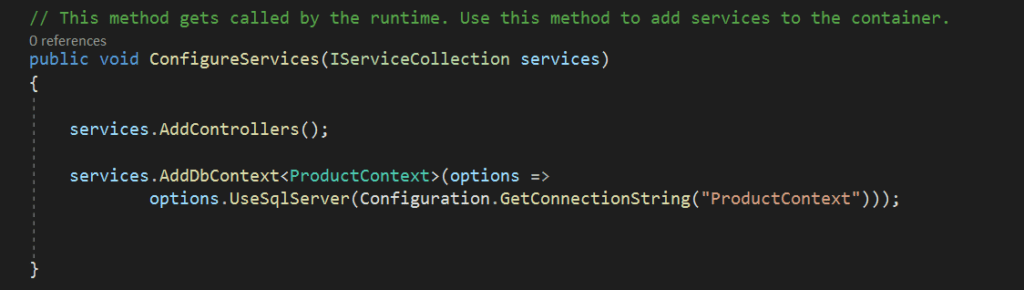
Also the connection string automatically add in appsettings.json file like below. ProductContext is the connection string and value you can modify according to your DB connection.
"ConnectionStrings": {
    "ProductContext": "Server=(localdb)\\mssqllocaldb;Database=ProductContext-2e02db2f-41e9-4ba7-9b78-d0733c05e2b5;Trusted_Connection=True;MultipleActiveResultSets=true"
  }
ProductController.cs
The following REST APIs are created:
- To list all products: HTTP Get method
- Get product detail: HTTP Get method
- Update product detail: HTTP Put method
- Create product: HTTP Post method
- Delete product: HTTP Delete method
[Route("api/[controller]")]
    [ApiController]
    public class ProductsController : ControllerBase
    {
        private readonly ProductContext _context;

        public ProductsController(ProductContext context)
        {
            _context = context;
        }

        // GET: api/Products
        [HttpGet]
        public async Task<ActionResult<IEnumerable<Product>>> GetProduct()
        {
            return await _context.Product.ToListAsync();
        }

        // GET: api/Products/5
        [HttpGet("{id}")]
        public async Task<ActionResult<Product>> GetProduct(int id)
        {
            var product = await _context.Product.FindAsync(id);

            if (product == null)
            {
                return NotFound();
            }

            return product;
        }

        // PUT: api/Products/5
        // To protect from overposting attacks, see https://go.microsoft.com/fwlink/?linkid=2123754
        [HttpPut("{id}")]
        public async Task<IActionResult> PutProduct(int id, Product product)
        {
            if (id != product.ProductId)
            {
                return BadRequest();
            }

            _context.Entry(product).State = EntityState.Modified;

            try
            {
                await _context.SaveChangesAsync();
            }
            catch (DbUpdateConcurrencyException)
            {
                if (!ProductExists(id))
                {
                    return NotFound();
                }
                else
                {
                    throw;
                }
            }

            return NoContent();
        }

        // POST: api/Products
        // To protect from overposting attacks, see https://go.microsoft.com/fwlink/?linkid=2123754
        [HttpPost]
        public async Task<ActionResult<Product>> PostProduct(Product product)
        {
            _context.Product.Add(product);
            await _context.SaveChangesAsync();

            return CreatedAtAction("GetProduct", new { id = product.ProductId }, product);
        }

        // DELETE: api/Products/5
        [HttpDelete("{id}")]
        public async Task<IActionResult> DeleteProduct(int id)
        {
            var product = await _context.Product.FindAsync(id);
            if (product == null)
            {
                return NotFound();
            }

            _context.Product.Remove(product);
            await _context.SaveChangesAsync();

            return NoContent();
        }

        private bool ProductExists(int id)
        {
            return _context.Product.Any(e => e.ProductId == id);
        }
    }
Entity Framework Code First Migrations
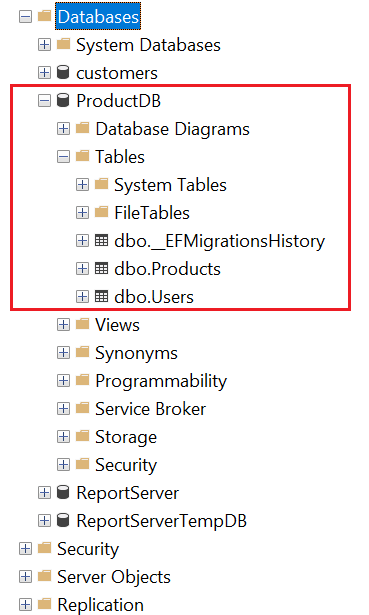
Code first migrations here help you to create the database for us with following tables Products and Users.
- Open Package manager console of the project and type the command Add-Migration and hit enter.

- After executing the command it adds a new file with the name “Initial” prefixed with the date time stamp. It prefixes the date time stamp so that it could track the various migrations added during development and segregate between those. Open the file and we see the class named “Initial” deriving from DbMigration class. This class contains two methods that are overridden from DbMigration class i.e. the base class. The method names are Up() and Down().
- The final command that creates the database and respective tables out of our context and model. It executes the Initial migration that we added and then runs the seed method from the configuration class. This command is smart enough to detect which migrations to run. For example it will not run previously executed migrations and all the newly added migrations each time will be taken in to account to be executed to update the database. It maintains this track as the database firstly created contains an additional table named __MigrationHistory that keeps track of all the migrations done.
- The command is Update-Database

After executing the update-database command the database is created like below and now we can test REST CRUD API using Postman tool.
Test REST API CRUD operation using Postman
Before starting to test the API we need to set the route page like below in launchSettings.json

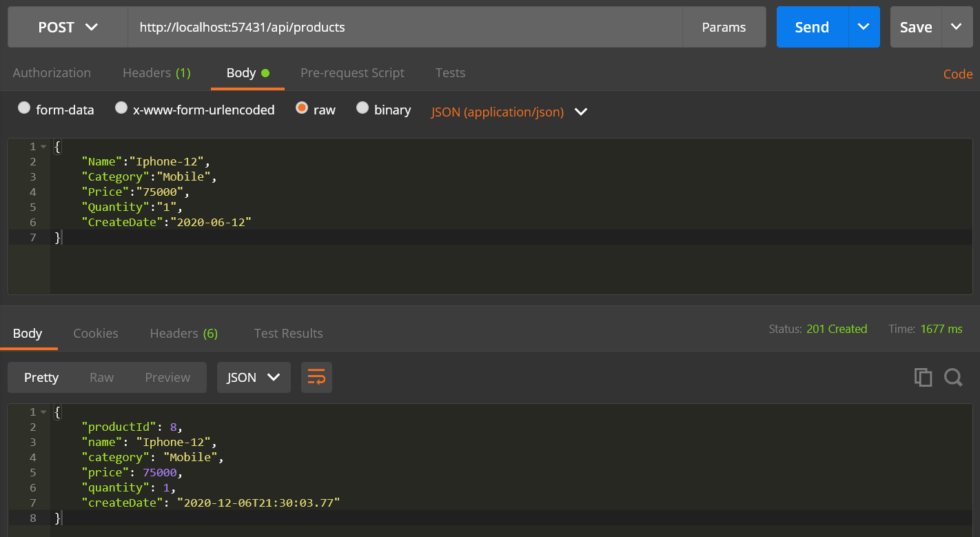
Create product: HTTP Post method
Open the Postman tool and run the application and here we want to create the customer data that means we push the customer information so like below we can push the data.
- Here http://localhost:49243/api/Customers is the URL to create CRUD operation.
- Here we want push the information to database so need to choose POST method in Postman.
- In the Body section append the inputs in json format as formatted above.
- Click the send button and then the data is pushed to database using post method like below;
- After click the send button the product data is entered into database using POST method like below.
[HttpPost]
   public async Task<ActionResult<Product>> PostProduct(Product product)
    {
      _context.Product.Add(product);
      await _context.SaveChangesAsync();
      return CreatedAtAction("GetProduct",
              new { id = product.ProductId }, product);
}- Enter this endpoint into Postman: https://localhost:44305/api/products.
- Choose POST method and set as header: ‘Content-Type’: ‘application/json’.
- Under Body Raw, choose type JSON (application/javascript) and paste the product details.
To Get list of all products: HTTP Get method
To fetch all the products that we need to change only method as GET instead of POST.
// GET: api/Products
        [HttpGet]
        public async Task<ActionResult<IEnumerable<Product>>> GetProduct()
        {
            return await _context.Product.ToListAsync();
        }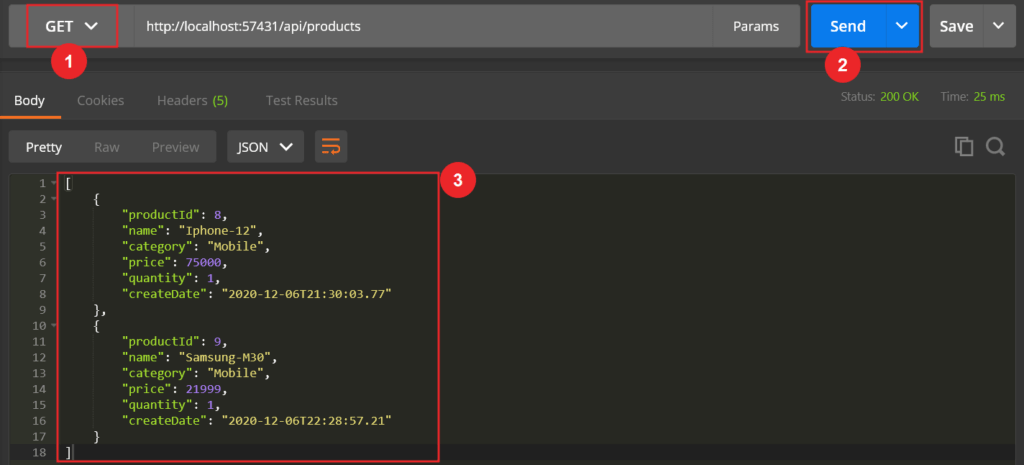
You can see that doing change is the GET method you can fetch all the product list that inserted in our database.
We need to secure the WEB API in different type of authentication methodology. Here we discuss how to secure ASP.NET Core Web API 5.0 using JWT authentication.
Secure ASP.NET Core Web API 5.0 using JWT authentication
Following below steps we can add JWT authentication in ASP .NET Core Web API.Step-1: Add the below JWT configuration in appsetting.json file
"JwtConfig": {
    "Key": "wRJSMeKKF2QT4fwpMeJf36PO1NiIsInR5cCI6IkNTY3ODkwIG9lIiwiaWF0IjoxN",
    "Issuer": "ProductAuthServer",
    "Audience": "ProductAuthClient",
    "Subject": "ProductAuthAccessToken"
  }
Step-2: Create a controller and check users credentials
Create a controller named as TokenController to perform following operations.
- Accept username and password as input.
- Check users credentials with database to ensure users’ identity.
- If it is valid then access token will be returned.
- If it is not valid then bad request will be return.
[Route("api/[controller]")]
    [ApiController]
    public class TokenController : ControllerBase
    {
        public IConfiguration _configuration;
        private readonly ProductContext _context;
        public TokenController(IConfiguration config, ProductContext context)
        {
            _configuration = config;
            _context = context;
        }
        [HttpPost]
        public async Task<IActionResult> Post(User _user)
        {

            if (_user != null && _user.UserName != null && _user.Password != null)
            {
                var user = await GetUser(_user.UserName, _user.Password);

                if (user != null)
                {
                    //create claims details based on the user information
                    var claims = new[] {
                    new Claim(JwtRegisteredClaimNames.Sub, _configuration["JwtConfig:Subject"]),
                    new Claim(JwtRegisteredClaimNames.Jti, Guid.NewGuid().ToString()),
                    new Claim(JwtRegisteredClaimNames.Iat, DateTime.UtcNow.ToString()),
                    new Claim("Id", user.UserId.ToString()),
                    new Claim("FullName", user.FullName),
                    new Claim("UserName", user.UserName),
                    new Claim("Email", user.Email),
                    new Claim("UserRole", user.UserRole)
                   };

                    var key = new SymmetricSecurityKey(Encoding.UTF8.GetBytes(_configuration["JwtConfig:Key"]));

                    var signIn = new SigningCredentials(key, SecurityAlgorithms.HmacSha256);

                    var token = new JwtSecurityToken(_configuration["JwtConfig:Issuer"], _configuration["JwtConfig:Audience"], claims, expires: DateTime.UtcNow.AddDays(1), signingCredentials: signIn);

                    return Ok(new JwtSecurityTokenHandler().WriteToken(token));
                }
                else
                {
                    return BadRequest("Invalid credentials");
                }
            }
            else
            {
                return BadRequest();
            }
        }

        private async Task<User> GetUser(string username, string password)
        {
            return  _context.User.FirstOrDefault(u => u.UserName == username && u.Password == password);
        }
    }
Using JWT claim it creates the token and the below line of code are responsible to create the JWT token.
var key = new SymmetricSecurityKey(Encoding.UTF8.GetBytes(_configuration["JwtConfig:Key"]));
var signIn = new SigningCredentials(key, SecurityAlgorithms.HmacSha256);
var token = new JwtSecurityToken(_configuration["JwtConfig:Issuer"], _configuration["JwtConfig:Audience"], claims, expires: DateTime.UtcNow.AddDays(1), signingCredentials: signIn);
Check the JWT token endpoint using Postman
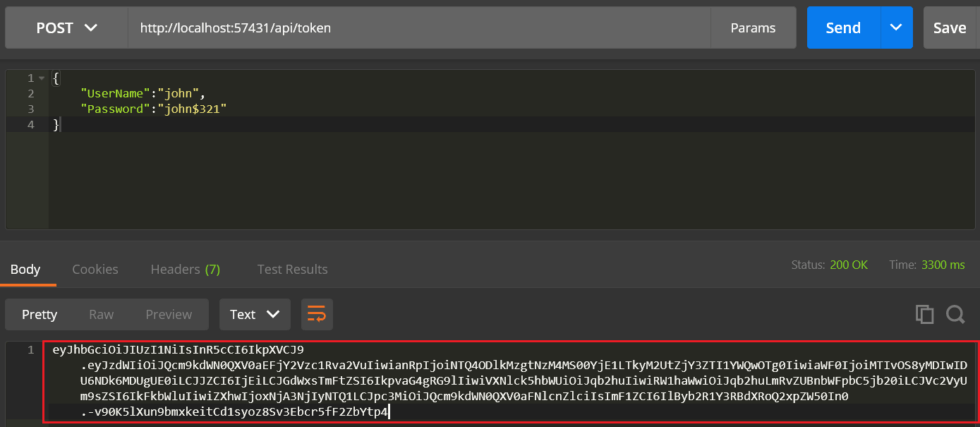
To check the JWT token endpoint in Postman we need to follow the below step.
- The endpoint is https://localhost:57431/api/token.
- Choose the POST method and set the header to ‘Content-Type’: ‘application/json’.
- Choose type JSON in the body section and pass the user information.
- User credentials is check, and a token will be generated and returned like below.

Secure the API endpoint of Product controller
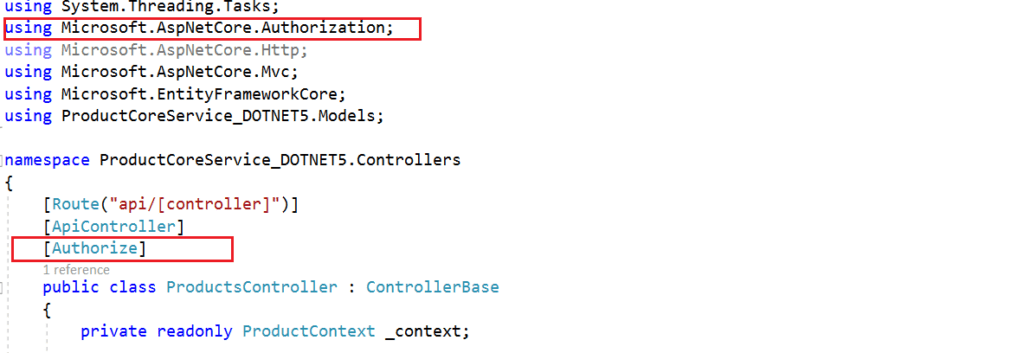
As we have already create the JWT token, then we have secure the endpoint using below steps.Add the below namespace in startup.cs file.
using Microsoft.AspNetCore.Authentication.JwtBearer;
using Microsoft.IdentityModel.Tokens;
Configure authorization middleware in the startup configureService method.
services.AddAuthentication(JwtBearerDefaults.AuthenticationScheme).AddJwtBearer(options =>
            {
                options.RequireHttpsMetadata = false;
                options.SaveToken = true;
                options.TokenValidationParameters = new TokenValidationParameters()
                {
                    ValidateIssuer = true,
                    ValidateAudience = true,
                    ValidAudience = Configuration["JwtConfig:Audience"],
                    ValidIssuer = Configuration["JwtConfig:Issuer"],
                    IssuerSigningKey = new SymmetricSecurityKey(Encoding.UTF8.GetBytes(Configuration["JwtConfig:Key"]))
                };
});- Here we passed the security key used when creating the token, and we have also enabled validation of Issuer and Audience.
- Also, we have set SaveToken to true, which stores the bearer token in HTTP Context. So we can access the token in the controller when needed.
Inject the authorization middleware into the Request pipeline in Configure method like below.
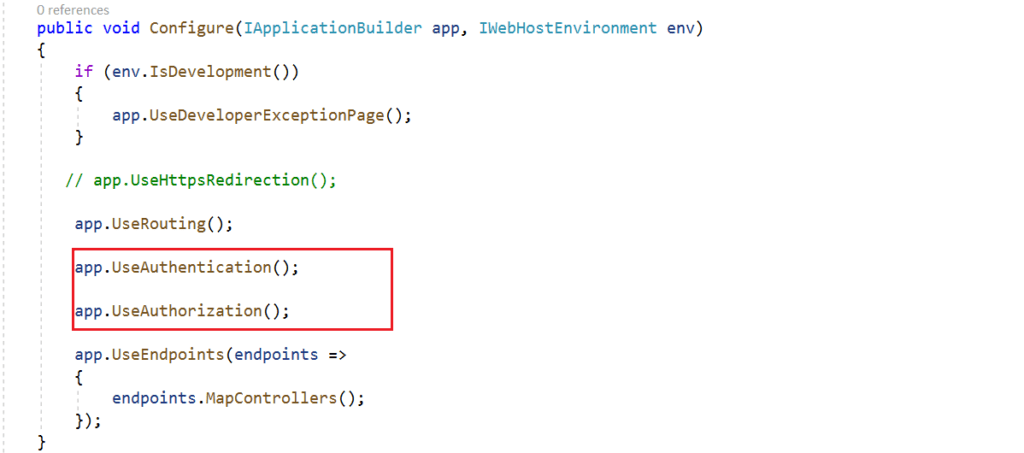
Add the authorization attribute in Product controller, after adding the [Authorize] attribute it secured with the token.
Test secured REST API using Postman
To fetch the list of product details let’s run the API using postman.
- Run the API URL http://localhost:49243/api/Products in the postman and see that all list of product are fetch or not.
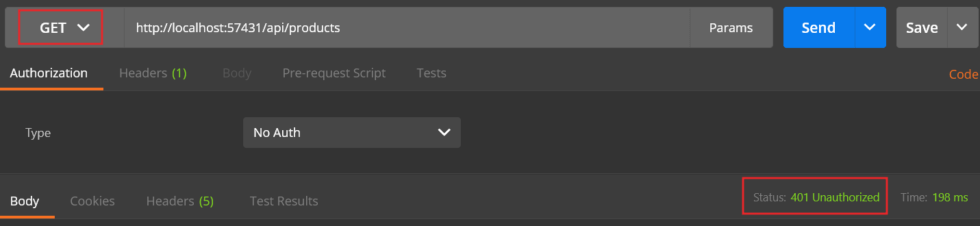
Now you can see that the response status code is 401 Unauthorized. The anonymous access has been blocked and the APIs have been secured. Let’s understand how to access this secure API controller.
How to access secured API passing JWT token
We have already create the JWT token, so we need to pass the authentication token inside in authorization header like below,
Run the Token controller to generate the JWT token. (http://localhost:57431/api/token)
Prepend the text Bearer with this token, the token is as follows.
Bearer eyJhbGciOiJIUzI1NiIsInR5cCI6IkpXVCJ9.eyJzdWIiOiJQcm9kdWN0QXV0aEFjY2Vzc1Rva2VuIiwianRpIjoiNTQ4ODlkMzgtNzM4MS00YjE1LTkyM2UtZjY3ZTI1YWQwOTg0IiwiaWF0IjoiMTIvOS8yMDIwIDU6NDk6MDUgUE0iLCJJZCI6IjEiLCJGdWxsTmFtZSI6IkpvaG4gRG9lIiwiVXNlck5hbWUiOiJqb2huIiwiRW1haWwiOiJqb2huLmRvZUBnbWFpbC5jb20iLCJVc2VyUm9sZSI6IkFkbWluIiwiZXhwIjoxNjA3NjIyNTQ1LCJpc3MiOiJQcm9kdWN0QXV0aFNlcnZlciIsImF1ZCI6IlByb2R1Y3RBdXRoQ2xpZW50In0.-v90K5lXun9bmxkeitCd1syoz8Sv3Ebcr5fF2ZbYtp4Under the Authorization header pass the token in the headers part, and then click Send.
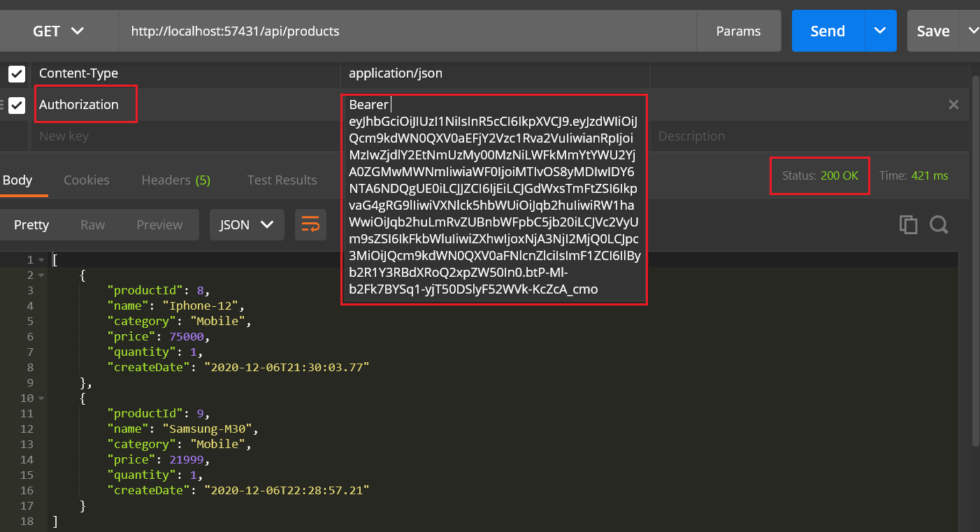
- When we pass the authorization header to the API, authentication middleware parses and validates the token. If it is found valid, it will set Identity.IsAuthenticated to true.
- The Authorize attribute added in the controller will check whether the request is authenticated. If it is true, the API can be accessed.
- If Identity.IsAuthenticated returns false, a 401 unauthorized error will be returned.

Conclusion
We discussed here about Build CRUD REST APIs with ASP.NET Core 5.0 with EF Core 5.0 and we saw how to create and test the CRUD operation with using POSTMAN.
Leave behind your valuable queries and suggestions in the comment section below. Also, if you think this article helps you, do not forget to share this with your developer community. Happy Coding 🙂
Jayant Tripathy
Coder, Blogger, YouTuberA passionate developer keep focus on learning and working on new technology.