
In this article we discuss create a CRUD application using Angular 10 with ASP.Net Web API-CRUD Operations (Insert Update and Delete) will be implemented inside an Asp .NET Web API Using Entity Framework and then consumed from an Angular 10 Application. If you are new to Angular then please explore our angular tutorials where we discussed about angular from basic to advance level, you can find here.
Prerequisite
– Angular 10 & CLI
– ngx-Toastr (NPM package) & Bootstrap and Font-Awesome Icons
– Visual Studio Code & Visual Studio
– ASP .NET Web API & SQL Server
– Entity Framework
Create ASP.NET Web API Project
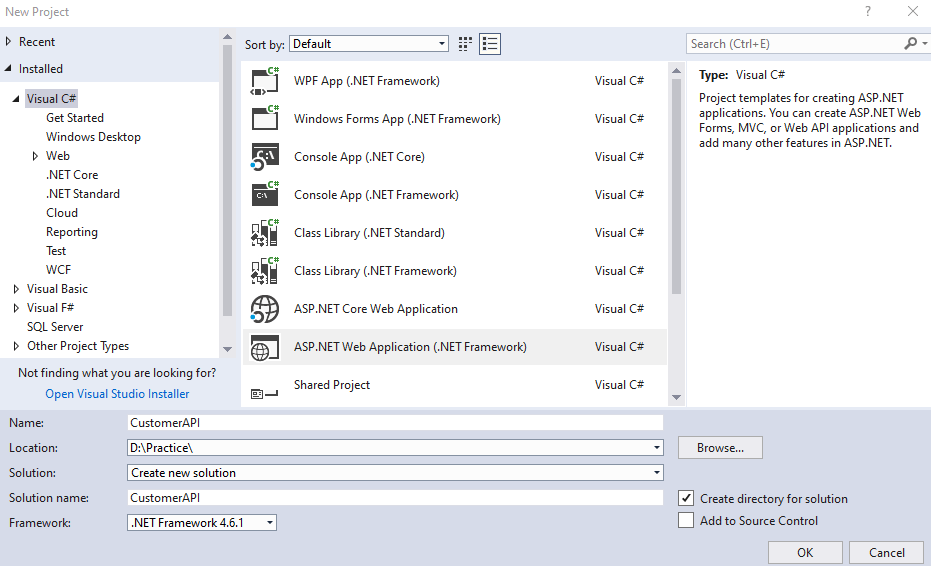
Let’s create a ASP.NET Web API Project to connect Angular application. Follow below steps to create ASP.NET Web API project. Open Visual studio choose ASP.NET Web Application and then select Empty template with checked Web API Project.
Create the Model Class
Let’s create a model of customer object. Right click on the Models folder and add the class named as Customer with following properties.
namespace CustomerAPI.Models
{
    [Table("Customer")]
    public class Customer
    {
        [Key]
        public int CustId { get; set; }
        public string Name { get; set; }
        public string Address { get; set; }
        public string Mobile { get; set; }
        public string Email { get; set; }
    }
}- Here we create the Customer Model with above properties.
- [Table(“Customer”)] is belong to System.ComponentModel.DataAnnotations.Schema namespace. Here Customer is the table name that we want to create dynamically using EF code first.
- CustId is the primary key of our entity table so we added as [Key]
After creating the Models class must rebuild the applications. To rebuild the project right click on Project and then click Rebuild.
Adding the API Controller
To do database operations to create, update,read and delete over model class we need to create the controller that should do the CRUD operations for us. To create the Controller right click on the Controllers folder and add a new Controller and in the prompt choose as Web API2 controller with actions, using Entity framework like below. Here we can use in-built entity framework scaffold technique to create CRUD query for us.
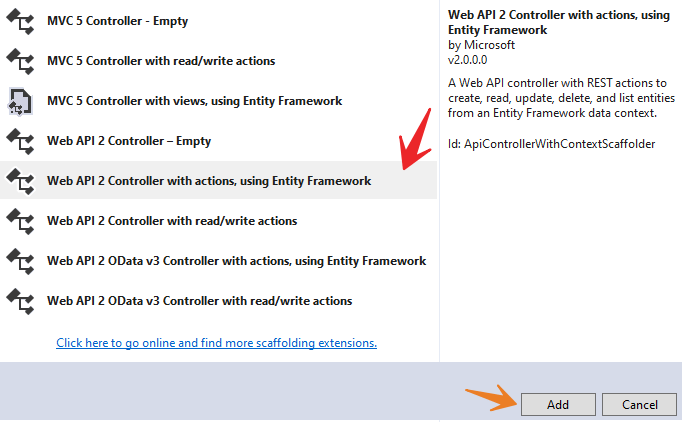
After click the Add button a prompt will open to scaffold the model to create CRUD operations and choose Web API2 controller with actions, using Entity Framework.
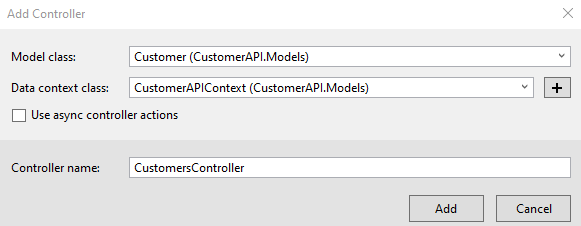
- In the Model Class choose the Model, in our case it is customer model class.
- In the Data Context class, add + symbol and add the CustomerAPI Context.
- Controller name in our case is CustomerController
After create the scaffold controller automatically it create the CRUD ( Create, Read, Update, Delete ) operations using Customer Model class and CustomerAPI Context class like below.
public class CustomersController : ApiController
    {
        private CustomerAPIContext db = new CustomerAPIContext();
        // GET: api/Customers
        public IQueryable<Customer> GetCustomers()
        {
            return db.Customers;
        }
        // GET: api/Customers/5
        [ResponseType(typeof(Customer))]
        public IHttpActionResult GetCustomer(int id)
        {
            Customer customer = db.Customers.Find(id);
            if (customer == null)
            {
                return NotFound();
            }
            return Ok(customer);
        }
        // PUT: api/Customers/5
        [ResponseType(typeof(void))]
        public IHttpActionResult PutCustomer(int id, Customer customer)
        {
            if (!ModelState.IsValid)
            {
                return BadRequest(ModelState);
            }
            if (id != customer.CustId)
            {
                return BadRequest();
            }
            db.Entry(customer).State = EntityState.Modified;
            try
            {
                db.SaveChanges();
            }
            catch (DbUpdateConcurrencyException)
            {
                if (!CustomerExists(id))
                {
                    return NotFound();
                }
                else
                {
                    throw;
                }
            }
            return StatusCode(HttpStatusCode.NoContent);
        }
        // POST: api/Customers
        [ResponseType(typeof(Customer))]
        public IHttpActionResult PostCustomer(Customer customer)
        {
            if (!ModelState.IsValid)
            {
                return BadRequest(ModelState);
            }
            db.Customers.Add(customer);
            db.SaveChanges();
            return CreatedAtRoute("DefaultApi",
                                   new { id = customer.CustId }, customer);
        }
        // DELETE: api/Customers/5
        [ResponseType(typeof(Customer))]
        public IHttpActionResult DeleteCustomer(int id)
        {
            Customer customer = db.Customers.Find(id);
            if (customer == null)
            {
                return NotFound();
            }
            db.Customers.Remove(customer);
            db.SaveChanges();
            return Ok(customer);
        }
        protected override void Dispose(bool disposing)
        {
            if (disposing)
            {
                db.Dispose();
            }
            base.Dispose(disposing);
        }
        private bool CustomerExists(int id)
        {
            return db.Customers.Count(e => e.CustId == id) > 0;
        }
    }
API Context Class
After adding the scaffold controller the API context class is also created inside the Model folder like below, that should contains the context of database schema. Here you can see CustomerAPIContext class implement the DbContext and base(“name=CustomerAPIContext”) is the name of the connection string to communicate with DB.
public class CustomerAPIContext : DbContext
    {
        public CustomerAPIContext() : base("name=CustomerAPIContext")
        {
        }
        public System.Data.Entity.DbSet<CustomerAPI.Models.Customer>
                       Customers { get; set; }
    }
Entity Framework Code First Migrations
Code first migrations here help you to update the existing database with your newly added model classes and your existing database remains intact with the existing data.
- Open Package manager console of the API project and type the command Enable-Migrations and hit enter.
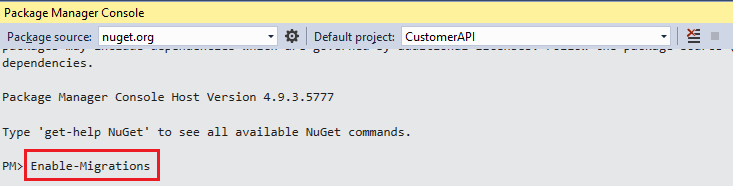
After adding this command a Migrations folder is generated like blow with crating the Configuration.cs class. This class is derived from DbMigrationsConfiguration class. This class contains a Seed method having the parameter as the context class that we got generated in the Models Seed is an overridden method that means it contains a virtual method in a base class and a class driven from DbMigrationsConfiguration can override that and add custom functionality.
internal sealed class Configuration : DbMigrationsConfiguration<CustomerAPI.Models.CustomerAPIContext>
    {
        public Configuration()
        {
            AutomaticMigrationsEnabled = false;
        }
    }
The next step is to execute the command named “Add-Migrations”. In the package manager console. The command would be Add-Migrations Initial “Initial” is the parameter we have use, you may be use any other text as per your choice.

After executing the command it adds a new file with the name “Initial” prefixed with the date time stamp. It prefixes the date time stamp so that it could track the various migrations added during development and segregate between those. Open the file and we see the class named “Initial” deriving from DbMigration class. This class contains two methods that are overridden from DbMigration class i.e. the base class. The method names are Up() and Down().
The Up method is executed to add all the initial configuration to the database and contains the create command in LINQ format. This helps to generate tables and all the modifications done over the model. Down command is the opposite of Up command. The code in the file is self-explanatory. The Up command here is having the code that creates the Students table and setting Id as its primary key. All this information is derived from the model and its changes.

- The final command that creates the database and respective tables out of our context and model. It executes the Initial migration that we added and then runs the seed method from the configuration class. This command is smart enough to detect which migrations to run. For example it will not run previously executed migrations and all the newly added migrations each time will be taken in to account to be executed to update the database. It maintains this track as the database firstly created contains an additional table named __MigrationHistory that keeps track of all the migrations done.
- The command is Update-Database

After the command execution, it creates the database in the specified server as per your server and adds the corresponding connection string to the Web.Config file. The name of the connection string is the same as the name of our context class and that’s how the context class and connection strings are related.
<connectionStrings>
<add name="CustomerAPIContext" connectionString="Data Source=ServerName; Initial Catalog=customers; User ID=sa;password=*****;"
providerName="System.Data.SqlClient" />
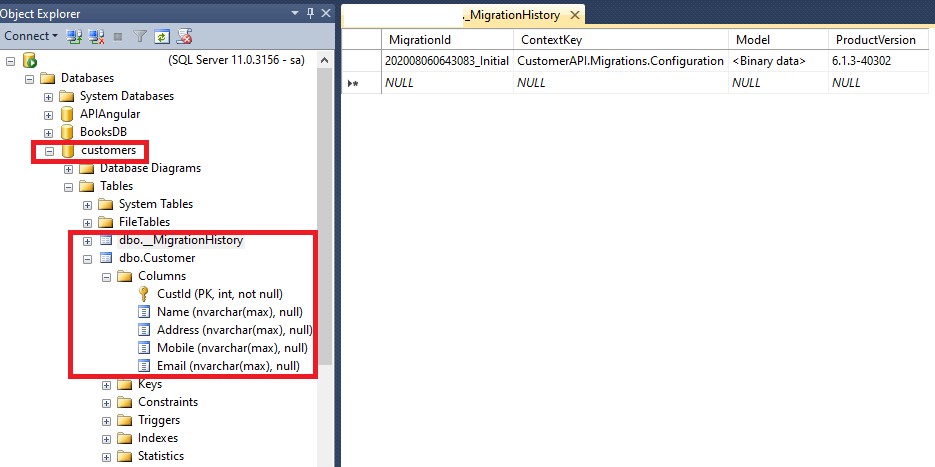
</connectionStrings>Now it automatically create the database named as “customers” with table name “customer”. Also it holds the migration history in the tables.
Exploring the Generated Database
You can see when navigate to SQL Server, find their the database is created for us.
But there is may be issue to access the Web API due to CORS. Let’s understand CORS
What is CORS and how & why to enable CORS in ASP.NET Web API ?
CORS (Cross-Origin Resource Sharing) : cross-origin HTTP request occurs when it requests a resource from a different domain, protocol, or port than the one from which the current document originated.
In this application, our web API project will block request from angular application, since they are cross-origin HTTP request(from different port numbers – 4200 and 49243). In-order to allow cross-origin HTTP request, we have to configure Web API project for this localhost:4200 request. so let’s look how we can do that.
How to enable CORS in ASP.NET Web API Project
- To enable CORS in ASP.NET Web API Project add the below package in ASP.NET Web API application. To add this package you can select the project then on Nuget package search CORS and install this.

Also you can install this package using Nuget package manager console using below command
Install-Package Microsoft.AspNet.WebApi.Cors -Version 5.2.3
Then to enable the CORS add the below code inside WebApiConfig.cs file, present in App_start folder.
public static class WebApiConfig
    {
        public static void Register(HttpConfiguration config)
        {
            // Web API routes
            config.MapHttpAttributeRoutes();
            var cors = new EnableCorsAttribute("*", "*", "*");
            //origins,headers,methods
            config.EnableCors(cors);
        }
    }
Now the ASP.NET Web API project project is complete, let’s create an Angular 10 application and consume the Web API inside the angular application.
Create Angular 10 Application
To create angular application we use Visual studio code editor. You can choose any editor using Angular CLI.
Creating new angular application
To create the Angular application with name NgCustomerCRUD and install default packages from npm, you can use following command.
ng new NgCustomerCRUD
Add Required Angular CRUD Components
Add the below CRUD Components using below command.
# from root component
   ng g c customers
# switch to parent component directory
   cd src\app\customers
# create child components
   ng g c customer
   ng g c customer-list
we creates customers component, remaining two components will be child components for this customers component. following command creates child components customer and customer-list components.Open appmodule.ts file, Make sure that newly added components are added to declarations array.
import { CustomersComponent } from './customers/customers.component';
import { CustomerComponent } from './customers/customer/customer.component';
import { CustomerListComponent } from './customers/customer-list/customer-list.component';
import { ToastrModule } from 'ngx-toastr';
import { BrowserAnimationsModule } from '@angular/platform-browser/animations';
@NgModule({
  declarations: [
    AppComponent,
    CustomersComponent,
    CustomerComponent,
    CustomerListComponent
  ],
  imports: [
    BrowserModule,
    AppRoutingModule,
    FormsModule,
    HttpClientModule,
    BrowserAnimationsModule,
    ToastrModule.forRoot()
  ],
Angular 10 Project Structure
The below are the project structure of Angular application of the Customer CRUD application. On the below we use
- On the src/app folder we create the root component name as “Customers” along with html and css files.
- Then add the customer form component inside the Customers folder.
- Then add the customer-list component to view the customer data and in their we should create the Edit & Delete.
- Under the shared folder we add the service class name as “customer.service.ts” to call the Web API and a model class is create name as “customer.model.ts” that hold the customer object.
- And, finally add all the components info into the app.model.ts file and add the CDN file for style or you can install these file manually and add it into angular.json file.
● src
+---● app
|   +--● customers (the root component)
|   |  |--customers.component.ts|.html|.css
|   |  +--● customer (customer form)
|   |  |  |--customer.component.ts|.html|.css
|   |  |
|   |  +--● customer-list (list inserted customers)
|   |  |  |--customer-list.component.ts|.html|.css
|   |  |
|   |  +--● shared
|   |     |--customer.service.ts
|   |     |--customer.model.ts
|   |
|   |--app.module.ts
|
+---● environments
|   |--environment.ts
|
|--index.html (cdn path for bootstrap and font awesome icon)
Create Service and Model Class
To create these classes let’s add a new folder shared, inside customers folder (/src/app/customers/ ).
Now create customer model class
# switch to shared folder
cd src\app\customers\shared
# create customer model class
ng g class customer --type=model
# create customer service class
ng g s customer
Let’s create the customer model class with following properties. CustId is the property that hold each record individually.
export class Customer {
    CustId:number;
    Name:string;
    Address:string;
    Mobile:string;
    Email:string;
}
Create Service Class to consume ASP.NET Web API, the service name is customer.service.ts
import { Injectable } from '@angular/core';
import { HttpClient } from '@angular/common/http';
import { Observable, of, Subject } from 'rxjs';
import { Customer } from './customer.model';
const baseURL = 'http://localhost:49243/api/Customers';
@Injectable({
  providedIn: 'root'
})
export class CustomerService {
  selectedCustomer : Customer;
  CustomerList : Observable<Customer[]>;
  constructor(private httpClient: HttpClient) {
   }
  getCustomerList(): Observable<Customer[]> {
    this.CustomerList=this.httpClient.get<Customer[]>(baseURL);
    return this.CustomerList;
  }
  getCustomerById(id): Observable<any> {
    return this.httpClient.get(`${baseURL}/${id}`);
  }
  addCustomer(data): Observable<any> {
    return this.httpClient.post(baseURL, data);
  }
  updateCustomer(id, data): Observable<any> {
    return this.httpClient.put(`${baseURL}/${id}`, data);
  }
  deleteCustomer(id): Observable<any> {
    return this.httpClient.delete(`${baseURL}/${id}`);
  }
  deleteAllCustomer(): Observable<any> {
    return this.httpClient.delete(baseURL);
  }
  searchByCustomer(name): Observable<any> {
    return this.httpClient.get(`${baseURL}?name=${name}`);
  }
}- In this service class we have imported http and rxjs related classes. http class is used to consume the Web API methods for Insert Update and Delete operations.
- The model class customer.model.ts is inject into service class.
- baseURL = ‘http://localhost:49243/api/Customers’ is the URL of ASP.NET Web API to consume the service.
- selectedCustomer is the variable that hold the customer model class.
- CustomerList is contains the Observable<Customer[]>.
- getCustomerList to fetch all the customer information and getCustomerById(id) fetch the customer information by Id.
- addCustomer and updateCustomer method service use for customer information add and update the data.
- deleteCustomer and searchByCustomer accordingly use to do the CRUD operation.
Design the CRUD Customer Template
We use bootstrap and font-Awesome Icons For Application Design. So first of all add CDN reference for these style sheets inside index.html. You can also add the package and use it.
  <!-- Bootstrap -->
<link rel="preload" href="https://maxcdn.bootstrapcdn.com/bootstrap/4.0.0-beta/css/bootstrap.min.css" data-rocket-async="style" as="style" onload="this.onload=null;this.rel='stylesheet'" integrity="sha384-/Y6pD6FV/Vv2HJnA6t+vslU6fwYXjCFtcEpHbNJ0lyAFsXTsjBbfaDjzALeQsN6M" crossorigin="anonymous">
<!-- font-awesome -->
<link rel="preload" href="https://maxcdn.bootstrapcdn.com/font-awesome/4.7.0/css/font-awesome.min.css" data-rocket-async="style" as="style" onload="this.onload=null;this.rel='stylesheet'">
Update add the selector <app-customers> app.component.html as follows
<div class="container">
  <app-customers></app-customers>
</div>
Add the following selector inside the customers.component.html file.
<nav class="navbar navbar-expand-lg navbar-light bg-light">
    <a class="navbar-brand" href="#">Customer Angular CRUD using ASP.NET Web API</a>
    <button class="navbar-toggler" type="button" data-toggle="collapse"
         data-target="#navbarNav" aria-controls="navbarNav" aria-expanded="false"
                    aria-label="Toggle navigation">
      <span class="navbar-toggler-icon"></span>
    </button>
  </nav>
  <div class="row mt-2">
    <div class="col-md-6">
      <app-customer></app-customer>
    </div>
    <div class="col-md-6">
      <app-customer-list></app-customer-list>
    </div>
  </div>
Angular CRUD Operations Form
we’ll create a customer form to implement Insert and Update Operation with customer Component. So we are going to create a Template Driven Form(TDF) using selectedCustomer property from injected CustomerService Class.
Insert Update and Reset Operation
Let’s discuss how to add the customer component with TS file and html.
customer.component.html
<form class="cust-form" #customerForm="ngForm" (ngSubmit)="onSubmit(customerForm)">
    <input type="hidden" name="CustId" #CustId="ngModel" [(ngModel)]="custservice.selectedCustomer.CustId">

      <div class="form-group  col-md-8">
        <input class="form-control" name="Name" #Name="ngModel" [(ngModel)]="custservice.selectedCustomer.Name"
          placeholder=" Name" required>
        <div class="validation-error" *ngIf="Name.invalid && Name.touched" style="color: red;">This Field is Required.</div>
      </div>

    <div class="form-group col-md-8">
      <input class="form-control" name="Address" #Address="ngModel" [(ngModel)]="custservice.selectedCustomer.Address" placeholder="Address"
        required>
      <div class="validation-error" *ngIf="Address.invalid && Address.touched" style="color: red;">This Field is Required.</div>
    </div>
    <div class="form-group col-md-8">
      <input class="form-control" name="Mobile" #Mobile="ngModel" [(ngModel)]="custservice.selectedCustomer.Mobile"
         placeholder="Mobile" required>
      <div class="validation-error" *ngIf="Mobile.invalid && Mobile.touched" style="color: red;">This Field is Required.</div>
    </div>

      <div class="form-group col-md-8">
        <input class="form-control" name="Email" #Email="ngModel" [(ngModel)]="custservice.selectedCustomer.Email"
         placeholder="Email" required>
        <div class="validation-error" *ngIf="Email.invalid && Email.touched" style="color: red;">This Field is Required.</div>
      </div>
      <div class="row ml-1">
      <div class="form-group col-md-4">
        <button [disabled]="!customerForm.valid" type="submit" class="btn btn-lg btn-block btn-primary">
          <i class="fa fa-floppy-o"></i> Submit</button>
      </div>
      <div class="form-group col-md-4">
        <button type="button" class="btn btn-lg btn-block btn-default" (click)="resetForm(customerForm)">
          <i class="fa fa-repeat"></i> Reset</button>
      </div>
    </div>
</form>- A hidden field is added for CustId property.
- custservice.selectedCustomer is to add the field like Name, Address, Email and Mobile.
- required attribute is added to Name and Address, Email and Mobile text boxes, so these two fields are mandatory to submit this form. When these text-boxes are invalid, ng-invalid and ng-dirty class will automatically added to it. so based on these classes we have implemented form validation. When these text boxes are not valid, customer form as whole is not valid, so we added conditional disable attribute to Submit Button.
when these text boxes are not valid, customer form as whole is not valid, so we added conditional disable attribute to Submit Button.
<button [disabled]="!customerForm.valid" type="submit" class="btn btn-lg btn-block btn-primary">
          <i class="fa fa-floppy-o"></i> Submit</button>
customer.component.ts
import { Component, OnInit } from '@angular/core';
import { NgForm } from '@angular/forms'
import { CustomerService } from '../shared/customer.service'
import { ToastrService } from 'ngx-toastr'
@Component({
  selector: 'app-customer',
  templateUrl: './customer.component.html',
  styleUrls: ['./customer.component.css']

})
export class CustomerComponent implements OnInit {
  custIdUpdate = null;
  constructor(public custservice: CustomerService, private toastr: ToastrService) {

  }
  ngOnInit(): void {
    this.resetForm();
  }
  resetForm(form?: NgForm) {
    if (form != null)
      form.reset();
    this.custservice.selectedCustomer = {
      CustId: 0,
      Name: '',
      Address: '',
      Mobile: '',
      Email: ''
    }
  }
  onSubmit(form: NgForm) {
    console.log(form.value.CustId);
    if(form.value.CustId==null)
    {
      form.value.CustId=0;
    }
    this.custservice.selectedCustomer.CustId=form.value.CustId
    if (this.custservice.selectedCustomer.CustId == 0) {
      this.custservice.addCustomer(form.value)
        .subscribe(data => {
          form.value.CustId=0;
          this.resetForm(form);
          this.custservice.getCustomerList();
          this.toastr.success('New Record Added Succcessfully', 'Customer Registration');
        })
    }
    else {
      console.log("hello");
      this.custservice.updateCustomer(form.value.CustId, form.value)
      .subscribe(data => {
        this.resetForm(form);
        this.custservice.getCustomerList();
        this.toastr.info('Record Updated Successfully!', 'Customer Registration');
      });
    }
  }
}- Inside customer.component.ts file we write code for Insert, Update and Delete Operation.
- Inject the CustomerService and ToastrService in the customer component.
- Then on Submit form add the customer form. If the customer Id is null then it insert the data using call the service method else it update the record.
- restForm function is used reset form controls value to initial stage, we called this function from reset button click event and from ngOnint Lifecycle Hook to initialize the form.
- Inside the form submit event function OnSubmit, we implement both insert and update operation based on CustomerID value. To show the success message, we use ToastrService class object toastr.
Install package ngx-toastr
Before that we are going to install ngx-toastr from npm package. This package helps us to show notification message inside angular applications.
To install ngx-toastr follow the below command.
npm install ngx-toastr --save
Then add ToastrModule inside appmodule.ts file.
import { ToastrModule } from 'ngx-toastr';
@NgModule({
  declarations: [
  ],
  imports: [
      ToastrModule.forRoot()
  ],
Then add toastr.css style-sheet reference in .angular-cli.json file.
"styles": [
"src/styles.css",
"node_modules/ngx-toastr/toastr.css"
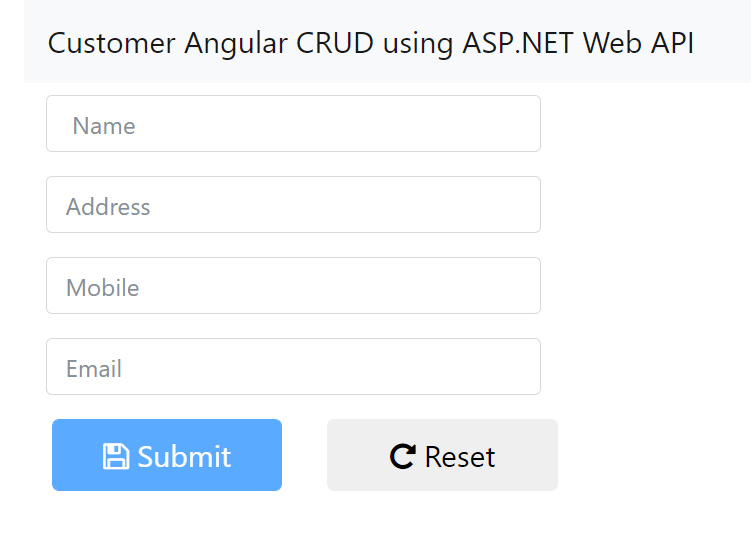
],Run application and you see the customer design form look like below. You can run the application using below command.
ng s --o
List Inserted Records and Delete Operation
Using customer-list component we add the list of all inserted customers and implement Delete operation. You can add following inside customer-list component.
customer-list.component.ts
import { Component, OnInit } from '@angular/core';
import { ToastrService } from 'ngx-toastr'
import { Customer } from '../shared/customer.model';
import { CustomerService } from '../shared/customer.service';
import { Observable, of, Subject } from 'rxjs';
@Component({
  selector: 'app-customer-list',
  templateUrl: './customer-list.component.html',
  styleUrls: ['./customer-list.component.css']
})
export class CustomerListComponent implements OnInit {
  allCustomers: Observable<Customer[]>;
  constructor(public custservice: CustomerService,
                       private toastr : ToastrService) { }
  ngOnInit() {
    this.loadAllCustomers();
  }
  loadAllCustomers() {
    this.allCustomers = this.custservice.getCustomerList();
  }
  getCustomerList() {
   this.custservice.getCustomerList();
  }
  showForEdit(cust: Customer) {
    this.custservice.selectedCustomer = Object.assign({}, cust);;
  }
  onDelete(id: number) {
    if (confirm('Are you sure to delete this record ?') == true) {
      this.custservice.deleteCustomer(id)
      .subscribe(x => {
        this.custservice.getCustomerList();
        this.toastr.warning("Deleted Successfully","Employee Register");
      })
    }
  }
}- Inside the customer-list.componenet.ts we have injected CustomerService and ToastrService Class.
- Inside the ngOnint Lifecycle hook, we called loadAllCustomers from CustomerService class. It will store customer collection from customer table inside customerList array. Now we can use this array to list customer collection.
customer-list.component.html
<table class="table table-sm table-hover">
    <tr *ngFor="let customer of custservice.CustomerList | async">
      <td>{{customer.Name}}</td>
      <td>{{customer.CustId}}</td>
      <td>
        <a class="btn" (click)="showForEdit(customer)">
          <i class="fa fa-pencil-square-o"></i>
        </a>
        <a class="btn text-danger" (click)="onDelete(customer.CustId)">
          <i class="fa fa-trash-o"></i>
        </a>
      </td>
    </tr>
</table>- On the above we iterate the customer list bind when submit the record.
- Also we use Edit and Delete operation with using method showForEdit() and onDelete()
Run the application again and the component design looks like this

- When we click on pencil button it will call showForEdit function to populate corresponding record inside the customer form.
- Using trash icon we implemented delete operation with onDelete function.
Final CRUD operation output
Let’s run the application and see the Final output of CRUD operation using Angular with ASP.NET Web API.
Conclusion
Leave behind your valuable queries and suggestions in the comment section below. Also, if you think this article helps you, do not forget to share this with your developer community. Happy Coding 🙂
Related Articles
- Step-by-Step Guide to Using Azure Redis Cache in ASP.NET Core 9 Web API
- Deploying Angular apps in Azure Blob Storage with CI/CD Integration 🚀
- Building a Chatbot in Angular using Gemini API
- Create a responsive sidebar with Angular Material- Angular 18 Example Series
- How to Deploy Angular 17/18 App in GitHub Pages
- .NET 8 Authentication with Identity in a Web API using Bearer Tokens and Cookies
- How to convert Text To Speech With Azure Cognitive Services using Angular and .Net Core
- CRUD operation using the repository pattern with .Net 8, Ef-Core, and MySQL
- Angular Interceptors- The Complete Guide
- How to use Response Compression in .NET Core
Jayant Tripathy
Coder, Blogger, YouTuberA passionate developer keep focus on learning and working on new technology.