
In this article, we will discuss How to Set up an Amazon CloudFront Distribution for Amazon S3 Bucket. Amazon Web Services (AWS) provides a powerful and scalable solution for hosting and distributing static information through its Simple Storage Service (S3) and CloudFront. This article walks you through configuring a CloudFront distribution for an S3 bucket, which improves the speed and security of content delivery to your consumers. Please read my previous article on How to send SMS using Amazon Simple Notification Services(SNS).
What is CloudFront?
- Amazon CloudFront is an AWS CDN service that caches content closer to users, increasing access speed.
- Works with origin servers such as S3 and EC2, distributing content to global edge servers.
- Delivers content faster by routing requests to the nearest Edge server, lowering latency.
- Supports streaming and progressive download, allowing for seamless video playback with caching benefits.
- The pay-as-you-go model is cost-effective for growing websites with large content distribution.
- High data transfer speeds and minimal latency improve performance while lowering costs.
Architecture Diagram
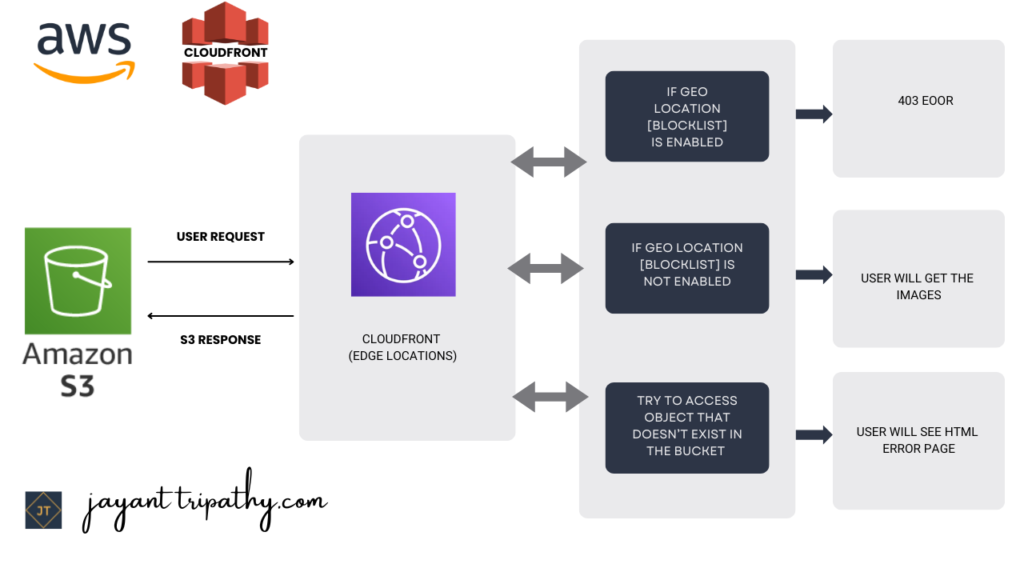
Here’s a simple architecture diagram outline for setting up an Amazon CloudFront Distribution for an Amazon S3 Bucket:
Architecture Components:
- User Requests Content → Sent to the nearest CloudFront Edge Location.
- CloudFront Edge Location → Checks if the content is cached; if not, it fetches from the origin (S3).
- Amazon S3 (Origin Server) → Stores the original content and serves it when requested.
- CloudFront Global Edge Network → Distributes cached content to users worldwide, reducing latency.
- Custom Domain & SSL (Optional) → Can be configured for secure content delivery.
Creating S3 Bucket and uploading image into the bucket
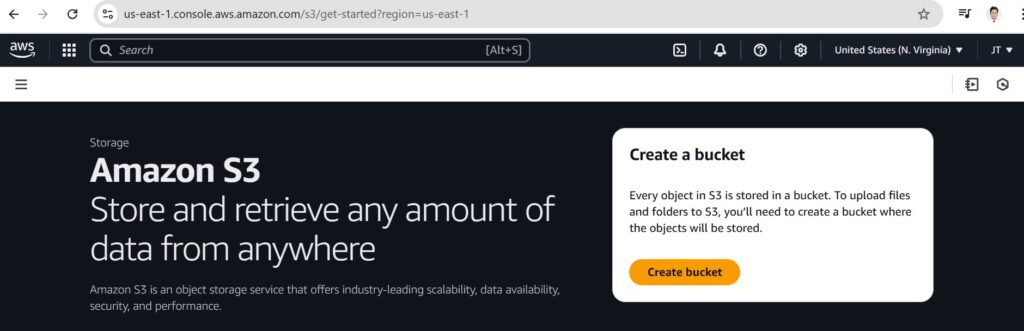
- Log in to your AWS Console, and we will create a new S3 bucket with a unique name that will enable ACLs and allow public access.
- Navigate to the Services menu at the top. Click on S3 in the Storage section.

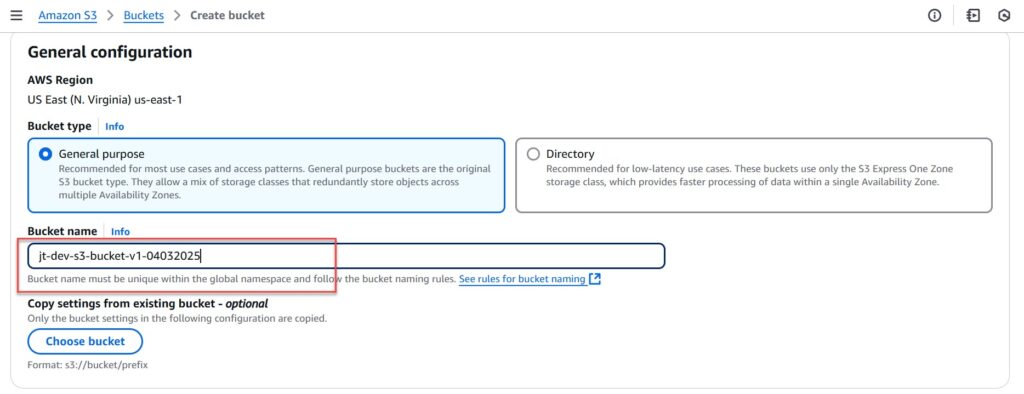
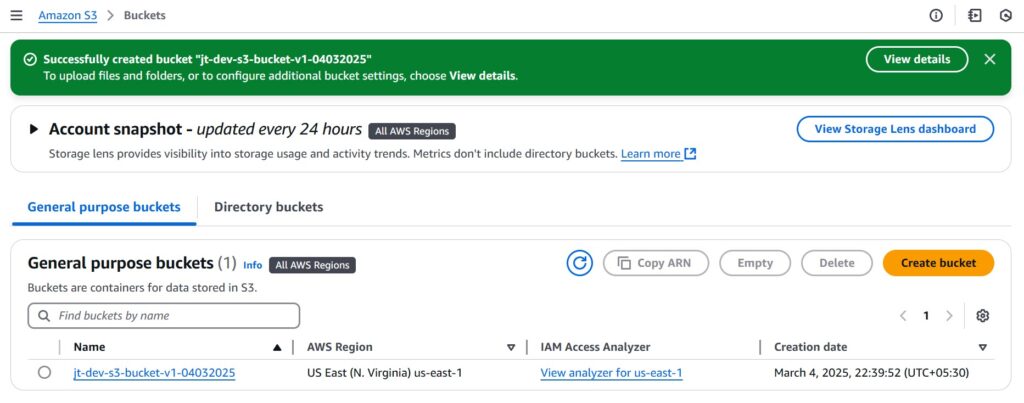
- In the S3 dashboard, select Create bucket and enter the bucket details.
- Bucket name: enter a globally unique name, I set bucket name as “
jt-dev-s3-bucket-v104032025“
- Object Ownership: Select the ACLs enabled option and Object Writer as the Object Owner.

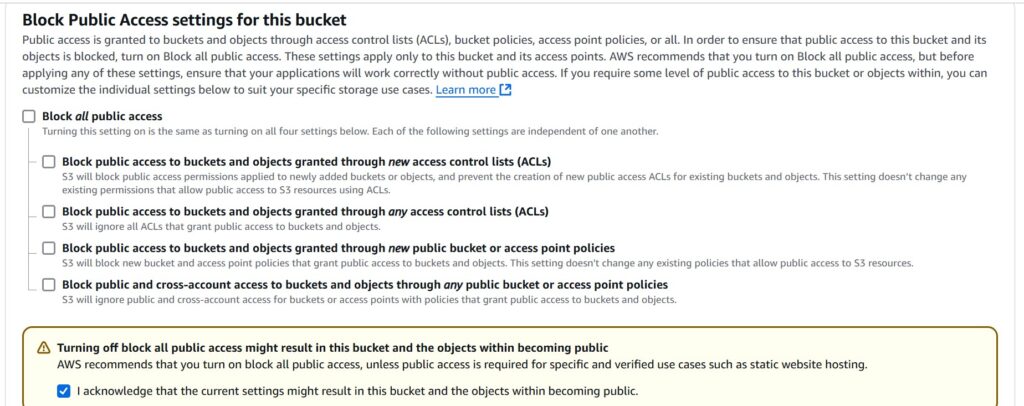
- Scroll down to this bucket’s Block Public Access options, uncheck the Block all Public Access option, and confirm the change.
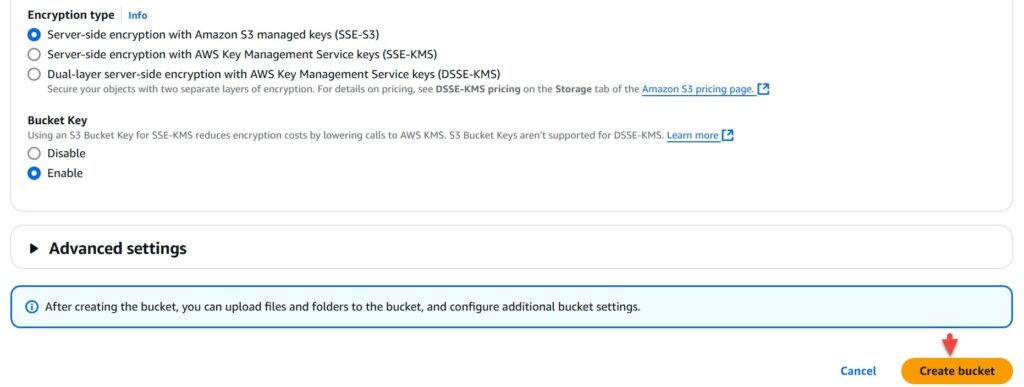
- There is no need to make any further changes; simply click the Create bucket button.
Upload a file to an S3 bucket
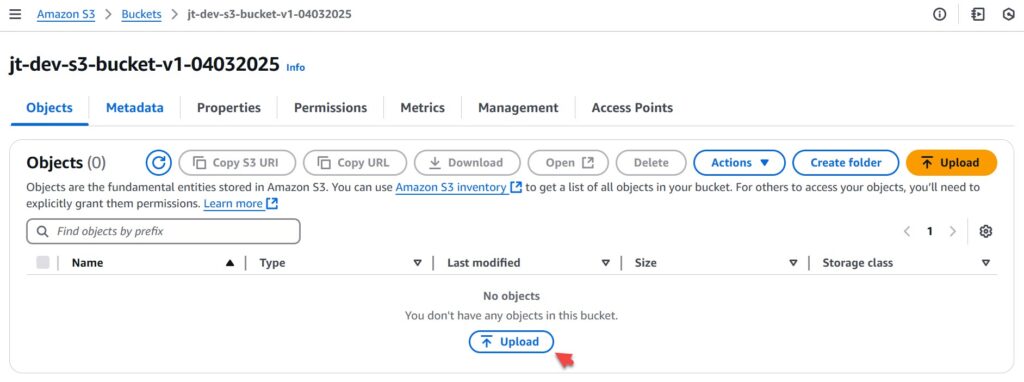
- Click on the bucket name link that we have created.
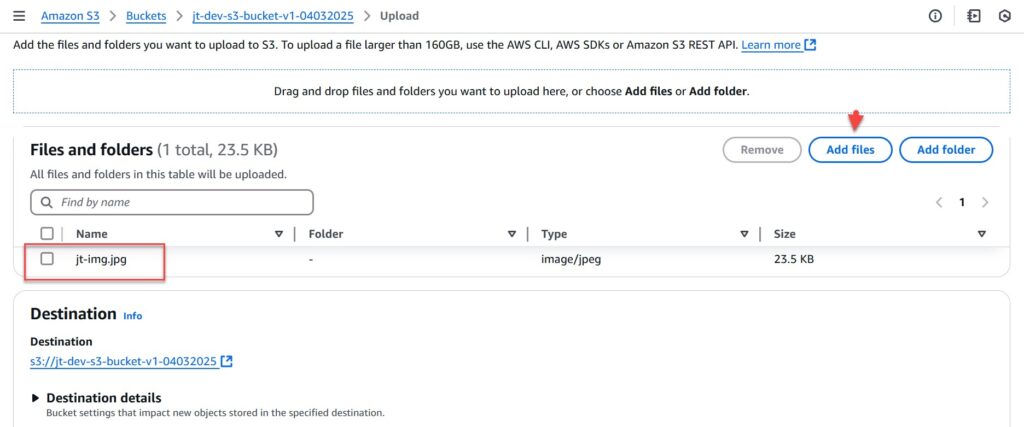
- When you click on the bucket name you just made, you’ll notice that no items have been created in it, click the uplaod button as per highlighted
- Click on “
Add files” and upload your chosen image for Browse for your local image.
- Click on the Upload button.
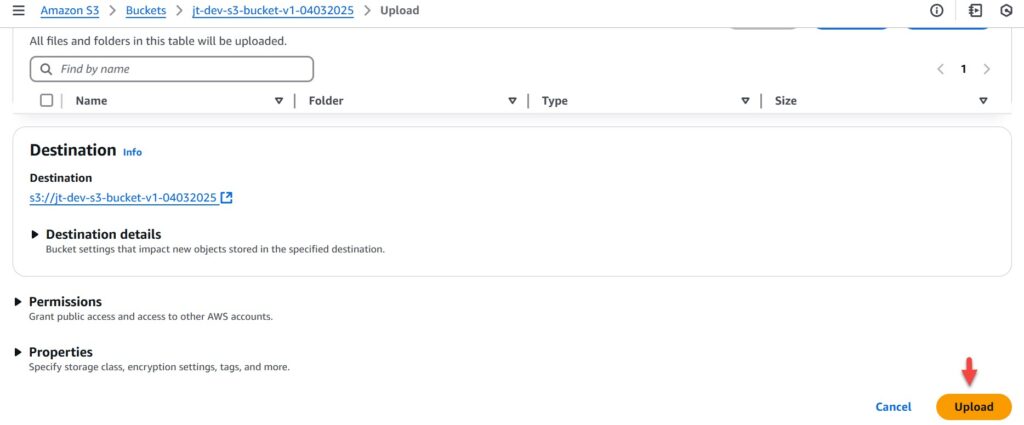
- You can track the upload’s progress from the transfer panel at the bottom of the screen. Once your file has been uploaded, click close to see an object in the bucket.

Creating Custom Error Pages
We’ll learn how to construct custom error pages for CloudFront. These pages will be displayed when an origin returns an HTTP 4xx or 5xx error. To accomplish this, we must store the error pages in a location that CloudFront can access. In this scenario, we’ll use the identical S3 bucket we created.
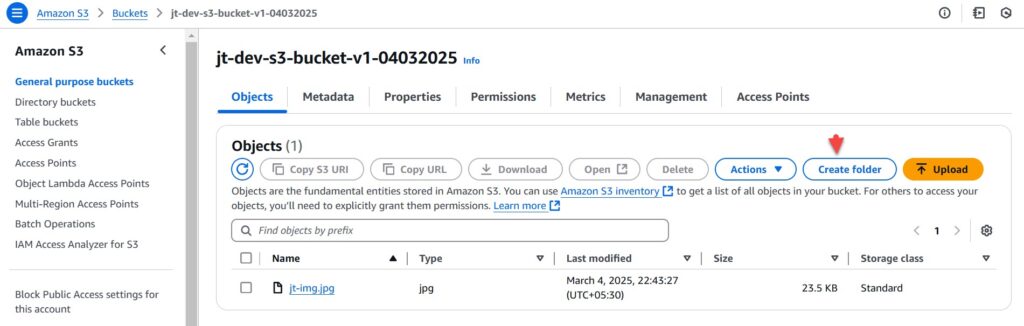
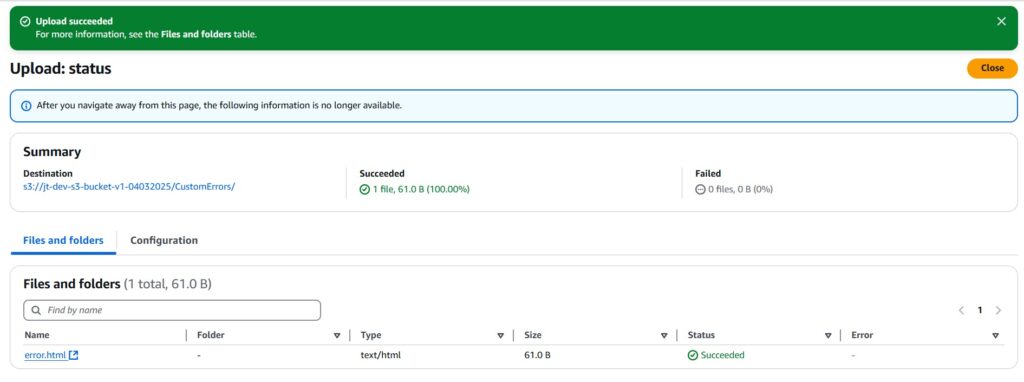
- To set up a custom error page, access the S3 bucket by clicking on it and then click on the button that says Create folder.
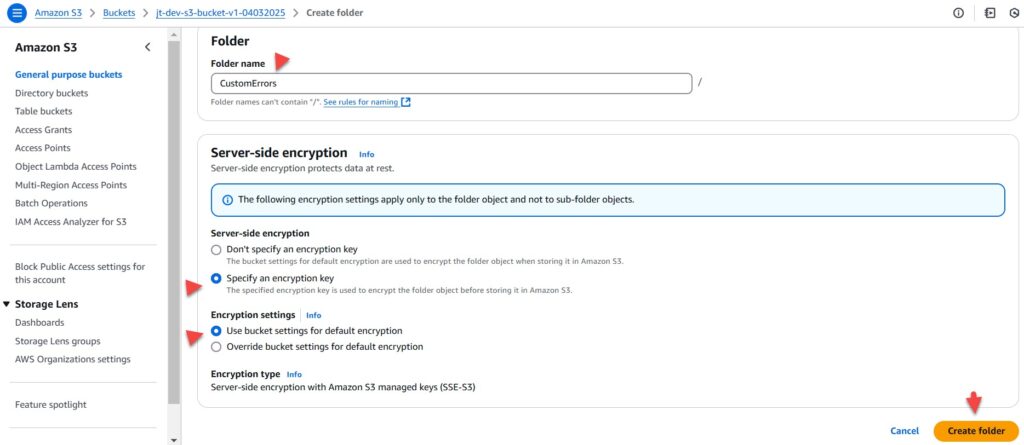
- Create a folder with the name CustomErrors, and select server-side encryption as Amazon S3-managed keys (SSE-S3). Click on the Create folder button.
- Create an
error.htmlfile and upload the file here like below, and then click on the upload button.
<html>
	<h1>
	   This is Custom Error Page
	</h1>
</html>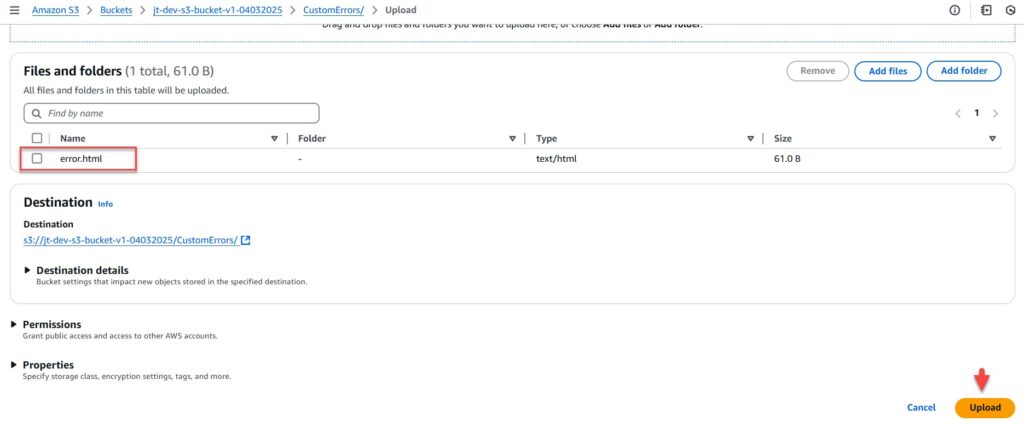
- Create a
blockfile.htmlfile and this custom HTML page will be used for showing geo-restrictions of your content in CloudFront.
<html><h1>This content is blocked in your location!!!</h1></html>
Making the objects public
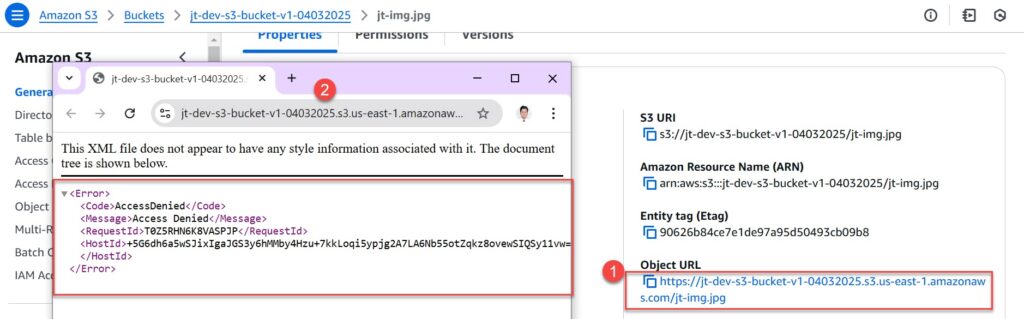
- Click on the image name. You can see the image details like Owner, size, link, etc.
- After uploading the image, we can see the URL and access it in a browser like this. We can see it goes to an Access Denied issue.
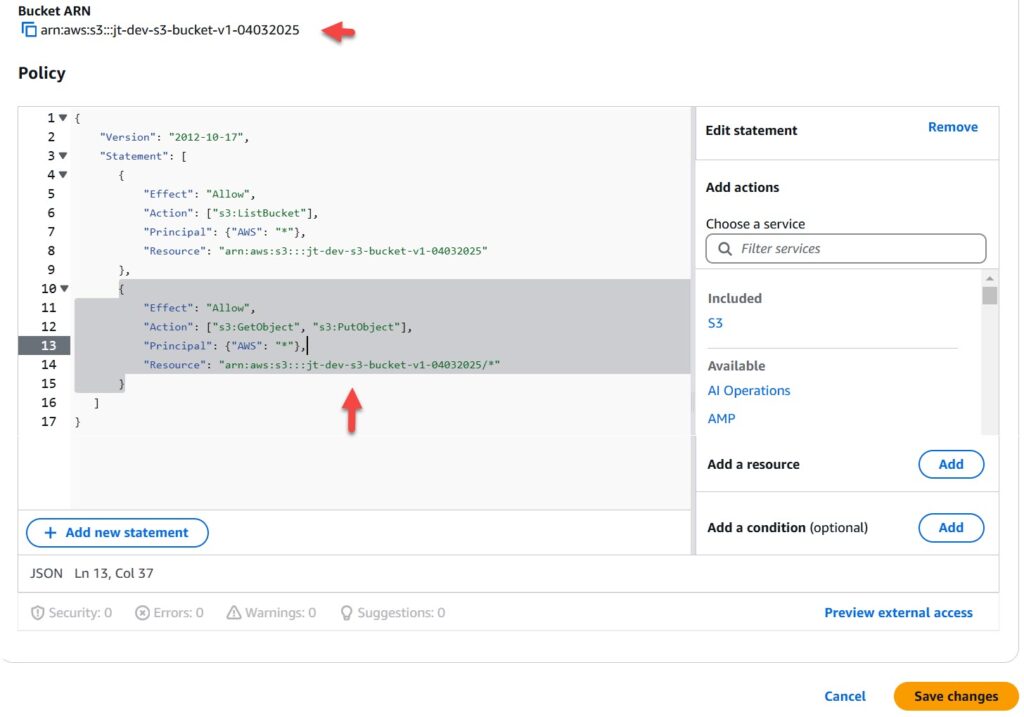
- Go back to the Bucket and click the Permissions tab. Scroll down to the Bucket Policy and click on the Edit button
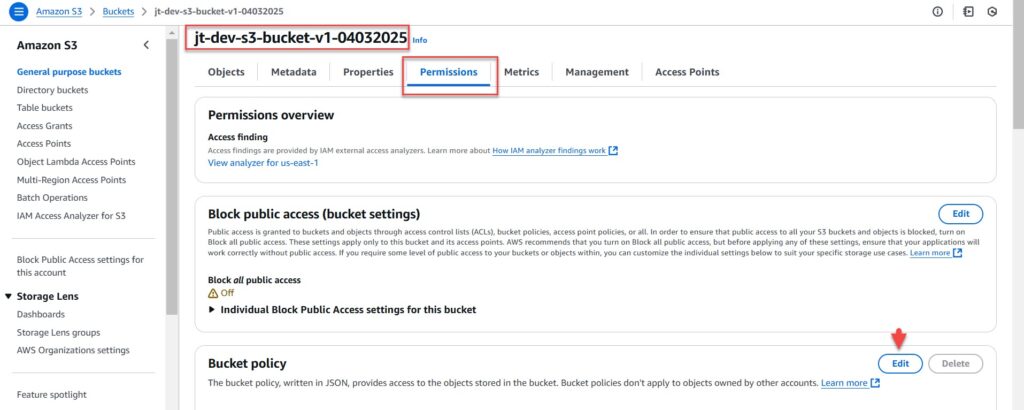
- Change the name of the bucket ARN with your bucket ARN in both the Resource option in the code and click on Save Changes.
{
   "Version": "2012-10-17",
   "Statement": [
       {
           "Effect": "Allow",
           "Action": ["s3:ListBucket"],
           "Principal": {"AWS": "*"},
           "Resource": "<YOUR_BUCKET_ARN>"
       },
       {
           "Effect": "Allow",
           "Action": ["s3:GetObject", "s3:PutObject"],
           "Principal": {"AWS": "*"},
           "Resource": "<YOUR_BUCKET_ARN>/*"
       }
   ]
}
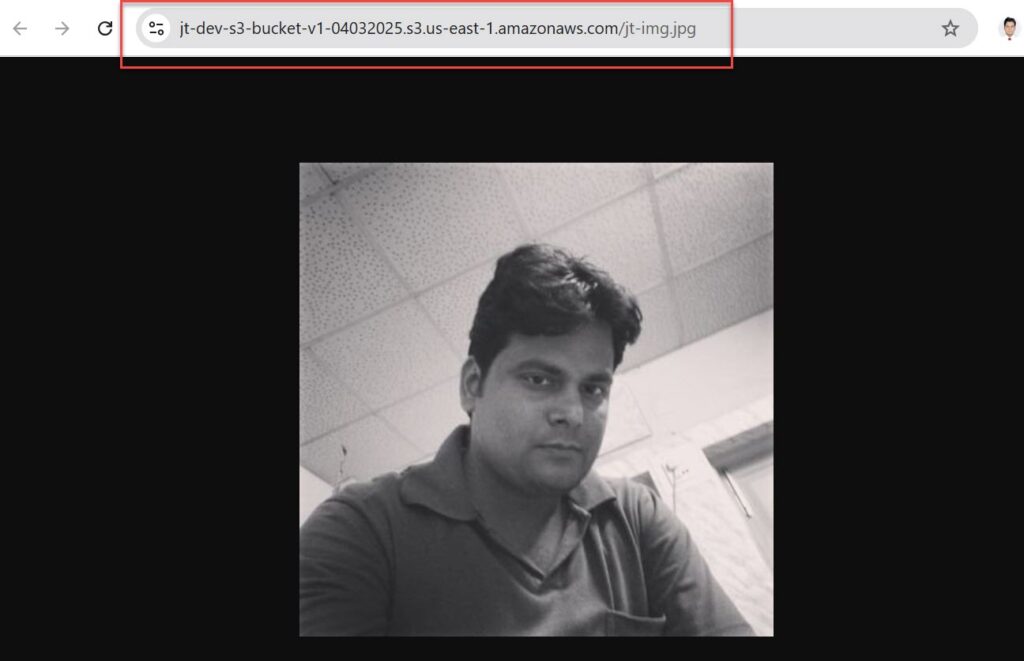
Now access the image like below, we can get the access image now.
Creating a CloudFront Distribution
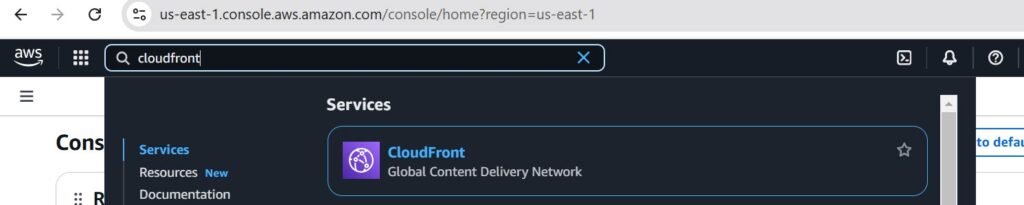
- Navigate to CloudFront by clicking on the Services menu at the top, then click on CloudFront in the Network and Content Delivery section.
- Click on Create a Cloudfront distribution.
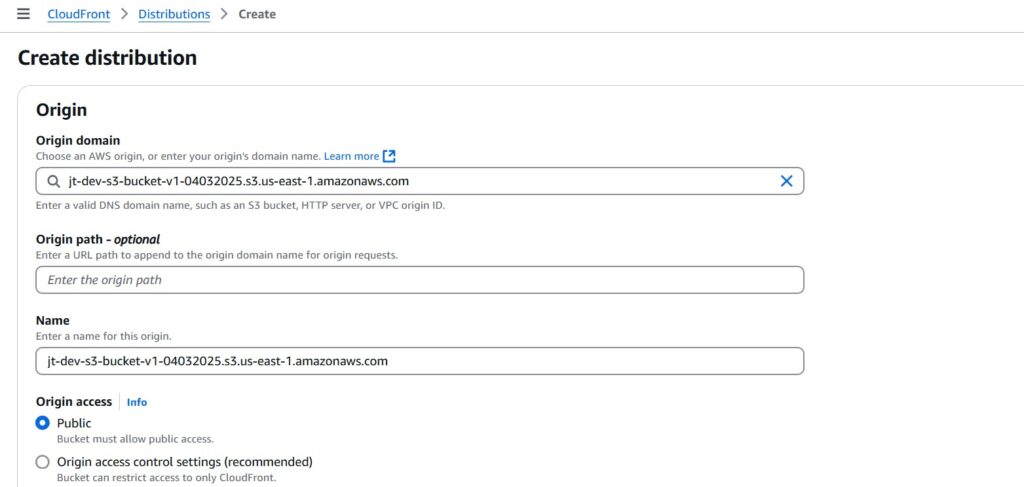
Now Configure distribution as follows:
- Origin Domain Name: On click of input space, Select S3 bucket.
- Choose Do not enable security protections under Web Application Firewall(WAF).
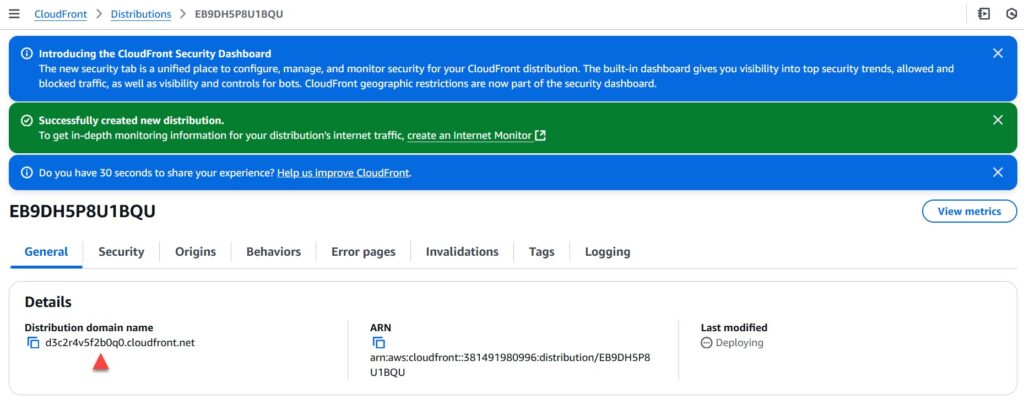
Leave everything as default, scroll down, and click on the Create distribution button, You can see that the CloudFront distribution is enabled successfully.

- The domain name that Amazon CloudFront assigns to your distribution appears in the list of distributions.
- Copy the highlight domain URL and access the image that we have uploaded into S3 bucket.
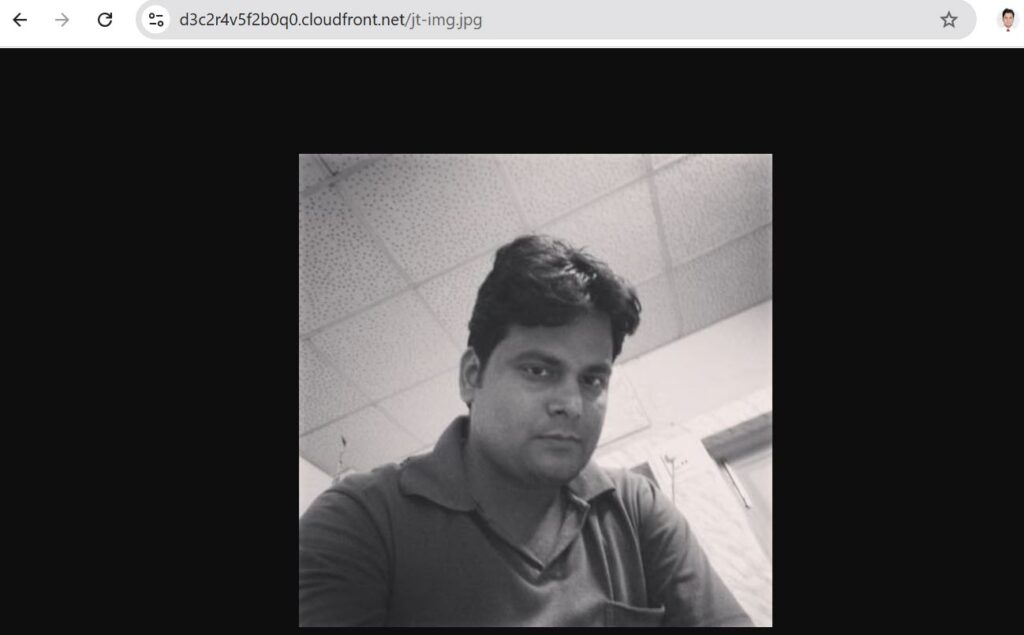
The CloudFront URL image loads as compared to the S3 URL. When end users request an object using a CloudFront domain name, they are automatically routed to the nearest edge location for high-performance delivery of your content.
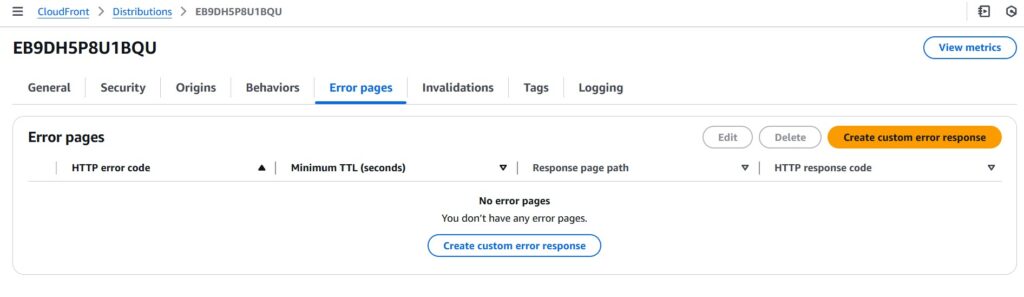
Configured Custom error Pages on CloudFront
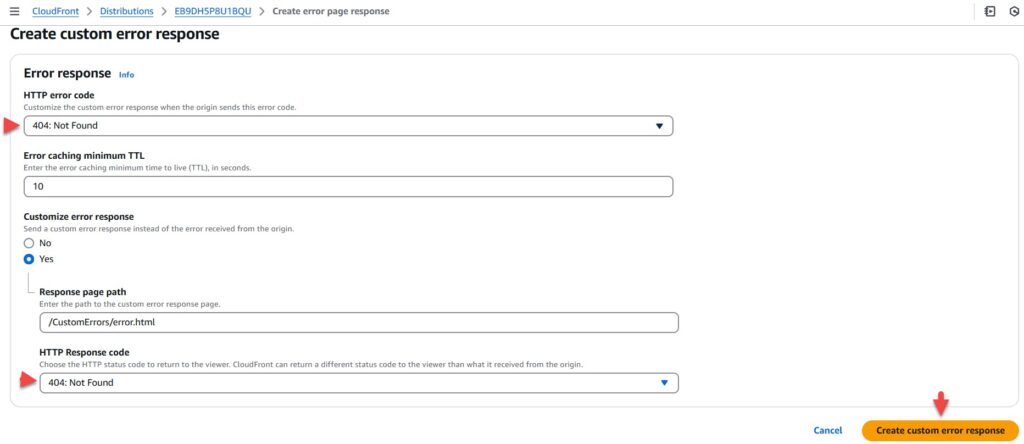
Navigate back to CloudFront Dashboard and select the distribution created. Select the Error pages tab, click on the Create custom error response button.
Now we need to set up our custom error page:
- HTTP Error Code: Select 404: Not Found, Error Caching Minimum TTL: Enter 10
- Customize Error Response: Select Yes
- Response Page Path: Enter
/CustomErrors/error.html - HTTP Response Code: Select 404: Not Found
- Click on Create custom error response button.
Navigate back to Distributions and wait for your distribution to complete, the state to change to Deploy.
Note: This process will take around 5–10 minutes.
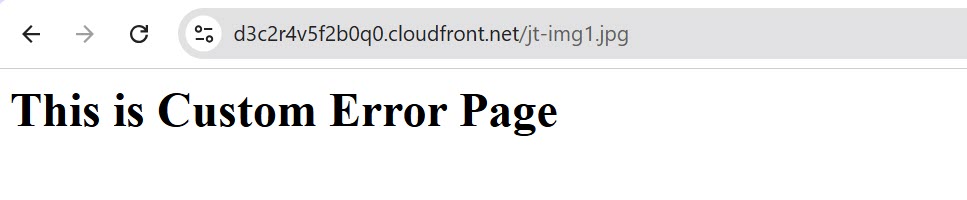
- Once the state has been changed to Deploy, we will test the error page. Enter the URL of an image that does not exist in your S3 bucket with the CloudFront domain name.
- In this case I have accessed
jt-img1.jpgfile that does not exist in the S3 bucket, so it causes the issue of 404.
Restricting the Geographic Distribution of Your Content
If you want to limit users in specific countries from viewing your material, you can use restrictions to create a whitelist (countries where they can) or a blacklist (countries where they cannot).
Go to your CloudFront Distributions and click on distribution list, and click on the security Tab
- On the distribution options page, select the Geographic locations tab and then click the Edit button.
- Click on the Block List and select the country name as India. Like I belong to India, so I want to block the content here.

- Navigate back to CloudFront Dashboard and select the distribution you have created.
- On the settings page, select the Error pages tab. Click on the Create custom error response button
- Now we need to set up our custom error page:
- Http Error Code: Select 403: Forbidden
- Error Caching Minimum TTL: Enter 10
- Customize Error Response: Select Yes
- Response Page Path: Enter /CustomErrors/block.html
- HTTP Response Code: Select 403: Forbidden
- Click on Create custom error response button.

Navigate back to Distributions and wait for your distribution to complete, the state to change to Deploy.
Note: This process will take around 5–10 minutes.
Once the state has been changed to Deploy, we will test the restriction through CloudFront in the browser. We can see that as I restricted to my location, it shows a custom error page.

Why do we use CloudFront Distribution with S3
You can access photos and other stuff directly through the S3 bucket URL, but CloudFront offers various advantages. Here’s why CloudFront is useful.
Faster Content Delivery (Low Latency):
- S3 serves content from a single AWS region, which may be far from consumers.
- CloudFront caches content in Edge Locations worldwide, lowering load times by serving from the closest location.
Reduced Data Transfer Costs:
- Direct S3 access: Charges are based on data moved out of the AWS area.
- CloudFront: AWS provides cheaper data transfer rates, particularly for delivering large-scale traffic.
Security & Access Control
- You can restrict S3 access and allow only CloudFront to serve content.
- Signed URLs & Signed Cookies: Allow access to private content only to authorized users.
DDoS Protection & Security
- CloudFront integrates with AWS Shield & WAF, offering built-in protection from attacks.
- Helps prevent direct S3 access exposure to the public.
Better Caching & Performance Optimization
- Supports cache policies to reduce repeated requests to S3.
- Optimizes media delivery with compression and format support.
Supports Custom Domains & SSL
- S3 URLs are long and not customizable (
s3.amazonaws.com/my-bucket/image.jpg). - CloudFront allows custom domains (CNAMEs) and SSL certificates for secure HTTPS access.
When Should You Use CloudFront Over Direct S3 Access?
✅ For public websites & apps: Faster delivery, lower costs, better security.
✅ For private content: Secure streaming, signed URLs, and authentication.
✅ For global audiences: Reduces latency by caching content closer to users.
❌ If S3 is used only for internal storage or occasional access, CloudFront may not be necessary.
Question and Answers regarding CloudFront
🔹 Q1: What is Amazon CloudFront?
CloudFront is a Content Delivery Network (CDN) that caches and delivers content (images, videos, websites) from Edge Locations closer to users, reducing latency and improving load times.
🔹 Q2: Why use CloudFront instead of accessing S3 directly?
Faster Load Times – Caches content globally for quicker access
Lower Data Transfer Costs – AWS charges lower rates for CloudFront compared to direct S3 requests
Security – Prevents direct access to S3, supports Signed URLs & WAF (Web Application Firewall)
Custom Domains & HTTPS – Enables secure HTTPS connections with your domain
🔹 Q3: How does CloudFront work with S3?
CloudFront acts as a middle layer between users and S3.
When a user requests content, CloudFront checks if it’s cached at an Edge Location.
If cached, it serves content instantly. If not cached, it fetches from S3 and stores it for future requests.
🔹 Q4: What is an Edge Location?
Edge Locations are globally distributed data centers where CloudFront caches content to serve users faster.
🔹 Q5: Can I use CloudFront with dynamic websites?
Yes! CloudFront can cache static assets (images, videos, CSS) and also accelerate dynamic content using dynamic site acceleration.
🔹 Q6: How do I restrict direct access to my S3 bucket when using CloudFront?
To ensure users can only access S3 through CloudFront:
Block all public access to the S3 bucket.
Use an S3 Bucket Policy that allows access only from CloudFront.
Enable OAI (Origin Access Identity) to restrict access to S3.
🔹 Q7: What are the pricing differences between S3 and CloudFront?
S3 charges for storage and data transfer.
CloudFront charges for data transfer from Edge Locations and requests.
CloudFront reduces S3 costs by caching frequently accessed content.
FAQ’s on CloudFront and S3 bucket
S3 vs. CloudFront
| Feature | Amazon S3 | Amazon CloudFront |
|---|---|---|
| Purpose | Object storage | Content delivery (CDN) |
| Access Speed | Slower, serves from a single AWS region | Faster, serves from nearest Edge Location |
| Latency | Higher if far from the region | Lower due to caching |
| Security | IAM roles, bucket policies, ACLs | WAF, signed URLs, OAI |
| Cost | Pay for storage & transfer | Pay for requests & edge data transfer |
| Supports Custom Domain & HTTPS | No | Yes |
| Best For | Storing large data (images, videos, backups) | Speeding up website & app content delivery |
Final Thought: Do I Need CloudFront if I Already Have S3?
- Use S3 alone if you only need basic storage and access.
- Use CloudFront with S3 if you want faster performance, lower latency, better security, and lower costs for global content delivery.
Conclusion
In this article, we discussed How to set up an Amazon CloudFront Distribution for Amazon S3 Bucket. Amazon Web Services (AWS) provides a powerful and scalable solution for hosting and distributing static information through its Simple Storage Service (S3) and CloudFront. We discussed bit by bit about why we should use CloudFront over S3 an dmany more..
Leave behind your valuable queries and suggestions in the comment section below. Also, if you think this article helps you, do not forget to share this with your developer community. Happy Coding 🙂
Latest Articles
- How to Set up an Amazon CloudFront Distribution for Amazon S3 Bucket 🚀
- How to install and configure AWS Toolkit for VS Code
- How to send SMS using Amazon Simple Notification Services(SNS)
- Send Emails from ASP.NET Core using Amazon SES
- How to Deploy Blazor WebAssembly to AWS Amplify
- How to host Angular app on AWS S3 bucket using CloudFront
- Building Serverless ASP.NET Core Web API with AWS Lambda using Function URLs
- Setting Up the AWS Toolkit for Visual Studio
- Create An Amazon AWS Free Tier Account
SUPPORT ME