
In this article we will learn about Authentication and Authorization In ASP.NET Core with JWT Token. Here we discuss how to Authenticate and Authorize the API using JWT token. Please read my previous article Microservices Architecture in ASP.NET Core-6.
JSON Web Token (JWT) is an open standard (RFC 7519) that defines a compact and self-contained way for securely transmitting information between parties as a JSON object. This information can be verified and trusted because it is digitally signed.
What is the JWT WEB TOKEN?
- Open Standard: Means anywhere, anytime, and anyone can use JWT.
- Secure data transfer between any two bodies, any two users, any two servers.
- It is digitally signed: Information is verified and trusted.
- There is no alteration of data.
- Compact: because JWT can be sent via URL, post request & HTTP header.
- Fast transmission makes JWT more usable.
- Self Contained: because JWT itself holds user information.
- It avoids querying the database more than once after a user is logged in and has been verified.
JWT is useful for
- Authentication
- Secure data transfer
JWT Token Structure
A JWT token contains a Header, a Payload, and a Signature.
Creating ASP.Net Core Web API 6.0 Application
- Create an ASP.Net Core Web API application using .Net 6.0
- Add the below packages using Nuget, Open the Nuget package manager and install the below packages.
Microsoft.AspNetCore.Authentication.JwtBearer
Microsoft.IdentityModel.Tokens
System.IdentityModel.Tokens.Jwt
Swashbuckle.AspNetCore
Get the Launch URL
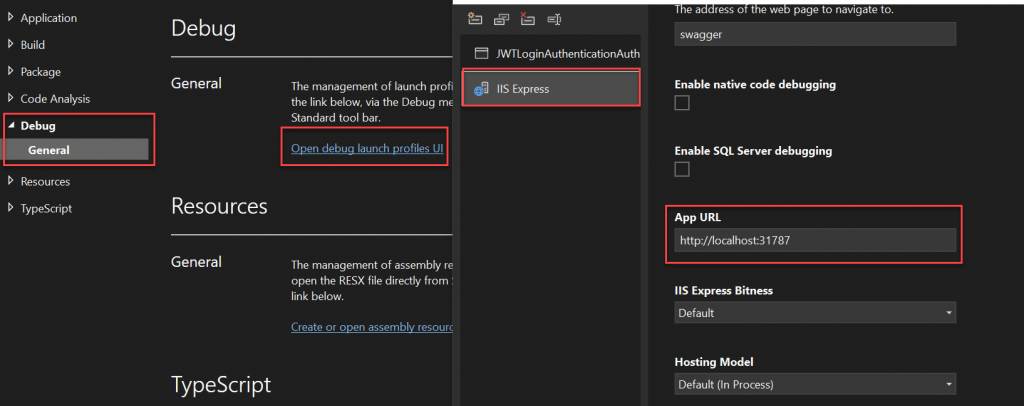
To get the launch URL path following below steps. Also you can find the same URL in launchsettings.json.
  "iisSettings": {
    "windowsAuthentication": false,
    "anonymousAuthentication": true,
    "iisExpress": {
      "applicationUrl": "http://localhost:31787",
      "sslPort": 44342
    }
  },
  "profiles": {
    "JWTLoginAuthenticationAuthorization": {
      "commandName": "Project",
      "dotnetRunMessages": true,
      "launchBrowser": true,
      "launchUrl": "swagger",
      "applicationUrl": "https://localhost:7128;http://localhost:5128",
      "environmentVariables": {
        "ASPNETCORE_ENVIRONMENT": "Development"
      }
},- Right click on project and expand Debug-> General.
- Click on Open dialog launch, Select IIS Express and here we can find App URL.
Adding the JWT Token information in Appsettings.json
- The audience claim in a JWT is meant to refer to the Resource Servers that should accept the token.
- Issuer: Who created the token. This can be verified by using the well-known openid configuration endpoint and the public keys that are listed there.
"Jwt": {
    "Key": "9xFRJkBVDjGZrg6Tkieq", //Generate random String from https://www.random.org/strings
    "Issuer": "https://localhost:31787", //App URL (We discussed above how we can get this URL)
    "Audience": "https://localhost:31787"
  }
Creating the Models
UserModel
 public class UserModel
    {
        public string Username { get; set; }
        public string Password { get; set; }
        public string Role { get; set; }
    }
UserLogin
public class UserLogin
    {
        public string Username { get; set; }
        public string Password { get; set; }
    }
UserConstants
- Here we have added two users that contains the user credentials with their roles.
public class UserConstants
    {
        public static List<UserModel> Users = new()
            {
                    new UserModel(){ Username="jayant",Password="J@321$",Role="Admin"},
                    new UserModel(){ Username="dev",Password="J@321$",Role="EndUser"},
            };
    }
JWT token Register for Authentication in Program.cs
- Line no. 15-28, here we registered the JWT token validation parameters considering the Issuer, Audience and key.
- Line no. 40-41, we registered authentication and authorization validation middleware to activate Auth mechnaisim.
using Microsoft.AspNetCore.Authentication.JwtBearer;
using Microsoft.IdentityModel.Tokens;
using System.Text;

var builder = WebApplication.CreateBuilder(args);

// Add services to the container.

builder.Services.AddControllers();
// Learn more about configuring Swagger/OpenAPI at https://aka.ms/aspnetcore/swashbuckle
builder.Services.AddEndpointsApiExplorer();
builder.Services.AddSwaggerGen();

//JWT Authentication
builder.Services.AddAuthentication(JwtBearerDefaults.AuthenticationScheme)
        .AddJwtBearer(options =>
        {
            options.TokenValidationParameters = new TokenValidationParameters
            {
                ValidateIssuer = true,
                ValidateAudience = true,
                ValidateLifetime = true,
                ValidateIssuerSigningKey = true,
                ValidIssuer = builder.Configuration["Jwt:Issuer"],
                ValidAudience = builder.Configuration["Jwt:Audience"],
                IssuerSigningKey = new SymmetricSecurityKey(Encoding.UTF8.GetBytes(builder.Configuration["Jwt:Key"]))
            };
        });

var app = builder.Build();

// Configure the HTTP request pipeline.
if (app.Environment.IsDevelopment())
{
    app.UseSwagger();
    app.UseSwaggerUI();
}

app.UseHttpsRedirection();
app.UseAuthentication();
app.UseAuthorization();
app.MapControllers();
app.Run();
Creating Authenticate user and generate token
Let’s create an API Controller that create the token and it authenticate the user.
- Line no. 28-44, generate the token by passing the user credentials.
- Here creates one Post Action method for Login and two methods for Authenticating the user credentials and Generate the token (if user is authenticated).
namespace JWTLoginAuthenticationAuthorization.Controllers
{
    [Route("api/[controller]")]
    [ApiController]
    public class LoginController : ControllerBase
    {
        private readonly IConfiguration _config;
        public LoginController(IConfiguration config)
        {
            _config = config;
        }

        [AllowAnonymous]
        [HttpPost]
        public ActionResult Login([FromBody] UserLogin userLogin)
        {
            var user = Authenticate(userLogin);
            if (user != null)
            {
                var token = GenerateToken(user);
                return Ok(token);
            }

            return NotFound("user not found");
        }

        // To generate token
        private string GenerateToken(UserModel user)
        {
            var securityKey = new SymmetricSecurityKey(Encoding.UTF8.GetBytes(_config["Jwt:Key"]));
            var credentials = new SigningCredentials(securityKey, SecurityAlgorithms.HmacSha256);
            var claims = new[]
            {
                new Claim(ClaimTypes.NameIdentifier,user.Username),
                new Claim(ClaimTypes.Role,user.Role)
            };
            var token = new JwtSecurityToken(_config["Jwt:Issuer"],
                _config["Jwt:Audience"],
                claims,
                expires: DateTime.Now.AddMinutes(15),
                signingCredentials: credentials);


            return new JwtSecurityTokenHandler().WriteToken(token);

        }

        //To authenticate user
        private UserModel Authenticate(UserLogin userLogin)
        {
            var currentUser = UserConstants.Users.FirstOrDefault(x => x.Username.ToLower() ==
                userLogin.Username.ToLower() && x.Password == userLogin.Password);
            if (currentUser != null)
            {
                return currentUser;
            }
            return null;
        }
    }
}
Creating Authorize Controller to manage user roles
- Here we have created two action methods with passing Authorize attributes according to their roles.
namespace JWTLoginAuthenticationAuthorization.Controllers
{
    [Route("api/[controller]")]
    [ApiController]
    public class UserController : ControllerBase
    {
        //For admin Only
        [HttpGet]
        [Route("getAdminUser")]
        [Authorize(Roles = "Admin")]
        public IActionResult AdminEndPoint()
        {
            var currentUser = GetCurrentUser();
            return Ok($"Hi you are an {currentUser.Role}");
        }
        //For EndUser Only
        [HttpGet]
        [Route("getEndUser")]
        [Authorize(Roles = "EndUser")]
        public IActionResult UserEndPoint()
        {
            var currentUser = GetCurrentUser();
            return Ok($"Hi you are an {currentUser.Role}");
        }
        private UserModel GetCurrentUser()
        {
            var identity = HttpContext.User.Identity as ClaimsIdentity;
            if (identity != null)
            {
                var userClaims = identity.Claims;
                return new UserModel
                {
                    Username = userClaims.FirstOrDefault(x => x.Type == ClaimTypes.NameIdentifier)?.Value,
                    Role = userClaims.FirstOrDefault(x => x.Type == ClaimTypes.Role)?.Value
                };
            }
            return null;

        }
    }
}
Test Authentication/Authorization mechanism using Postman
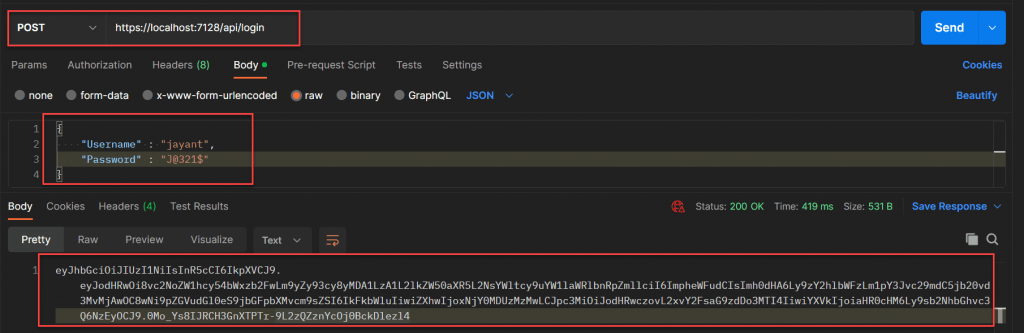
Open the postman tool and call the POST method by passing the user credentials of Admin like below then the user is authenticate and generate the token .
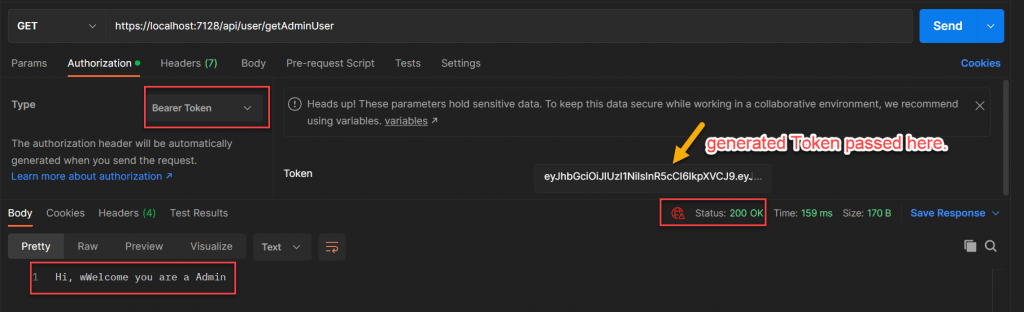
Validate Admin User
By passing the above generated token we validate the user controller. Like below you can see it passed the authorization to the admin user and return the result as 200 status ok.
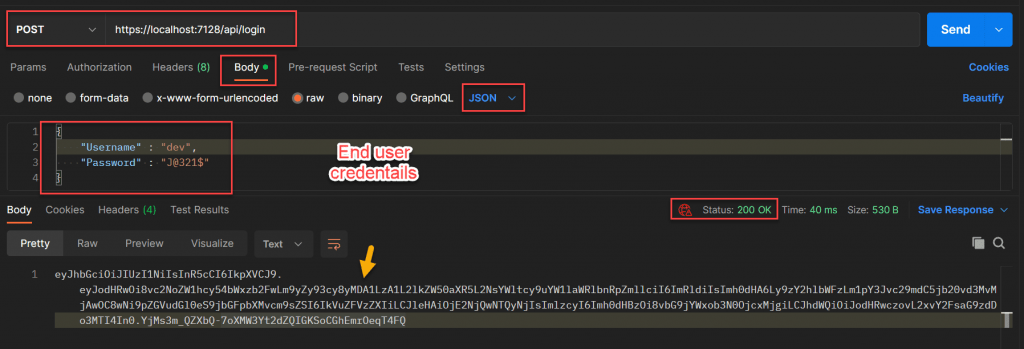
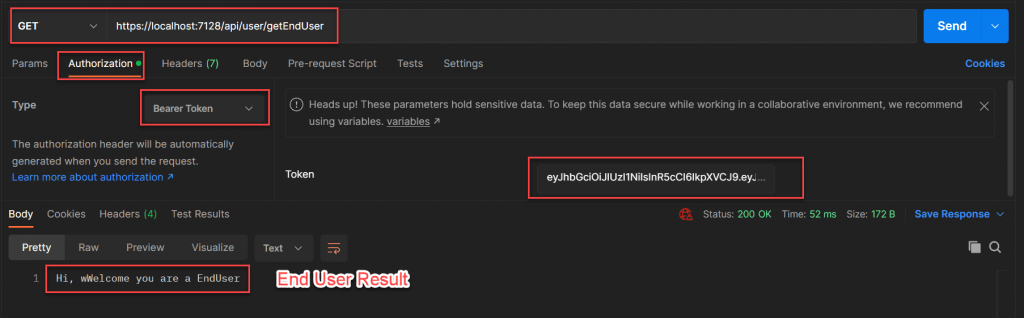
Validate End User
To validate end user we follow the same process by passing the end user credentials we should create the token and then by passing the token it authorize the end user.
That’s it.
Conclusion
So far we learned how to use Authentication and Authorization in ASP.NET Core with JWT Token and also see how we can test this in Postman.
Leave behind your valuable queries and suggestions in the comment section below. Also, if you think this article helps you, do not forget to share this with your developer community. Happy Coding 🙂
Related Articles
- Step-by-Step Guide to Using Azure Redis Cache in ASP.NET Core 9 Web API
- .NET 8 Authentication with Identity in a Web API using Bearer Tokens and Cookies
- How to convert Text To Speech With Azure Cognitive Services using Angular and .Net Core
- CRUD operation using the repository pattern with .Net 8, Ef-Core, and MySQL
- How to use Response Compression in .NET Core
Jayant Tripathy
Coder, Blogger, YouTuberA passionate developer keep focus on learning and working on new technology.