
In this article we are going to discuss how to use angular material in angular 9 application. Please read my previous article Material Dashboard in Angular. Here we create a sample angular 9 application and there we use material design. We have create some controls of materiel theme in this example.
Create Angular Project
The below command is use if are freshly start the angular and install updated angular CLI version.
npm install -g @angular/cli@
To create a new project add the below command with Routing as YES and style as CSS. ng-material-design here our project name, you can create a project according to your choice.
ng new ng-material-design
Add the material design into angular
Using below command we can add the material design into angular 9 application.
ng add @angular/material
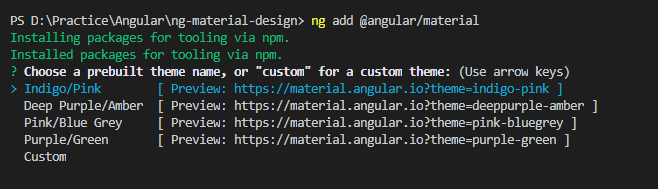
On the above image while we run the command it prompt that which material theme want to install. In our case we use “Indigo/Pink”. You can install any other theme according to your choice just navigate to the themes.

On the above image you can see after installing the “Indigo/pink” theme the material package also added into package.json, angualr.json and styles.css automatically.
After adding the theme you can find the css in angular.json file like below;
"styles": [
              "./node_modules/@angular/material/prebuilt-themes/indigo-pink.css",
              "src/styles.css"
            ],
import { BrowserModule } from '@angular/platform-browser';
import { NgModule } from '@angular/core';
import { AppRoutingModule } from './app-routing.module';
import { AppComponent } from './app.component';
import { BrowserAnimationsModule } from '@angular/platform-browser/animations';
import { FormsModule } from '@angular/forms';
import { MatButtonModule } from '@angular/material/button';
import { MatIconModule } from '@angular/material/icon';
import {MatSliderModule} from '@angular/material/slider';
import {MatSelectModule} from '@angular/material/select';
@NgModule({
declarations: [
AppComponent
],
imports: [
BrowserModule,
AppRoutingModule,
BrowserAnimationsModule,
MatSliderModule,
FormsModule,
MatButtonModule,
MatIconModule,
MatSelectModule
],
providers: [],
bootstrap: [AppComponent]
})
export class AppModule { }Code Explanation
We need to add the several modules into app.module.ts to access in HTML page. After importing the module we need to add into Imports[].
Remove all the predefined HTML in app.componenet.html file then add the materiel design like below;
<div class="container mt-5">
  <h1>Angular Basic Material Design form</h1>
  <h2>Slider</h2>
  <mat-slider min="1" max="100" step="1" value="1"></mat-slider>
  <h2>TextBox</h2>
   <input matInput placeholder="Simple Input" [(ngModel)]="title" class="form-control">
   <h2>Dropdown</h2>
   <mat-form-field appearance="fill">
    <mat-label>Favorite food</mat-label>
    <mat-select>
      <mat-option *ngFor="let food of foods" [value]="food.value">
        {{food.viewValue}}
      </mat-option>
    </mat-select>
  </mat-form-field>
  <h2>Icon</h2>
  <mat-icon>home</mat-icon>
  <h2>Button</h2>
  <button mat-raised-button>Material button</button>
</div>
import { Component } from '@angular/core';
interface Food {
value: string;
viewValue: string;
}
@Component({
selector: 'app-root',
templateUrl: './app.component.html',
styleUrls: ['./app.component.css']
})
export class AppComponent {
title = 'ng-material-design';
foods: Food[] = [
{value: 'steak-0', viewValue: 'Steak'},
{value: 'pizza-1', viewValue: 'Pizza'},
{value: 'tacos-2', viewValue: 'Tacos'}
];
}Code Explanation
app.component.html
- Here we take a basic example to create a materiel text box. Matinput is responsible for to convert the textbox into material text-box with [(ngModel)] is used to bind the title.
- Then we create the material slider, Icon, Button etc..
- We create a dummy drop down to access the value from app.component.ts. In the mat-option we iterate the result and bind the data into dropdown.
app.component.ts
- Here we declare title value that should append on the text box.
- Then we added a Interface of Food that hold the fruits information.
- Finally, we declare a foods list that contain food array.
- Consuming the foods list the drop-down can bind.
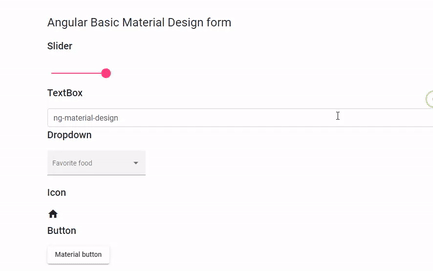
That’s it run the application and see the output like below;
Conclusion
Leave behind your valuable queries and suggestions in the comment section below. Also, if you think this article helps you, do not forget to share this with your developer community. Happy Coding 🙂
Related Articles
- Deploying Angular apps in Azure Blob Storage with CI/CD Integration 🚀
- Building a Chatbot in Angular using Gemini API
- Create a responsive sidebar with Angular Material- Angular 18 Example Series
- How to Deploy Angular 17/18 App in GitHub Pages
- How to convert Text To Speech With Azure Cognitive Services using Angular and .Net Core
Jayant Tripathy
Coder, Blogger, YouTuberA passionate developer keep focus on learning and working on new technology.