
In this article, we will learn about Step-by-Step Guide to Using Azure Redis Cache in ASP.NET Core 9 Web API. Azure provides a fully managed version of Redis called Azure Cache for Redis. It acts as a high-performance, in-memory data store that helps boost both the speed and scalability of applications. By keeping frequently accessed data in memory, it allows APIs and services to handle large volumes of requests much faster, ensuring quick read and write operations. Please read my previous article on Redis, Redis Caching in ASP.NET Core.
Caching is one of the most widely used techniques in modern software development because it helps improve the performance and scalability of applications. Popular platforms like Gmail, Facebook, and Instagram rely heavily on caching to deliver a fast and responsive user experience, even when millions of users are active at the same time. In high-traffic applications, every request to the database or API adds latency and increases server load. Without optimization, this can slow down the system and impact user satisfaction. Caching in .NET applications (and other platforms) provides a solution by storing frequently accessed data in memory, allowing faster reads and reducing the number of direct calls to the database or external services.
This makes caching a critical tool for building scalable web applications that can handle large workloads while maintaining speed and responsiveness.
Why Caching is used?
A cache is a high-speed memory storage layer used to temporarily store frequently accessed data. By keeping commonly used data in memory, it significantly improves application performance, reduces unnecessary database queries, and enables faster data retrieval.
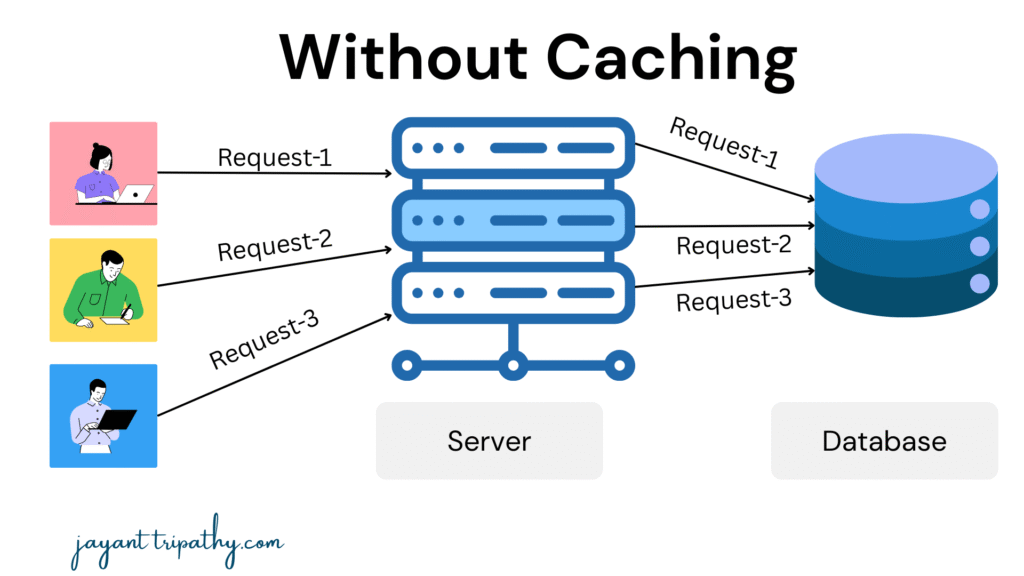
Without Caching scenarios where users frequently request the same data, every request without caching directly hits the database. This increases response time, puts unnecessary load on the database, and reduces overall application performance. For example, when static data is needed – such as a list of countries, configuration values, or product categories – the information is identical for all users. Without caching, each request redundantly queries the database to fetch the same data. By introducing a cache, we can store this static data in memory once and serve it quickly to all users, reducing database calls and improving both speed and scalability.
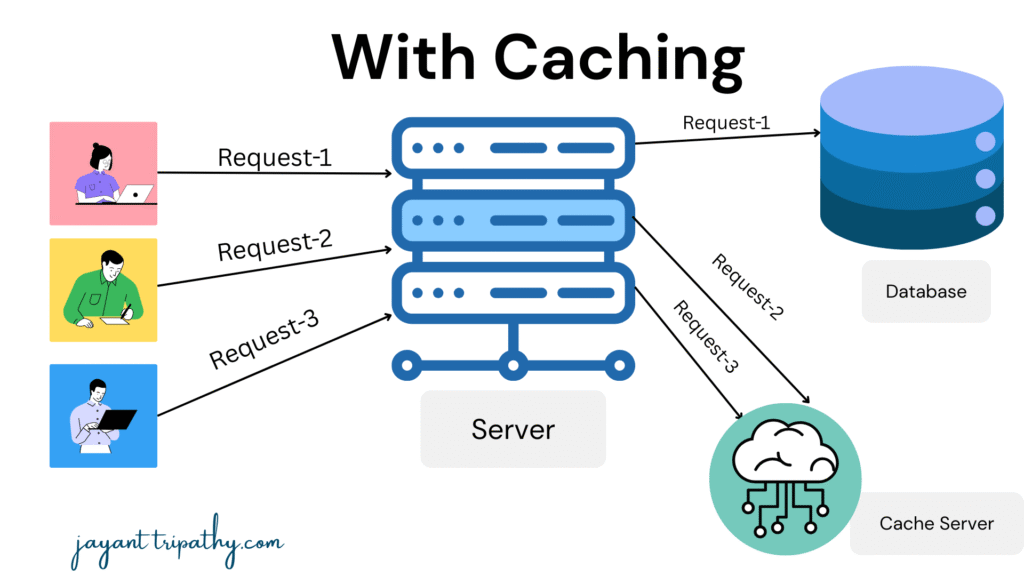
When we introduce caching, the behavior changes significantly. If multiple users request the same static or frequently accessed data, only the first user’s request will hit the database. The retrieved data is then stored in the cache. Subsequent user requests for the same data are served directly from the cache instead of querying the database again. This reduces unnecessary database calls, improves response time, and ensures the application can handle a larger number of concurrent users efficiently.
What is Redis Caching and how it works?
Redis(Remote DIctionary Server) is an open source, in-memory data structure store, used as a database, cache and message broker. It supports data structures such as strings, hashes, lists, sets, sorted sets with range queries, bitmaps, hyperloglogs, geospatial indexes with radius queries and streams.
It’s a NoSQL Database as well and is being used at tech giants like Stack overflow, Flickr, GitHub, and so on. Redis is a great option for implementing a highly available cache to reduce the data access latency and improve the application response time. As a result, we can reduce the load off our database to a very good extent.
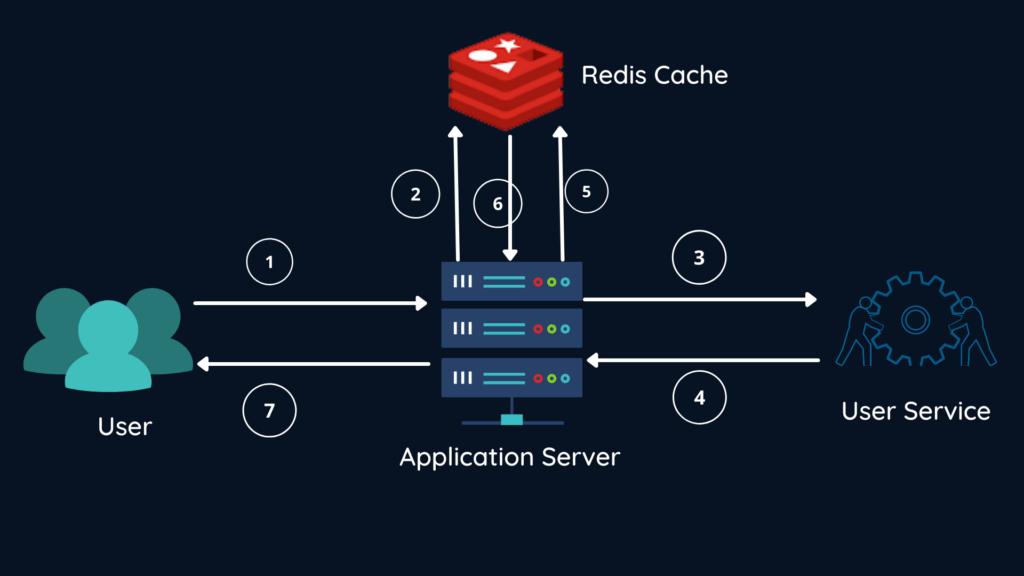
⚡ In short:
- First request → DB → Cache + User
- Subsequent requests → Cache → User (no DB hit)
Step-by-Step Explanation
1. User Request → Application Server
- The user makes a request (e.g., fetch profile data, product details, etc.).
- The request first reaches the application server.
2. Application Server → Redis Cache (Check Cache)
- Before hitting the database or service, the application checks Redis Cache to see if the requested data is already stored.
3. Cache Miss → Application Server → User Service
- If the data is not found in Redis (cache miss), the application server forwards the request to the user service (or underlying database/service layer).
4. User Service → Application Server (Return Data)
- The user service processes the request and returns the required data back to the application server.
5. Application Server → Redis Cache (Store Data)
- The application server then stores this data in Redis Cache so that the next time the same request is made, it can be served directly from the cache.
6. Redis Cache → Application Server (Cache Hit)
- For subsequent requests of the same data, Redis returns the response instantly (a cache hit), avoiding another round trip to the database/user service.
7. Application Server → User (Send Response)
- Finally, the application server sends the response back to the user — much faster if it was served from cache.
Azure Redis Cache Setup
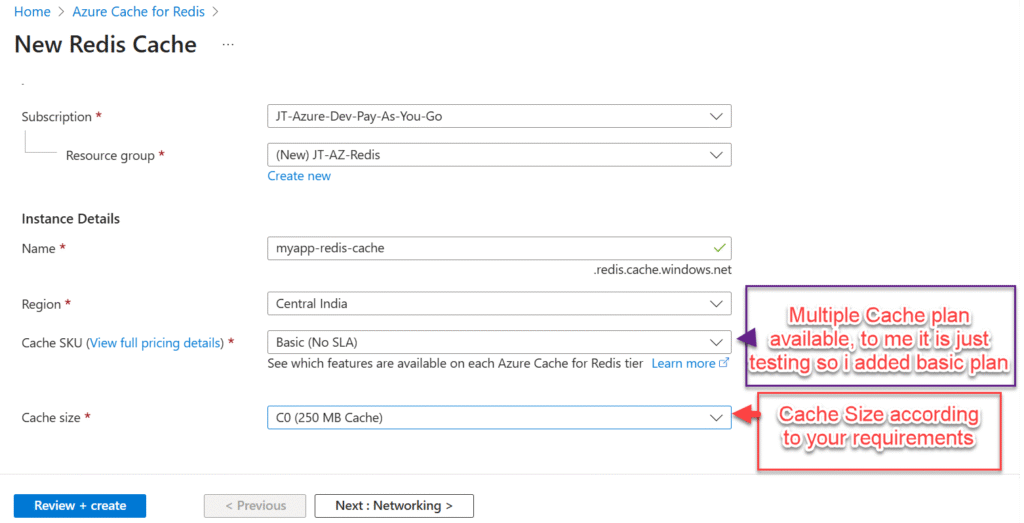
Step 1: Create Azure Cache for Redis Instance
- Go to Azure Portal.
- Search for “Azure Cache for Redis” and click Create.
- Fill in details:
- Subscription & Resource Group → choose or create new.
- DNS Name → unique name (e.g.,
myapp-redis-cache). - Location → choose nearest region.
- Pricing Tier → start with
Basic C0for dev/test.
- Click Review + Create, then Create.
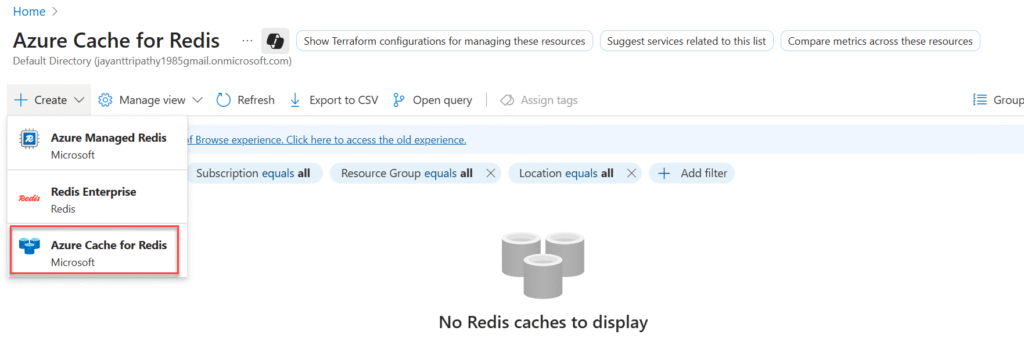
Here you ca see 3 different types of Azure Cache creation option available. We choose here as Azure Cache for Redis
- Azure Managed Redis → Microsoft’s new fully managed Redis with autoscaling & latest features.
- Redis Enterprise → Premium Redis by Redis Labs with geo-replication & enterprise-grade features.
- Azure Cache for Redis → Classic Microsoft-managed Redis, simple & cost-effective for most apps.
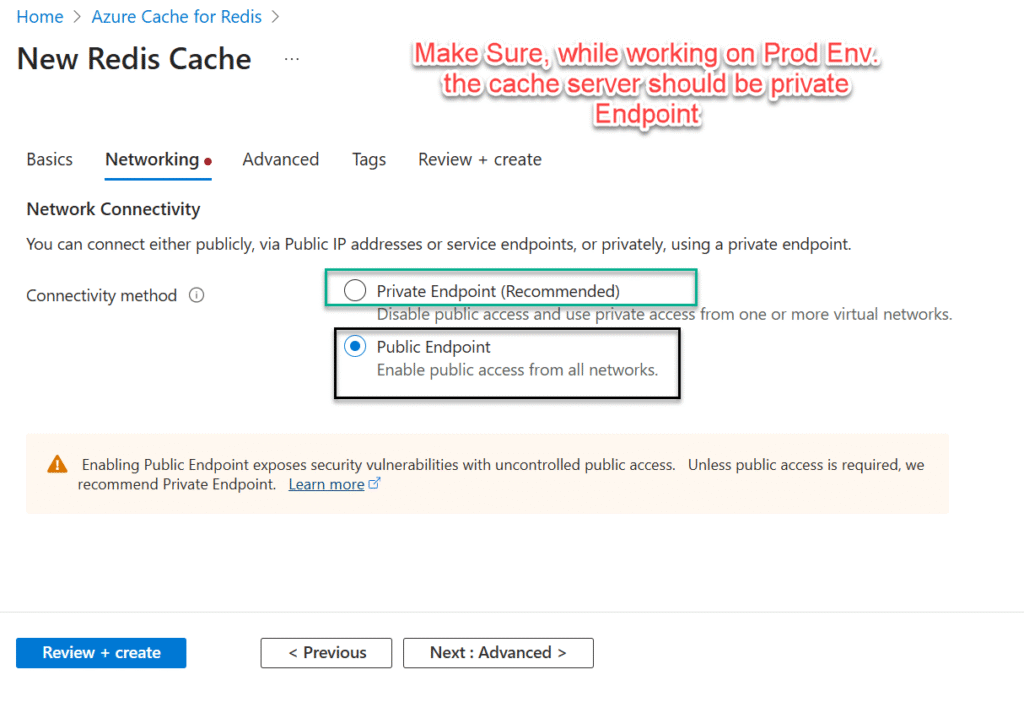
- Private Endpoint (Recommended) → Restricts access to Redis only through your VNet/private IP, blocking public internet.
- Public Endpoint → Exposes Redis with a public IP, accessible from anywhere (less secure).
➡️ If you want production-grade security & compliance, go with Private Endpoint.
➡️ If you’re just doing a quick test/demo, Public Endpoint is simpler.
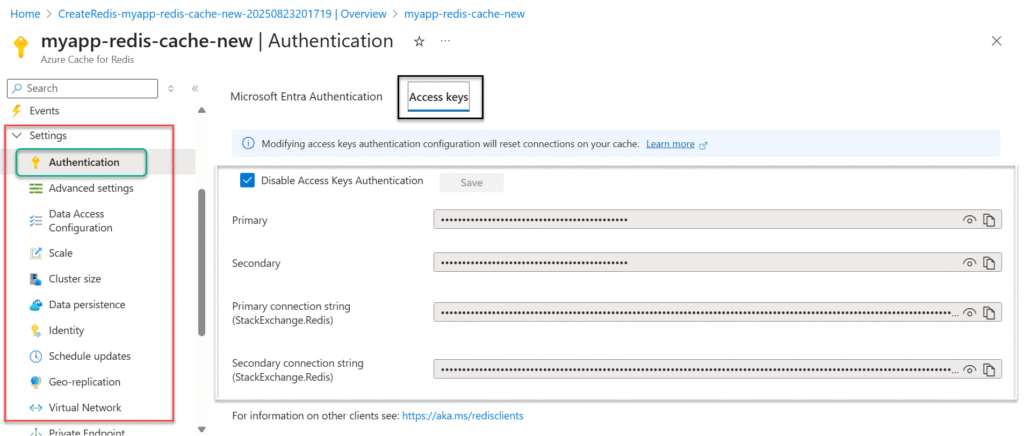
After the deployment, we can see the Access keys section inside the Settings -> Authentication cache.
Creating an ASP .NET Core Web API Project
Create an ASP.NET Core project following the steps below and integrate Azure Redis Cache. For this demo, instead of connecting to a database, I’m using EF Core with a seed implementation to generate sample data.
- Launch the Visual Studio IDE and click on “Create new project”.
- In the “Create new project” window, select “ASP.NET Core Web API” from the template list.
- Click Next. In the “Configure your new project” window, specify the name and location for the new project and then click Create.
- In the “Create New ASP.NET Core Web API” window shown next, select .NET Core as the runtime and .NET 9.0 from the drop-down list at the top(I’m using .NET 9 .Net core SDK). Select “API” as the project template to create a new ASP.NET Core API application.
Updating the project setup to prepare for Redis integration
- Created a Model Class named as “
ProductDetails” that hold the Product information. - Created as DbContext class inside Data holder to implement the
ProductDetails. - Created seed Data class, which we use to initially insert some data.
- Configure the Azure Redis Cache connection string inside the
appsettings.jsonfile. - Create a
RedisCacheRepositoryclass and implement the interface - Create a Product Controller and there apply the Cache
- Register the Services inside
program.csfile and we have created a Redis console test to see if this work fine or not.
public class SeedData
{
    public static void Initialize(IServiceProvider serviceProvider)
    {
        using (var context = new DbContextClass(
            serviceProvider.GetRequiredService<DbContextOptions<DbContextClass>>()))
        {
            if (context.Products.Any())
            {
                return;
            }

            context.Products.AddRange(
                new ProductDetails
                {
                    Id = 1,
                    ProductName = "IPhone",
                    ProductDescription = "IPhone 14",
                    ProductPrice = 120000,
                    ProductStock = 100
                },
                new ProductDetails
                {
                    Id = 2,
                    ProductName = "Samsung TV",
                    ProductDescription = "Smart TV",
                    ProductPrice = 400000,
                    ProductStock = 120
                },
                new ProductDetails
                {
                    Id = 3,
                    ProductName = "Dell Laptop",
                    ProductDescription = "Dell Inspiron 15",
                    ProductPrice = 85000,
                    ProductStock = 75
                },
                new ProductDetails
                {
                    Id = 4,
                    ProductName = "Sony Headphones",
                    ProductDescription = "Sony WH-1000XM4",
                    ProductPrice = 25000,
                    ProductStock = 200
                },
                new ProductDetails
                {
                    Id = 5,
                    ProductName = "Apple Watch",
                    ProductDescription = "Apple Watch Series 8",
                    ProductPrice = 45000,
                    ProductStock = 60
                },
                new ProductDetails
                {
                    Id = 6,
                    ProductName = "Canon Camera",
                    ProductDescription = "Canon EOS 1500D",
                    ProductPrice = 55000,
                    ProductStock = 40
                },
                new ProductDetails
                {
                    Id = 7,
                    ProductName = "Amazon Echo",
                    ProductDescription = "Echo Dot 4th Gen",
                    ProductPrice = 3500,
                    ProductStock = 150
                }
            );
            context.SaveChanges();
        }
    }
}
{
"Logging": {
"LogLevel": {
"Default": "Information",
"Microsoft.AspNetCore": "Warning"
}
},
"AllowedHosts": "*",
"RedisConnectionString": "<Redis Connection Put here>"
}using AzureRedisCacheDemo.Interfaces;
using Newtonsoft.Json;
using StackExchange.Redis;
namespace AzureRedisCacheDemo.Repositories
{
public class RedisCacheRepository : IRedisCache
{
private readonly IDatabase _db;
public RedisCacheRepository(IDatabase db)
{
_db = db;
}
public async Task<T?> GetCacheDataAsync<T>(string key)
{
try
{
var value = await _db.StringGetAsync(key); // ✅ async call
if (!string.IsNullOrEmpty(value))
{
return JsonConvert.DeserializeObject<T>(value!);
}
}
catch (RedisException ex)
{
// TODO: Log exception properly
}
return default;
}
public Task<bool?> RemoveData(string key)
{
throw new NotImplementedException();
}
public async Task<bool> RemoveDataAsync(string key)
{
try
{
if (await _db.KeyExistsAsync(key)) // ✅ use async
{
return await _db.KeyDeleteAsync(key); // ✅ async delete
}
}
catch (RedisException ex)
{
// TODO: Log exception properly
}
return false;
}
public async Task<bool?> SetCacheData<T>(string key, T value, DateTimeOffset expirationTime)
{
var expiryTime = expirationTime - DateTimeOffset.Now;
if (expiryTime <= TimeSpan.Zero)
{
// Do not set cache if expiration is invalid
return false;
}
try
{
var serializedValue = JsonConvert.SerializeObject(value);
return await _db.StringSetAsync(key, serializedValue, expiryTime); // ✅ async version
}
catch (RedisException ex)
{
// TODO: Log exception
}
return false;
}
}
}using AzureRedisCacheDemo.Interfaces;
using AzureRedisCacheDemo.Models;
using Microsoft.AspNetCore.Mvc;
using System.Collections.Generic;
namespace AzureRedisCacheDemo.Controllers
{
[Route("api/[controller]")]
[ApiController]
public class ProductsController : ControllerBase
{
private readonly IProductService _productService;
private readonly IRedisCache _redisCache;
public ProductsController(IProductService productService, IRedisCache redisCache)
{
_productService = productService;
_redisCache = redisCache;
}
/// <summary>
/// Product List
/// </summary>
/// <returns></returns>
[HttpGet]
public async Task<ActionResult<List<ProductDetails>>> ProductListAsync()
{
var cacheData =await _redisCache.GetCacheDataAsync<List<ProductDetails>>("product");
if (cacheData != null)
{
return new List<ProductDetails>(cacheData);
}
var productList = await _productService.ProductListAsync();
if(productList != null)
{
var expirationTime = DateTimeOffset.Now.AddMinutes(5.0);
_redisCache.SetCacheData<List<ProductDetails>>("product", productList, expirationTime);
return Ok(productList);
}
else
{
return NoContent();
}
}
/// <summary>
/// Get Product By Id
/// </summary>
/// <param name="productId"></param>
/// <returns></returns>
[HttpGet("{productId}")]
public async Task<ActionResult<ProductDetails>> GetProductDetailsByIdAsync(int productId)
{
var cacheData = await _redisCache.GetCacheDataAsync<List<ProductDetails>>("product"); // ✅ await
if (cacheData != null && cacheData.Any())
{
var filteredData = cacheData.FirstOrDefault(x => x.Id == productId);
if (filteredData != null)
{
return Ok(filteredData);
}
}
var productDetails = await _productService.GetProductDetailByIdAsync(productId);
if (productDetails != null)
{
return Ok(productDetails);
}
else
{
return NotFound();
}
}
/// <summary>
/// Add a new product
/// </summary>
/// <param name="productDetails"></param>
/// <returns></returns>
[HttpPost]
public async Task<IActionResult> AddProductAsync(ProductDetails productDetails)
{
var isProductInserted = await _productService.AddProductAsync(productDetails);
_redisCache.RemoveData("product");
if (isProductInserted)
{
return Ok(isProductInserted);
}
else
{
return BadRequest();
}
}
/// <summary>
/// Update product details
/// </summary>
/// <param name="productDetails"></param>
/// <returns></returns>
[HttpPut]
public async Task<IActionResult> UpdateProductAsync(ProductDetails productDetails)
{
var isProductUpdated = await _productService.UpdateProductAsync(productDetails);
_redisCache.RemoveData("product");
if (isProductUpdated)
{
return Ok(isProductUpdated);
}
else
{
return BadRequest();
}
}
/// <summary>
/// Delete product by id
/// </summary>
/// <param name="productId"></param>
/// <returns></returns>
[HttpDelete]
public async Task<IActionResult> DeleteProductAsync(int productId)
{
var isProductDeleted = await _productService.DeleteProductAsync(productId);
_redisCache.RemoveData("product");
if (isProductDeleted)
{
return Ok(isProductDeleted);
}
else
{
return BadRequest();
}
}
}
}using AzureRedisCacheDemo.Data;
using AzureRedisCacheDemo.Interfaces;
using AzureRedisCacheDemo.Models;
using AzureRedisCacheDemo.Repositories;
using AzureRedisCacheDemo.Services;
using Microsoft.EntityFrameworkCore;
using StackExchange.Redis;
var builder = WebApplication.CreateBuilder(args);
// Register Redis connection (singleton)
builder.Services.AddSingleton<IConnectionMultiplexer>(sp =>
{
var configuration = builder.Configuration.GetValue<string>("RedisConnectionString");
return ConnectionMultiplexer.Connect(configuration);
});
// Register Redis database (scoped)
builder.Services.AddScoped<IDatabase>(sp =>
{
var multiplexer = sp.GetRequiredService<IConnectionMultiplexer>();
return multiplexer.GetDatabase();
});
// Register services
builder.Services.AddScoped<IProductService, ProductService>();
builder.Services.AddScoped<IRedisCache, RedisCacheRepository>();
// Use In-Memory DB for demo
builder.Services.AddDbContext<DbContextClass>(o =>
o.UseInMemoryDatabase("RedisCacheDemo"));
// Add controllers + Swagger
builder.Services.AddControllers();
builder.Services.AddEndpointsApiExplorer();
builder.Services.AddSwaggerGen();
var app = builder.Build();
// ✅ Redis Console Test (runs on startup)
try
{
    var multiplexer = app.Services.GetRequiredService<IConnectionMultiplexer>();
    var db = multiplexer.GetDatabase();

    Console.WriteLine("Connecting to Azure Redis Cache...");
    db.StringSet("test:key", "HelloRedis");
    var value = db.StringGet("test:key");

    Console.WriteLine($"✅ Redis test successful. Retrieved value = {value}");
}
catch (Exception ex)
{
    Console.WriteLine($"❌ Redis connection test failed: {ex.Message}");
}
// Seed data into DB
using (var scope = app.Services.CreateScope())
{
var services = scope.ServiceProvider;
var context = services.GetRequiredService<DbContextClass>();
SeedData.Initialize(services);
}
if (app.Environment.IsDevelopment())
{
app.UseSwagger();
app.UseSwaggerUI();
}
app.UseHttpsRedirection();
app.UseAuthorization();
app.MapControllers();
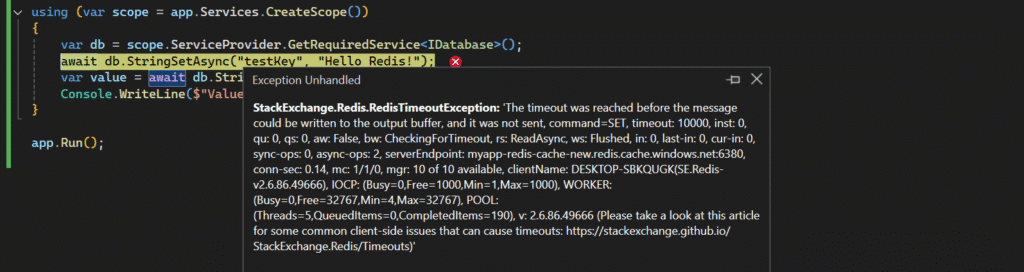
app.Run();The application is configured, now get the connection string from Redis and put into Appsetting.json file.
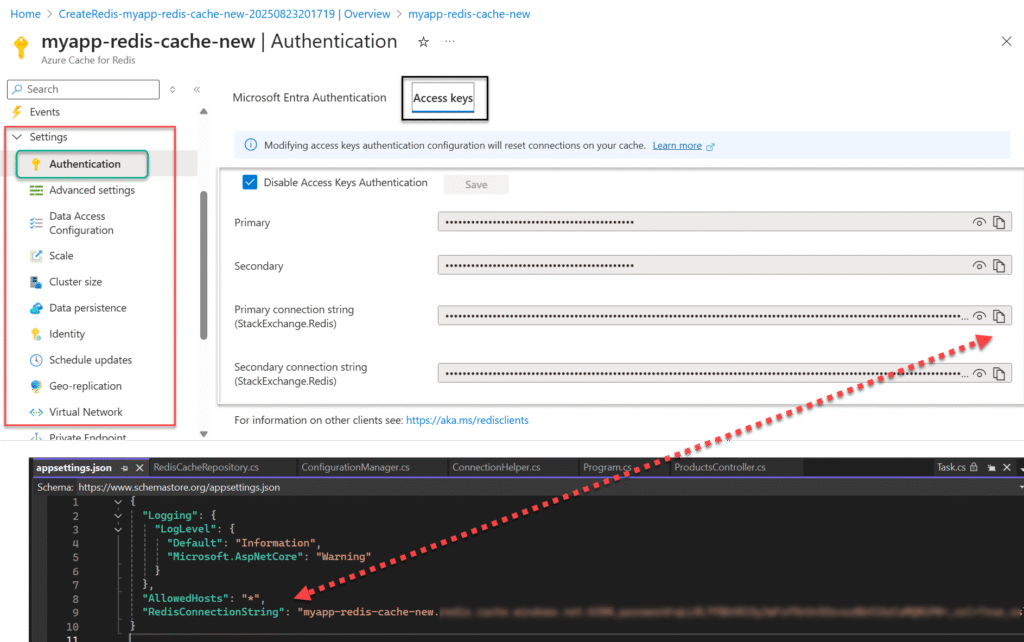
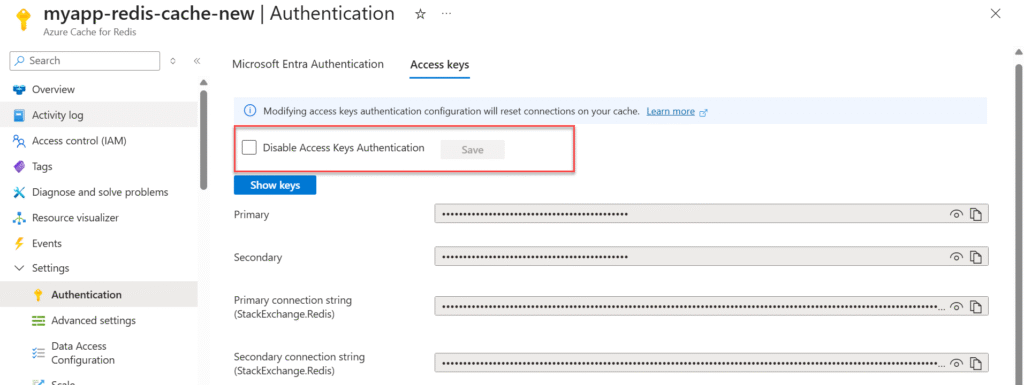
After the changes I face one problem like below, so we need to fix this by uncheck the Disable Access key Authentication.
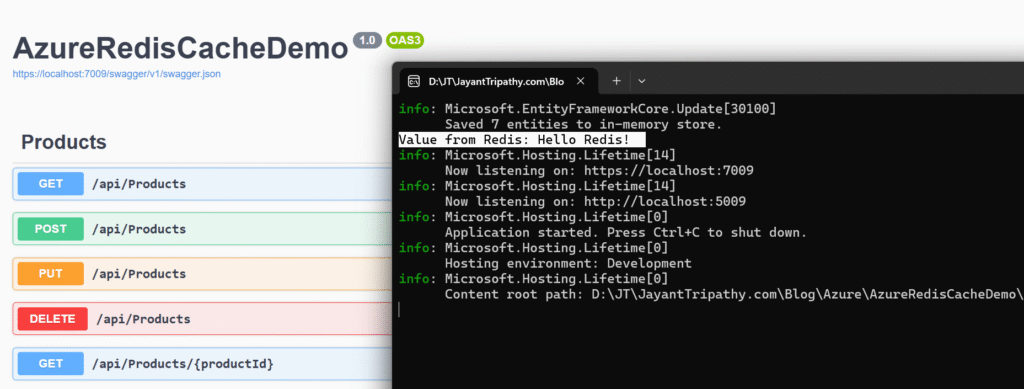
Testing the Redis Cache Implementation
As you can see, the value we set in the program file has been successfully retrieved from Redis in the console.
// ✅ Redis Console Test (runs on startup)
try
{
var multiplexer = app.Services.GetRequiredService<IConnectionMultiplexer>();
var db = multiplexer.GetDatabase();
Console.WriteLine("Connecting to Azure Redis Cache...");
db.StringSet("test:key", "HelloRedis");
var value = db.StringGet("test:key");
Console.WriteLine($"✅ Redis test successful. Retrieved value = {value}");
}
catch (Exception ex)
{
Console.WriteLine($"❌ Redis connection test failed: {ex.Message}");
}
Test using Postman
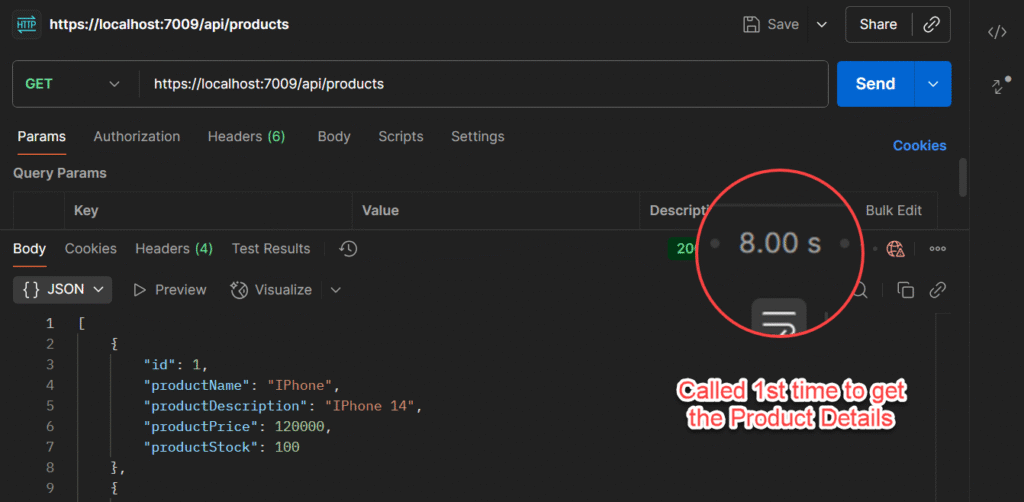
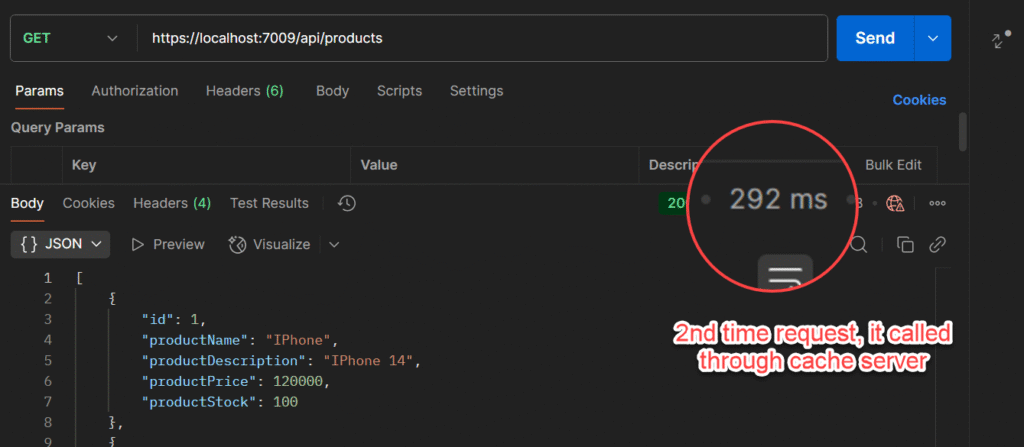
Using Postman, we can observe the difference in response times before and after implementing caching. In the first image, the call takes longer because it queries the database to fetch the data. In the second image, the data is retrieved from the Redis Cache server, resulting in much faster response times.
Test using Azure Redis Console
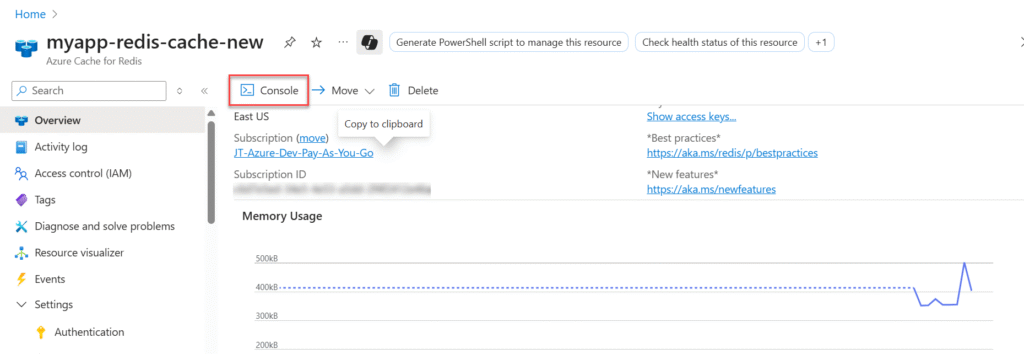
To test through Test using Azure Redis Console, Go to Azure Redis and under overview click on the console.
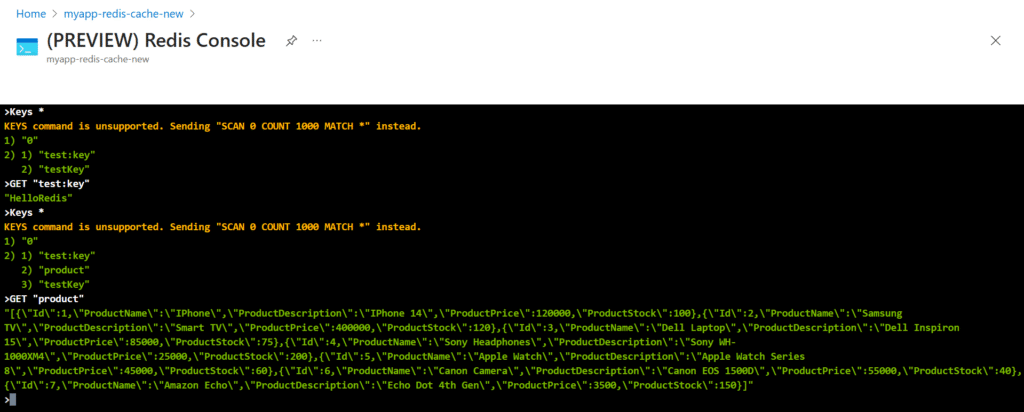
Keys *  // Using this we can see all the keys that are in registered through Azure Redis.
        // In my case, I have 3 keys, 2 for consoles check and 1 from my controller
To access your key hit command like

GET "<Your Key Name>" // in my case it is GET "test:Key"

To access the Product details that is available in Redis Server

GET "product" // And you can see the product data's are found.
What benefits of Using Redis Cache?
Azure Cache for Redis is a fully managed service that provides secure Redis server instances with full Redis API compatibility. It can significantly improve the performance and scalability of applications. Some common scenarios include:
Caching Data
Instead of loading database results directly into the cache, we can follow the cache-aside pattern. Data is fetched from the database only when needed, then stored in the cache for subsequent requests.
Example: In an e-commerce application, product details (like price, stock, description) can be cached. This avoids repeated database queries for the same product when multiple users browse it.
Caching Content
For web applications serving static content that doesn’t change often, in-memory caching provides quick access. This reduces the need to fetch the same content repeatedly from a datastore.
Example: A content management system (CMS) can cache frequently accessed blog posts, images, or marketing banners. This ensures users get faster page loads while reducing strain on the backend database.
Session Storage
User session or history data can grow quickly if stored in cookies, which negatively impacts performance. Instead, Redis can associate session data with users efficiently.
Example: In a shopping website, items in a user’s cart can be stored in Redis. When the user returns or navigates across pages, the cart can be quickly retrieved without hitting the database each time.
Messaging and Job Queuing
Azure Cache for Redis can act as a distributed queue to manage background tasks or jobs.
Example: In a ride-sharing app, new ride requests can be placed in a Redis queue. Background workers then process these requests asynchronously, matching riders with drivers in near real-time.
Distributed Transactions
Redis supports executing multiple operations as a single atomic transaction, ensuring consistency.
Example: In a banking application, transferring money between two accounts can be handled as a single transaction. Both the debit and credit operations succeed together, or neither executes, preventing data inconsistencies.
Source Code
Conclusion
In this article, we discussed about Step-by-Step Guide to Using Azure Redis Cache in ASP.NET Core 9 Web API. Azure provides us with it’s own implementation of Redis called Azure Cache for Redis. Here we had discussed how we can create and implement Redis Cache.
Leave behind your valuable queries and suggestions in the comment section below. Also, if you think this article helps you, do not forget to share this with your developer community. Happy Coding 🙂
Latest Articles
- How to Secure React.js application with Azure AD Authentication Using MSAL Library
- 🔐 Securing .NET Core Web Apps with Azure AD/Intra and MSAL
- Step-by-Step Guide to Using Azure Redis Cache in ASP.NET Core 9 Web API
- 🤖 Build a Full-Stack AI App with React, Node.js & Azure OpenAI
- Effortless React Deployment 🚀: CI/CD with GitHub Actions & Azure Static Web Apps
- Deploying Angular apps in Azure Blob Storage with CI/CD Integration 🚀
- How to Build a serverless CRUD app with Azure function and Cosmos DB
- How to resolve Function App Cannot Create within Azure Portal
- How to convert Text To Speech With Azure Cognitive Services using Angular and .Net Core
- Building CI/CD Pipeline(YAML) using Azure DevOps – GitHub to Azure Web App (PaaS)
- Upload Download and Delete files in Azure Blob Storage using ASP.NET Core and Angular
- How to upload files to Azure Blob Storage using Asp.Net Core Web API
- Introduction to Azure Cosmos DB
- How to create Cosmos DB in Azure
- Logging into Azure App Service with ASP.Net Core
SUPPORT ME: