
This article explain how to send Email in ASP.NET Core using MailKit. For this article we consider ASP.NET Core 5.0, at the end of this article you will have full depth idea about how we can easily integrate Email in ASP.NET Core. Also please follow our article about Toast Notifications in ASP.NET Core Razor Pages.
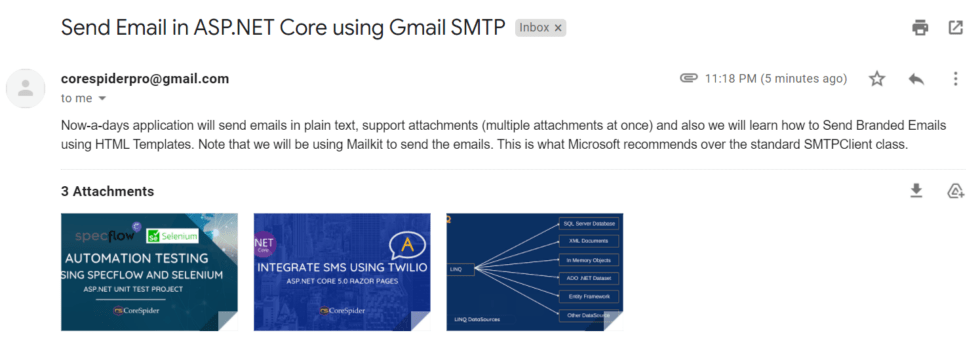
Now-a-days application will send emails in plain text, support attachments (multiple attachments at once) and also we will learn how to Send Branded Emails using HTML Templates. Note that we will be using Mailkit to send the emails. This is what Microsoft recommends over the standard SMTPClient class.
What is MailKit ?
MailKit is an open-source cross-platform library that can be used in .NET or .NET Core applications running on Windows, Linux, or Mac. MailKit is a more like email clients of SMTP server. The SMTP server will have an address that will be used by email clients to send emails in ASP.NET Core. Based on the SMTP email server being used to send mails you will have to obtain server details like Host, Port, etc., and configure the same in your application.
What is SMTP Server ?
SMTP(Simple Mail Transfer Protocol) server are email based application servers that allow you to send and receive mails between senders & receivers. For e.g. Gmail is an SMTP server. On registering for email service these servers provided email id account using which we can send/receive emails on that SMTP Server.
What are going to discuss in this Post ?
In this post we are going to create examples of
- Send Email with Attachments
- Send Email With Custom Template
Creating ASP.NET Core Project and Implement Email Configuration
Let’s create a .NET Core Web API project considering ASO.NET Core 5.0 with selecting ASP.NET Core Web API.
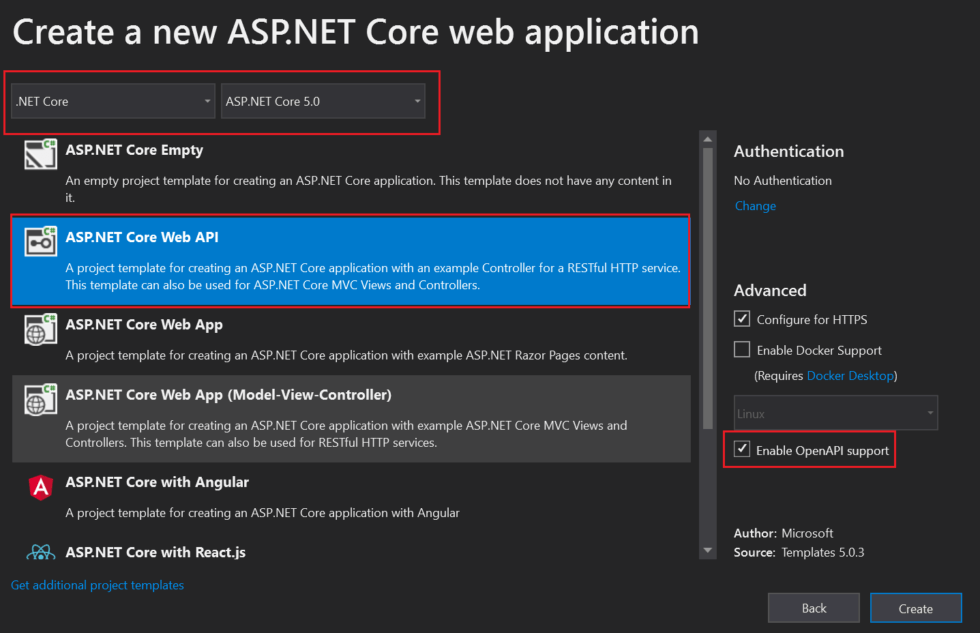
Tick on Enable OpenAPI Support that enables SWAGGER into .NET Core API Project.
Swagger is an Interface Description Language for describing RESTful APIs expressed using JSON. Swagger is used together with a set of open-source software tools to design, build, document, and use RESTful web services. Swagger includes automated documentation, code generation, and test-case generation
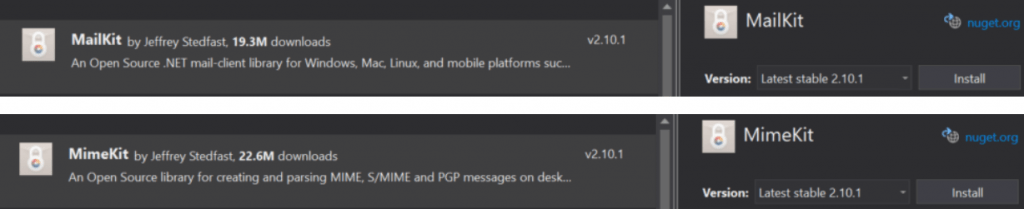
Add MailKit Nuget package to ASP.NET Core Project
Add SMTP Server & Email Account details in appsettings.json file
To send an email we need SMTP server which will connect to server to send emails. Also to access this SMTP server we will need security credentials to access that server i.e. details of the Email Account which has been created on that server to send emails will be required. Now, these details should not be hardcoded in code as these are configurable parameters that can change over time so we will store the above details in the appsettings.json file.
For demonstration purposes password is being stored in the appsettings.json file.
"EmailSettings": {
    "EMail": "corespiderpro@gmail.com",
    "Name": "CoreSpider-The Knowledge Hub",
    "Password": "**********",
    "Host": "smtp.gmail.com",
    "Port": 587
  }
Quick Tip to Secure Sensitive Data
During Development, It is advisable to add data that is to be kept private on to the appsettings.Development.Json. This file is generated while setting the Environment Variable to Development. While adding the project to source control, you can exclude the appsettings.Development.json, so that GIT ignores the file and does not commit it to the main repository. In this way, we can have a good separation of confidential information from the outside world.
Configure Gmail SMTP Server
To configure Gmail SMTP follow these steps.
Developers usually prefer using the GMAIL SMTP server for production and testing purposes, as it is quite easy and reliable too. Gmail allows you to send 2,000 emails per day using the Gmail SMTP Server for FREE. That’s pretty much to get started, right?
Here is what you will need to use Gmail SMTP.
- Regarding Gmail ID (Do not use a personal Email ID, quite risky if compromised.)
- The Password.
- Host or SMTP Server address – If you are going with Gmail, use smtp.gmail.com
- Port – Use 465 (SSL) or 587 (TLS)
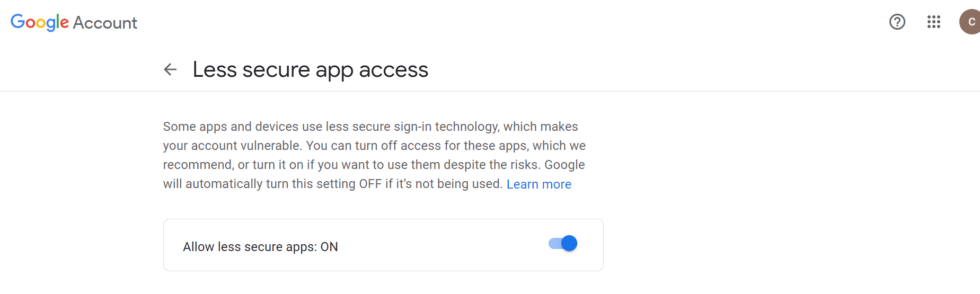
After you get the details, we will need to allow your Gmail account to send emails using external (less- secure applications). To enable this, go to https://myaccount.google.com/security and turn ON Less Secure App Access.
Access the Appsettings.json file
To access the appsettings.json file we need to create a Settings folder inside our ASP.NET Core Web API project. And create a class with name as EmailSettings.
 public class EmailSettings
    {
        public string EMail { get; set; }
        public string Name { get; set; }
        public string Password { get; set; }
        public string Host { get; set; }
        public int Port { get; set; }
    }
We have the data in appsettings.json file. How do we transfer these data to an instance of EmailSettings at runtime ? IOptions and Dependency Injection to the rescue. Navigate to Starup/ConfigureServices Method and add the following line.
services.Configure<EmailSettings>(Configuration.GetSection("EmailSettings"));Declaring the Model that hold Email Information’s
Let’s create a Model class holds the Email Information that responsible to send email with attachments. Create another model class that hold the information of Email and UserName that is responsible with templates.
public class EmailInfo
    {
        public string EmailTo { get; set; }
        public string Subject { get; set; }
        public string Body { get; set; }
        public List<IFormFile> Attachments { get; set; }
    }
public class EmailSource
{
public string EmailTo { get; set; }
public string UserName { get; set; }
}Create a Interface that responsible to Send Email
Let’s create a Interface inside Services folder with declaring two methods.
public interface IEmailService
    {
        Task SendEmailAsync(EmailInfo emailInfo);
        Task SendEmailTemplateAsync(EmailSource emailSource);
    }
Create a Concrete class that implement Interface
We will have a method that takes in the EmailInfo object and sends the email. Next, Add a concrete class that will implement this interface. Services/EmailService.cs
public class EmailService : IEmailService
    {
        private readonly EmailSettings _mailSettings;
        public EmailService(IOptions<EmailSettings> mailSettings)
        {
            _mailSettings = mailSettings.Value;
        }
        public async Task SendEmailAsync(EmailInfo emailInfo)
        {
            var email = new MimeMessage();
            email.Sender = MailboxAddress.Parse(_mailSettings.EMail);
            email.To.Add(MailboxAddress.Parse(emailInfo.EmailTo));
            email.Subject = emailInfo.Subject;
            var builder = new BodyBuilder();
            if (emailInfo.Attachments != null)
            {
                byte[] fileBytes;
                foreach (var file in emailInfo.Attachments)
                {
                    if (file.Length > 0)
                    {
                        using (var ms = new MemoryStream())
                        {
                            file.CopyTo(ms);
                            fileBytes = ms.ToArray();
                        }
                        builder.Attachments.Add(file.FileName, fileBytes, ContentType.Parse(file.ContentType));
                    }
                }
            }
            builder.HtmlBody = emailInfo.Body;
            email.Body = builder.ToMessageBody();
            using var smtp = new SmtpClient();
            smtp.Connect(_mailSettings.Host, _mailSettings.Port, SecureSocketOptions.StartTls);
            smtp.Authenticate(_mailSettings.EMail, _mailSettings.Password);
            await smtp.SendAsync(email);
            smtp.Disconnect(true);
        }

        public async Task SendEmailTemplateAsync(EmailSource emailSource)
        {
            string FilePath = Directory.GetCurrentDirectory() + "\\Templates\\CustomTemplate.html";
            StreamReader str = new StreamReader(FilePath);
            string MailText = str.ReadToEnd();
            str.Close();
            MailText = MailText.Replace("[username]", emailSource.UserName).Replace("[email]", emailSource.EmailTo);
            var email = new MimeMessage();
            email.Sender = MailboxAddress.Parse(_mailSettings.EMail);
            email.To.Add(MailboxAddress.Parse(emailSource.EmailTo));
            email.Subject = $"Welcome {emailSource.UserName}";
            var builder = new BodyBuilder();
            builder.HtmlBody = MailText;
            email.Body = builder.ToMessageBody();
            using var smtp = new SmtpClient();
            smtp.Connect(_mailSettings.Host, _mailSettings.Port, SecureSocketOptions.StartTls);
            smtp.Authenticate(_mailSettings.EMail, _mailSettings.Password);
            await smtp.SendAsync(email);
            smtp.Disconnect(true);
        }

    }
Code Explanation
Here we Injecting the IOptions<EmailSettings> to the constructor and assigning it’s value to the instance of EmailSettings. Like this, we will be able to access the data from the JSON at runtime.
SendEmailAsync
- The basic idea is to create an object of MimeMessage (a class from Mimekit ) and send it using a SMTPClient instance (Mailkit).
- Here we create new object of MimeMessage and adds in the Sender, To Address and Subject to this object. We will be filling the message related data (subject, body) from the mailRequest and the data we get from our JSON File.
- If there are any attachments (files) in the request object, we transform the file to an attachment and add it to the mail message as an Attachment Object of Body Builder.
- Send the Message using the SMTP SendMailAsync Method.
SendEmailTemplateAsync
- We get the file path of our welcome template and read the file as a string. ( We create a HTML template name as CustomTemplate.html) inside “\Templates\CustomTemplate.html”.
- Now, We replace the username and email tag with the actual data and here we adds a default subject
- Set the body of the email from the template string and send email using SMTP SendAsync.
Add the Dependency Injection Service in startup.cs
services.AddTransient<IEmailService, EmailService>();
Create controller to send the Email
Let’s create a controller name as EmailController and here we call the service class.
[Route("api/[controller]")]
    [ApiController]
    public class EmailController : ControllerBase
    {
        private readonly IEmailService mailService;
        public EmailController(IEmailService mailService)
        {
            this.mailService = mailService;
        }
        [HttpPost("sendEmail")]
        public async Task<IActionResult> SendMail([FromForm] EmailInfo emailInfo)
        {
            try
            {
                await mailService.SendEmailAsync(emailInfo);
                return Ok();
            }
            catch (Exception ex)
            {
                throw;
            }
        }
        [HttpPost("sendEmailTemplate")]
        public async Task<IActionResult> SendWelcomeMail([FromForm] EmailSource source)
        {
            try
            {
                await mailService.SendEmailTemplateAsync(source);
                return Ok();
            }
            catch (Exception ex)
            {
                throw;
            }
        }
    }
Code Explanation
- We make constructor Injection inside EmailController.
- And we make [HttpPost(“sendEmail”)] that responsible to send email with attachments.
- And we make [HttpPost(“sendEmailTemplate”)] that responsible to send email with templates.
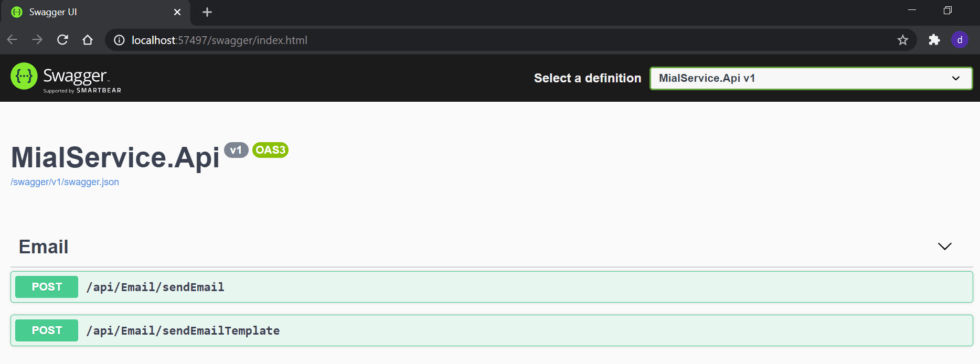
Now we are ready ! All the configurations has been done and now we ready to test the Email using Swagger API.
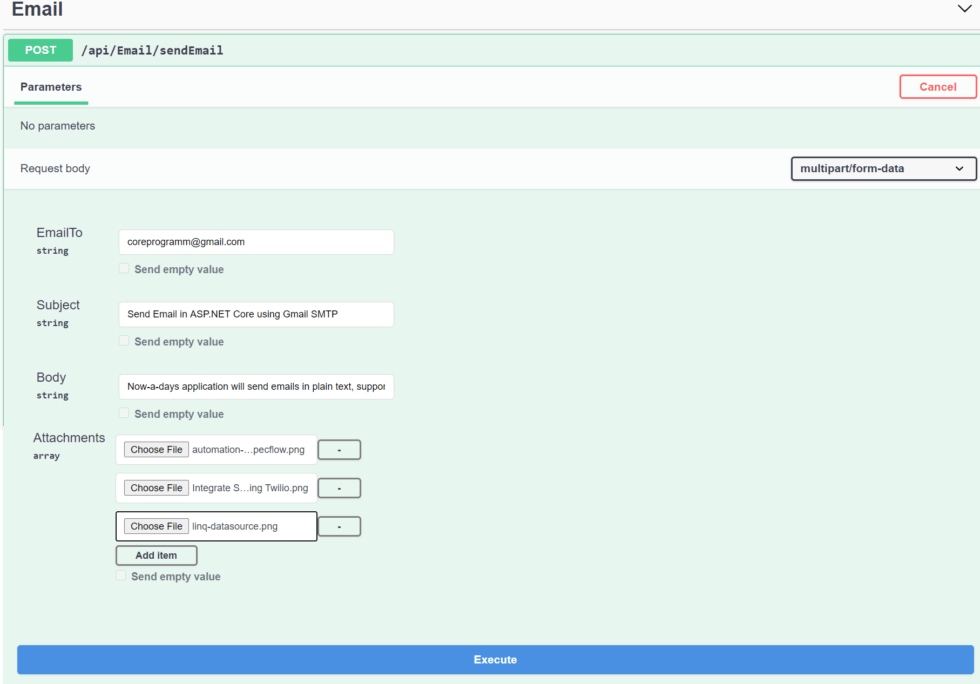
Send Email – (Testing With Swagger)
Let’s build the application and run the project and as SWAGGER is already is configured while we create the project and select the Enable Open API Support.
Test Email with Attachment
To use email with attachment, add the email Id where we are going to sent email with Subject and Body. Here we added 3 attachments and then click on Execute button to send the email.

Let’s open the Gmail account and we can clearly seen that the Gmail SMTP work perfectly.
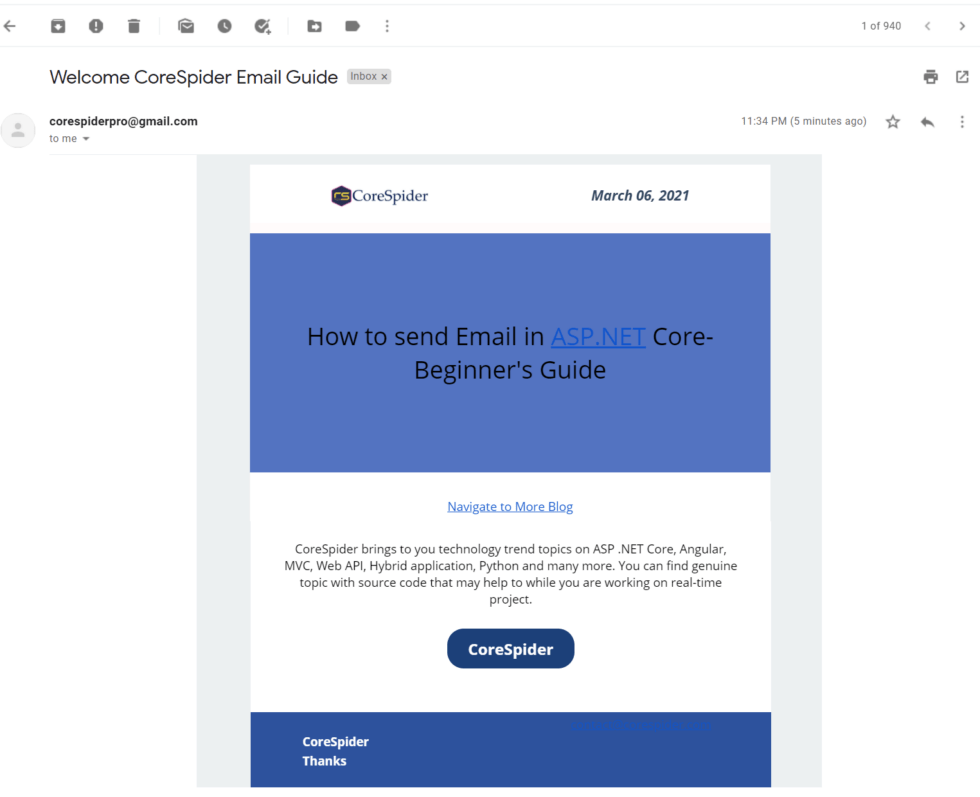
Test Email with Custom TemplateWe already create a custom HTML file inside Templates folder. Let’s using swagger we can test the email with templates file considering Email and UserName.
Let’s check the Gmail and we can see the Email with template
Conclusion
Leave behind your valuable queries and suggestions in the comment section below. Also, if you think this article helps you, do not forget to share this with your developer community. Happy Coding 🙂
Related Articles
- 🔐 Securing .NET Core Web Apps with Azure AD/Intra and MSAL
- How to Integrate AdminLTE with ASP.NET Core
- How to run ASP.Net Core Web Application in Docker Container
- ChatGPT Integration in ASP.Net Core using OpenAI
- How to use cookies in ASP.Net Core- Complete Guide
Jayant Tripathy
Coder, Blogger, YouTuberA passionate developer keep focus on learning and working on new technology.