
In this article we will learn about How to Integrate AdminLTE with ASP.NET Core. The AdminLTE template is the best open source admin dashboard & control panel theme. Built on the Bootstrap UI framework. AdminLTE provides a range of responsive, reusable, and commonly used components. We’ll also go through how to integrate Identity Server into our MVC application. You’ll also learn a lot about Views, Layouts, Partial Views, Conditional Rendering, Navigation Indicator, and much more. Please read my previous article of JWT Authentication And Authorization With Identity Framework in .NET Core 6.0.
What is AdminLTE?
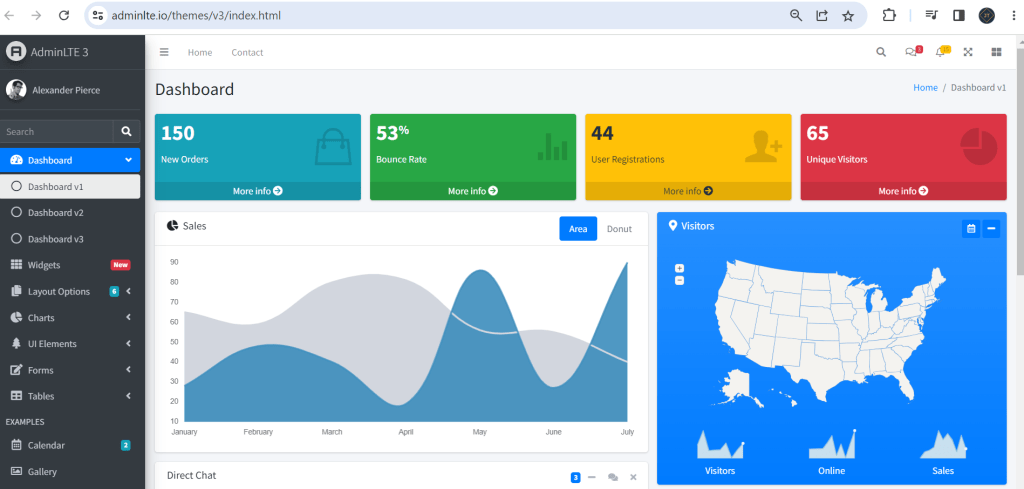
AdminLTE is an open-sourced Admin Dashboard Template that is built over Bootstrap. It is packed with quite a lot of responsive and commonly used components that are very easily integrated with your webapplications.
To get a better picture, click here to see a demo of AdminLTE in action.
You may have noticed how premium it already appears. For the time being, these pages are not linked to any server-side apps. They are simply ordinary HTML files. In this tutorial, we will use some best practises to connect AdminLTE this UI with our ASP.NET Core MVC application.
Downloading AdminLTE
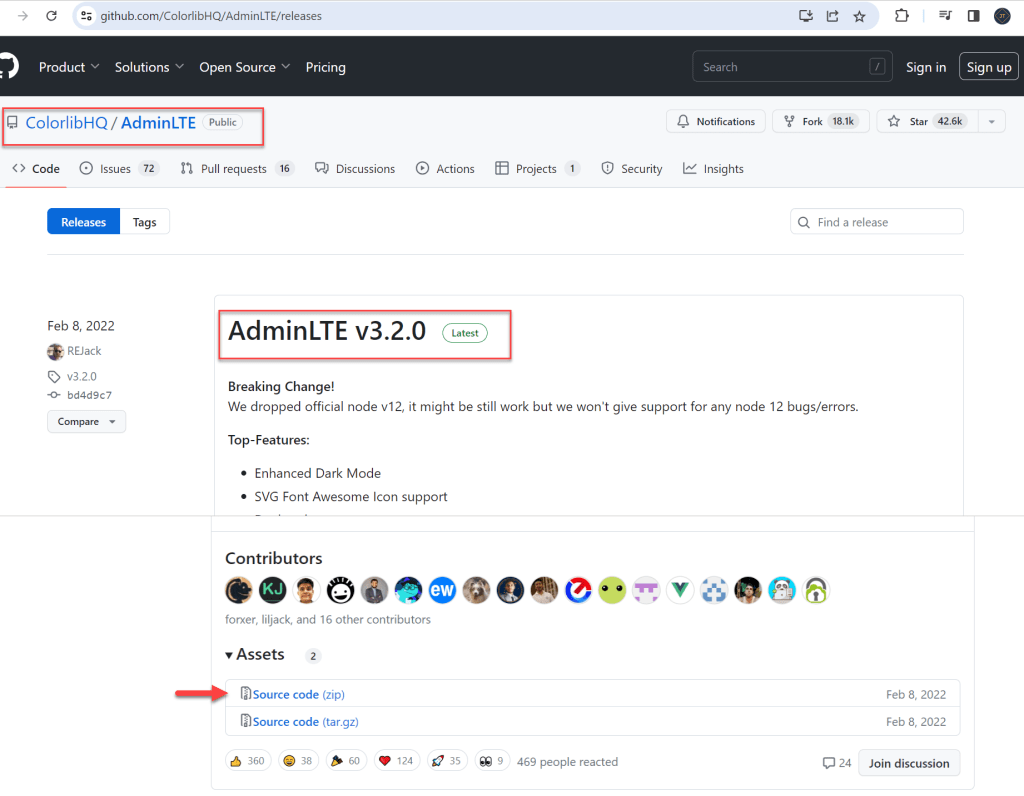
AdminLTE is completely FREE to use. Follow this link to start downloading. At the time of writing this article, 3.0.2 is the latest version available. Click on the link to Source Code to download the zipped file on to your machine.
Exploring the Folder Structure
Before we can integrate AdminLTE with ASP.NET Core, we must first examine the template’s structure. After downloading, unzip the file. A slew of folders and files can be found here. We will only need to touch a few files. I’ll give you a quick rundown of what each folder contains.
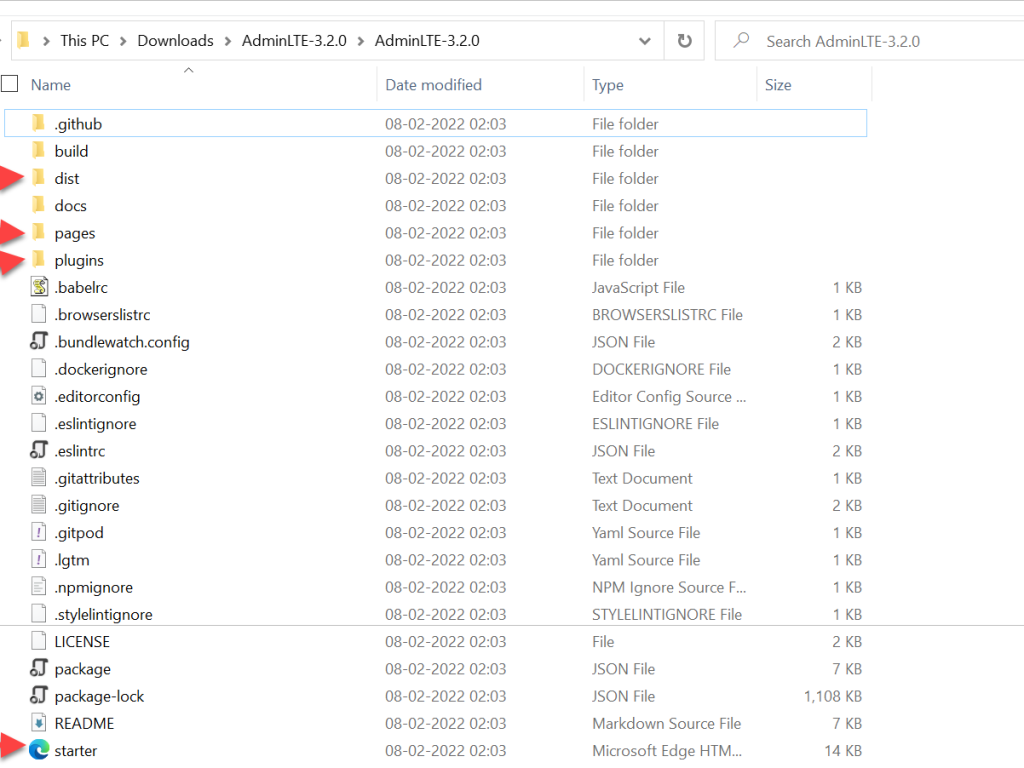
- dist – This is the distribution folder that contains all the css and js files, mostly all the static files of the application. We will need to copy this folder over to
wwrootfolder of our MVC Project later. - pages – Here you get a list of all pre-made HTML files to refer to. This is quite an important section as it uses all the available components and can be helpful to check out how components are being utilized.
- plugins – third party JS plugins like select2,
jQuery,datatables, etc are contained here. We will need this folder too. - starter.html – Here we get a minimal setup of the HTML file. We will be using this page to generate the
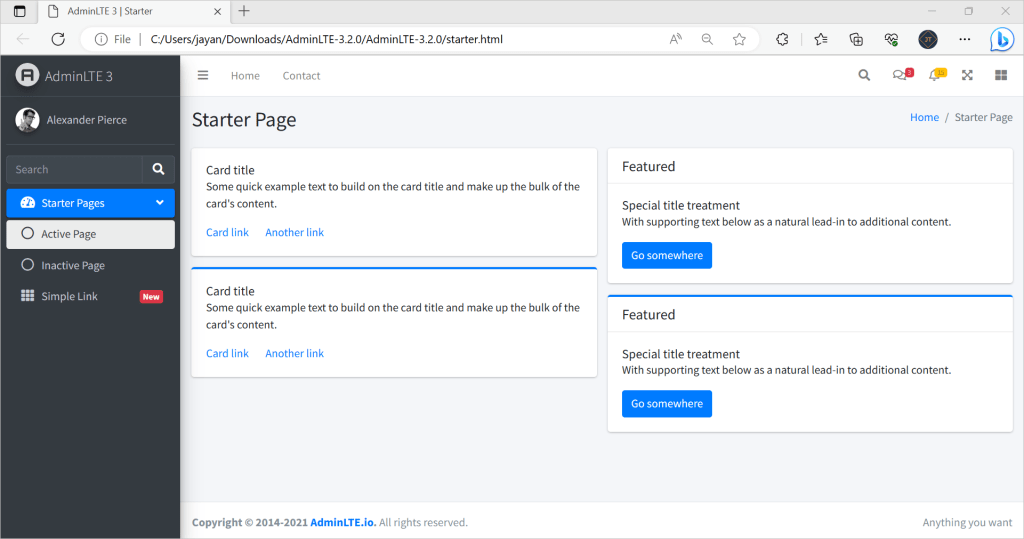
_Layout.cshmlfor our ASP.NET Core MVC Application. I have attached a screenshot below.
When we click on the starter.html file, it opens and we can see the template.
Setting up ASP.NET Core MVC Project for integrating AdminLTE
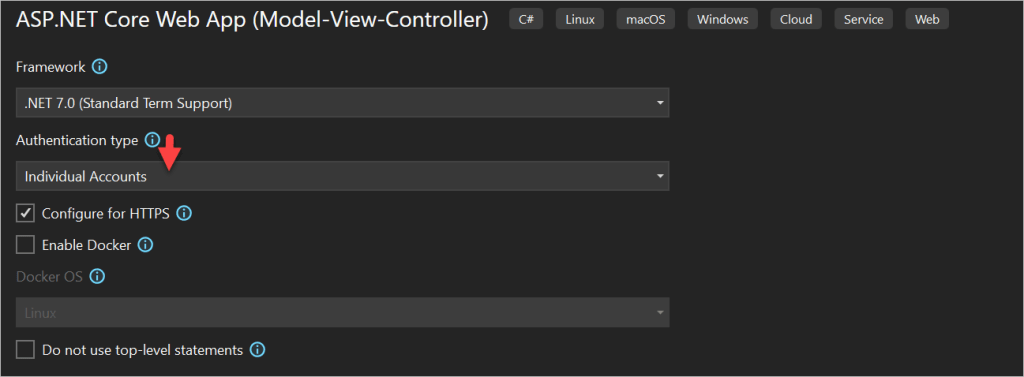
Let’s create a new ASP.NET Core Application with the Model-View-Controller (MVC) Template. Make sure you select the authentication mode to Individual User Accounts. This enables us to use the built in Authentication (using Microsoft Identity).
- Launch the Visual Studio IDE and click on “Create new project”.
- In the “Create new project” window, select “
ASP.NET Core Model View Controller(MVC) Project” from the list of templates displayed. - Click Next. In the “Configure your new project” window, specify the name and location for the new project and then click Create.
- In the “Create New ASP.NET Core Web App(Model-View-Controller)” window shown next, select .NET Core as the runtime and
.NET 7.0from the drop-down list at the top. Select “API” as the project template to create a new ASP.NET Core API application. - Ensure that the check boxes “Enable Docker Support” is disabled s we won’t be using the default feature we will add it manually later and “Configure for HTTPS” are checked.
- Make Authentication type as “Individual Accounts”
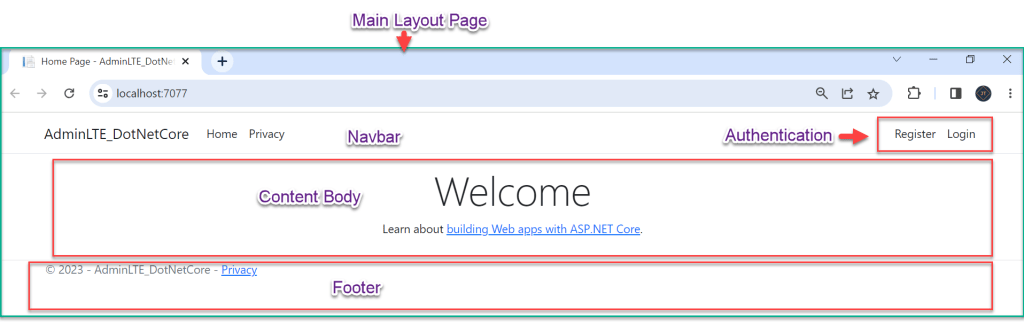
Build and run the Application. This is the default layout that comes out of the box with ASP.NET Core 7 Web Applications.
This is how the page is split into.
- Main Layout Page – This is the master layout defined at /Views/Shared/_Layout.cshtml
- Navigate Panel – Within the master layout,a partial view reference is defined that calls the _LoginPartial.cshtml page.
- Content Body – Here is where the actual content goes, this is the placeholder that render the pages.
Why this type of separation came into picture in Enterprise Application
Views (CHTML) can be generated by controllers in ASP.NET Core MVC. Consider a real-world application with numerous controllers and views. Do you really want to define the whole HTML for each view? We already know that there will be a site-wide uniform template.
So, with this Layout approach, you describe the layout cshtml once and dynamically add the content of each other page within the layout page.
Open Layout.cshtml under the folder ../Views/Shared/_Layout.cshtml, here we can see it mentioned the RenderBody()
<div class="container">
        <main role="main" class="pb-3">
            @RenderBody()
        </main>
    </div>
The @RenderBody tag loads this material, so that at runtime you get the entire web page (including the static HTML content and the dynamic code written by C#). Let’s talk about partial viewpoints now. In the _Layout.cshtml file.
<partial name="_LoginPartial" />Integrating AdminLTE with ASP.NET Core
With the basic concepts of Layouts, View and partial Views clear, it will be easier to integrate any 3rd Party HTML Layout to our ASP.NET Core Applications.
Copying the Required Resources
As previously said, AdminLTE is designed with Bootstrap. As a result, it includes numerous jquery and js integrations. We will not only replicate the HTML content, but also any related resources such as CSS, pictures, libraries, JS files, and so forth.
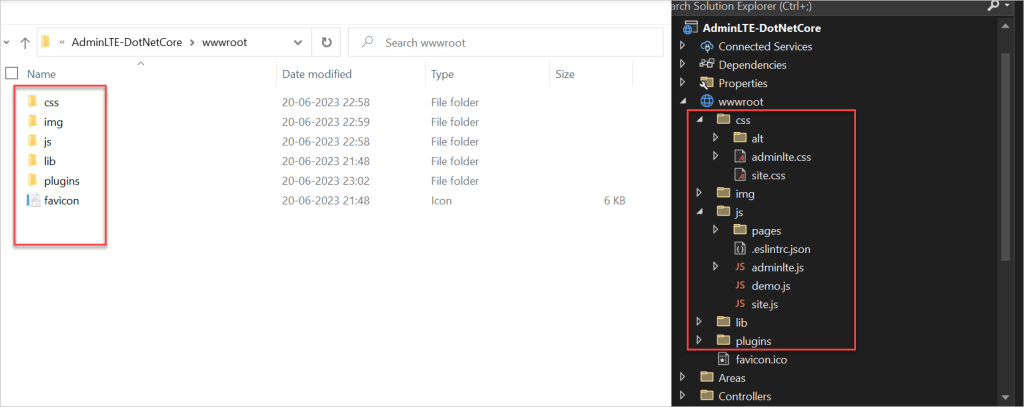
- Navigate to dist/css in our AdminLTE Folder and copy the content to the wwwroot/css folder in Visual Studio. Do the same with the js folder. Simply copy the desired folder/file and head to Visual Studio to copy the contents across. A wwwroot folder may be found here. This folder contains the static files for ASP.NET Core apps. Simply use the CTRL+V command to paste the copied file here.
- Then, move the entire image folder to the wwwroot directory. Return to the AdminLTE folder’s root and copy the plugins folder to the wwwroot folder as well.
This is what your wwwroot folder will look like once we’ve finished copying the content.
Adding Layout pages & Partial Views
An Application can have multiple Layout pages. For this tutorial, let’s not disturb the existing _Layout.cshtml page. Rather, let’s build one specifically for AdminLTE.
In the Shared Folder, create a new folder named AdminLTE. Here is where you would want to put all the .cshtml related to AdminLTE.
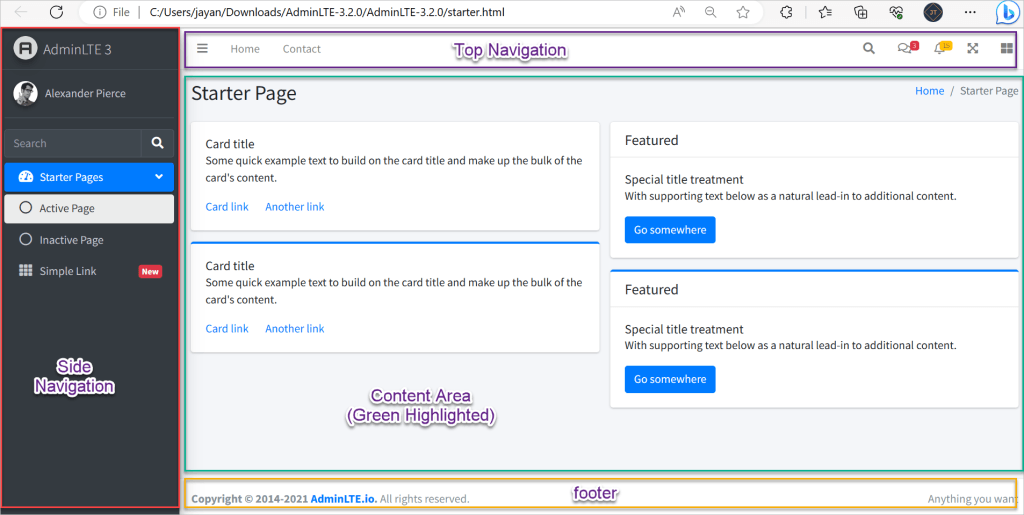
Before building the layout pages and partial views, let’s decide on how we will separate the HTML content. Note that we will be using the starter.html page to build the Layout. Open the starter.html page on your browser.
Under the AdminLTE Folder (inside on shared folder) create a new View and name it _Layout.cshtml. Make sure to uncheck the partial view and layout page options.
Here is how we could split up the page into.
- Side Navigation
- Top Navigation
- Body
- Footer
Under the AdminLTE Folder create a new View and name it _Layout.cshtml. Make sure to uncheck the partial view and layout page options.
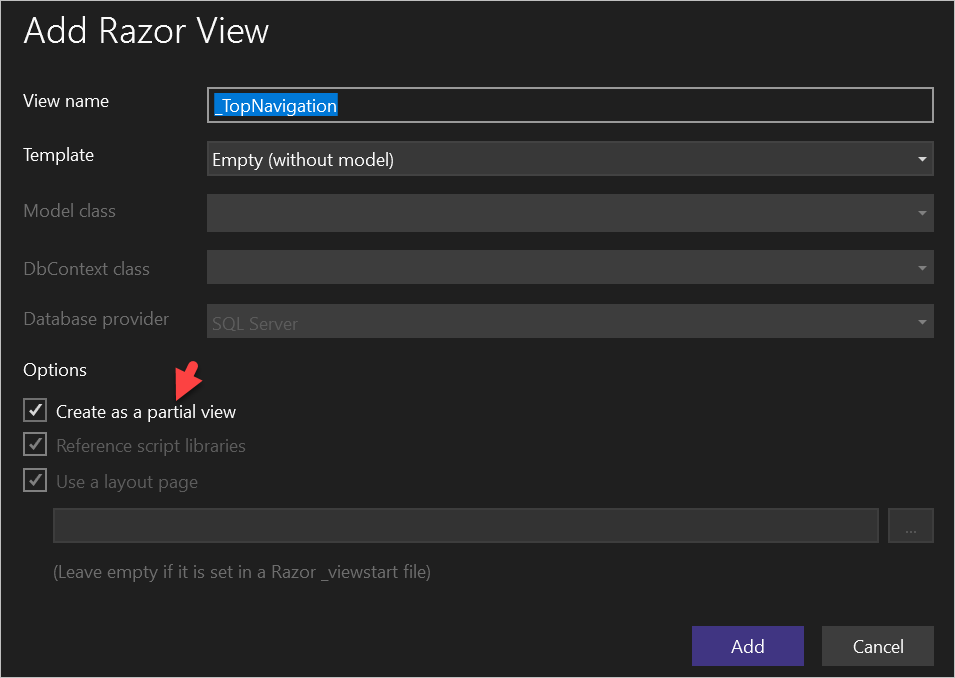
Next, let’s start adding the partial view files. In the same AdminLTE folder, add a new view and name it _MainNavigation.cshtml. And similarly create other partial views,
- _TopNavigation
- _Footer
- _Scripts
- _Styles
Let’s start adding content to each file. So, now we have the idea of how we will split the HTML. Open up starter.html in a code editor. All the required AdminLTE pages like below.
Main Navigation
Search for a class “main-sidebar”. Cut it and move it to _MainNavigation.cshtml. Here you have all the sidebar items at once place for you to extend.
<partial name="AdminLTE/_MainNavigation" />Scripts
Go to the end of the file. Above the body tag, you can find few of the script reference there. Cut it and Paste it over to _Scripts.cshml. Replace in the starter.html with the following.
<partial name="AdminLTE/_Scripts" />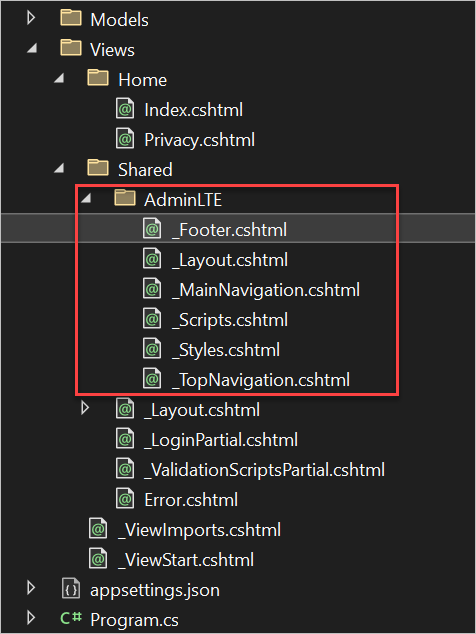
Styles
Below the title tag, you can see a bunch of stylesheet references. Cut and paste to _Scripts.cshtml and Replace with the following instead.
<partial name="AdminLTE/_Styles" />Footer
Just above where the scripts were defined, you can find the footer container. Cut this and move to _Footer.cshtml. Add the following instead in the starter.html. We will move the codes from here to the _Layout.cshtml once we are done with the partial views.
<partial name="AdminLTE/_Footer" />Top Navigation
Search for the class “main-header” and move the content over to _TopNavigation.cshtml.
<partial name="AdminLTE/_TopNavigation" />Body
You can find a div class “content”. Delete the entire child div which has a class named “row”. This is where we would want to put our @RenderBody tag.
Now, we have moved all the possible components to partial views. What remains in our code editor would look something like this. Move this to the _Layout.cshtml
@*
    For more information on enabling MVC for empty projects, visit https://go.microsoft.com/fwlink/?LinkID=397860
*@
@{
}
<!DOCTYPE html>
<html lang="en">
<head>
    <meta charset="utf-8" />
    <meta name="viewport" content="width=device-width, initial-scale=1" />
    <meta http-equiv="x-ua-compatible" content="ie=edge" />

    <title>AdminLTE 3 | Starter</title>
    <partial name="AdminLTE/_Styles" />
</head>
<body class="hold-transition sidebar-mini">
    <div class="wrapper">
        <partial name="AdminLTE/_TopNavigation" />
        <partial name="AdminLTE/_MainNavigation" />
        <div class="content-wrapper">
            <div class="content-header">
                <div class="container-fluid">
                    <div class="row mb-2">
                        <div class="col-sm-6">
                            <h1 class="m-0 text-dark">Starter Page</h1>
                        </div>
                        <div class="col-sm-6">
                            <ol class="breadcrumb float-sm-right">
                                <li class="breadcrumb-item"><a href="#">Home</a></li>
                                <li class="breadcrumb-item active">Starter Page</li>
                            </ol>
                        </div>
                    </div>
                </div>
            </div>
            <div class="content">
                <div class="container-fluid">
                    @RenderBody()
                </div>
            </div>
        </div>
        <aside class="control-sidebar control-sidebar-dark">
            <div class="p-3">
                <h5>Title</h5>
                <p>Sidebar content</p>
            </div>
        </aside>
        <partial name="AdminLTE/_Footer" />
    </div>
    <partial name="AdminLTE/_Scripts" />
</body>
</html>
Update the UI
For this, Navigate to Views/Home/Index.cshtml and mention the layout manually.
@{
    ViewData["Title"] = "Home Page";
    Layout = "~/Views/Shared/AdminLTE/_Layout.cshtml";
}
Open _Styles.cshtml and modify as below
<link rel="stylesheet" href="~/plugins/fontawesome-free/css/all.min.css">
<link rel="stylesheet" href="~/css/adminlte.min.css">
<link href="https://fonts.googleapis.com/css?family=Source+Sans+Pro:300,400,400i,700" rel="stylesheet">
Open _Scripts.cshtml and modify as below
<script src="~/plugins/jquery/jquery.min.js"></script>
<script src="~/plugins/bootstrap/js/bootstrap.bundle.min.js"></script>
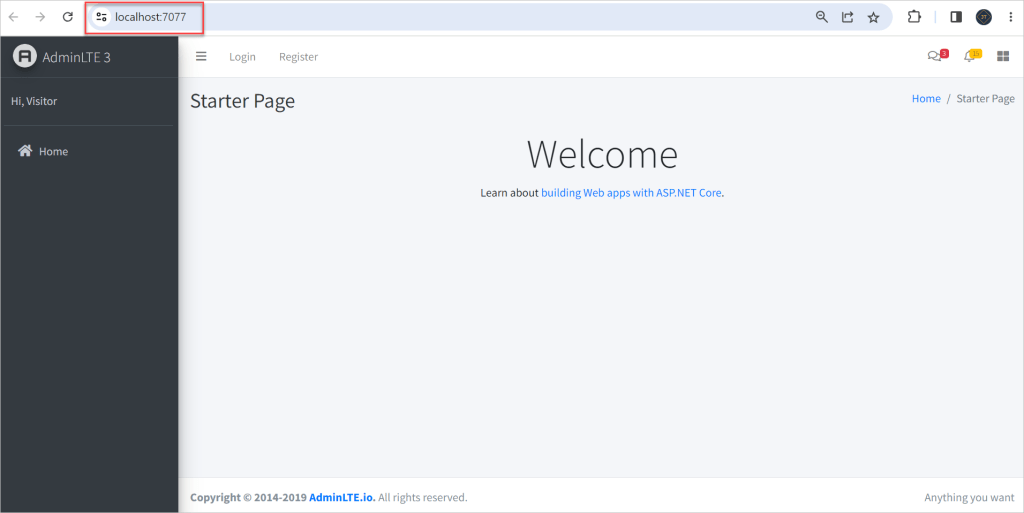
<script src="~/js/adminlte.min.js"></script>That’s it. Run the application and we can see the basic AdminLTE template like below,
Navigation Indicator
For this to work, we need data from our ASP.NET Core regarding the current controller and action method. And based on this we need to change the class of the corresponsing navigation item to active. Active means the current page.
Add a new folder in the root of the project. Name it Helpers. Under it, add a new NavigationIndicatorHelper class.
public static class NavigationIndicatorHelper
    {
        public static string MakeActiveClass(this IUrlHelper urlHelper, string controller, string action)
        {
            try
            {
                string result = "active";
                string controllerName = urlHelper.ActionContext.RouteData.Values["controller"].ToString();
                string methodName = urlHelper.ActionContext.RouteData.Values["action"].ToString();
                if (string.IsNullOrEmpty(controllerName)) return null;
                if (controllerName.Equals(controller, StringComparison.OrdinalIgnoreCase))
                {
                    if (methodName.Equals(action, StringComparison.OrdinalIgnoreCase))
                    {
                        return result;
                    }
                }
                return null;
            }
            catch (Exception)
            {
                return null;
            }

        }
    }
What this helper class does is as follows – It has a URLHelper extension method. You may also use this method on the cshtml page. It takes the controller and the name of the action method and compares it to the existing route data. If they match, we return the string “active”, else we return null.
Navigate to _MainNavigation.cshtml and make changes. Include these lines
@using static AdminLTE.MVC.Helpers.NavigationIndicatorHelper;
.
.
<a asp-controller="Home" asp-action="Index" class="nav-link @Url.MakeActiveClass("home","index")">
.
.
<a asp-controller="Home" asp-action="Privacy" class="nav-link @Url.MakeActiveClass("home","privacy")">
Integrating the UI with existing Authentication
Let me sketch a situation for you. The prerequisite is that we obtain a specific viewpoint. We have Index and Privacy pages in our instance. Assume we maintain the Index Page accessible to everyone. However, restrict access to the Privacy page and only allow access if the user is authenticated. We’ll also want to remove the item from the navigation menu if it hasn’t been authorised.
If the visitors tries to access the resource (without auth) by navigating directly to ../Home/Privacy, we redirect him to a login page. So this is what we will be doing here. This is quite a practical scenario right?
- AdminLTE comes with a default Login and Register page too! It’s located under
../pages/examplesfolder as login.html and register.html.
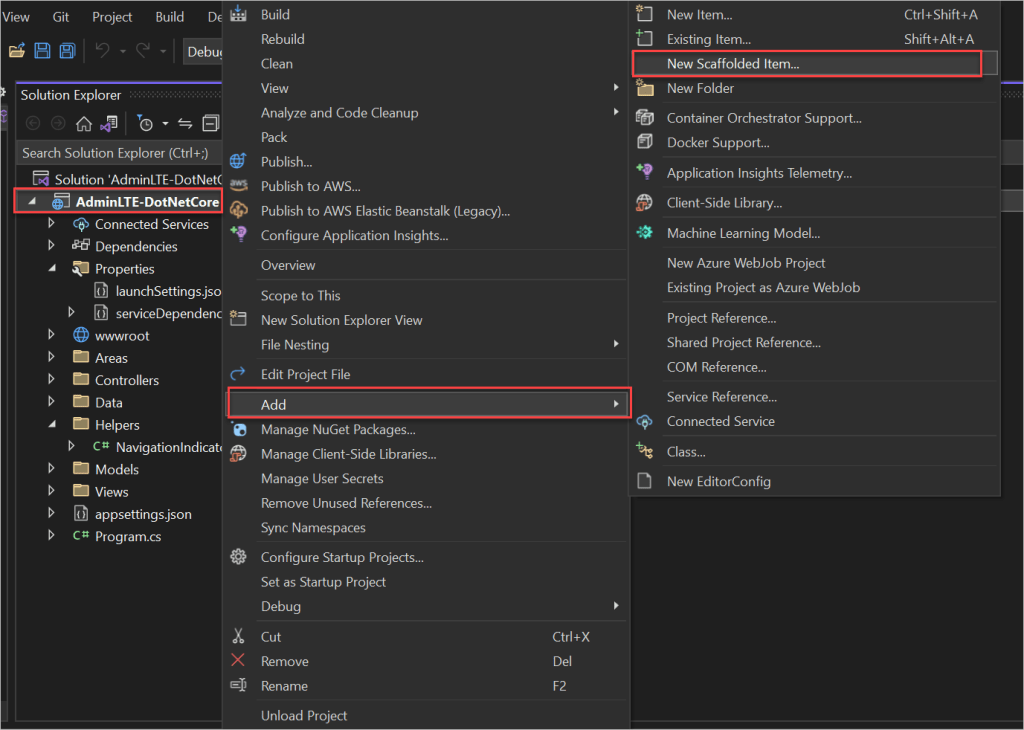
Applications that include Identity can apply the scaffolder to selectively add the source code contained in the Identity Razor Class Library. Follow these steps to bring back the Login and Register Razor Pages for us to modify.
Right click on the Project -> Add New -> New Scaffolded Item.
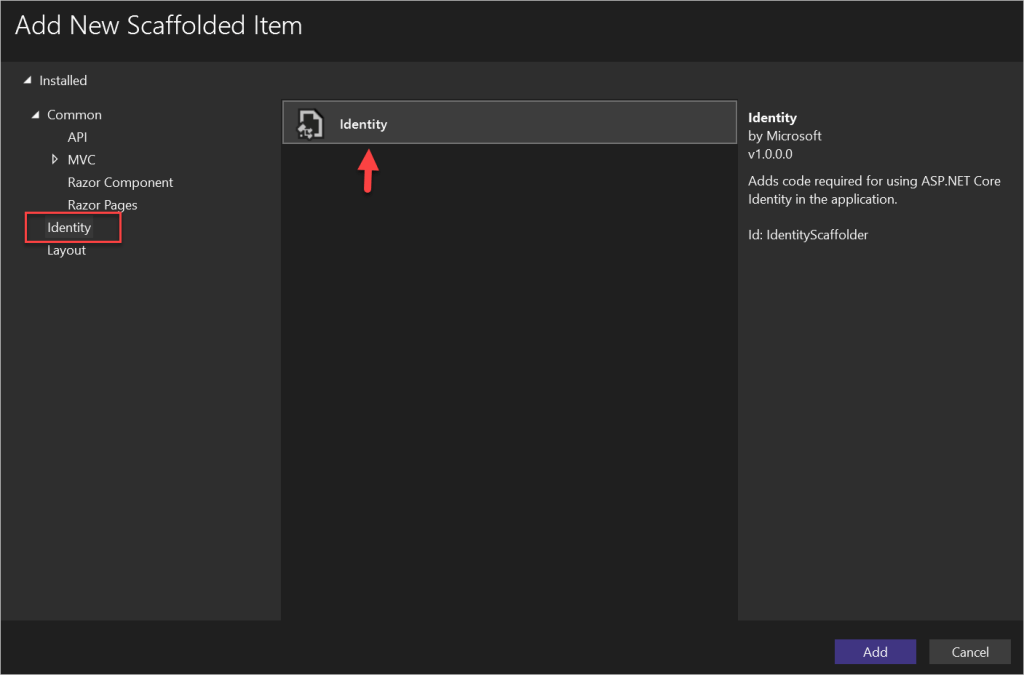
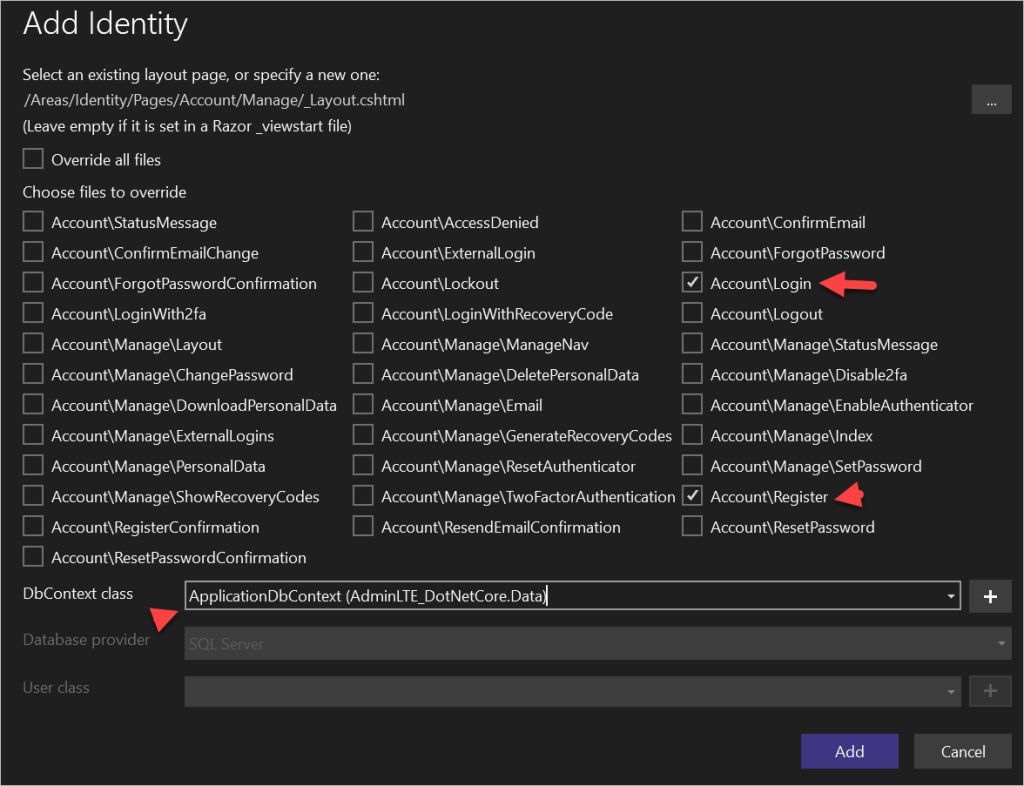
Now, we get to select the required Identity pages. To keep things simple, let’s add only the Login and Registration page. Make sure you select the data class as well. Click Add. Now, Visual Studio does its magic and generate the selected files.
In the background, Visual Studio also makes a DataContext class for you and registers it in the startup services with a default local db.
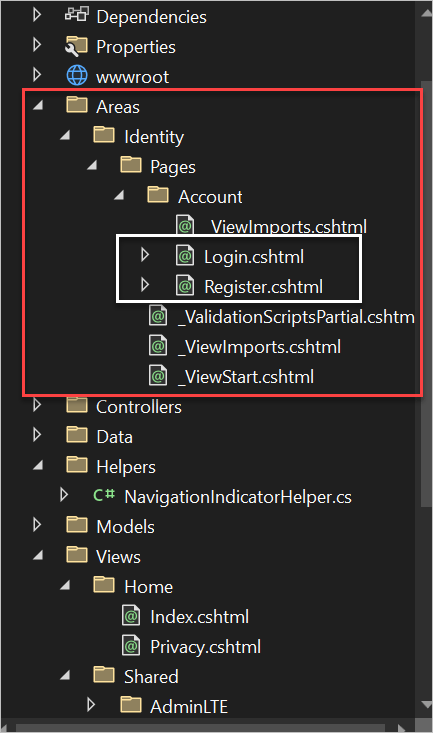
Once it’s done, you see the following folder with our selected Identity Pages.
Now we’ll connect these Views to the login.html and register.html pages. You would benefit from doing this integration on your own to better understand the circumstances.
Enabling Authentication
Now that we have our Identity Pages ready, let us setup our ASP.NET Core Application to enable Authentication.
We will secure all the Controller methods by default. As per as our requirement, we need to allow any random visitor to use the Home/Index method.
Navigate to Program.cs add these lines.
builder.Services.AddMvc(o =>
{
    var policy = new AuthorizationPolicyBuilder()
        .RequireAuthenticatedUser()
        .Build();
    o.Filters.Add(new AuthorizeFilter(policy));
});
This will add a new policy to the ASP.NET Core MVC Application that every method needs an authenticated user, unless we define it as [AllowAnonymous]
Now, go to the Home Controller and add [AllowAnonymous] above the Index method. This means that the method can be accessed by anyone.
[AllowAnonymous]
public IActionResult Index()
{
    return View();
}
Conclusion
We discussed here How to Integrate AdminLTE with ASP.NET Core. The AdminLTE template is the best open source admin dashboard & control panel theme. Built on the Bootstrap UI framework. AdminLTE provides a range of responsive, reusable, and commonly used components.
Leave behind your valuable queries and suggestions in the comment section below. Also, if you think this article helps you, do not forget to share this with your developer community. Happy Coding 🙂
Related Articles
- 🔐 Securing .NET Core Web Apps with Azure AD/Intra and MSAL
- How to Integrate AdminLTE with ASP.NET Core
- How to run ASP.Net Core Web Application in Docker Container
- ChatGPT Integration in ASP.Net Core using OpenAI
- How to use cookies in ASP.Net Core- Complete Guide
- Deploy ASP.Net Core apps to Azure App Service
- How to detect whether page is load on Mobile or Desktop browser in ASP.Net Core
- AddTransient Vs AddScoped Vs AddSingleton Example in ASP.Net Core
- Razor file compilation in ASP.NET Core
- ViewData in ASP.Net Core MVC
SUPPORT ME