
In this article we will learn about complete guide of Building CRUD REST APIs in ASP.Net Core 7.0 with EF. Here we will learn step by step process to execute to building the REST APIs and test with POSTMAN tool. .NET 7 has brought enhanced support for cloud-native scenarios, tools to make it easier to upgrade legacy projects, and simplifying the developer experience by making it easier to work with containers. Please read my previous article Authentication and Authorization in ASP.NET Core with JWT Token.
Prerequisite
– Visual Studio 2022
– .NET 7 SDK
Creating an ASP.NET Core Web API Project
- Launch the Visual Studio IDE and click on “Create new project”.
- In the “Create new project” window, select “ASP.NET Core Web API Project” from the list of templates displayed.
- Click Next. In the “Configure your new project” window, specify the name and location for the new project and then click Create.
- In the “Create New ASP.NET Core Web Application” window shown next, select .NET Core as the runtime and
.NET 7.0from the drop-down list at the top. Select “API” as the project template to create a new ASP.NET Core API application. - Ensure that the check boxes “Enable Docker Support” is disabled s we won’t be using those features here and “Configure for HTTPS” are checked.
- Ensure that Authentication is set as “No Authentication” as we won’t be using authentication either and Click Create.
Here In this example, we will create the Employee CRUD API
Adding the required packages for creating CRUD
Install-Package Microsoft.EntityFrameworkCore-Version 7.0.1
Install-Package Microsoft.EntityFrameworkCore.SqlServer-Version 7.0.1
Install-Package Microsoft.EntityFrameworkCore.Tools-Version 7.0.1
Install-Package Microsoft.VisualStudio.Web.CodeGeneration.Design-Version 7.0.1
Creating Models
We have created two models: Employee and Department with following properties like below.
- [Table(“Employees”)] is belong to
System.ComponentModel.DataAnnotations.Schemanamespace. Here Employees is the table name that we want to create dynamically using EF code first and the same for departments.
 [Table("Employees")]
    public class Employee
    {
        [Key]
        public int EmployeeId { get; set; }
        public string FullName { get; set; }
        public string Designation { get; set; }
        public int? Department { get; set; }
        public int? Status { get; set; }
        public DateTime? CreateDate { get; set; }
        public int? CreatedBy { get; set; }
        public DateTime? UpdatedDate { get; set; }
        public int? UpdatedBy { get; set; }
    }
[Table("Departments")]
public class Department
{
[Key]
public int DepartmentId { get; set; }
public string DepartmentName { get; set; }
}Adding Database Connection String in the Appsettings.json
"ConnectionStrings": {
    "DefaultConnection": "Server=JAYANTT;Database=CommunicationDB;Trusted_Connection=True;MultipleActiveResultSets=True;Encrypt=False;"
  }
Adding Context Class to generate the EF Code First Approach
- We have create the
DataContextclass and implement theDbContexti.e form namespaceMicrosoft.EntityFrameworkCore. - Here we added Employee and Department DbSet to add the table information.
OnModelCreatingadded static data information into Department table and added the default value condition.
 public class DataContext : DbContext
    {
        public DataContext(DbContextOptions<DataContext> options)
            : base(options)
        {
        }

        public DbSet<crud_api_aspnetcore7.Models.Employee> Employees { get; set; } = default!;

        public DbSet<crud_api_aspnetcore7.Models.Department> Departments { get; set; } = default!;

        protected override void OnModelCreating(ModelBuilder modelBuilder)
        {
            modelBuilder.Entity<Department>().HasData(
                new Department {  DepartmentId= 1,  DepartmentName = "IT"},
                new Department { DepartmentId = 2, DepartmentName = "HR" },
                new Department { DepartmentId = 3, DepartmentName = "Marketing" },
                new Department { DepartmentId = 4, DepartmentName = "Sales" }
            );
            modelBuilder.Entity<Employee>()
                .Property(b => b.CreateDate)
                .HasDefaultValue(DateTime.Now);
            modelBuilder.Entity<Employee>()
                .Property(b => b.CreatedBy)
                .HasDefaultValue(1);
            modelBuilder.Entity<Employee>()
                .Property(b => b.UpdatedBy)
                .HasDefaultValue(null);
            modelBuilder.Entity<Employee>()
             .Property(b => b.UpdatedDate)
             .HasDefaultValue(null);
        }
    }
Getting the Connection string value in Program.cs
builder.Services.AddDbContext<DataContext>(options =>
    options.UseSqlServer(builder.Configuration.GetConnectionString("DefaultConnection") ?? throw new InvalidOperationException("Connection string 'crud_api_aspnetcore7Context' not found.")));
Adding Employee Controller for CRUD
The following REST APIs are created:
- To list all employees: HTTP Get method
- Get employee detail: HTTP Get method
- Update employee detail: HTTP Put method
- Create employee : HTTP Post method
- Delete employee : HTTP Delete method
    [Route("api/[controller]")]
    [ApiController]
    public class EmployeesController : ControllerBase
    {
        private readonly DataContext _context;

        public EmployeesController(DataContext context)
        {
            _context = context;
        }

        // GET: api/Employees
        [HttpGet]
        public async Task<ActionResult<IEnumerable<Employee>>> GetEmployees()
        {
          if (_context.Employees == null)
          {
              return NotFound();
          }
            return await _context.Employees.ToListAsync();
        }

        // GET: api/Employees/5
        [HttpGet("{id}")]
        public async Task<ActionResult<Employee>> GetEmployee(int id)
        {
          if (_context.Employees == null)
          {
              return NotFound();
          }
            var employee = await _context.Employees.FindAsync(id);

            if (employee == null)
            {
                return NotFound();
            }

            return employee;
        }

        // PUT: api/Employees/5
        // To protect from overposting attacks, see https://go.microsoft.com/fwlink/?linkid=2123754
        [HttpPut("{id}")]
        public async Task<IActionResult> PutEmployee(int id, Employee employee)
        {
            if (id != employee.EmployeeId)
            {
                return BadRequest();
            }

            _context.Entry(employee).State = EntityState.Modified;

            try
            {
                await _context.SaveChangesAsync();
            }
            catch (DbUpdateConcurrencyException)
            {
                if (!EmployeeExists(id))
                {
                    return NotFound();
                }
                else
                {
                    throw;
                }
            }

            return Ok("Updated the information successfully !");
        }

        // POST: api/Employees
        // To protect from overposting attacks, see https://go.microsoft.com/fwlink/?linkid=2123754
        [HttpPost]
        public async Task<ActionResult<Employee>> PostEmployee(Employee employee)
        {
          if (_context.Employees == null)
          {
              return Problem("Entity set 'DataContext.Employees'  is null.");
          }
            _context.Employees.Add(employee);
            await _context.SaveChangesAsync();

            return CreatedAtAction("GetEmployee", new { id = employee.EmployeeId }, employee);
        }

        // DELETE: api/Employees/5
        [HttpDelete("{id}")]
        public async Task<IActionResult> DeleteEmployee(int id)
        {
            if (_context.Employees == null)
            {
                return NotFound();
            }
            var employee = await _context.Employees.FindAsync(id);
            if (employee == null)
            {
                return NotFound();
            }

            _context.Employees.Remove(employee);
            await _context.SaveChangesAsync();

            return Ok("Deleted the information successfully !");
        }

        private bool EmployeeExists(int id)
        {
            return (_context.Employees?.Any(e => e.EmployeeId == id)).GetValueOrDefault();
        }
    }
Entity Framework Code First Migrations
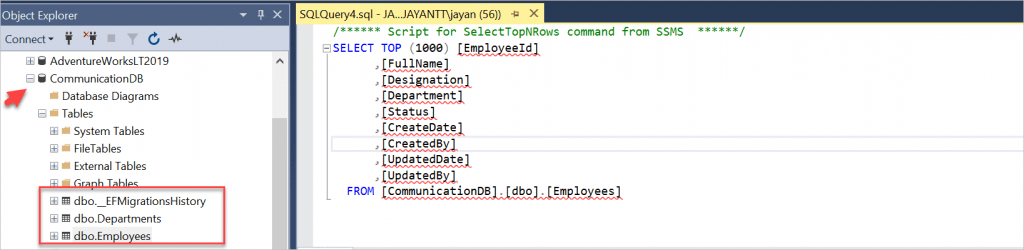
Code first migrations here help you to create the database for us with following tables Employees and Departments.
// Add migrations
Add-Migration
// After migrations complete then run the below command, it create the database
Update-Database- Open Package manager console of the project and type the command
Add-Migrationand hit enter. - After executing the command it adds a new file with the name
"Initial"prefixed with the date time stamp. It prefixes the date time stamp so that it could track the various migrations added during development and segregate between those. Open the file and we see the class named “Initial” deriving from DbMigration class. This class contains two methods that are overridden from DbMigration class i.e. the base class. The method names are Up() and Down(). - The final command that creates the database and respective tables out of our context and model. It executes the Initial migration that we added and then runs the seed method from the configuration class. This command is smart enough to detect which migrations to run. For example it will not run previously executed migrations and all the newly added migrations each time will be taken in to account to be executed to update the database. It maintains this track as the database firstly created contains an additional table named __MigrationHistory that keeps track of all the migrations done.
- The command is Update-Database

After updating the above command, we can see on below picture the Database has been created with following tables.
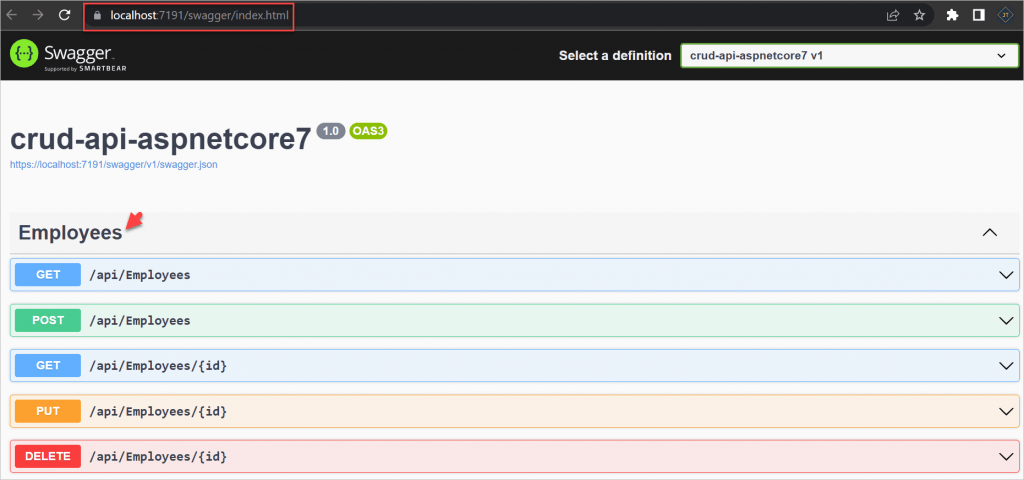
That’s it. Run the application and you can see the REST APIs are in the swagger. The API URL is: https://localhost:7191
Test the CRUD API in Postman
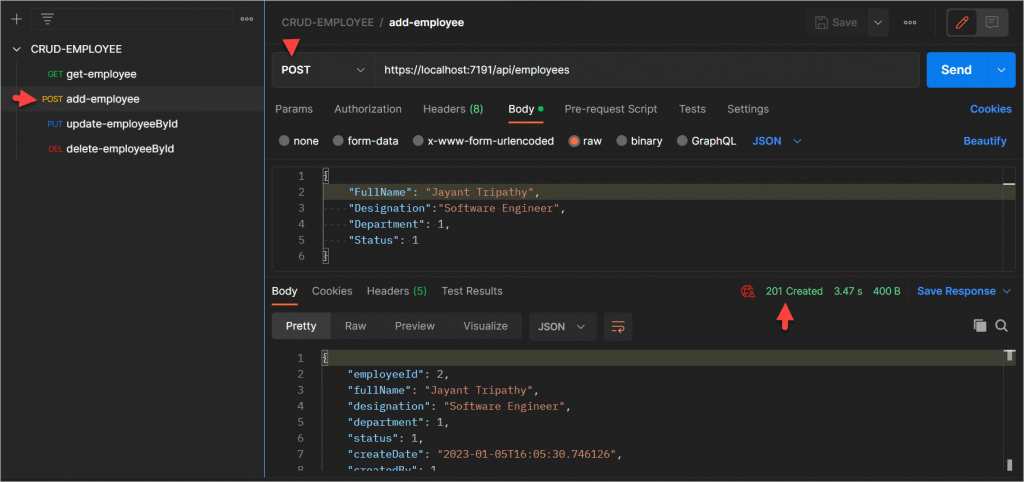
Adding the Employee Information- POST
- Open the Postman Tool and make as method as
POSTand then add the below API with the employee information in the body section and click send. - You can see on below it returned as 201 created, and returned the created employee.
https://localhost:7191/api/employees
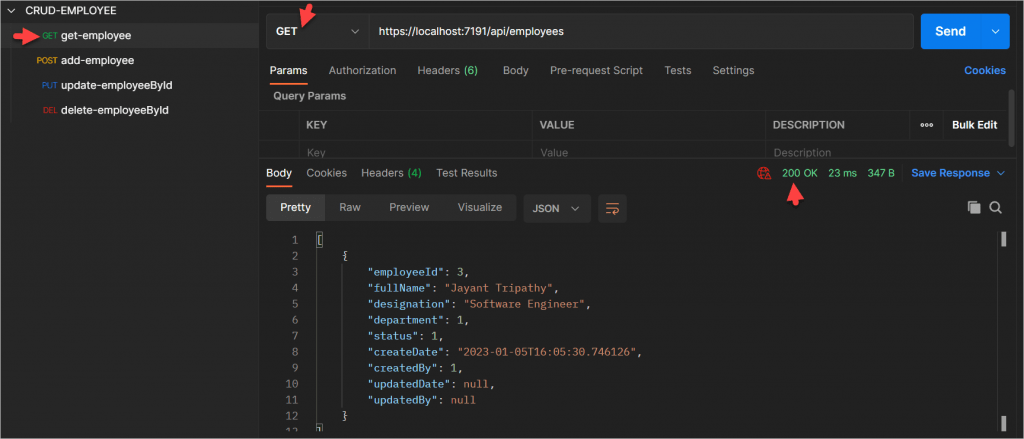
Getting All the Employee Information- GET
- Open the Postman Tool and make as method as GET and then add the below API with the employee information in the body section and click send.
- You can see on below it returned as 200 success with returned employees.
https://localhost:7191/api/employees
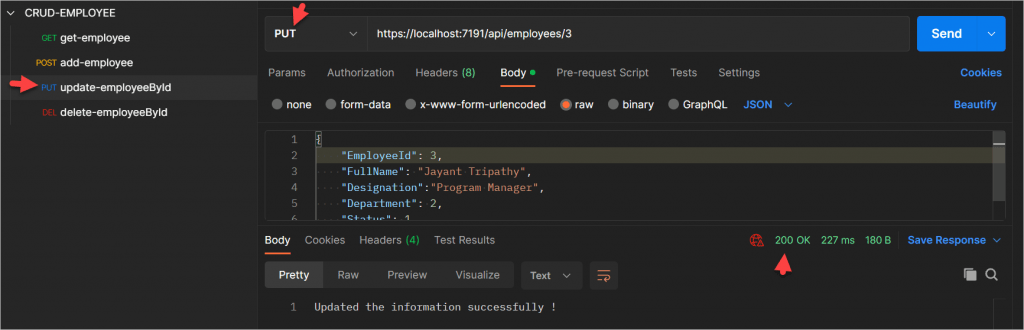
Updating the Employee Information- PUT
- Open the Postman Tool and make as method as PUT and then add the below API with the employee information in the body section and click send.
- You can see on below it returned as 200 success with returned message, I have updated some information within the body section and it updated in DB.
https://localhost:7191/api/employees/3
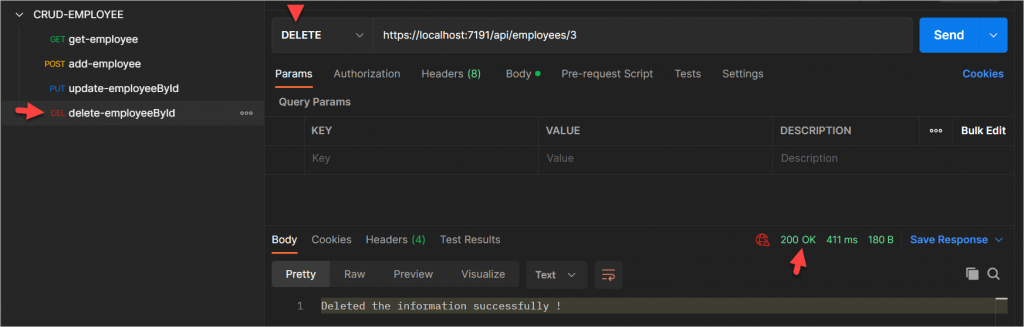
Deleting the Employee Information- DELETE
- Open the Postman Tool and make as method as DELETE and then add the below API with the employee information in the body section and click send.
- You can see on below it returned as 200 success with returned message and it deleted the record.
https://localhost:7191/api/employees/3
Conclusion
We discussed in the article about Building CRUD REST APIs in ASP.Net Core 7.0 with EF. We learnt here step by step process to execute to building the REST APIs and test with POSTMAN tool.
Leave behind your valuable queries and suggestions in the comment section below. Also, if you think this article helps you, do not forget to share this with your developer community. Happy Coding 🙂
Related Articles
- Step-by-Step Guide to Using Azure Redis Cache in ASP.NET Core 9 Web API
- .NET 8 Authentication with Identity in a Web API using Bearer Tokens and Cookies
- How to convert Text To Speech With Azure Cognitive Services using Angular and .Net Core
- CRUD operation using the repository pattern with .Net 8, Ef-Core, and MySQL
- How to use Response Compression in .NET Core
- How to Integrate GraphQL in .Net Core
- Upload Download and Delete files in Azure Blob Storage using ASP.NET Core and Angular
- How to upload files to Azure Blob Storage using Asp.Net Core Web API
- How to store app secrets in ASP.NET Core using Secret Manager
- Logging into Azure App Service with ASP.Net Core
Jayant Tripathy
Coder, Blogger, YouTuberA passionate developer keep focus on learning and working on new technology.