
In this article we will learn about in details of Hangfire with ASP.Net Core 7.0- Background Jobs. Almost all applications require some kind of background work. Whether it’s a long and arduous work or a repeated job that we have to do every other day, we’ll discover how to quickly implement it in this post. We’ll be using Hangfire, an open-source ASP.NET Core library, for this.
Running jobs in the background is a common programming task that we face on a regular basis. And performing these jobs correctly without breaking your code isn’t easy, but it’s also not difficult. I used to use Windows services to schedule different operations within my C# program. Then I discovered Hangfire, a near-perfect library.
Find Source Code here in this link https://github.com/JayantTripathy/Hangfire.API
In my earlier blog post, you can find various background jobs techniques that I posted, but my preference is Hangfire and in this blog post we can discuss it in details.
What Is Hangfire?
Hangfire is an open-source and well-documented task scheduler for ASP.NET and ASP.NET Core. It’s multi-threaded, easily scalable, and offers a variety of job types. It’s well structured, simple to use, and gives a powerful performance.
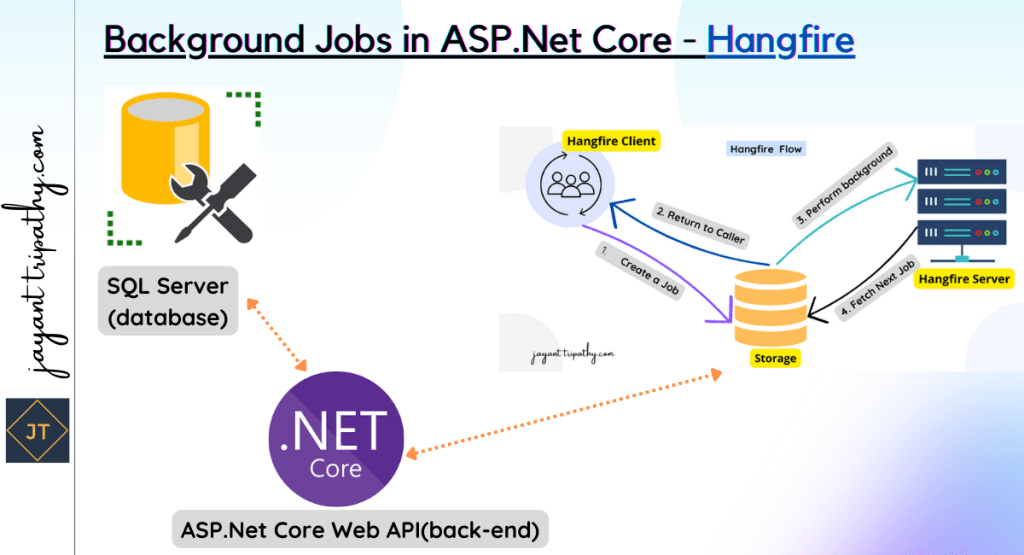
Hangfire Workflow
The client, server, and storage are the three essential components of Hangfire architecture. They are connected throughout the process and rely on one another.
Role of Each Component
Let’s see what each component is responsible for:
- Hangfire client – These are the actual libraries inside our application. The client creates the job, serializes its definition, and makes sure to store it into our persistent storage.
- Hangfire storage – This is our database. It uses a couple of designated tables that Hangfire creates for us. It stores all the information about our jobs – definitions, execution status, etc. Hangfire supports both RDBMS and NoSQL options, so we can choose which one works for our project. By default, it uses SQL Server, but any other supported option is also easy to configure.
- Hangfire server – The server has the task of picking up job definitions from the storage and executing them. It’s also responsible for keeping our job storage clean from any data that we don’t use anymore. The server can live within our application, or it can be on another server. It always points to the database storage so its location doesn’t play a role, but this diversity can be very useful.
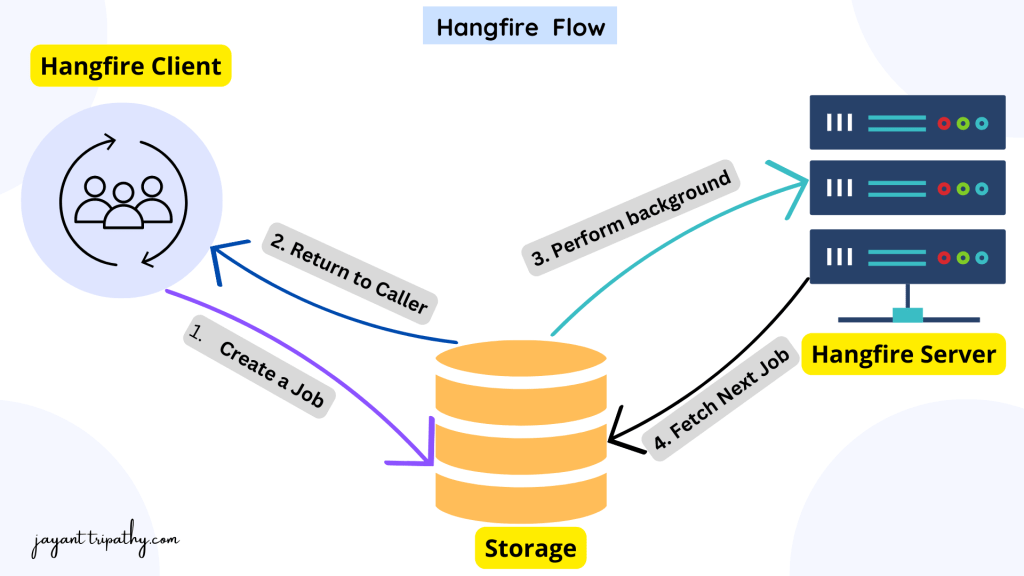
Since Hangfire is designed to be as flexible as possible, we can manually extend some of its components, such as storage implementation, task creation, and job activation processes, to meet unique requirements.
The workflow between components is straightforward:
After we specify our task in the code and call the appropriate Hangfire method to create it, the Hangfire client creates the job and stores it in the database. The control then returns to the application so the main thread can continue with its work. When a job is in the storage, the server picks it up and creates a background thread to process the fetched job.
Introduction to Background Tasks
To keep our applications running smoothly and our users satisfied, we can leverage a notion known as background processing for specific activities. A task is a method in our programming that contains logic that we must run. Processing it in the background allows us to execute it independently of the application’s main thread.
When Should We Use Background Processing?
There are many situations in which we need to keep specific work away from the spotlight. Sometimes it’s a long-running task that the UI data display doesn’t depend on and it slows down the application flow.
An example might be uploading a bunch of photos to a social media platform. We wouldn’t want this action to prevent our users from using the platform while we process the photos. We can do the upload task behind the scenes and the user can continue to browse freely.
We also may need to schedule some tasks to run every hour, week, or maybe a month. Like watching out for inactive users or sending subscription invoices. Or we may need to send a notification to our user once, except not right now, but in about three days.
We can handle all these tasks with a good background task scheduler that takes care of the details for us. This is where Hangfire shines.
ASP.NET Core Background Jobs
Background jobs are methods or functions that may take a long time to complete (unknown amount of time). These jobs, if launched on the main thread of our application, may or may not block user interaction, giving the impression that our.NET Core Application has hung and is not responding. This is especially important for client-facing applications. As a result, we have background jobs that, like multithreading, run in another thread, making our application appear rather asynchronous.
Integrating Hangfire in ASP.NET Core 7.0
Let’s start with a specific scenario so that we may understand Hangfire and its full potential. Assume we are creating an API that is in charge of delivering emails to users in various conditions, this is a better method to explain Hangfire. Hangfire is one of the simplest libraries to learn, yet it is also one of the most powerful. It is one of the packages that completely aids in the development of asynchronously decoupled apps.
As previously stated, Hangfire stores Job Data in a database. In this tutorial, we will use the MSSQL Server Database. During the initial run, Hangfire automatically creates the necessary tables.
Setting up the ASP.Net Core 7.0 Web API Project
Using the below steps we can create the sample ASP.Net Core 7.0 Web API Project.
- Launch the Visual Studio IDE and click on “Create new project”.
- In the “Create new project” window, select “
ASP.Net Core Web API Project” from the list of templates displayed. - Click Next. In the “Configure your new project” window, specify the name and location for the new project and then click Create.
- In the “ASP.Net Core Web API Project” window shown next, select .NET Core as the runtime and
.NET 7.0from the drop-down list at the top. Select “API” as the project template to create a new ASP.NET Core API application. - Ensure that the check boxes “Enable Docker Support” is disabled s we won’t be using the default feature we will add it manually later and “Configure for HTTPS” are checked.
- Make Authentication type as “None” as we are not using any authentication mode here.
- You can check the Open API support if you want to use Swagger
Installing the Hangfire Packages
Installing the only package you would need to set-up Hangfire.
Install-Package HangfireFor connecting to the MS SQL Server database we need to install another package
Install-package Microsoft.Data.SqlClientConfiguring Hangifire
We are now ready to configured the package so that it will be supported by our ASP.NET Core API application. This is a simple step, and once you install the package, you will be offered a small Readme that shows you how to complete the configuration.
Open up the appsettings.json file in the Hangfire.API Project and add the connection string like below, for your case you can add the SQL server connection accordingly.
I have created the blank database named as “HangfireDB” in my MS SQL Server.
"ConnectionStrings": {
    "DefaultConnection": "Server=JAYANTT;Database=HangfireDB;Trusted_Connection=True;MultipleActiveResultSets=True;Encrypt=False;"
  }
Navigate to Program.cs and modify the code as shown below.
- Line #2- Adds Hangfire service to our application. We have also mentioned the Storage to be used, MSSQL Server, along with the connection string/name (I have added the connection string in the
appsettings.jsonfile). - Line #3- Here fires up the Hangfire Server, which is responsible for job processing.
- Line #18- Then finally add the app.UseHangfireDashboard middleware – It gives us access to the Hangfire dashboard through our ASP.NET Core application. The dashboard will be accessible via the
/mydashboardURL.
// Add services to the container.
builder.Services.AddHangfire(x => x.UseSqlServerStorage(builder.Configuration.GetConnectionString("DefaultConnection")));
builder.Services.AddHangfireServer();

builder.Services.AddControllers();
// Learn more about configuring Swagger/OpenAPI at https://aka.ms/aspnetcore/swashbuckle
builder.Services.AddEndpointsApiExplorer();
builder.Services.AddSwaggerGen();

var app = builder.Build();

// Configure the HTTP request pipeline.
if (app.Environment.IsDevelopment())
{
    app.UseSwagger();
    app.UseSwaggerUI();
}
app.UseHangfireDashboard("/mydashboard");
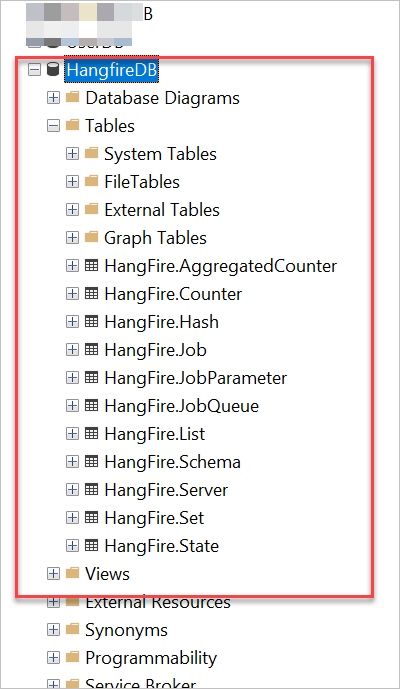
Hangfire Database Schema
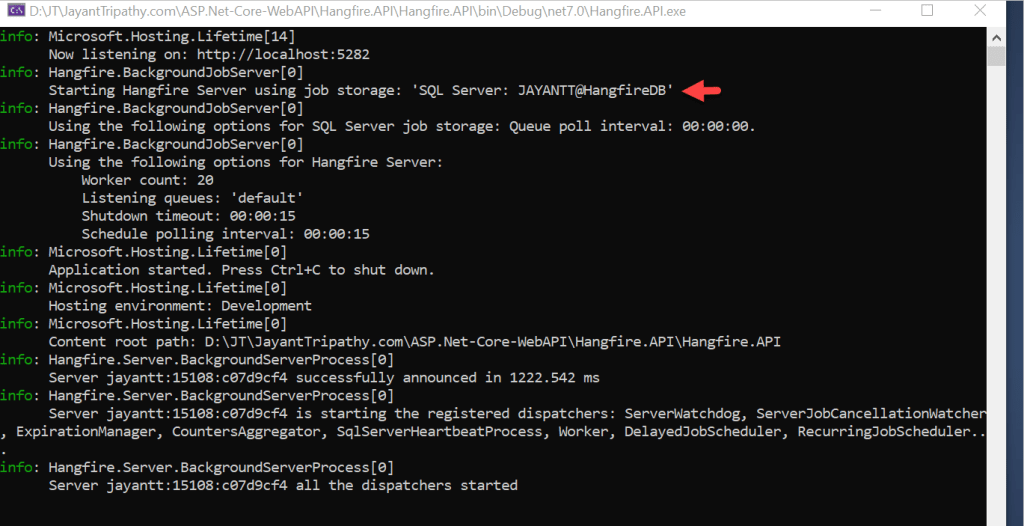
When you start your ASP.NET Core Application for the time, Hangfire checks if you have an associated Hangfire Schema available in your database. If not, It will create a bunch of tables for you. Here is how your database would look like, and you can see in the prompt window the Hangfire server is running.
Hangfire Dashboard
After the application load, navigate to /mydashboard. You will be able to view the Hangfire dashboard like below,
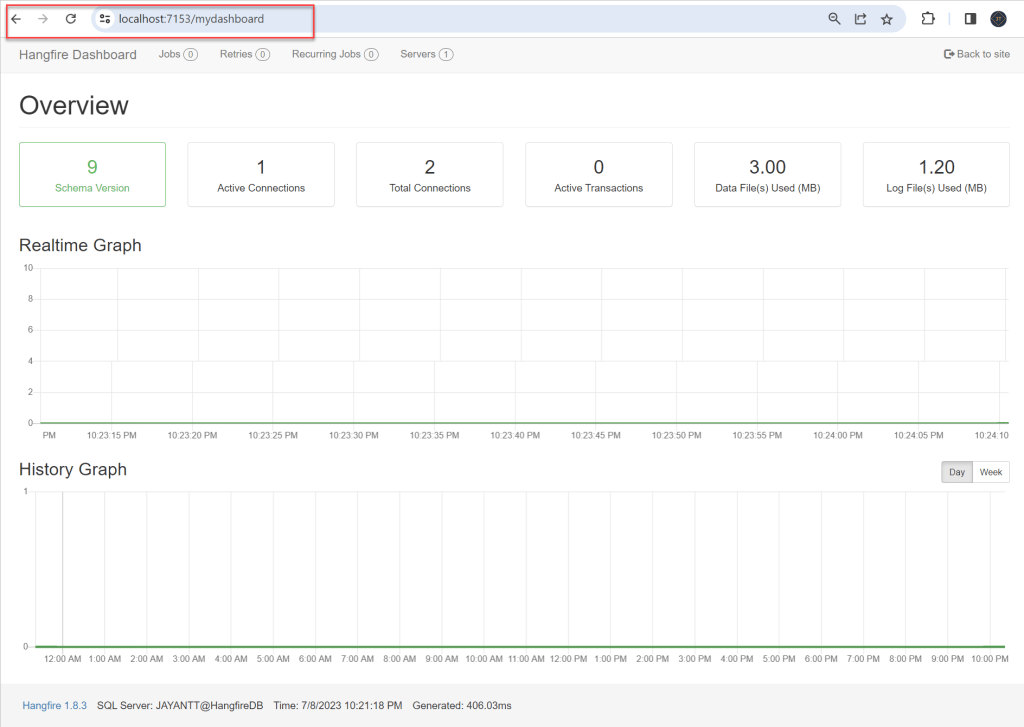
Within the dashboard, we can see all the running and scheduled jobs that we create with our Hangfire client. We can also monitor servers, job retries, failed jobs and keep an eye on all jobs in the queue. Another great thing that we can do in the dashboard is we can manually trigger any existing jobs.
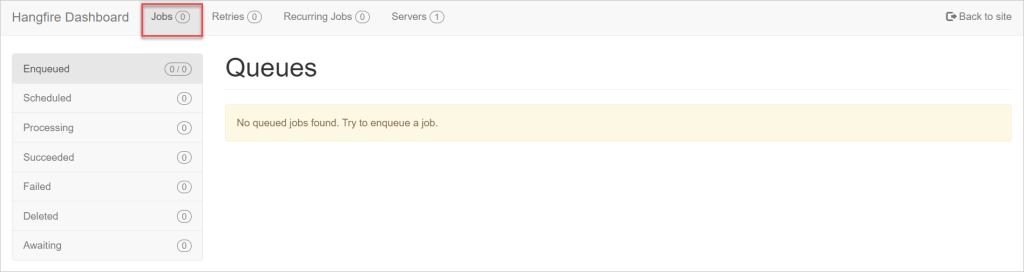
Hangfire Process
Here on below by navigating the Tabs we can see the Jobs type process.
All the jobs that are available in the datastore ( our MSSQL Server) will be listed here. You will get a complete idea of the state of each job (Enqueued, Succeeded, Processing, Failed, etc) on this screen.
Jobs do fail from time to time owing to external circumstances. In our scenario, our API attempts to send an email to the user, but an internal connection problem prevents the operation from being done. When a job fails, Hangfire keeps retrying it until it succeeds. (configurable)

What if you need to mail the invoice to the user on a monthly basis? Recurring jobs are a key element of Hangfire. This page allows you to keep track of all the jobs that have been configured.

Remember that we mentioned services while configuring Hangfire in the Program.cs class. AddHangfireServer().. This is the tab that displays all of the active Hangfire Servers. These servers are in charge of processing jobs. Assume you haven’t yet added the services.You can still add Hangfire Jobs to the database using AddHangfireServer() in the Startup class, but they won’t be run until you fire up a Hangfire Server.

Setting of Email Service to use in Hangfire Controller
We have added an Interface Services/IEmailService.cs that has function SendEmail which will be implemented in dummy service to write to console that email has been sent.
public interface IEmailService
    {
        void SendEmail(string backGroundJobType, string startTime);
    }
Add class Services/EmailService that will implement interface IEmailService & will contain an implementation of SendEmail method to writing to console window.
 public class EmailService : IEmailService
    {
        public void SendEmail(string backGroundJobType, string startTime)
        {
            Console.WriteLine(backGroundJobType + " - " + startTime + " - Email Sent - " + DateTime.Now.ToLongTimeString());
        }
    }
Now register this service in the application dependency injection container so that it can be injected into the controller. To add EmailService to the container add the following line of code in Method program.cs file
builder.Services.AddTransient<IEmailService, EmailService>();Now let’s add a new API controller i.e. HangfireController into which we will inject IEmailService to call method SendEmail from service in controller action method SendEmaila and also Inject other services for background job.
 public class HangfireController : ControllerBase
    {
        private IEmailService _emailService;
        private IBackgroundJobClient _backgroundJobClient;
        private IRecurringJobManager _recurringJobManager;

        public HangfireController(IEmailService emailService, IBackgroundJobClient backgroundJobClient,
            IRecurringJobManager recurringJobManager)
        {
            _emailService = emailService;
            _backgroundJobClient = backgroundJobClient;
            _recurringJobManager = recurringJobManager;
        }
 }
Job Types in Hangfire
Background Jobs in ASP.NET Core (or say any technology) can be of many types depending on the requirements. Let’s go through the Job Types available with Hangfire with proper implementation and explanation on our ASP.NET Core API Project.
Fire and Forget Jobs
Fire-and-forget jobs are executed only once and almost immediately after creation. We will create our first background Job. When we create this type of job, the server executes it only once, as soon as it can.
[HttpGet]
[Route("FireAndForgetJob")]
public ActionResult CreateFireAndForgetJob()
{
_backgroundJobClient.Enqueue(() => _emailService.SendEmail("Fire-and-Forget Job", DateTime.Now.ToLongTimeString()));
return Ok();
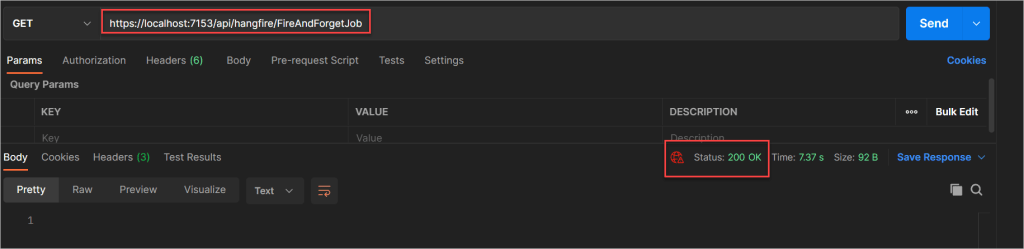
}Our new endpoint uses the injected Hangfire interface to schedule this type of job. We call the interface’s Enqueue() method and pass it our FireAndForgetJob() text on email service method call as the parameter. This convenient Enqueue method takes care of creating and saving the job definition to our storage and, of course, enqueuing it for processing.
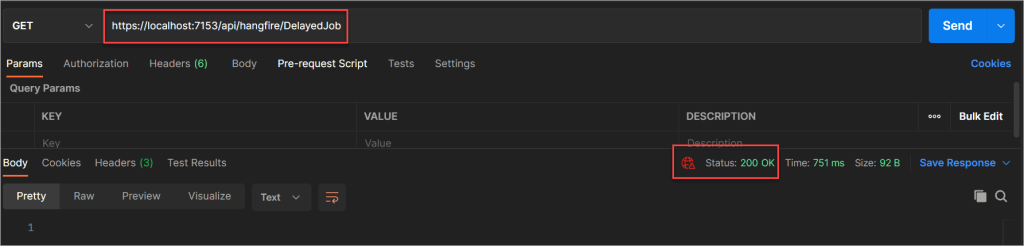
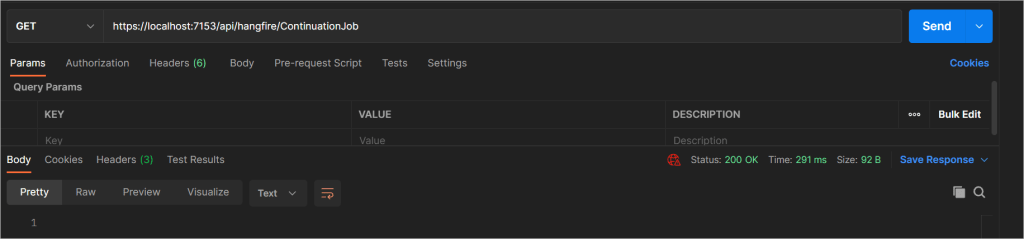
Run this GET method on the POSTMAN and you can see the Result as 200 success.
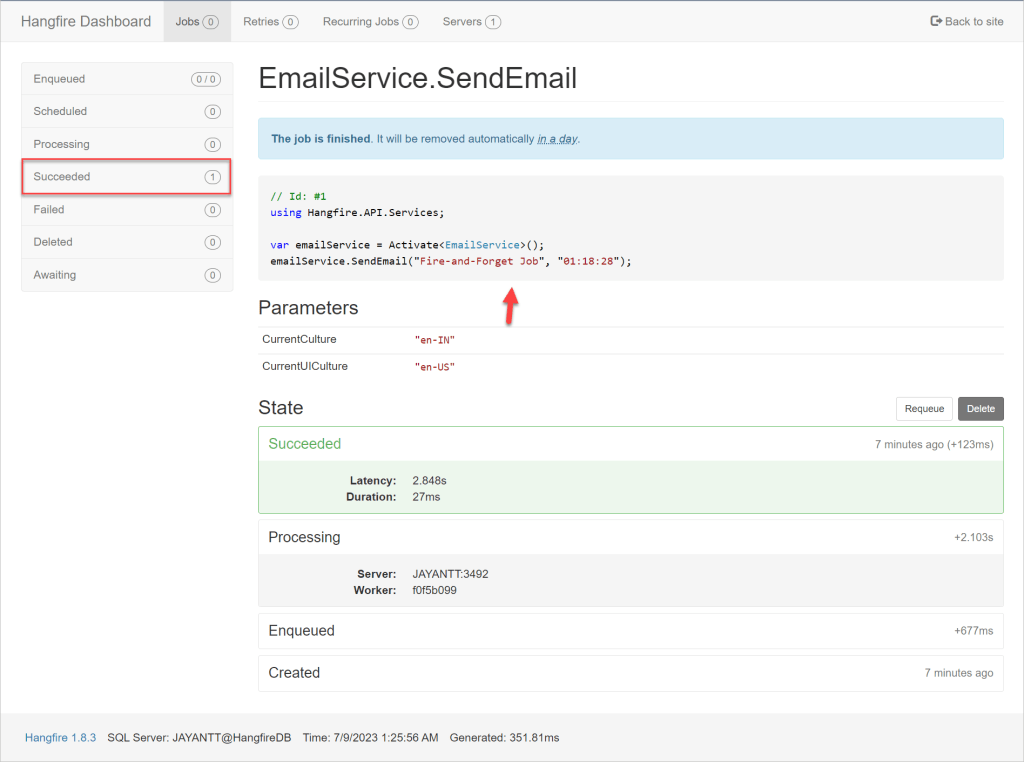
Under the Succeeded Tab, you can see the count of completed jobs. You also get to see the details of each job, similar to the below screenshot. All the parameters and function Names are exposed here. Want to run this job again with the same parameters? Press on the Requeue button. It re-adds your job in the queue for Hangfire to process. It happens almost immediately.
Delayed Jobs
What if we want to send a mail to a user after 10 minutes instead of immediately? We employ delayed Jobs in such circumstances. Let’s wait and see how it’s implemented before I go into further depth. Add these lines of code to the same controller. It is very identical to the previous form, but we add a delay factor.
[HttpGet]
        [Route("DelayedJob")]
        public ActionResult CreateDelayedJob()
        {
            _backgroundJobClient.Schedule(() => _emailService.SendEmail("Delayed Job", DateTime.Now.ToLongTimeString()), TimeSpan.FromSeconds(30));
            return Ok();
}- We add a
CreateDelayedJob()endpoint, where we are again using the IBackgroundJobClient interface. This time, however, we are not calling theEnqueue()method. Instead, we use theSchedule()method and we pass it two parameters – ourDelayedJob()service method call, and the delay. - The
Schedule()method will create the job definition and save it, but it will also make sure to schedule it in the queue at the specified time.
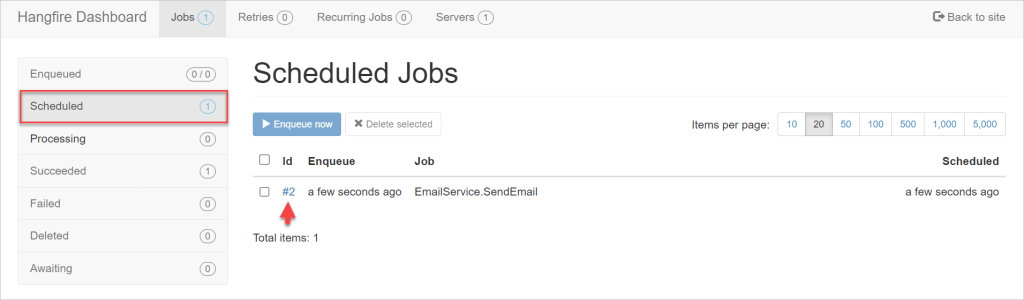
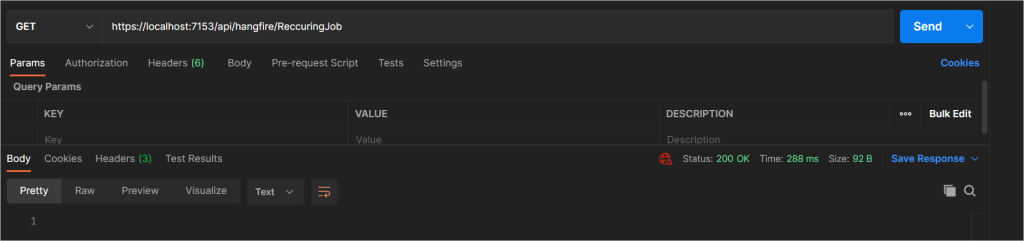
Recurring Jobs
Let’s say our Customer has a service subscription with us. We would certainly have to give him/her a payment reminder or the invoice itself. This necessitates the creation of a Recurring Job in which I can send my customers emails on a monthly basis. We schedule our recurring jobs so they can repeat in a certain interval. For those types of tasks, Hangfire makes use of the CRON software utility.
We now also inject the Hangfire IReccuringJobManager interface inside the constructor. It exposes useful methods for handling recurring jobs and we will use it to schedule our new job.
 [HttpGet]
        [Route("ReccuringJob")]
        public ActionResult CreateReccuringJob()
        {
            _recurringJobManager.AddOrUpdate("jobId",() => _emailService.SendEmail("Recurring Job", DateTime.Now.ToLongTimeString()), Cron.Minutely);
            return Ok();
}- We use the newly injected interface’s
AddOrUpdate()method. To this method, we pass a job id of choice, ourRecurringJob()method call, and the CRON interval. - The hangfire method will create a new job with the specified id, or update an existing one. In this example, we will just be creating the job for the first time.
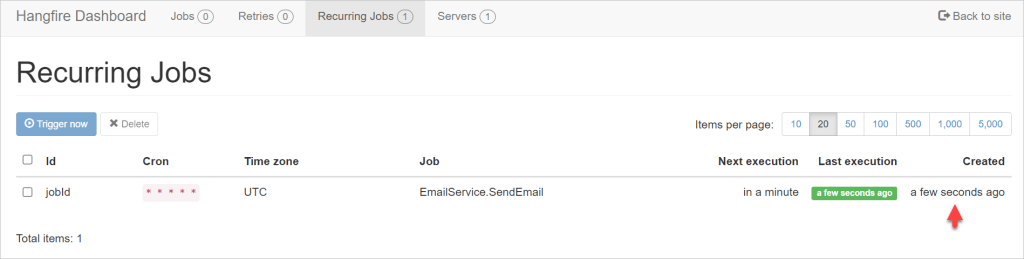
While this shows that we scheduled our job to repeat at the specified time, every time the server processes it, the processed instance will become visible in the Succeeded section of the Jobs tab.
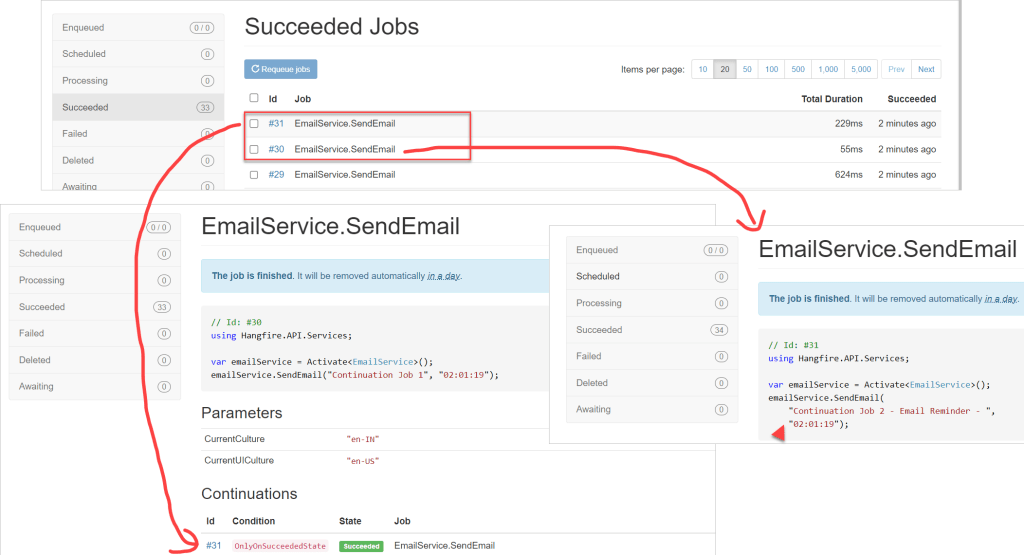
Continuation Jobs
The last type of job we are going to cover is the Continuation job. Its main feature is that it chains together task execution. With it, we can get two jobs to run one after the other in continuation.
[HttpGet]
        [Route("ContinuationJob")]
        public ActionResult CreateContinuationJob()
        {
            var jobId = _backgroundJobClient.Schedule(() => _emailService.SendEmail("Continuation Job 1", DateTime.Now.ToLongTimeString()), TimeSpan.FromSeconds(45));
            _backgroundJobClient.ContinueJobWith(jobId, () => Console.WriteLine("Continuation Job 2 - Email Reminder - " + DateTime.Now.ToLongTimeString()));
            return Ok();
}- In the
CreateContinuationJob()endpoint, we again use the Hangfire IBackgroundJobClient interface. We first use it to create a simple Fire and Forget job – now we know how to do that :). - We want this job to be a trigger for the next job, so we make sure to collect the id that the
Enqueue()method returns. After it’s created, we call the interface’sContinueJobWith()method and pass the job id of the created job along with ourContinuationJob()method call. TheContinueJobWith()method will make sure to chain our two jobs together.
The final Controller code of Hangfire is given below,
namespace Hangfire.API.Controllers
{
    [Route("api/[controller]")]
    [ApiController]
    public class HangfireController : ControllerBase
    {
        private IEmailService _emailService;
        private IBackgroundJobClient _backgroundJobClient;
        private IRecurringJobManager _recurringJobManager;

        public HangfireController(IEmailService emailService, IBackgroundJobClient backgroundJobClient,
            IRecurringJobManager recurringJobManager)
        {
            _emailService = emailService;
            _backgroundJobClient = backgroundJobClient;
            _recurringJobManager = recurringJobManager;
        }

        [HttpGet]
        [Route("FireAndForgetJob")]
        public ActionResult CreateFireAndForgetJob()
        {
            _backgroundJobClient.Enqueue(() => _emailService.SendEmail("Fire-and-Forget Job", DateTime.Now.ToLongTimeString()));
            return Ok();
        }

        [HttpGet]
        [Route("DelayedJob")]
        public ActionResult CreateDelayedJob()
        {
            _backgroundJobClient.Schedule(() => _emailService.SendEmail("Delayed Job", DateTime.Now.ToLongTimeString()), TimeSpan.FromSeconds(30));
            return Ok();
        }

        [HttpGet]
        [Route("ReccuringJob")]
        public ActionResult CreateReccuringJob()
        {
            _recurringJobManager.AddOrUpdate("jobId",() => _emailService.SendEmail("Recurring Job", DateTime.Now.ToLongTimeString()), Cron.Minutely);
            return Ok();
        }

        [HttpGet]
        [Route("ContinuationJob")]
        public ActionResult CreateContinuationJob()
        {
            var jobId = _backgroundJobClient.Enqueue(() => _emailService.SendEmail("Continuation Job 1", DateTime.Now.ToLongTimeString()));
            _backgroundJobClient.ContinueJobWith(jobId, () => _emailService.SendEmail("Continuation Job 2 - Email Reminder - ",  DateTime.Now.ToLongTimeString()));
            return Ok();
        }
    }
}
Find Source Code here in this link https://github.com/JayantTripathy/Hangfire.API
Conclusion
We’ve learned a lot about the simple and powerful library called Hangfire and discussed Hangfire with ASP.Net Core 7.0- Background Jobs. We now know how to set it up in our ASP.NET Core application and how to use it to schedule different types of jobs. Now it’s time to go schedule some background tasks!
Leave behind your valuable queries and suggestions in the comment section below. Also, if you think this article helps you, do not forget to share this with your developer community. Happy Coding 🙂
Related Articles
- Step-by-Step Guide to Using Azure Redis Cache in ASP.NET Core 9 Web API
- .NET 8 Authentication with Identity in a Web API using Bearer Tokens and Cookies
- How to convert Text To Speech With Azure Cognitive Services using Angular and .Net Core
- CRUD operation using the repository pattern with .Net 8, Ef-Core, and MySQL
- How to use Response Compression in .NET Core
- How to Integrate GraphQL in .Net Core
- Upload Download and Delete files in Azure Blob Storage using ASP.NET Core and Angular
- How to upload files to Azure Blob Storage using Asp.Net Core Web API
- How to store app secrets in ASP.NET Core using Secret Manager
- Logging into Azure App Service with ASP.Net Core
SUPPORT ME