In this article we will learn about How to Implement Repository Pattern in ASP.Net Core Web API. This article describes how to use Entity Framework Core to implement the repository pattern in ASP.NET Core. Using migration, we will create a database from a model using the “Code First” development approach. And we test the API here using Postman Tool. Please read my previous article of How to Implement AutoMapper in ASP.Net Core – Beginner’s Guide.
Prerequisites
- .NET 6 SDK (or newer)
- A .NET code editor or IDE (e.g. VS Code with the C# plugin, Visual Studio)
- Some experience with ASP.NET Core MVC or Web API and EF Core.
What is Repository Pattern?
A Repository pattern is a design pattern that interacts data from and to the Domain and Data Access Layers ( like Entity Framework Core / Dapper). Repositories are classes that hide the logics required to store or retrieve data. Thus, our application will not care about what kind of ORM we are using, as everything related to the ORM is handled within a repository layer. This allows you to have a cleaner separation of concerns. Repository pattern is one of the heavily used Design Patterns to build cleaner solutions.
Why we use Repository Pattern?
This is one of the most contentious issues in the.NET Core Community. Microsoft created the Entity Framework Core by combining the Repository and Unit of Work Patterns. So, why do we need to add another layer of abstraction on top of the Entity Framework Core, which is yet another Data Access abstraction?
Microsoft themselves recommend using Repository Patterns in complex scenarios to reduce the coupling and provide better Testability of your solutions. In cases where you want the simplest possible code, you would want to avoid the Repository Pattern.
The below image suggest using a custom repository adds an abstraction layer that can be used to ease testing by mocking the repository. There are multiple alternatives when mocking. You could mock just repositories or you could mock a whole unit of work. Usually mocking just the repositories is enough, and the complexity to abstract and mock a whole unit of work is usually not needed
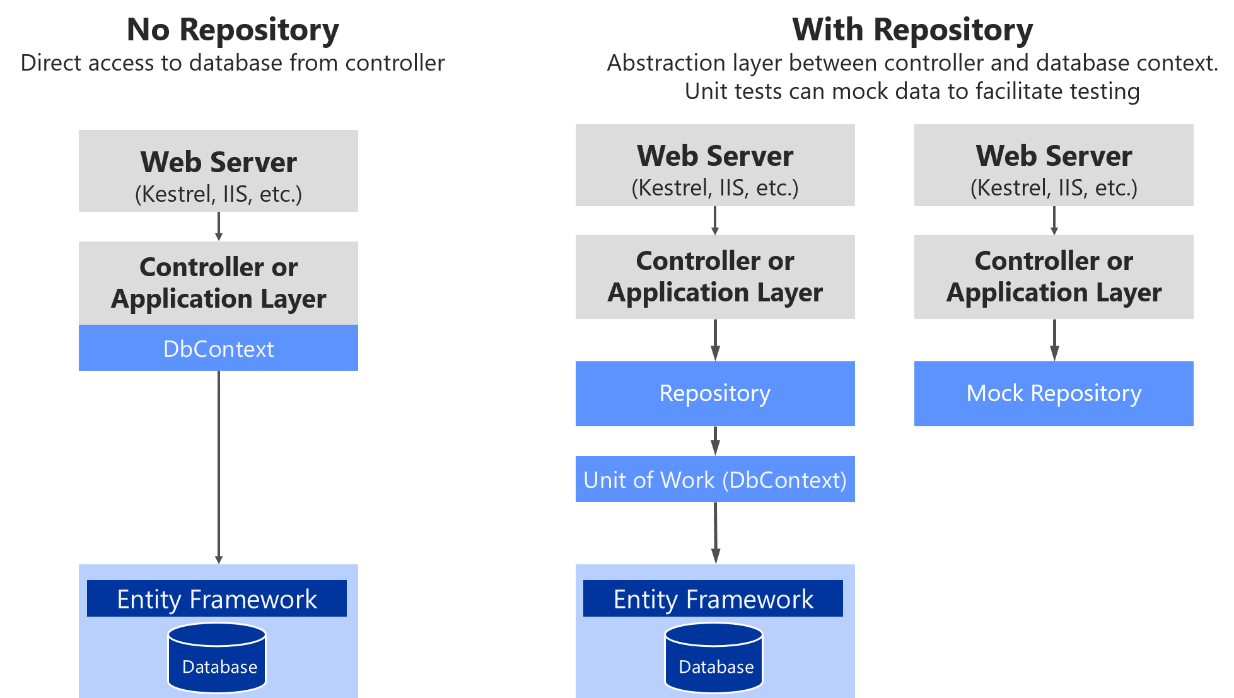
Adding the Repository has its own set of advantages. However, I strongly advise against using Design Patterns everywhere. Use it only when the situation necessitates the use of a Design Pattern. That being said, the Repository pattern can be beneficial in the long run.
Repository Pattern flow
The repository pattern is intended to create an abstraction layer between the data access layer and the business logic layer of an application. It is a data access pattern that prompts a more loosely coupled approach to data access. We create the data access logic in a separate class, or set of classes, called a repository with the responsibility of persisting the application’s business model.
The repository mediates between the data source layer and the business layers of the application. It queries the data source for the data, maps the data from the data source to a business entity, and persists changes in the business entity to the data source. A repository separates the business logic from the interactions with the underlying data source. The repository pattern has some advantages which are as follows.
- As we can access data source from many locations, so we can apply centrally managed, caching, consistent access rules and logic
- As business logic and database access logic are separate, so both can be tested separately.
- It provides the code’s maintainability and readability by separating business logic from the data or service access logic.

How to Implement Repository Pattern in ASP.Net Core Web API
Here I’m creating a API of Movies List so I can further use in any of my application, here we implement the repository pattern. The project using .NET SDK 7
- Launch the Visual Studio IDE and click on “Create new project”.
- In the “Create new project” window, select “
ASP.NET Core Web Application” from the list of templates displayed. - Click Next. In the “Configure your new project” window, specify the name and location for the new project and then click Create.
- In the “Create New ASP.NET Core API” window shown next, select .NET Core as the runtime and
.NET 7.0from the drop-down list at the top. Select “API” as the project template to create a new ASP.NET Core API application. - Ensure that the check boxes “Enable Docker Support” is disabled s we won’t be using the default feature we will add it manually later and “Configure for HTTPS” are checked.
- Ensure that Authentication is set as “No Authentication” as we won’t be using authentication either and Click Create.
Let’s start by creating a new Solution. Here I am naming my Solution as RepositoryPattern.API and the first project as RepositoryPattern.API (ASP.NET Core).
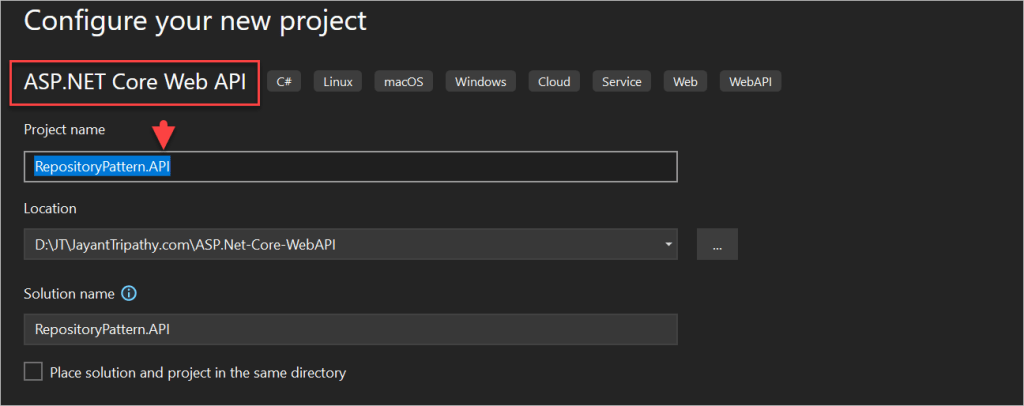
Simalary, let’s add 2 more .NET Core Class Library Projects within the solution. We will call DataAccessEFCore and Domain. Here are the features and purposes of each project.
- Domain – Holds the Entities and Interfaces. It does not depend on any other project in the solution.
- DataAccessEFCore – Since we will be using Entity Framework Core – Code First Apporach to interact with our Database, let’s build a project that solely represents everything related to EFCore. The aim is that, later down the road one can easily build another Data Access layer like DataAccess.Dapper or so. And our application would still support it. Here is where Dependency Inversion comes to play.
- RepositoryPattern.API – This is like the presentation layer of the entire solution. It depends on both the projects.

Setting up the Entities and EFCore
Now, let’s add the Required Entities to the Domain Project. Create a new Folder in the Domain Project named Entities.
- Here we have created the entities named as
Movie.csthat holds the movie information’s along with the image property.
 public class Movie
    {
        public int Id { get; set; }
        public string Name { get; set; }
        public string MovieType { get; set; }
        public string Duration { get; set; }
        public string Language { get; set; }
        public string Description { get; set; }

        [DataType(DataType.Date)]
        public DateTime? ReleaseDate { get; set; }

        [NotMapped]
        public IFormFile? Images { get; set; }

        [JsonIgnore]
        public string? ImagePath { get; set; }
        public DateTime? CreatedDate { get; set; }

        public int? CreatedById { get; set; }
        public DateTime? UpdatedDate { get; set;}

        public int? UpdatedById { get; set; }
    }
Next , we will setup and configure Entity Framework Core. Install these Required Packages in the DataAccessEFCore Project. Here is where we would have our DbContect Class and the actual Implementations of the Repositories.
Install-Package Microsoft.EntityFrameworkCore
Install-Package Microsoft.EntityFrameworkCore.SqlServer- Add a reference to the Domain Project (where we have defined our entities) and create a new Class in the DataAccessEFCore Project and Name it ApplicationContext.cs.
- Here we have add the DbContext with DbSet as Movies.
- And by default we set the created date and updated date as current date time.
 public class ApplicationContext : DbContext
    {
        public ApplicationContext(DbContextOptions<ApplicationContext> options) : base(options)
        {
        }
        protected override void OnModelCreating(ModelBuilder modelBuilder)
        {
            modelBuilder.Entity<Movie>()
                .Property(b => b.CreatedDate)
                .HasDefaultValue(DateTime.Now);

            modelBuilder.Entity<Movie>()
    .Property(b => b.UpdatedDate)
    .HasDefaultValue(DateTime.Now);
        }
        public DbSet<Movie> Movies { get; set; }
}- Once our Data Access Layer is done, let’s move to the RepositoryPattern.API Project to register EFCore within the ASP.NET Core Application. Firstly, Install this package on the RepositoryPattern.API Project. This allows you to run EF Core commands on the CLI.
Install-Package Microsoft.EntityFrameworkCore.Tools- Next, Navigate to
Program.csand add this line to Register theApplicationContextclass that we created. Note that you will have to add a reference of theDataAccessEFCoreProject to theRepositoryPattern.APIProject.
builder.Services.AddDbContext<ApplicationContext>(options =>
options.UseSqlServer(builder.Configuration.GetConnectionString("DefaultConnection") ?? throw new InvalidOperationException("Connection string have some issues.")));- Open up the
appsettings.jsonfile in theRepositoryPattern.APIProject and add the connection string like below, for your case you can add the SQL server accordingly.
 "ConnectionStrings": {
    "DefaultConnection": "Server=JAYANTT;Database=JTMovieDB;Trusted_Connection=True;MultipleActiveResultSets=True;Encrypt=False;"
}- Finally, Let’s update the database. Open your Package Manager Console on Visual Studio and run the following commands.
- Make sure that you have set your Startup Project as
RepositoryPattern.APIand the Default Project asDataAccessEFCore. Here is a screenshot on below, you can see after the command ran Migrations is completed and the database ids created and we can find the table name as Movies.
add-migration Initial
update-database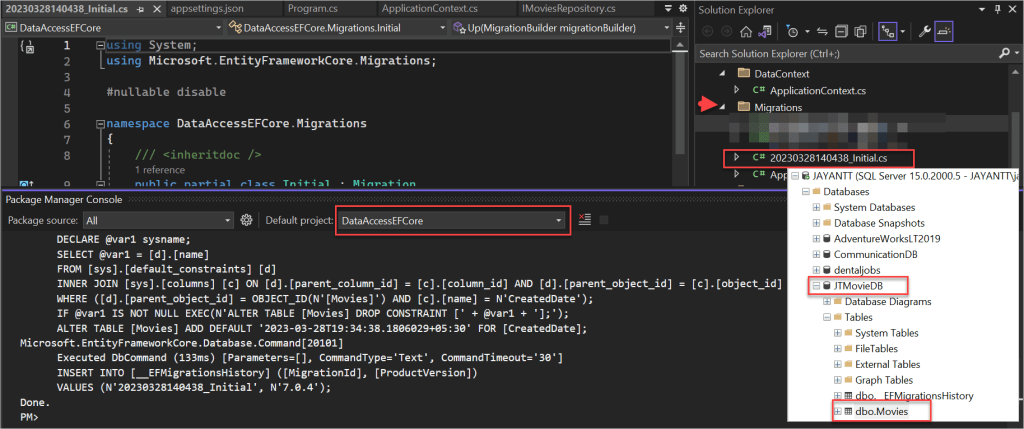
Building a Generic Repository in Repository Pattern
Under the Domain project, we have created a folder named as Interfaces and created the interface as IRepositoryBase.
Why we create an Interface under Domain Project?
We will be inverting the dependencies, so that, you can define the interface in the Domain Project, but the implementation can be outside the Domain Project. In this case, the implementations will go the DataAccess.EFCore Project. Thus, your domain layer will not depends on anything, rather, the other layers tend to depend on the Domain Layer’s interface. This is a simple explanation of Dependency Inversion Principle
 public interface IRepositoryBase<T> where T : class
    {
        Task<IEnumerable<T>> GetAll();
        Task<T> GetById(int id);
        void Create(T entity);
        void Update(T entity);
        void Delete(T entity);
    }
This is the Generic Interface, that expose the functions.
- Task<IEnumerable<T>> GetAll() – Get all the lists.
- Task<T> GetById(int id) – Get the list by Id
- void Create(T entity) – Adds new record into context
- void Update(T entity) – Update the record into context
- void Delete(T entity) – Removes the record from the context
Now, Let’s implement this Interfaces. Create a new class in the DataAccessEFCore Project and name it Repositories/GenericRepository
public abstract class RepositoryBase<T> : IRepositoryBase<T> where T : class
    {
        protected readonly ApplicationContext _context;
        public RepositoryBase(ApplicationContext context)
        {
            _context = context;
        }
        public async Task<IEnumerable<T>> GetAll() => _context.Set<T>().AsNoTracking();

        public async Task<T> GetById(int id) => await _context.Set<T>().FindAsync(id);
        public void Create(T entity) => _context.Set<T>().Add(entity);

        public void Update(T entity) => _context.Set<T>().Update(entity);

        public void Delete(T entity) => _context.Set<T>().Remove(entity);

    }
This class will implement the IGenericRepository Interface. We will also inject the ApplicationContext here. This way we are hiding all the actions related to the dbContext object within Repository Classes. Also note that, for the ADD and Remove Functions, we just do the operation on the dbContext object. But we are not yet commiting/updating/saving the changes to the database.
Similarly, let’s create interface and implementation for MovieRepository.
 public interface IMoviesRepository : IRepositoryBase<Movie>
    {
    }
public class MoviesRepository : RepositoryBase<Movie>, IMoviesRepository
{
public MoviesRepository(ApplicationContext applicationContext)
: base(applicationContext)
{
}
}Create the Wrapper class to implement Repository
We have created the interface under Domain Project
 public interface IRepositoryWrapper
    {
        IMoviesRepository Movie { get; }
        void Save();
}- Here we are injecting a private AppplicationContext.
 public class RepositoryWrapper: IRepositoryWrapper
    {
        private ApplicationContext _appContext;
        private IMoviesRepository _movie;
        public IMoviesRepository Movie
        {
            get
            {
                if (_movie == null)
                {
                    _movie = new MoviesRepository(_appContext);
                }
                return _movie;
            }
        }
        public RepositoryWrapper(ApplicationContext applicationContext)
        {
            _appContext = applicationContext;
        }

        public void Save()
        {
            _appContext.SaveChanges();
        }
    }
Finally, let’s register these services, To register the service we have created the class under RepositoryPattern.API as ServiceExtensions API.
Here registered the IRepositoryWrapper and also used IPostService that is used for saving the image file that we will discuss on below.
 public static class ServiceExtensions
    {
        public static void ConfigureCors(this IServiceCollection services)
        {
            services.AddCors(options =>
            {
                options.AddPolicy("CorsPolicy",
                    builder => builder.AllowAnyOrigin()
                    .AllowAnyMethod()
                    .AllowAnyHeader());
            });
        }

        public static void ConfigureIISIntegration(this IServiceCollection services)
        {
            services.Configure<IISOptions>(options =>
            {

            });
        }
        public static void ConfigureRepositoryWrapper(this IServiceCollection services)
        {
            services.AddScoped<IRepositoryWrapper, RepositoryWrapper>();
            services.AddTransient<IPostService, PostService>();
        }
    }
After this implement this extension class under program file. Added the service implementation builder.Services.ConfigureRepositoryWrapper().
var builder = WebApplication.CreateBuilder(args);

// Add services to the container.
builder.Services.ConfigureCors();
builder.Services.ConfigureIISIntegration();
builder.Services.ConfigureRepositoryWrapper();
builder.Services.AddControllers().AddNewtonsoftJson();
// Learn more about configuring Swagger/OpenAPI at https://aka.ms/aspnetcore/swashbuckle
builder.Services.AddEndpointsApiExplorer();
builder.Services.AddSwaggerGen();
builder.Services.AddDbContext<ApplicationContext>(options =>
    options.UseSqlServer(builder.Configuration.GetConnectionString("DefaultConnection") ?? throw new InvalidOperationException("Connection string have some issues.")));


var app = builder.Build();
Create the File Extensions to save the Image
We have created this CRUD where we want save the image file .
 public interface IPostService
    {
        Task SavePostImageAsync(Movie _movie);
    }
The base response contains the error, success and error code, if the image post response failed.
public class BaseResponse
    {
        [JsonIgnore(Condition = JsonIgnoreCondition.Always)]
        public bool Success { get; set; }
        [JsonIgnore(Condition = JsonIgnoreCondition.WhenWritingNull)]
        public string ErrorCode { get; set; }
        [JsonIgnore(Condition = JsonIgnoreCondition.WhenWritingNull)]
        public string Error { get; set; }
    }
public class PostResponse : BaseResponse
{
public Movie Post { get; set; }
}This FileHelper class is generating the unique id that we can use to rename the Image.
public class FileHelper
    {
        public static string GetUniqueFileName(string fileName)
        {
            fileName = Path.GetFileName(fileName);
            return string.Concat(Path.GetFileNameWithoutExtension(fileName)
                                , "_"
                                , Guid.NewGuid().ToString().AsSpan(0, 4)
                                , Path.GetExtension(fileName));
        }
}- Here in the PostService we implemented the IWebHostEnvironment that is responsible for getting content root path where we want to save the image file.
- We are going to save the image file under Images folder in RepositoryPattern.API Project
public class PostService : IPostService
    {
        private readonly IWebHostEnvironment environment;
        public PostService(IWebHostEnvironment environment)
        {
            this.environment = environment;
        }
        public async Task SavePostImageAsync(Movie _movie)
        {
            var uniqueFileName = FileHelper.GetUniqueFileName(_movie.Images.FileName);

            var uploads = Path.Combine(environment.ContentRootPath, "Images");

            var filePath = Path.Combine(uploads, uniqueFileName);

            Directory.CreateDirectory(Path.GetDirectoryName(filePath));

            await _movie.Images.CopyToAsync(new FileStream(filePath, FileMode.Create));

            _movie.ImagePath = uniqueFileName;

            return;
        }
    }
Make sure to enable the below middleware
app.UseStaticFiles();Create the Movies Controller
- Here we have created the Controller that will implement the repository pattern and will handle the CRUD.
- We have used dependencies of Repository wrapper and Postservice for saving the image.
- We have created HTTPGET, HTTPPOST, HTTPPUT, HTTPDELETE method to handle the CRUD operation.
[Route("api/[controller]")]
    [ApiController]
    public class MoviesController : ControllerBase
    {
        private IRepositoryWrapper _repository;
        private readonly ILogger<MoviesController> logger;
        private readonly IPostService postService;
        public MoviesController(IRepositoryWrapper repository, IPostService postService, ILogger<MoviesController> logger)
        {
            _repository = repository;
            this.postService = postService;
            this.logger = logger;
        }

        [HttpGet]
        public async Task<IActionResult> GetAsync()
        {
            var movies = await _repository.Movie.GetAll();
            return Ok(movies);
        }

        [HttpGet]
        [Route("getbyId/{id}")]
        public async Task<IActionResult> GetByIdAsync(int id)
        {
            var movies = await _repository.Movie.GetById(id);
            return Ok(movies);
        }

        [HttpPost]
        [RequestSizeLimit(5 * 1024 * 1024)]
        public async Task<IActionResult> PostAsync([FromForm] Movie movieRequest)
        {
            if (movieRequest == null)
            {
                return BadRequest(new PostResponse { Success = false, ErrorCode = "S01", Error = "Invalid post request" });
            }

            if (string.IsNullOrEmpty(Request.GetMultipartBoundary()))
            {
                return BadRequest(new PostResponse { Success = false, ErrorCode = "S02", Error = "Invalid post header" });
            }

            if (movieRequest.Images != null)
            {
                await postService.SavePostImageAsync(movieRequest);
            }
            _repository.Movie.Create(movieRequest);
            _repository.Save();
            return Ok();
        }


        [HttpPut("{id:int}")]
        public async Task<IActionResult> PutAsync(int id, [FromForm] Movie movieRequest)
        {

            try
            {
                if (id != movieRequest.Id)
                    return BadRequest("ID mismatch");

                var movieToUpdate = await _repository.Movie.GetById(id);

                if (movieToUpdate == null)
                    return NotFound($"Movie with Id = {id} not found");

                movieToUpdate.Name = movieRequest.Name;
                movieToUpdate.MovieType = movieRequest.MovieType;
                movieToUpdate.Duration = movieRequest.Duration;
                movieToUpdate.Language = movieRequest.Language;
                movieToUpdate.Description = movieRequest.Description;
                movieToUpdate.ReleaseDate = movieRequest.ReleaseDate;
                if (movieRequest.ImagePath != null){
                    movieToUpdate.ImagePath = movieRequest.ImagePath;
                    await postService.SavePostImageAsync(movieRequest);
                }
                movieToUpdate.UpdatedDate = DateTime.Now;
                _repository.Movie.Update(movieToUpdate);
                _repository.Save();
                return Ok(movieToUpdate);
            }
            catch (Exception)
            {
                return StatusCode(StatusCodes.Status500InternalServerError,
                    "Error updating data");
            }
        }

        [HttpDelete("{id}")]
        public async Task<IActionResult> DeleteAsync(int id)
        {
            var moviedetails = await _repository.Movie.GetById(id);
            if (moviedetails == null)
            {
                return NotFound();
            }
            _repository.Movie.Delete(moviedetails);
            _repository.Save();
            return Ok("Record Deleted Successfully");
        }
    }
Let’s run the application and you can the Swagger imaplementaion.
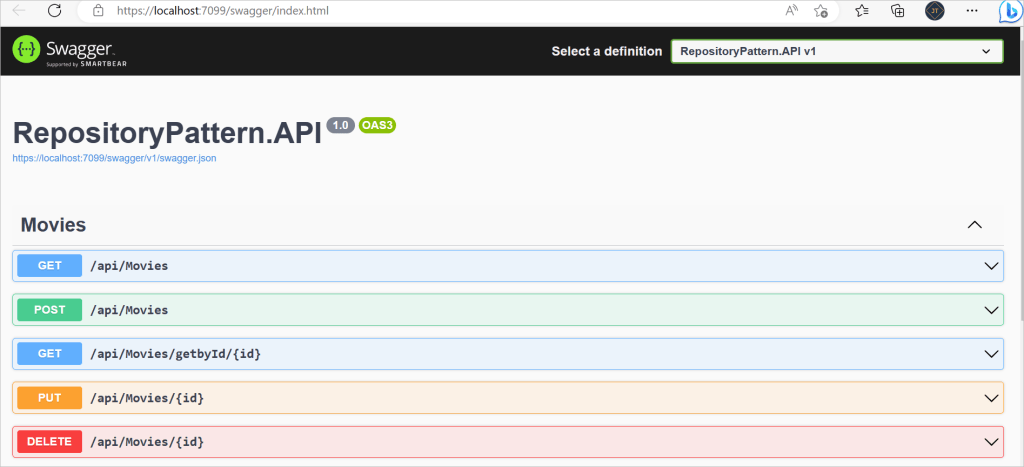
Testing with POSTMAN
Adding the Movie Information using POST
- Here we have called the as api/movies and used the form-data as we are posting the image into the POST
- Make sure in the images, choose the dropdown as File instead of Text and select the files where it located.
- Make sure the Content-Type as
multipart/form-dataas we are dealing with form-data.


[HttpPost]
        [RequestSizeLimit(5 * 1024 * 1024)]
        public async Task<IActionResult> PostAsync([FromForm] Movie movieRequest)
        {
            if (movieRequest == null)
            {
                return BadRequest(new PostResponse { Success = false, ErrorCode = "S01", Error = "Invalid post request" });
            }

            if (string.IsNullOrEmpty(Request.GetMultipartBoundary()))
            {
                return BadRequest(new PostResponse { Success = false, ErrorCode = "S02", Error = "Invalid post header" });
            }

            if (movieRequest.Images != null)
            {
                await postService.SavePostImageAsync(movieRequest);
            }
            _repository.Movie.Create(movieRequest);
            _repository.Save();
            return Ok();
        }
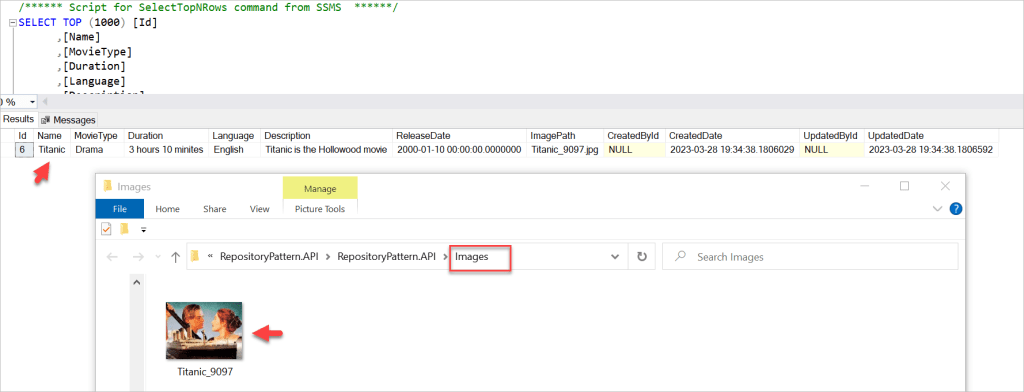
You can see the response status is 200 and the data are saved into database and the images are saved into RepositoryPattern.API Project.
Updating the Movie Information using PUT
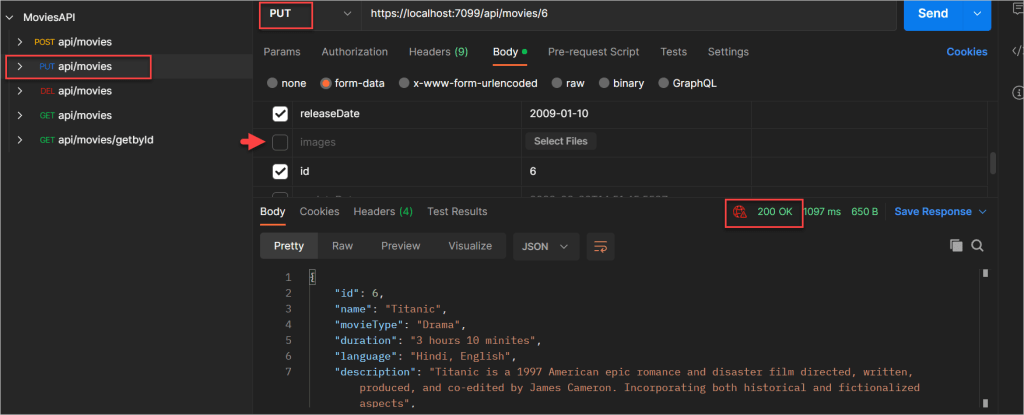
Using the PUT method we can update the information. Let’s see I’m updating the Language and description information of the data.
- Here we have added the Id in query string to which movie information need to update.
- Here we don’t want to update the images so I make it uncheck.
[HttpPut("{id:int}")]
        public async Task<IActionResult> PutAsync(int id, [FromForm] Movie movieRequest)
        {

            try
            {
                if (id != movieRequest.Id)
                    return BadRequest("ID mismatch");

                var movieToUpdate = await _repository.Movie.GetById(id);

                if (movieToUpdate == null)
                    return NotFound($"Movie with Id = {id} not found");

                movieToUpdate.Name = movieRequest.Name;
                movieToUpdate.MovieType = movieRequest.MovieType;
                movieToUpdate.Duration = movieRequest.Duration;
                movieToUpdate.Language = movieRequest.Language;
                movieToUpdate.Description = movieRequest.Description;
                movieToUpdate.ReleaseDate = movieRequest.ReleaseDate;
                if (movieRequest.ImagePath != null){
                    movieToUpdate.ImagePath = movieRequest.ImagePath;
                    await postService.SavePostImageAsync(movieRequest);
                }
                movieToUpdate.UpdatedDate = DateTime.Now;
                _repository.Movie.Update(movieToUpdate);
                _repository.Save();
                return Ok(movieToUpdate);
            }
            catch (Exception)
            {
                return StatusCode(StatusCodes.Status500InternalServerError,
                    "Error updating data");
            }
        }
Here you can see the below information updated.

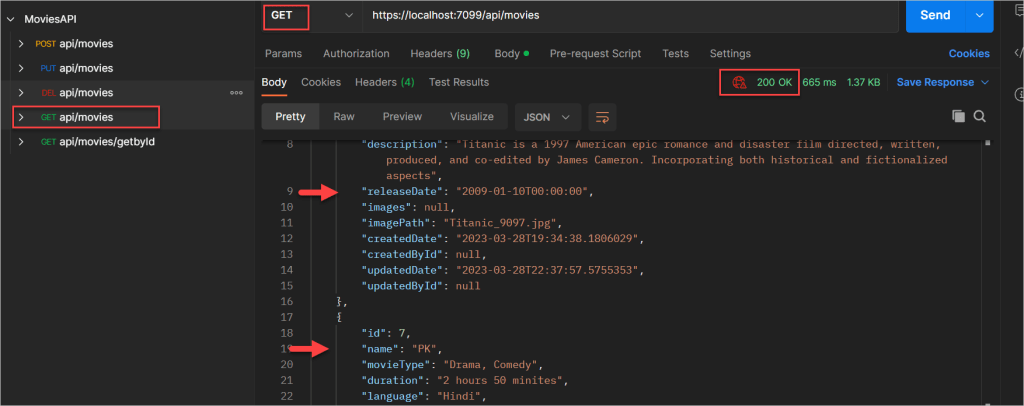
Also I have added some more data using POST method.

Getting all the Movie Information using GET
[HttpGet]
        public async Task<IActionResult> GetAsync()
        {
            var movies = await _repository.Movie.GetAll();
            return Ok(movies);
        }
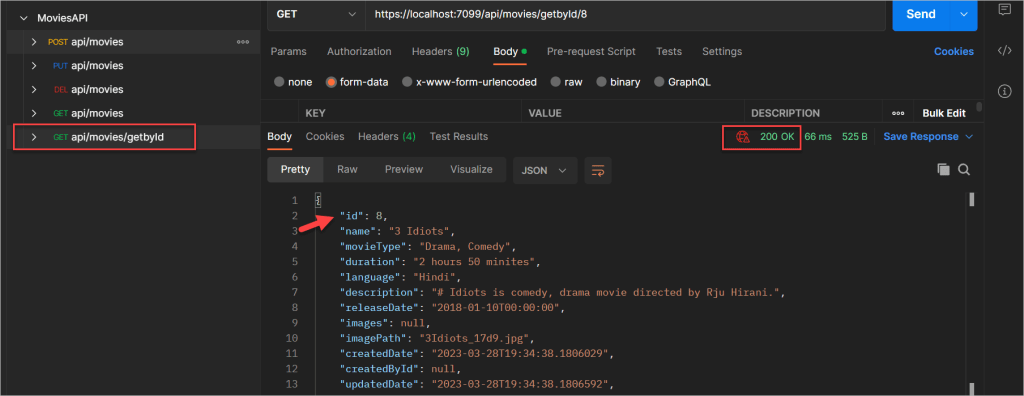
Getting Movie Information By Id using GET
 [HttpGet]
        [Route("getbyId/{id}")]
        public async Task<IActionResult> GetByIdAsync(int id)
        {
            var movies = await _repository.Movie.GetById(id);
            return Ok(movies);
        }
Benefits of Repository Pattern
Reduces Duplicate Queries
Consider having to write lines of code only to retrieve some data from your datastore. What if this collection of queries is going to be utilised several times throughout the application? Isn’t it tedious to write this code over and over again? Here’s another advantage of using Repository Classes. You might create your data access code in the Repository and invoke it from numerous Controllers / Libraries.
De-couples the application from the Data Access Layer
For ASP.NET Core, there are numerous ORMs available. Entity Framework Core is now the most popular. However, this will alter in the future years. It is critical to create applications that can transition over to a new DataAccessTechnology with minimal impact on our application’s code base in order to keep up with evolving technologies and keep our Solutions up to date.
Conclusion
In this post we learned about How to Implement Repository Pattern in ASP.Net Core Web API. The Repository pattern increases the level of abstraction in your code. This may make the code more difficult to understand for developers who are unfamiliar with the pattern. But once you are familiar with it, it will reduce the amount of redundant code and make the logic much easier to maintain.
Leave behind your valuable queries and suggestions in the comment section below. Also, if you think this article helps you, do not forget to share this with your developer community. Happy Coding 🙂
Related Post
- How to use Response Compression in .NET Core
- How to Integrate GraphQL in .Net Core
- Upload Download and Delete files in Azure Blob Storage using ASP.NET Core and Angular
- How to upload files to Azure Blob Storage using Asp.Net Core Web API
- How to store app secrets in ASP.NET Core using Secret Manager
- Logging into Azure App Service with ASP.Net Core
- Integrate Paging in ASP.Net Core Web API- Beginner’s Guide
- Create CRUD Operation using ReactJs and ASP.Net Core API- Starter Template
- How to use Policy-based Authorization using JWT in .Net Core 7 and Angular
- How to use Azure Key Vault in ASP.Net Core
SUPPORT ME
