
In this article we will learn about How to Build ASP.Net Core API using Azure Cosmos DB Local Emulator. Here we will learn how to use EF Core to develop a .NET 7 API that can perform CRUD operations on Azure Cosmos DB. Please read my previous article of How to Send Emails from ASP.NET Core using Azure.
Cosmos DB local emulator is being used for testing, this is a completely free database service. You may easily run the emulator on your Windows PC. You can download the Emulator MSI setup from this URL.
Find Source Code here in this link.
What is Cosmos DB?
Cosmos DB has recently become one of the most demanding No SQL databases. This is a multi-model and horizontally scalable database (now accessible with SQL, Mongo DB, Cassandra, Table, and Graph APIs etc). Azure CosmosDB is a completely managed NoSQL database, Data will be kept in a key/value JSON format according to NoSQL. Cosmos DB provides ‘High Availability’ and ‘Low Latency’ for any application. Cosmos DB is very quick in response delivering, auto-scaling, effective auto failure management, etc.
Any existing application that works on different DBs can be easily migrated to Azure CosmosDB as it provides APIs for integration like ‘SQL/Core API’.
Install Cosmos DB Emulator and create database locally
Please download the Cosmos DB Emulator MSI setup from this URL. You can run the emulator after downloading and installing it to build a new database and collection for your application.
- After installing the MSI Cosmos DB emulator, we can see the below URI with Key and connection string when we open the emulator.
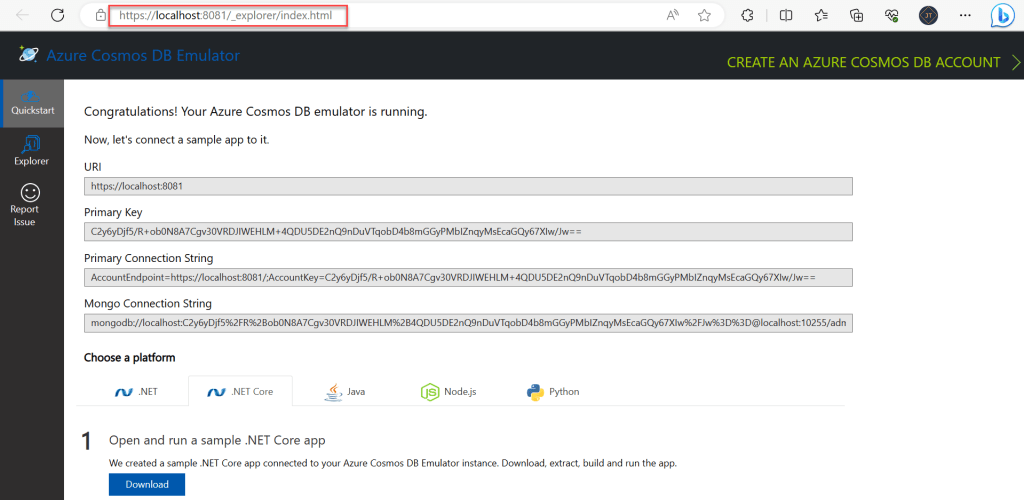
- In this emulator, you can see a URI and a primary key. These values will be used later in our program to connect to Cosmos DB. You can build a new database and collection by selecting the Explorer tab.
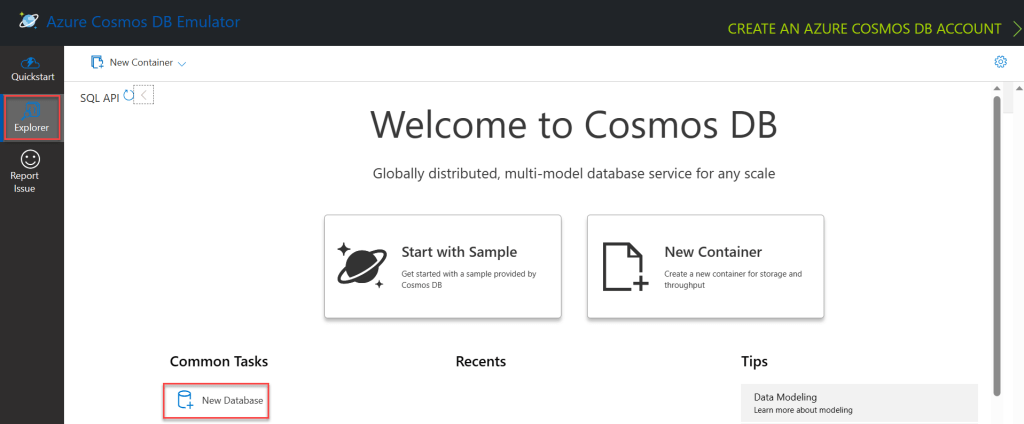
Create Database
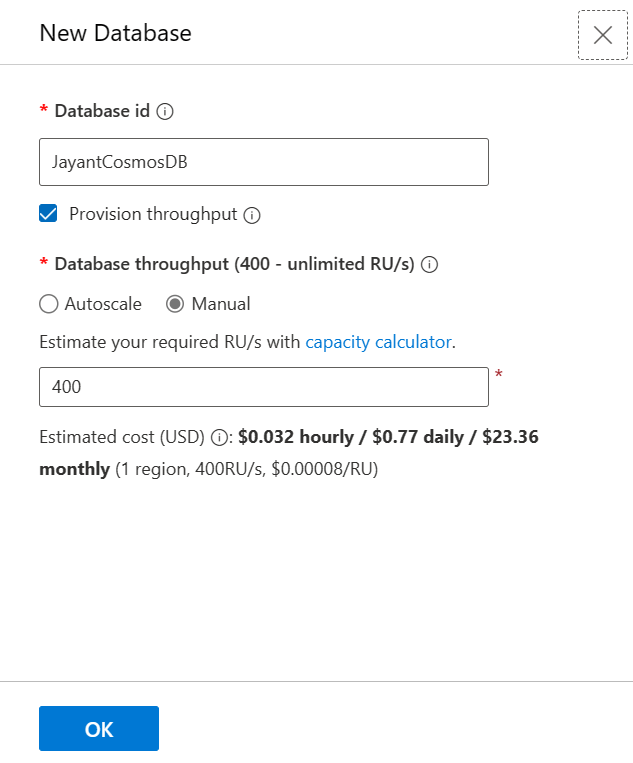
- After clicking on the New Database button, a window appears in which we must provide the Database name; in this case, I have entered JayantCosmosDB.
- Regarding the cost as we are using Cosmos DB locally so we don’t bother for now, we will discuss more about pricing when we use Azure Portal Cosmos DB.
- And finally click Ok to create the database according to our selection.
You can configure provided throughput for your databases and containers in Azure Cosmos DB. Standard (manual) and autoscale provided throughput are the two options. This page explains how provided throughput works.
A database in Azure Cosmos DB is a container management unit. A database is made up of schema-independent containers. A container in Azure Cosmos DB is the unit of scalability for both throughput and storage. A container is deployed across all Azure regions connected with your Azure Cosmos DB account and is horizontally partitioned over a collection of servers inside an Azure region.
With Azure Cosmos DB, you can specify throughput at two levels:
- Containers for Azure Cosmos DB
- Databases in Azure Cosmos DB
Create Database Container
- You can give your database a name and a collection id. A Partition key must be provided. In Cosmos DB, a Partition key is essential for data storage.
- Please keep in mind that once you’ve created the collection, you can’t change the partition key. You must exercise extreme caution when selecting the suitable partition key.
- In contrast to SQL databases, there is no need to build additional schemas throughout the design process. At runtime, data will be saved in JSON format with suitable field names.
We have set the container Id as “todo” as we are going to CRUD operations of todo web api application.
Partition key we have set here "/id"
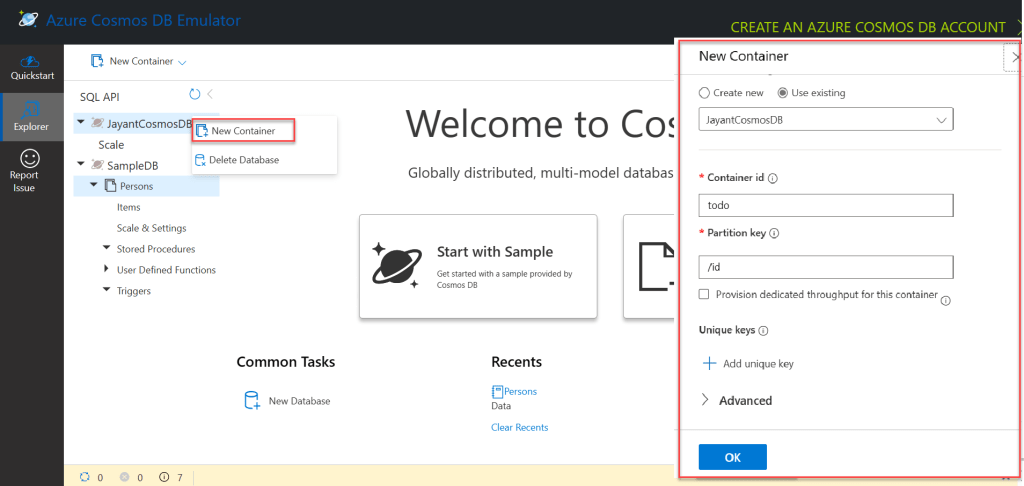
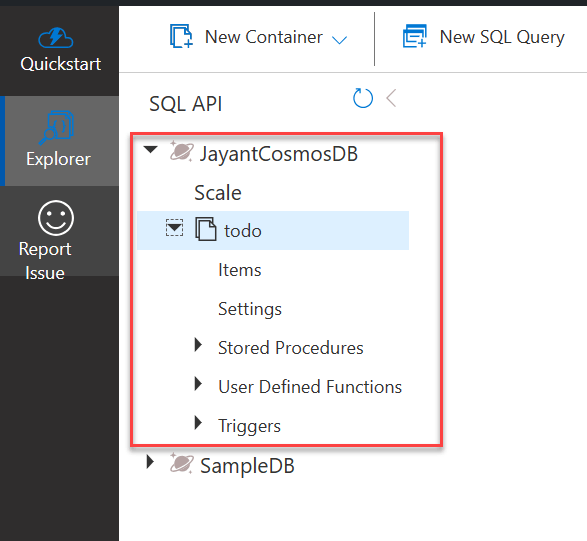
- Click on Ok and then you can see like below the database with container has been created.
Creating an ASP.Net Core Web API Application
Using below steps we can create ASP.Net Core API applicattion.
- Launch the Visual Studio IDE and click on “Create new project”.
- In the “Create new project” window, select “
ASP.Net Core Web API Project” from the list of templates displayed. - Click Next. In the “Configure your new project” window, specify the name and location for the new project and then click Create.
- In the “ASP.Net Core Web API Project” window shown next, select .NET Core as the runtime and
.NET 7.0from the drop-down list at the top. Select “API” as the project template to create a new ASP.NET Core API application. - Ensure that the check boxes “Enable Docker Support” is disabled s we won’t be using the default feature we will add it manually later and “Configure for HTTPS” are checked.
- Make Authentication type as “None” as we are not using any authentication mode here.
- You can check the Open API support if you want to use Swagger
Install the package Microsoft.Azure.Cosmos
We need to install the package Microsoft.Azure.Cosmos

We require URI and PrimaryKey to connect to CosmosDB. Copy the URI and PrimaryKey from Keys. Make a.NET Web API app and edit your appsettings.json and add the values
"AzureCosmosDBSettings": {
    "URI": "https://localhost:8081",
    "PrimaryKey": "<Add Primary Key>",
    "DatabaseName": "JayantCosmosDB",
    "ContainerName": "todo"
  }
Creating the Models
AzureCosmosDBSettings Class
Add the below class to get the Azure Cosmos DB Settings from appsettings jso file.
 public class AzureCosmosDBSettings
    {
        public string URI { get; set; }
        public string PrimaryKey { get; set; }
        public string DatabaseName { get; set; }
        public string ContainerName { get; set; }
    }
Tasks Model Class
Add the Tasks model class to manage the Todo App model.
public class Tasks
    {
        [JsonProperty("id")]
        public string id { get; set; }

        [JsonProperty("title")]
        public string Title { get; set; }

        [JsonProperty("description")]
        public string Description { get; set; }
    }
Creating the to-do Services
Create the files ITodoService.cs and TodoService.cs in the Service folder. We will specify our four operations in the ITodoService.cs file as follows.
ITodoService.cs
public interface ITodoService
    {
        Task<List<Tasks>> GetTasks(string cosmosQuery);
        Task<Tasks> AddTask(Tasks task);
        Task<Tasks> UpdateTask(Tasks task);
        Task DeleteTask(string id, string partition);
    }
TodoService.cs
We need to implement the below operations inside TodoService.cs.
- Here we added inside the constructor the
IOptions<AzureCosmosDBSettings>that fetch the appsettings value. - ContainerClient() is responsible to read the container informations that we have created under cosmos Db emulator.
- We have added Get, Add, Update and Delete tasks method for CRUD operations.
public class TodoService : ITodoService
    {
        private readonly AzureCosmosDBSettings _azureCosmosDBSettings;
        public TodoService(IOptions<AzureCosmosDBSettings> azureCosmosDBSettings)
        {
            _azureCosmosDBSettings = azureCosmosDBSettings.Value;
        }
        private Container ContainerClient()
        {
            CosmosClient cosmosDbClient = new CosmosClient(_azureCosmosDBSettings.URI, _azureCosmosDBSettings.PrimaryKey);
            Container containerClient = cosmosDbClient.GetContainer(_azureCosmosDBSettings.DatabaseName, _azureCosmosDBSettings.ContainerName);
            return containerClient;
        }
        public async Task<Tasks> AddTask(Tasks task)
        {
            var _container = ContainerClient();
            var item = await _container.CreateItemAsync<Tasks>(task, new PartitionKey(task.id));
            return item;
        }
        public async Task DeleteTask(string id, string partition)
        {
            var _container = ContainerClient();
            await _container.DeleteItemAsync<Tasks>(id, new PartitionKey(partition));
        }
        public async Task<List<Tasks>> GetTasks(string cosmosQuery)
        {
            var _container = ContainerClient();
            var query = _container.GetItemQueryIterator<Tasks>(new QueryDefinition(cosmosQuery));
            List<Tasks> results = new List<Tasks>();
            while (query.HasMoreResults)
            {
                var response = await query.ReadNextAsync();
                results.AddRange(response);
            }
            return results;
        }
        public async Task<Tasks> UpdateTask(Tasks task)
        {
            var _container = ContainerClient();
            var item = await _container.UpsertItemAsync<Tasks>(task, new PartitionKey(task.id));
            return item;
        }
    }
GetTask method: The _container.GetItemQueryIterarot() method fetches data base on the query that we initialized with the ‘QueryDefinition’.
Initially, it will not fetch data directly; instead, it will obtain a flag indicating whether or not data exists. The data is then obtained by invoking the ReadNextAsync() function. As a result, we may deduce that the GetItemQueryIterator attempts to retrieve data as a stream.
AddTask method: Our action method AddTask accepts a payload parameter of type Tasks. For the new item, we are producing a ‘Id’ value. The new item is then saved to the container using a Cosmos DB call.
UpdateTask method: Here ‘UpsertItemAsync()’ method helps to update the item in the Cosmos DB container.
DeleteTask method: Action method contains 2 query parameter like ‘id’, ‘partition’. The partition value is for to send as partition key value.
Register the services under Program.cs
Line #1- To read the AzureCosmosDBSettings from Appsettings.json file.
Line#2- Register the Todo Services using AddSingleton()
builder.Services.Configure<AzureCosmosDBSettings>(builder.Configuration.GetSection("AzureCosmosDBSettings"));
builder.Services.TryAddSingleton<ITodoService,TodoService>();
Creating the Todo Controller
We require a controller, Create a TaskController.cs file in the Controllers folder and paste the code snippets below into it.
- We injected here ITodo Service and created method to handle GET, PIOST, PUT and DELETE method.
[Route("api/[controller]")]
    [ApiController]
    public class TodoController : ControllerBase
    {
        private readonly ITodoService _todoService;
        public TodoController(ITodoService todoService)
        {
            _todoService = todoService;
        }
        [HttpGet]
        public async Task<IActionResult> Get()
        {
            var sqlQuery = "SELECT * FROM c";
            var result = await _todoService.GetTasks(sqlQuery);
            return Ok(result);
        }
        [HttpPost]
        public async Task<IActionResult> Add(Tasks task)
        {
            task.id = Guid.NewGuid().ToString();
            var result = await _todoService.AddTask(task);

            return Ok(result);
        }
        [HttpPut]
        public async Task<IActionResult> Update(Tasks task)
        {
            var result = await _todoService.UpdateTask(task);
            return Ok(result);
        }
        [HttpDelete]
        public async Task<IActionResult> Delete(string id, string
        partition)
        {
            await _todoService.DeleteTask(id, partition);
            return Ok();
        }
    }
That’s it the change. Launch the application, you will see the Swagger UI, where you may test the APIs that we have built. I have etested this API using POSTMAN
Test the Todo API using Postman
POST Method
Using the procedures below, we may enter the information below into the database. We’ve added id, title, and description here. After clicking the send button, the data was posted and we received 200 success with the Guid generate for the id field.

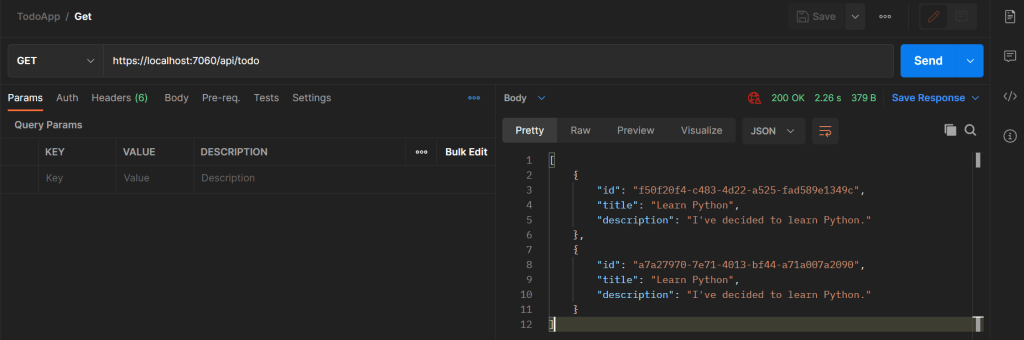
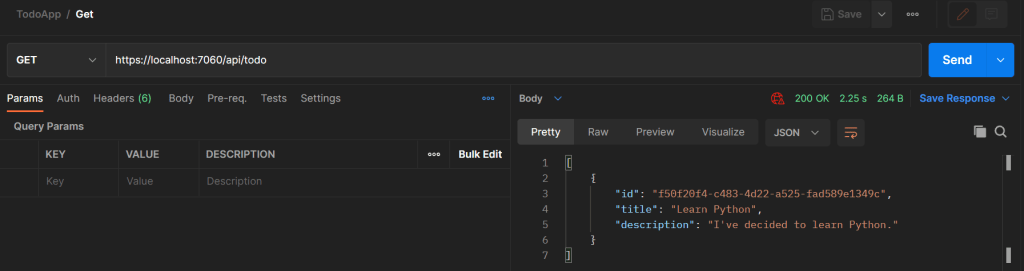
GET Method
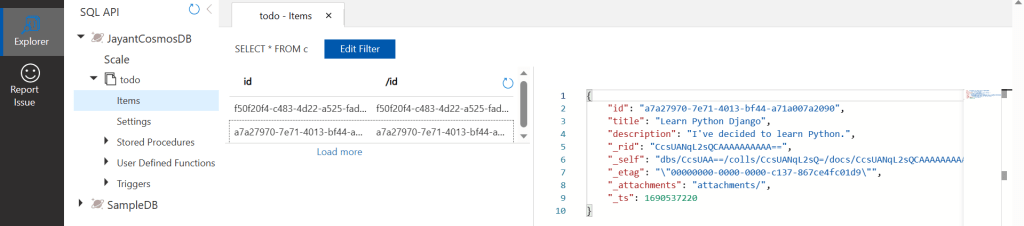
I entered two pieces of information into the database, and when we hit the transmit button for GET, we can see the two data entries.
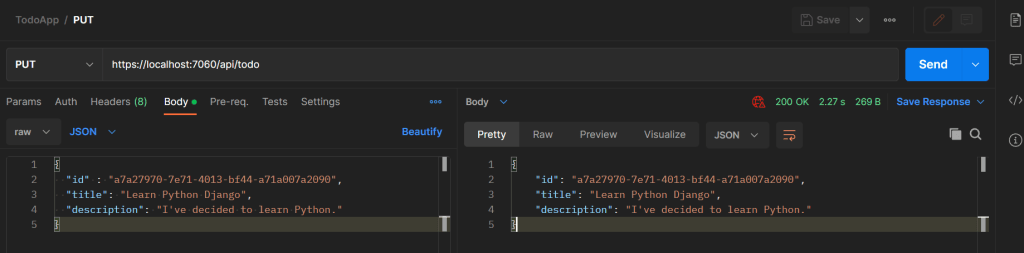
PUT Method
We updated one of the information using the PUT technique, and you can see it got 200 success with the update information on the right hand side.
Let’s move to the Azure Cosmos DB Emulator we can see the update infomrations like below.
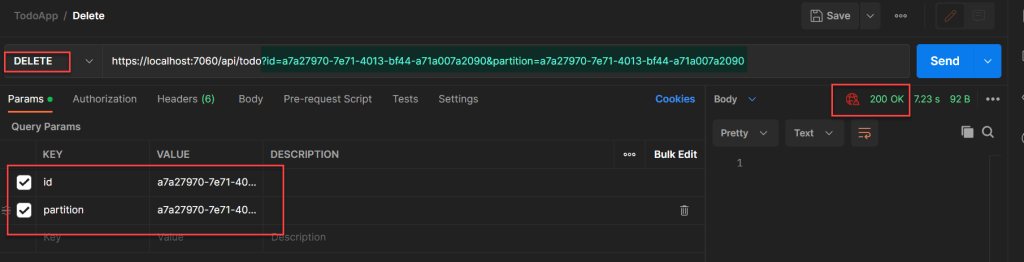
DELETE Method
Let’s delete one of the entries using the image below. Here, we need to provide the id field that we want to delete, as well as the partition key as the /id, therefore the two parameters must be added as shown below.
As one of the data has been erased, let us perform the GET method to see if the other data has been destroyed and we only have one data.
That’s it for this article of Build ASP.Net Core API using Azure Cosmos DB Local Emulator. 🙂
Find Source Code here in this link.
Conclusion
So far we learnt about How to Build ASP.Net Core API using Azure Cosmos DB Local Emulator. Hopefully, this article provided some useful demonstration of .NET API CRUD Operation Using Azure Cosmos DB. I would appreciate your feedback, recommendations, and improved ways.
Leave behind your valuable queries and suggestions in the comment section below. Also, if you think this article helps you, do not forget to share this with your developer community. Happy Coding 🙂
Related Articles
- Building an AI Knowledge Base Search with Azure AI Foundry: Step-by-Step Guide
- How to Secure React.js application with Azure AD Authentication Using MSAL Library
- 🔐 Securing .NET Core Web Apps with Azure AD/Intra and MSAL
- Step-by-Step Guide to Using Azure Redis Cache in ASP.NET Core 9 Web API
- 🤖 Build a Full-Stack AI App with React, Node.js & Azure OpenAI
- Effortless React Deployment 🚀: CI/CD with GitHub Actions & Azure Static Web Apps
- Deploying Angular apps in Azure Blob Storage with CI/CD Integration 🚀
- How to Build a serverless CRUD app with Azure function and Cosmos DB
- How to resolve Function App Cannot Create within Azure Portal
- .NET 8 Authentication with Identity in a Web API using Bearer Tokens and Cookies
SUPPORT ME