
In this article we will learn about Dependency Injection in Angular. In this tutorial, we will learn what is Angular Dependency Injection is and how to inject dependency into a Component, Directives, Pipes, or a Service by using an example. Please read my previous article Angular Services.
What is Dependency Injection?
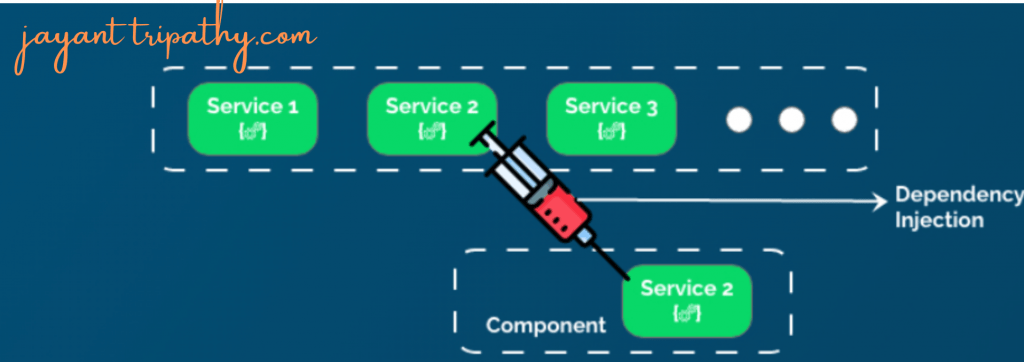
In software engineering, dependency injection is a technique whereby one object supplies the dependencies of another object. In other words, we can say that, it is a coding pattern in which classes receives their dependencies from external sources rather than creating them itself.
Dependency Injection is the heart of Angular Applications. The Dependency Injection in Angular is a combination of two terms i.e. Dependency and Injection.
- Dependency: Dependency is an object or service that is going to be used by another object.
- Injections: It is a process of passing the dependency object to the dependent object. It creates a new instance of the class along with its require dependencies.
What is Angular Dependency Injection
Dependency Injection (DI) is a technique in which a class receives its dependencies from external sources rather than creating them itself.
Types of Dependency Injection in Angular
There are three types of Dependency Injections in Angular, they are as follows:
- Constructor injection: Here, it provides the dependencies through a class constructor.
- Setter injection: The client uses a setter method into which the injector injects the dependency.
- Interface injection: The dependency provides an injector method that will inject the dependency into any client passed to it. On the other hand, the clients must implement an interface that exposes a setter method that accepts the dependency.
Understanding Dependency Injection with an example
- We import the
Productmodel from theproduct.ts. - The
getProductsmethod returns the collection of the products. In this example, we have hardcoded the products. In real life, you would send an HTTP GET request to your back end API to get the data. The hardcoded product items hold name, description, Price with the image name.
ProvidedIn
Instead of adding ProductService to providers of the AppModule, you can also add it in the providedIn metadata with the value root. In fact, using the ProvidedIn is the preferred way to provide a service in a module
import { Injectable } from '@angular/core';
import { Product } from '../class/product';

@Injectable({
  providedIn: 'root'
})
export class ProductService {

  products: Product[]=[];
  constructor() { }

  getProductDetails(){
    this.products = [
      new Product(1,'HP Spectre x360', 'HP Spectre x360 2-in-1 Laptop OLED Touch 13.5-ef0054TU.', 149999,'laptop.jpg'),
      new Product(2,'iPhone 13 Pro', 'Apple iPhone 13 Pro (256 GB) - Alpine Green', 119900,'mobile.jpg'),
      new Product(3,'SONY Camera', 'SONY ILCE-7M4K/BQIN5 Mirrorless Camera Single Lens: 28-70 mm  (Black)', 230990,'camera.png'),
      new Product(4,'SAMSUNG Crystal 4K', 'SAMSUNG Crystal 4K 138 cm (55 inch) Ultra HD (4K) LED Smart Tizen TV  (UA55AUE60AKLXL)', 45990,'tv.png'),
     ];
     return this.products;
  }
}
Using Dependency Injection Invoke the service on Component
Here we can use the Dependency injection invoking technique by using constructor injection.
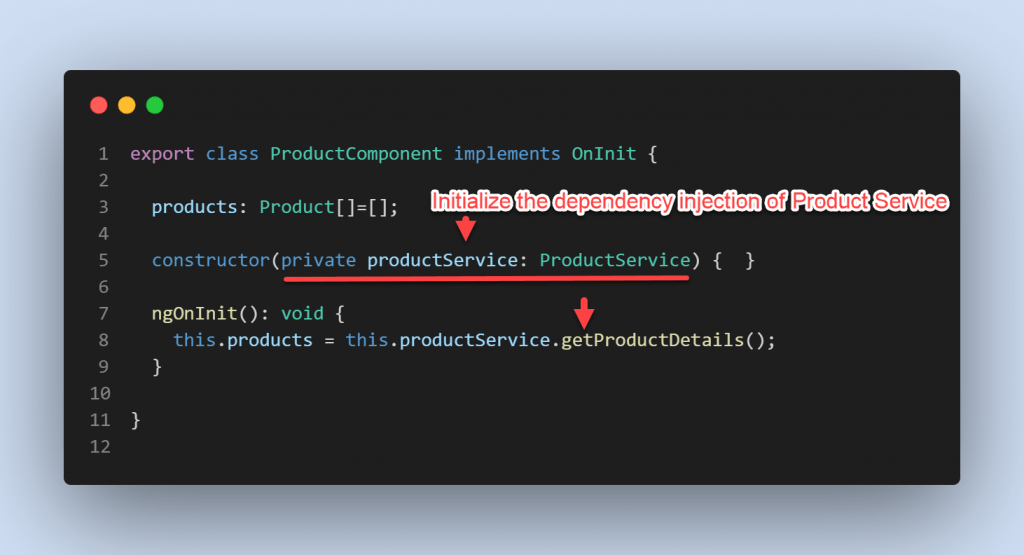
export class ProductComponent implements OnInit {

  products: Product[]=[];

  private _productService: ProductService;

  constructor(productService: ProductService) {

    this._productService= productService ;

  }

  ngOnInit(): void {
    this.products = this._productService.getProductDetails();
  }

}
- From the Component class we can see that the constructor is provided with an instance of ProductService class, and then the constructor is assigning that instance to the private field _productService.
- The Angular Injector is creating the instance to the constructor. When an instance of ProductComponent class is created, the angular injector creates an instance of the ProductService class and provides it to the ProductComponent constructor. The constructor then assigns that instance to the private field _productService. We then use this private field _productService to call the ProductService methods
getProducts(). - Here we register the ProductService with the Angular Injector. We register a service with the angular injector by using the providers property of
@Componentdecorator or@NgModuledecorator. We already know we decorate an angular component with@Componentdecorator and an angular module with@NgModuledecorator.
How to minimize the dependency injection call
We can also use the constructor like below, we directly inject the service in constructor injection.
Registering Dependency at Component Level
When you register a service with the @Component decorator’s providers property, you are registering the service with an angular injector at the component level. That component and all of its children will then have access to the service. The syntax for registering dependency at the component level is as follows. You must register the service in the Component decorator’s Providers array.
@Component({
  selector: 'app-product',
  templateUrl: './product.component.html',
  styleUrls: ['./product.component.css'],
  providers: [ProductService]
})
Registering Dependency at Module Level
We can also add the Services to Providers array of the @NgModule. Then they will be available for use in all the components & Services of the application. The ProductService in this case added to the Injector instance at the module level.
@NgModule({
  declarations: [...],
  imports: [...],
  providers: [ProductService],
  bootstrap: []
})
Benefits of Dependency Injection
- Loosely Coupled : Our Component is now only loosely linked to the ProductService. ProductComponent is unable to create the ProductService. In reality, it knows nothing about the ProductService. It only works with the ProductService that is passed to it.
- Easier to Test: ProductComponent is now easier to Test. Our ProductComponent is not dependent on a particular implementation of ProductService anymore. It will work with any implementation of ProductService that is passed on to it.
- Reduces boilerplate code because dependencies are initialized by their injector component.
- Decouples component logic.
- Makes it easier to extend the application classes.
Service Scope of Dependency Injection
The services that we provide at the root module are app-scoped, which means that we can access them from every component/service within the app.
Any service provided in the other Modules (Other than the Lazy Loaded Module) is also available for the entire application.
The services provided at the Component level are available only to the Component & and to the child components.
Conclusion
In this article we discussed about Dependency Injection in Angular. Dependency Injection (DI) is a technique in which a class receives its dependencies from external sources rather than creating them itself.
Leave behind your valuable queries and suggestions in the comment section below. Also, if you think this article helps you, do not forget to share this with your developer community. Happy Coding 🙂
Related Articles
- Deploying Angular apps in Azure Blob Storage with CI/CD Integration 🚀
- How to resolve Function App Cannot Create within Azure Portal
- Building a Chatbot in Angular using Gemini API
- Create a responsive sidebar with Angular Material- Angular 18 Example Series
- How to Deploy Angular 17/18 App in GitHub Pages
- How to convert Text To Speech With Azure Cognitive Services using Angular and .Net Core
- Angular Interceptors- The Complete Guide
- Upload Download and Delete files in Azure Blob Storage using ASP.NET Core and Angular
- Introduction to Azure Cosmos DB
- How to create Cosmos DB in Azure
Jayant Tripathy
Coder, Blogger, YouTuberA passionate developer keep focus on learning and working on new technology.